


IoC(Inverse of Control),控制反转
某一接口实现类的选择控制权从调用类中移除,转交给第三方决定,即由Spring容器借由Bean配置来进行控制。
Ioc的类型
①构造函数注入
在构造函数注入中,通过调用类的构造函数,将接口实现类通过构造函数变量传入
②属性注入
可以有选择地通过Setter方法完成调用类所需依赖的注入,更加灵活方便
③接口注入
将调用类所有依赖注入的方法抽取到一个接口中,调用类通过实现该接口提供相应的注入方法
Spring通过配置文件或注解描述类和类的依赖关系,自动完成类的初始化和依赖注入工作。
Java反射机制(reflect)
Java允许通过程序化的方法间接对Class进行操作。Class文件由类装载器装载后,在JVM中将形成一份描述Class结构的元信息对象,通过该元信息对象可以获知Class的结构信息
简单实例
public class Car {
    private String brand;
    private String color;
    private int maxSpeed;
    //默认构造函数
    public Car(){System.out.println("init car!!");}
    //带参构造函数
    public Car(String brand,String color,int maxSpeed){
        this.brand = brand;
        this.color = color;
        this.maxSpeed = maxSpeed;
    }
    //   未带参的方法
    public void introduce() {       System.out.println("brand:"+brand+";color:"+color+";maxSpeed:"+maxSpeed);
    }
   // getter/setter方法
}
一般情况下,我们采用传统方式直接调用目标类的方法:
Car car=new Car();
car.setBrand("特斯拉");
//或者:
Car car=new Car(""特斯拉),"蓝色";
下面我们通过一种间接的方式操控目标类
import java.lang.reflect.Constructor;
import java.lang.reflect.Method;

public class ReflectTest {
    public static Car initByDefaultConst() throws Throwable{
        // ①获得类加载器并通过类加载器获取Car类对象(Car的反射类对象)
        ClassLoader loader=Thread.currentThread().getContextClassLoader();
        Class clazz=loader.loadClass("com.smart.reflect.Car");
        //②获取类的默认构造器对象并通过它实例化Car
        Constructor cons=clazz.getDeclaredConstructor((Class[]) null);
        Car car=(Car)cons.newInstance();
        //③通过反射方法设置属性
        Method setBrand=clazz.getMethod("setBrand",String.class);
        setBrand.invoke(car,"特斯拉ModelS");
        Method setColor=clazz.getMethod("setColor",String.class);
        setColor.invoke(car,"蓝色");
        Method setMaxSpeed=clazz.getMethod("setMaxSpeed",int.class);
        setMaxSpeed.invoke(car,300);
        return  car;
    }
    public static void main(String[] args) throws Throwable{
        Car car=initByDefaultConst();
        car.introduce();
    }
}
①处获取当前线程的ClassLoader,然后通过指定全限定类名”com.smart.reflect.Car”装载Car类的反射实例
②处通过Car的反射类对象获取Car的构造函数对象cons,通过构造函数对象的newInstance()方法实例化Car对象,效果等同于new Car()
③处,通过Car反射类对象的getMethod(String methodName,Class paramClass)获取属性的Setter方法,第一个参数是目标Class的方法名,第二个参数是方法入参的对象类型。
在获取方法反射对象后,即可通过invoke(Object obj,Object param)方法调用目标类的方法,第一个参数是操作的目标类对象实例,第二个参数是目标方法的入参
类加载器ClassLoader
工作机制
类装载器就是寻找类的字节码文件并构造出类在JVM内部表示对象的组件。
在Java中,类装载器把一个类装入JVM中,需要以下步骤:
①装载
查找和导入class文件
②链接
执行校验,准备和解析步骤,其中解析步骤是可选的
校验:检查载入Class文件数据的正确性
准备:给类的静态变量分配存储空间
解析:将符号引用转换为直接引用
③初始化
对类的静态变量,静态代码块执行初始化工作
类装载工作由ClassLoader及其子类负责。ClassLoader是一个重要的Java运行时系统组件,负责在运行时查找和装入Class字节码文件。
JVM在运行时会产生3个ClassLoader::根装载器,ExtClassLoader(扩展类装载器)和AppClassLoader(应用类装载器)。根装载器不是ClassLoader的子类,它使用C++编写,根装载器负责装载JRE(Java Runtime Environment,Java运行环境)的核心类库,如JRE目标下的rt.jar,charsets.jar等。ExtClassLoader和AppClassLoader都是ClassLoader的子类,其中ExtClassLoader负责装载JRE扩展目录ext中的JAR类包,AppClassLoader负责装载Classpath路径下的类包
根装载器时ExtClassLoader的父装载器,ExtClassLoader是AppClassLoader的父装载器。在默认情况下,使用AppClassLoader装载应用程序的类
public class ClassLoaderTest {
    public static void main(String[] args){
        ClassLoader loader=Thread.currentThread().getContextClassLoader();
        System.out.println("current loader:"+loader );
        System.out.println("parent loader:"+loader.getParent());
        System.out.println("grandparent loader:"+loader.getParent().getParent());
    }
}
可以看到输出
current loader:sun.misc.Launcher$AppClassLoader@18b4aac2
parent loader:sun.misc.Launcher$ExtClassLoader@1540e19d
grandparent loader:null
可知当前ClassLoader是AppClassLoader,其父ClassLoader是ExtClassLoader,祖父ClassLoader是根装载器,因为在Java中无法获得其句柄,所以返回null
JVM装载类时使用“全盘负责委托机制”,“全盘负责”是指当一个ClassLoader装载一个类时,除非显式地使用另一个ClassLoader,该类所依赖及引用的类也由这个ClassLoader载入
“委托机制”是指先委托父装载器寻找目标类,只有在找不到的情况下才从自己的类路径中查找并装载目标类。
ClassLoader是一个抽象类,下面是一些重要接口方法
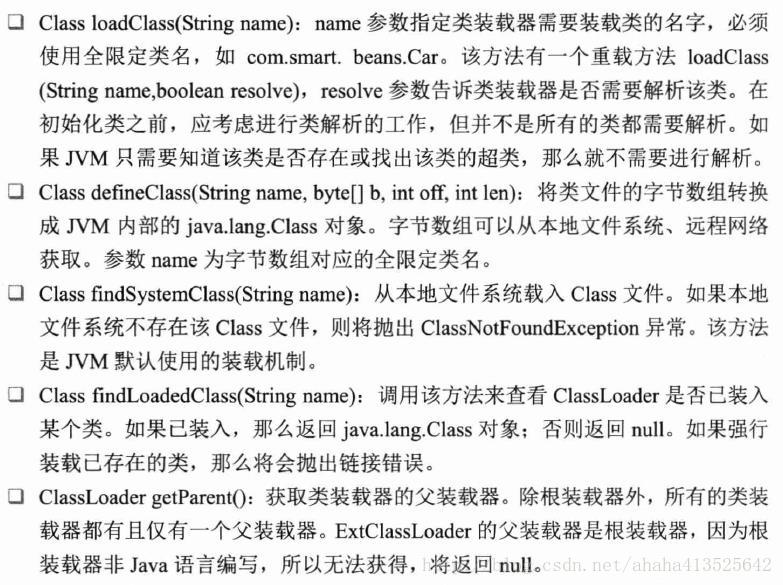
除JVM默认的3个ClassLoader外,用户可以编写自己的第三方类装载器,以实现一些特殊的需求。
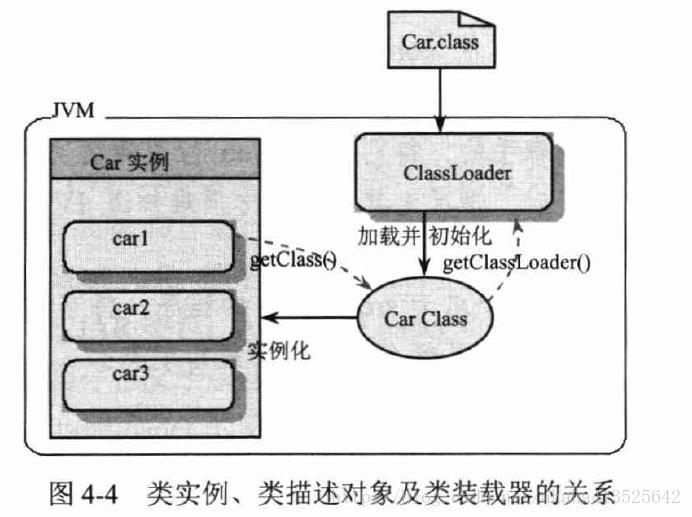
类文件被装载并解析后,在JVM内将拥有一个对应的java.lang.Class类描述对象。该类的实例都拥有指向这个类描述对象的引用,而类描述对象又拥有指向关联ClassLoader的引用,如图
Java反射机制
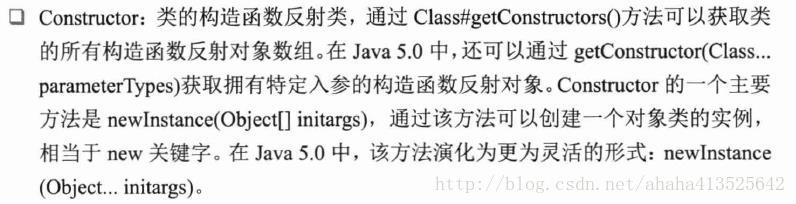
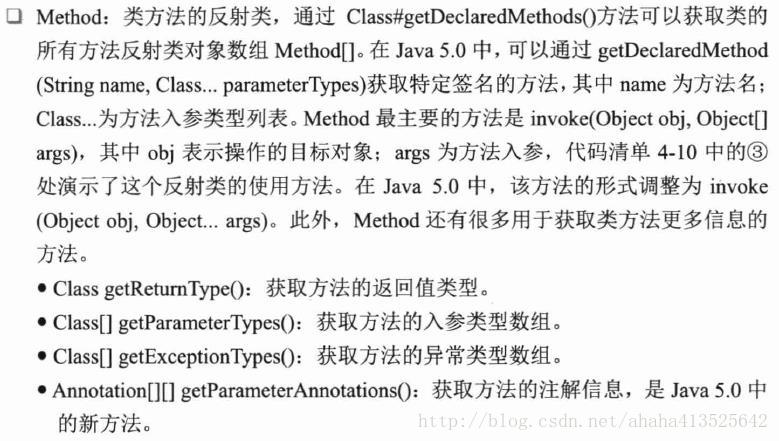
Class反射对象描述类语义结构,可以从Class对象中获取构造函数,成员变量,方法类等类元素的反射对象,并以编程的方式通过这些反射对象对目标类对象进行操作。这些反射对象类在java.reflect包中定义。
下面介绍3个主要的反射类
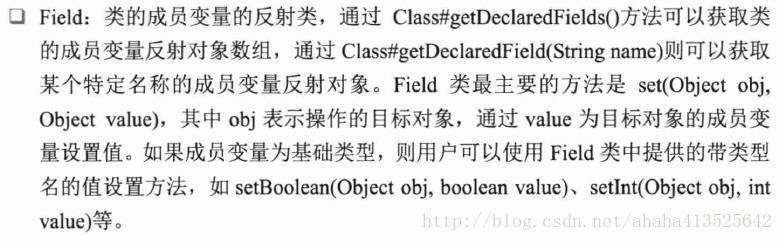
此外,Java还为包提供了Package反射类。,为注解提供了AnnotatedElement反射类
Java的反射体系保证了可以通过程序化的方式访问目标类中所有的元素,对于private或protected成员变量和方法,只要JVM的安全机制运行,也可以通过反射进行调用
package com.smart.reflect;

public class PrivateCar {
   //private成员变量:使用传统的类实例调用方式,只能在本类中访问
   private String color;
   //protected方法:使用传统的类实例调用方式,只能在子类和本包中访问
   protected void drive(){
       System.out.println("drive private car! the color is:"+color);
   }
}
color变量和drive方法都是私有的,通过类实例变量无法在外部访问私有变量,调用私有方法,但通过反射机制可以绕过这个限制
public class PrivateCarReflect {
    public static void main(String[] args) throws Throwable {
        ClassLoader loader=Thread.currentThread().getContextClassLoader();
        Class clazz=loader.loadClass("com.smart.reflect.PrivateCar");
        PrivateCar pcar=(PrivateCar)clazz.newInstance();
        Field colorFld=clazz.getDeclaredField("color");

        //取消Java语言访问检查以访问private变量
        colorFld.setAccessible(true);
        colorFld.set(pcar,"红色");
        //因为缺省,所以入参类型为Class[]) null
        Method driveMtd=clazz.getDeclaredMethod("drive",(Class[]) null);
      //  Method driveMethod=clazz.getDeclaredMethod("drive"); JDK 5以下使用

        //取消Java语言访问检查以访问protected方法
        driveMtd.setAccessible(true);
        driveMtd.invoke(pcar,(Object[]) null);
    }
}
在访问private或protected成员变量和方法时,必须通过setAccessible(boolean access)方法取消Java语言检查,否则将抛出IllegalAccessException。如果JVM的安全管理器设置了相应的安全机制,那么调用该方法将抛出SecurityException
资源访问利器
资源抽象接口
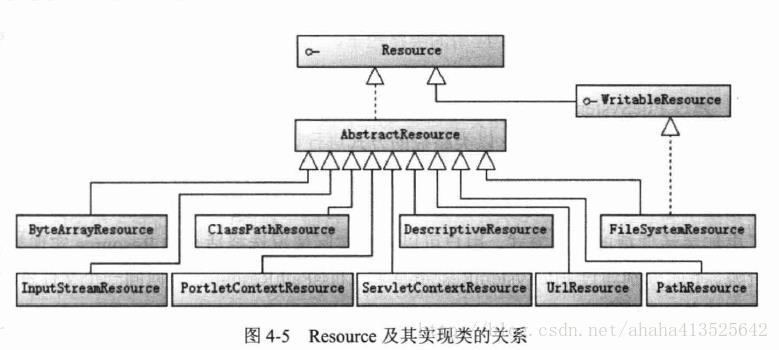
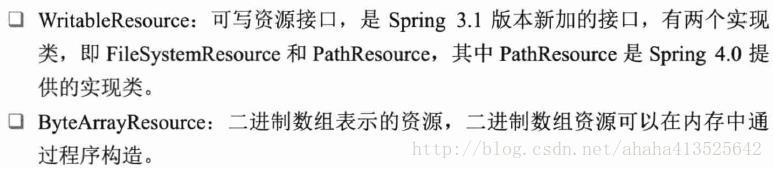
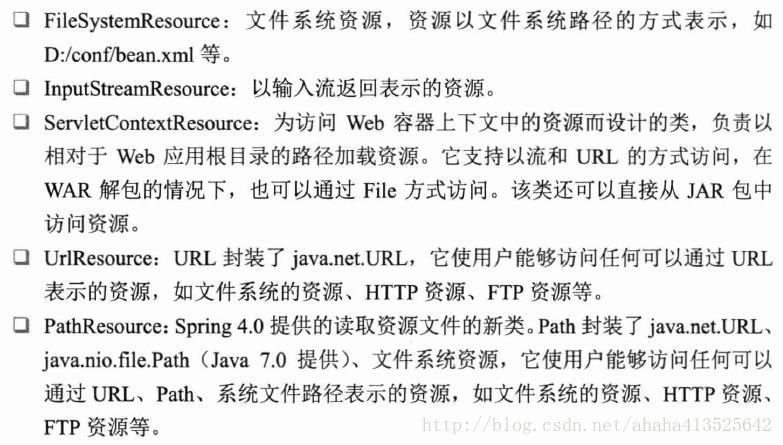
Spring设计了一个Resource接口,它为应用提供了更强的底层资源访问能力。该接口拥有对应不同资源类型的实现类
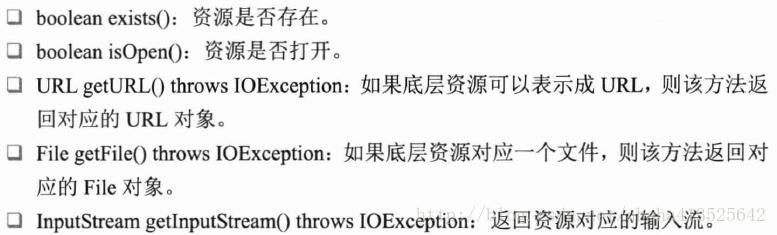
Resource接口的主要方法
Spring使用Resource装载各种资源,包括配置文件资源,国际化属性文件资源等。

如果有一个文件位于Web应用的类路径下,用户可以通过以下方式对这个文件资源进行访问:
①通过FileSystemResource以文件系统绝对路径的方式进行访问
②通过ClassPathResource以类路径的方式进行访问
③通过ServletContextResource以相对于Web应用根目录的方式进行访问
下面分别通过FileSystemResource和ClassPathResource访问同一个文件资源
public class FileSourceExample {
    public static void main(String[] args) {
        try {
           String filePath="F:\\programmer software\\IntelliJ IDEA Community Edition 2017.2.3\\" +
                   "IdeaProjects\\chapter4\\src\\main\\resources\\conf\\file1.txt";
           //使用系统文件路径方式加载文件
            WritableResource res1 = new PathResource(filePath);
            //使用类路径方式加载文件
            Resource res2=new ClassPathResource("conf/file1.txt");
            //使用WritableResource接口写资源文件
            OutputStream stream1=res1.getOutputStream();
            stream1.write("欢迎光临\n论坛".getBytes());
            stream1.close();
            //使用Resource接口读资源文件
            InputStream ins1=res1.getInputStream();
            InputStream ins2=res2.getInputStream();

            ByteArrayOutputStream baos=new ByteArrayOutputStream();
            int i;
            while ((i = ins1.read()) != -1) {
                baos.write(i);
            }
            System.out.println(baos.toString());

            System.out.println("res1:"+res1.getFilename());
            System.out.println("res2:"+res2.getFilename());
        }catch (IOException e){
             e.printStackTrace();
        }
    }
}
记得在pom.xml中引入相关依赖
 <!-- spring 依赖-->
        <dependency>
            <groupId>org.springframework</groupId>
            <artifactId>spring-beans</artifactId>
            <version>${spring.version}</version>
        </dependency>
        <dependency>
            <groupId>org.springframework</groupId>
            <artifactId>spring-context</artifactId>
            <version>${spring.version}</version>
        </dependency>
        <dependency>
            <groupId>org.springframework</groupId>
            <artifactId>spring-context-support</artifactId>
            <version>${spring.version}</version>
        </dependency>
获取资源后,用户可以通过Resource接口定义的多个方法访问文件的数据和其他信息:
通过getFileName()方法获取文件名
通过getFile()方法获取资源对应的File对象
通过getInputStream()方法直接获取文件的输入流
通过WriatbleResource接口定义的多个方法向文件写数据,通过getOutputStream()方法直接获取文件的输出流。
此外,还可以通过createRelative(String relativePath)在资源相对地址上创建新的文件
在Web应用中,用户还可以通过ServletContextResource以相对于Web应用根目录的方式访问文件资源
<%@ page language="java" contentType="text/html";charset="utf-8"
    pageEncoding="utf-8" %>
<jsp:directive.page import="org.springframework.web.context.support.ServletContextResource"/>
<jsp:directive.page import="org.springframework.core.io.Resource"/>
<jsp:directive.page import="org.springframework.web.util.WebUtils"/>
 <%
 //注意文件资源地址以相对于Web应用根路径方式表示
    Resource res3 = new ServletContextResource(application,"/WEB-INF/classes/conf/file1.txt");
    out.print(res3.getFilename()+"<br/>");
    out.print(WebUtils.getTempDir(application).getAbsolutePath());
 %>
对于位于远程服务器(Web服务器或FTP服务器)的文件资源,用户可以方便地通过UrlResource进行访问
资源加载时默认采用系统编码读取资源内容。如果资源文件采用特殊的编码格式,那么可以通过EncodedResource对资源进行编码,以保证资源内容操作的正确性
public class FileSourceExample {
    public static void main(String[] args)throws IOException {
        Resource res=new ClassPathResource("conf/file1.txt");
        EncodedResource encRes=new EncodedResource(res,"UTF-8");
        String content= FileCopyUtils.copyToString(encRes.getReader());
        System.out.println(content);
    }
}
资源加载
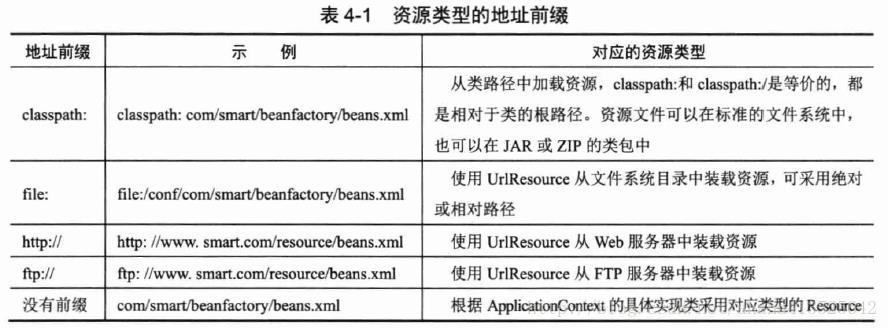
Spring提供了一个强大的加载资源的机制,不仅能够通过“classpath:”,”file:”等资源地址前缀识别不同的资源类型,还支持Ant风格带通配符的资源地址
资源地址表达式
Spring支持的资源类型的地址前缀
假设有多个JAR包或文件系统类路径都拥有一个相同的包名(如com.smart).”classpath:”只会在第一个加载的com.smart包的类路径下查找,而”classpath*:”会扫描所有这些JAR包及类路径下出现的com.smart类路径
这对分模块打包的应用非常有用。假设一个名为smart的应用分为3个模块,一个模块对应一个配置文件,分别是module1.xml,module2.xml和module3.xml,都放在com.smart目录下。每个模块单独打成JAR包。
使用”classpath*:com/smart/module*.xml”可以成功加载这3个模块的配置文件,而使用”classpath:com/smart/module*.xml”只能加载一个模块的配置文件
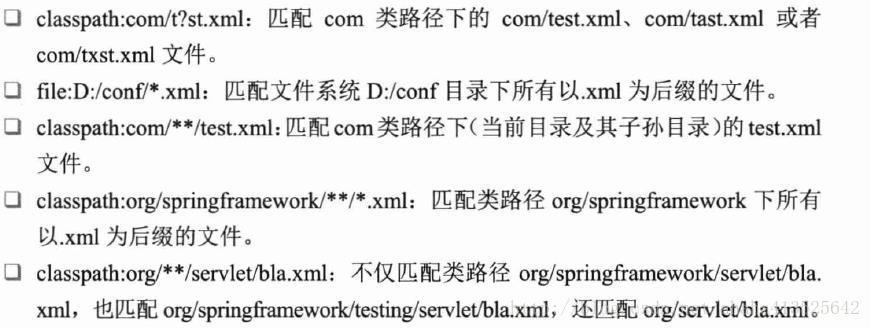
Ant风格的资源地址支持3中匹配符

示例:
资源加载器
Spring定义了一套资源加载的接口,并提供了实现类(三角形实线是继承,三角形虚线是实现)

ResourceLoader的getResources()方法仅支持带资源类型前缀的表达式,不支持Ant风格的资源路径表达式,而ResourcePatternResolver扩展了ResourceLoader,它的getResource()方法两种都可以。
PathMatchingResourcePatternResolver是Spring提供的标准实现类
public class PatternResolverTest {
    @Test
    public void getResource() throws Throwable{
        ResourcePatternResolver resolver=new PathMatchingResourcePatternResolver();
        //加载所有类包com.smart(及子孙包)下以.xml为后缀的资源
        Resource resources[]=resolver.getResource("classpath*:com/smart/**/*.xml");
        assertNotNull(resources);
        for (Resource resource:resources){
            System.out.println(resource.getDescription());
        }
    }
}
用Resource操作文件时,如果资源配置问价在项目发布时会被打包到JAR中,那么不能使用Resour.getFile()方法,否则会抛出FileNotFoundException,但可以使用getInputStream()方法读取
(new DefaultResourceLoader()).getResource("classpath:conf/sys.properties").getInputStream()BeanFactory和ApplicationContext
Spring通过一个配置文件描述Bean和Bean之间的依赖关系,利用Java的反射功能实例化Bean并建立Bean支架的依赖关系。
BeanFactory是Spring框架的基础设施,面向Spring本身,ApplicationContext面向使用Srping框架的开发者,几乎所有的应用场合都可直接使用ApplicationContext而不是底层的BeanFactory
BeanFactory介绍
BeanFactory是类的通用工厂,可以创建并管理各种类的对象。Spring称被创建和管理的Java对象为Bean。
BeanFactory的类体系结构
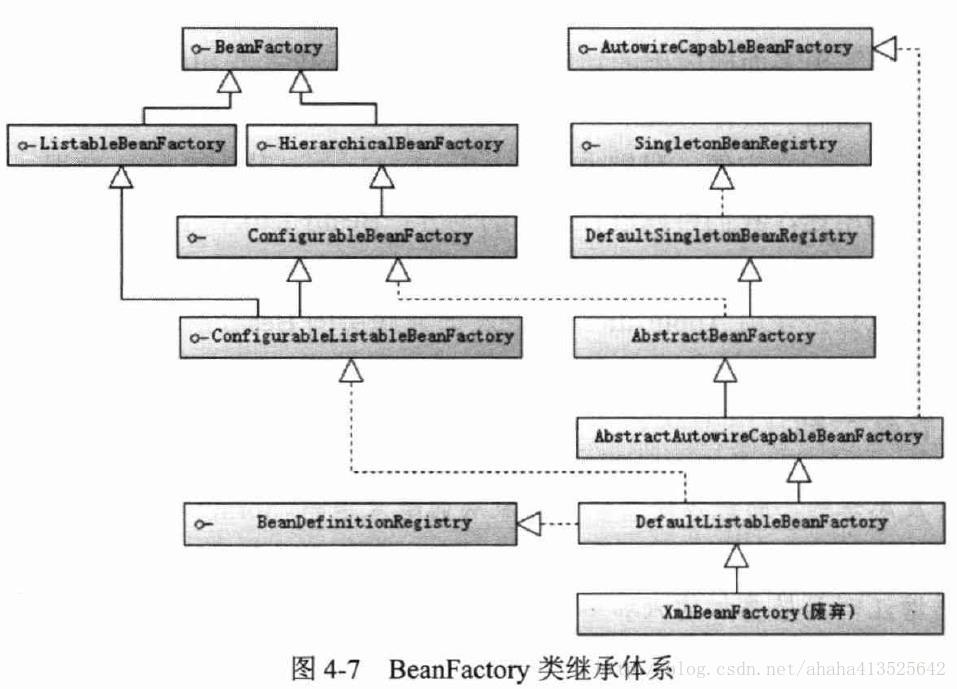
BeanFactory最主要的方法就是getBean(String beanName),该方法从容器中返回特定名称的Bean
其他接口:

初始化BeanFactory
下面使用Spring配置文件为Car提供配置信息,然后通过BeanFactory装载配置文件,启动Spring IoC容器
beans.xml:Car的配置文件,配置文件都要放在resource文件夹下,最后有着和java文件夹一样的文件体系
<?xml version="1.0" encoding="UTF-8" ?>
<beans xmlns="http://www.springframework.org/schema/beans"
    xmlns:xsi="http://www.w3.org/2001/XMLSchema-instance"
    xmlns:p="http://www.springframework.org/schema/p"
    xsi:schemaLocation="http://www.springframework.org/schema/beans
       http://www.springframework.org/schema/beans/spring-beans-4.0.xsd">
   <bean id="car1" class="com.smart.Car"
         p:brand="红旗CA72"
         p:color="黑色"
         p:maxSpeed="200"/>
</beans>
下面通过XmlBeanDefinitionReader, DefaultListableBeanFactory实现类启动Spring IoC容器
public class BeanFactoryTest {
    @Test
    public void getBean() throws Throwable{
        ResourcePatternResolver resolver=new PathMatchingResourcePatternResolver();
        Resource res=resolver.getResource("classpath:/com/smart/beanfactory/beans.xml");
        System.out.println(res.getURL());
        //已废弃,不建议使用
        //BeanFactory bf=new XmlBeanFactory(res);

        //通过Resource装载Spring配置信息并启动IoC容器
        DefaultListableBeanFactory factory=new DefaultListableBeanFactory();
        XmlBeanDefinitionReader reader=new XmlBeanDefinitionReader(factory);
        reader.loadBeanDefinitions(res);
        System.out.println("init BeanFactory.");
        //通过getBean()方法从IoC容器中获取Bean
        Car car=factory.getBean("car", Car.class);
        System.out.println("car bean is ready for use!");
        car.introduce();
    }
}
XmlBeanDefinitionReader通过Resource装载Spring配置信息并启动IoC容器,然后通过BeanFactory#getBean(String beanName)方法从IoC容器中获取Bean。
通过BeanFactory启动IoC容器时,并不会初始化配置文件中定义的Bean,初始化动作发生在第一个调用时。
对于单实例(singleton)的Bean来说,BeanFactory会缓存Bean实例,所以第二次调用getBean()获取Bean时,将直接从IoC容器的缓存中获取Bean实例
Spring在DefaultSingletonBeanRegistry类中提供了一个用于缓存单实例Bean的缓存器,它是一个用HashMap实现的缓存器,单实例的Bean以beanName为键保存在这个HashMap中
在初始化BeanFactory时,必须为其提供一种日志框架,使用Log4J,在类路径下提供Log4J配置文件,启动Spring容器才不会报错。
log4j.properties
log4j.rootLogger=INFO,A1
log4j.appender.A1=org.apache.log4j.ConsoleAppender
log4j.appender.A1.layout=org.apache.log4j.PatternLayout
log4j.appender.A1.layout.ConversionPattern=%d %5p [%t] (%F:%L) - %m%n
ApplicationContext介绍
ApplicationContext由BeanFactory派生而来,提供了更多面向实际应用的功能。在BeanFactory中,很多功能需要以编程的方式实现,而在ApplicationContext则可以通过配置的方式实现
ApplicationContext类体系结构

主要实现类是ClassPathXmlApplicationContext和FileSystemXmlApplicationContext,前者默认从类路径加载配置文件,后者默认从文件系统中装载配置文件。
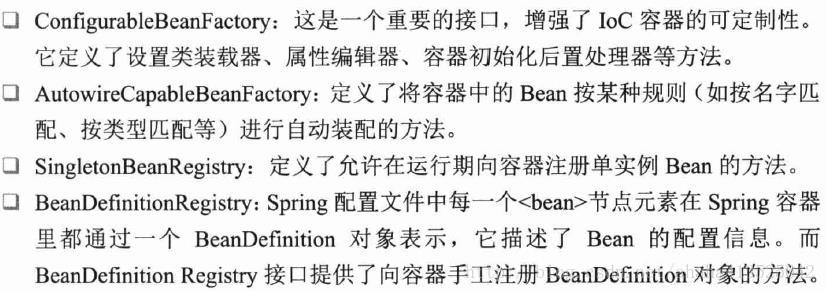
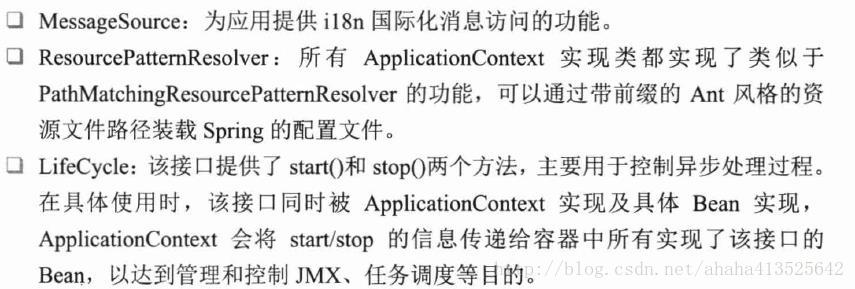
ApplicationContext继承了HierarchicalBeanFactory和ListableBeanFacotry接口,还通过多个其他的接口扩展了BeanFactory的功能


ConfigurableApplicationContext扩展于ApplicaitonContext,它新增了两个主要的方法:refresh()和close(),让ApplicaitonContext有启动,刷新和关闭ApplicaitonContext的能力。
ApplicaitonContext的初始化,如果配置文件放在类路径中,则可以优先考虑使用ClassPathXmlApplicationContext实现类
ApplicaitonContext ctx=new ClassPathXmlApplicationContext("com/smart/context/beans.xml");对于ClassPathXmlApplicationContext来说”com/smart/context/beans.xml”等同于”classpath:com/smart/context/beans.xml”
如果配置文件放在文件系统的路径下,则优先考虑使用FileSystemXmlApplicationContext实现类
ApplicationContext cts=new FileSystemXmlApplicationContext("com/smart/context/beans.xml");“com/smart/context/beans.xml”等同于”file:com/smart/context/beans.xml”
还可以指定一组配置文件,Spring会自动将多个配置文件在内存中”整合”成一个配置文件
ApplicaitonContext ctx=new ClassPathXmlApplicationContext(new String[]{"conf/bean1.xml","conf/beans.xml"})ClassPathXmlApplicationContext和FileSystemXmlApplicationContext都可以显式使用资源类型前缀的路径,区别在于如果不显式指定资源类型前缀,则分别将路径解析为类路径和文件系统路径
在获取ApplicaitonContext实例后,可以像BeanFactory一样调用getBean返回Bean。
BeanFactory在初始化容器时,并未实例化Bean,直到第一次访问某个Bean时才实例化目标Bean
ApplicaitonContext 在初始化时就实例化所有singleton的Bean,因此初始化时间会稍长一些,但没有“第一次惩罚”的问题
Spring支持基于类注解的配置方式,主要功能来自JavaConfig。一个标注@Configuration注解的POJO即可提供Spring所需的Bean配置信息。
//表示是一个配置信息提供类
@Configuration
public class Beans {
     //定义一个Bean
     @Bean(name="car")
    public Car buildCar(){
         Car car=new Car();
         car.setBrand("特斯拉");
         car.setMaxSpeed(300);
         car.setColor("蓝色");
         return car;
     }
}
类注解的配置方式可以容易地让开发者控制Bean的初始化过程,比基于XML文件的配置方式更加灵活
Spring为基于注解类的配置提供了专门的ApplicationContext实现类:AnnotationConfigApplicationContext
public class AnnotationConfigApplicationContextTest {
    @Test
    public void getBean(){
        //通过一个带Configuration的POJO加载Bean配置
        ApplicationContext ctx=new AnnotationConfigApplicationContext(Beans.class);
        Car car=ctx.getBean("car", Car.class);
        assertNotNull(car);
    }
}
AnnotationConfigApplicationContext加载Beans.class中的Bean定义并调用Beans.class的方法实例化Bean,启动容器并装配Bean。
Spring支持使用Groovy DSL(domain-specific language,领域特定语言)来进行Bean定义配置。基于Groovy脚本语言,可以实现复杂,灵活的Bean配置逻辑。
groovy-beans.groovy配置信息,放在resource相应的目录下
package com.smart.context;
import com.smart.Car;

beans{
    car(Car){   //名字(类型)
        brand="特斯拉";  //注入属性
        color="蓝色";
        maxSpeed=300;
    }
}
Spring为基于Groovy的配置提供了专门的ApplicationContext实现类:GenericGroovyApplicationContext
public class GroovyApplicationContextTest {
@Test
public void getBean(){
ApplicationContext ctx=
new GenericGroovyApplicationContext("classpath:com/smart/context/groovy-beans.groovy");
Car car=(Car)ctx.getBean("car");
assertNotNull(car);
assertEquals(car.getColor(),"蓝色");
}
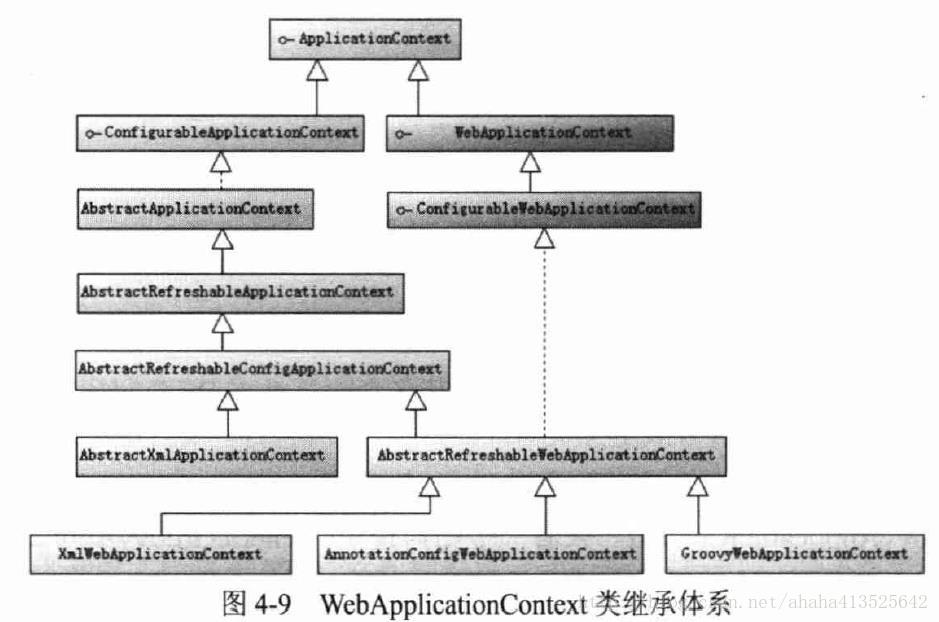
}WebApplicationContext类体系结构
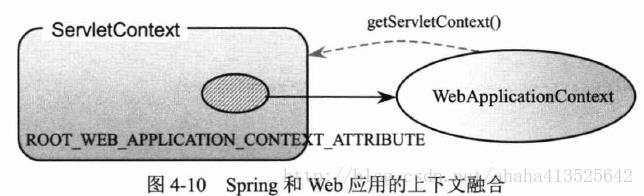
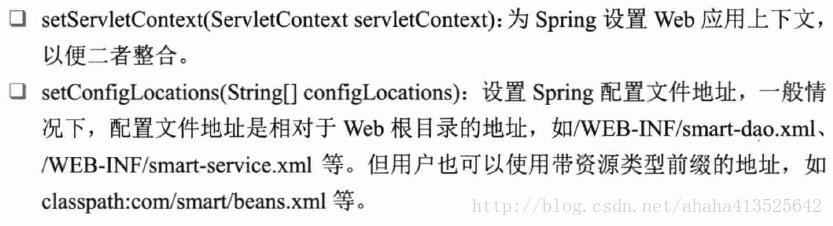
WebApplicationContext是专门为Web应用准备的,允许从相对于Wen根目录 的路径中装载配置文件在完成初始化工作。从WebApplicationContext中可以获得ServletContext的引用,整个WebApplicationContext将作为属性放置到ServletContext中,以便Web应用环境可以访问Spring应用上下文。Spring专门为此提供了一个工具类WebApplicationContextUtils,通过该类的getWebApplicationContext(ServletContext sc)方法,可以从ServletContext中获取WebApplicationContext实例。
在非Web应用的环境下,Bean只有singleton和prototype两种作用域。WebApplicationContext为Bean添加了三个作用域:request,session和global session
WebApplicationContext定义了一个常量ROOT_WEB_APPLICATION_CONTEXT_ATTRIBUTE,在context启动时,WebApplicationContext实例即以此为键放置在ServletContext的属性列表中,可以通过以下语句从Web容器中获取WebApplicationContext:
WebApplicationContext wac=(WebApplicationContext)servletContext.getAttribute(
WebApplicationContext.ROOT_WEB_APPLICATION_CONTEXT_ATTRIBUTE);
这是工具类WebApplicationContextUtils的getWebApplicationContext(ServletContext sc)方法的内部实现。这样,Spring的WebApplicationContext和Web容器的context就可以实现互访,二者实现了融合
ConfigurableWebApplicationContext扩展了WebApplicationContext,它允许通过配置的方式实例化WebApplicationContext,同时定义了两个重要的方法
WebApplicationContext初始化
WebApplicationContext需要ServletContext实例,必须在拥有Web容器(ServletContext)的前提下才能完成启动工作。在web.xml中配置自启动的Servlet或定义Web容器监听器(ServletContextListener),就可以完成启动Spring WebApplicationContext的工作
Spring分别提供了用于启动WebApplicationContext的Servlet和Web容器监听器,二者的内部都实现了启动WebApplicationContext实例的逻辑:
①org.springframework.web.context.ContextLoaderServlet
②org.springframework.web.context.ContextLoaderListener
使用ContextLoaderListener启动WebApplicationContext的具体配置
...
<!-- 指定配置文件-->
<context-param>
   <param-name>contextConfigLocation</param-name>
   <param-value>
      /WEB-INF/smart-dao.xml,/WEB-INF/smart-service.xml
   </param-value>
</context-param>

<!-- 声明Web容器监听器-->
<listener>
   <listener-class>
            org.springframework.web.context.ContextLoaderListener
   </listener-class>
</listener>
ContextLoaderListener通过WebApplicationContext的参数contextConfigLocation获取Spirng配置文件的位置。可以指定多个配置文件,用逗号,空格或冒号分隔都可以
对于未带资源类型前缀的配置文件路径,WebApplicationContext默认这些路径相对于Web的部署根路径,也可以采用带资源类型前缀的路径配置,如”classpath*:/smart-*.xml”是等效的。
在不支持容器监听器的低版本Web容器汇总,则采用ContextLoaderServlet
...
<!-- 指定配置文件-->
<context-param>
   <param-name>contextConfigLocation</param-name>
   <param-value>
      /WEB-INF/smart-dao.xml,/WEB-INF/smart-service.xml
   </param-value>
</context-param>
...
<!--声明自启动的Servlet-->
<servlet>
   <servlet-name>springContextLoaderServlet</servlet-name>
   <servlet-class>org.springframework.web.context.ContextLoaderServlet
   </servlet-class>
   <!-- 启动顺序-->
   <load-on-startup>1</load-on-startup>
</servlet>
WebApplicationContext需要使用日志功能,用户可以将Log4J的配置文件放置在类路径/webapp/WEB-INF/classer下。
如果放在其他位置,必须在web.xml中指定Log4J配置文件的位置。
Spring为启动Log4J引擎提供了两个类似于启动WebApplicationContext的实现类:Log4JConfigServlet和Log4JConfigLister,这两种方式都必须保证能能够在装载Spring配置文件前先装载Log4J配置信息。
指定Log4J配置文件时启动Spring Web应用上下文
<!-- 指定配置文件-->
<context-param>
   <param-name>contextConfigLocation</param-name>
   <param-value>
      /WEB-INF/smart-dao.xml,/WEB-INF/smart-service.xml
   </param-value>
</context-param>

<!--指定Log4J配置文件的位置-->
<context-param>
   <param-name>log4jConfigLocation</param-name>
   <paramvalue>/WEB-INF/log4j.properties</param-value>
</context-param>

<!-- 装载Log4J配置文件的自启动Servlet -->
<servlet>
  <servlet-name>log4jConfigServlet</servlet-name>
  <servlet-class>org.springframework.web.util.Log4jConfigServlet
  </servlet-class>
  <load-on-startup>1</load-on-startup>
</servlet>
<!--声明自启动的Servlet-->
<servlet>
   <servlet-name>springContextLoaderServlet</servlet-name>
   <servlet-class>org.springframework.web.context.ContextLoaderServlet
   </servlet-class>
   <!-- 启动顺序-->
   <load-on-startup>2</load-on-startup>
</servlet>
将Log4jConfigServlet的启动顺序设置为1,而将springContextLoaderServlet设置为2,这样前者先启动,完成装载Log4J配置文件并初始化Log4J引擎的工作,后者再启动。
如果使用Web监听器,必须把Log4jConfigServlet放置在ContextLoaderListener的前面,这样Spring将自动使用XmlWebApplicationContext启动Spring容器,即通过XML文件为Spring容器提供Bean的配置信息。
如果使用标注@Configuration的Java类提供配置信息,则web.xml需要按以下方式配置
<web-app version="2.5"
         xmlns="http://java.sun.com/xml/ns/javaee"
         xmlns:xsi="http://www.w3.org/2001/XMLSchema-instance"
         xsi:schemaLocation="http://java.sun.com/xml/ns/javaee
    http://java.sun.com/xml/ns/javaee/web-app_2_5.xsd">
    <!--通过指定context参数,让Spring使用AnnotationConfigWebApplicationContext而非
    XmlWebApplicationContext启动容器 -->
    <context-param>
        <param-name>contextClass</param-name>
        <param-value>
            org.springframework.web.context.support.AnnotationConfigWebApplicationContext
        </param-value>
    </context-param>

    <!-- 指定标注了标注了@Configuration的配置类,多个可以用逗号或空格分隔-->
    <context-param>
        <param-name>contextConfigLocation</param-name>
        <param-value>
            com.smart.AppConfig1
        </param-value>
    </context-param>

    <!-- ContextLoaderListener监听器将根据上面配置使用
         AnnotationConfigWebApplicationContext根据contextConfigLocation
         指定的配置类启动Spring容器-->
    <listener>
        <listener-class>
            org.springframework.web.context.ContextLoaderListener
        </listener-class>
    </listener>

</web-app>
如果使用Groovy DSL配置Bean信息,则web.xml需要这样配置
<?xml version="1.0" encoding="UTF-8"?>
<web-app version="2.5"
         xmlns="http://java.sun.com/xml/ns/javaee"
         xmlns:xsi="http://www.w3.org/2001/XMLSchema-instance"
         xsi:schemaLocation="http://java.sun.com/xml/ns/javaee
    http://java.sun.com/xml/ns/javaee/web-app_2_5.xsd">
    <!--通过指定context参数,让Spring使用GroovyWebApplicationContext而非
    XmlWebApplicationContext或AnnotationConfigWebApplicationContext启动容器 -->
    <context-param>
        <param-name>contextClass</param-name>
        <param-value>
            org.springframework.web.context.support.GroovyWebApplicationContext
        </param-value>
    </context-param>

    <!-- 指定标注了Groovy的配置文件-->
    <context-param>
        <param-name>contextConfigLocation</param-name>
        <param-value>
            classpath:conf/spring-mvc.groovy
        </param-value>
    </context-param>

    <!-- ContextLoaderListener监听器将根据上面配置使用
         GroovyWebApplicationContext根据contextConfigLocation
         指定的配置类启动Spring容器-->
    <listener>
        <listener-class>
            org.springframework.web.context.ContextLoaderListener
        </listener-class>
    </listener>

</web-app>
GroovyWebApplicationContext会根据contextConfigLocation上下文参数指定的conf/spring-mvc.groovy所提供的Spring配置信息初始化容器
父子容器
通过HierarchicalBeanFactory接口,Spring的IoC容器可以建立父子层级关联的容器体系,子容器可以访问父容器中的Bean,但父容器不能访问子容器中的Bean。
在容器中,Bean的id必须是唯一的,但子容器可拥有一个和父容器id相同的Bean。
父子容器层级体系增强了Spring容器架构的扩展性和灵活,因为第三方可以通过编程的方式为一个已存在的容器添加一个或多个特殊用途的子容器,以提供一些额外的功能。
Spring使用父子容器,在Spring MVC中,展现层Bean位于一个子容器中,而业务层和持久层Bean位于父容器中,这样,展现层Bean就可以引用业务层和持久层Bean,而业务层和持久层Bean则看不到展现层Bean
Bean的生命周期
BeanFactory中Bean的生命周期
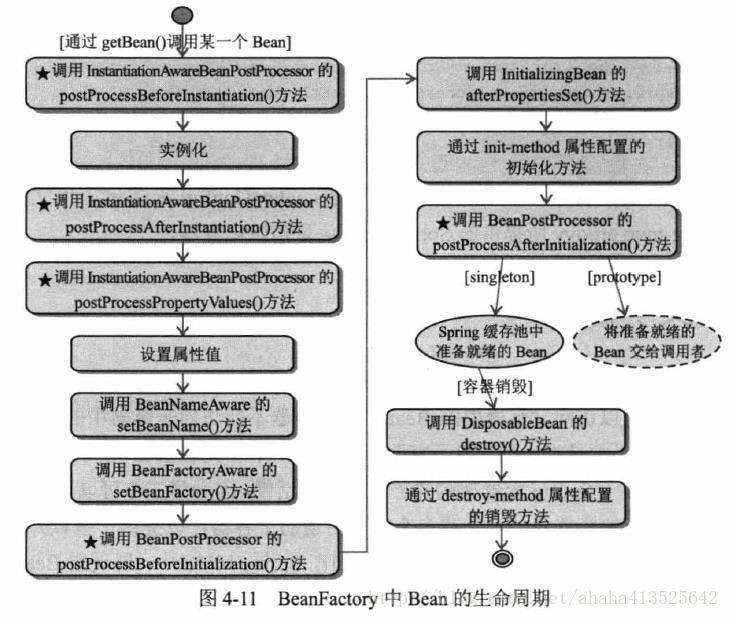
具体过程如下:


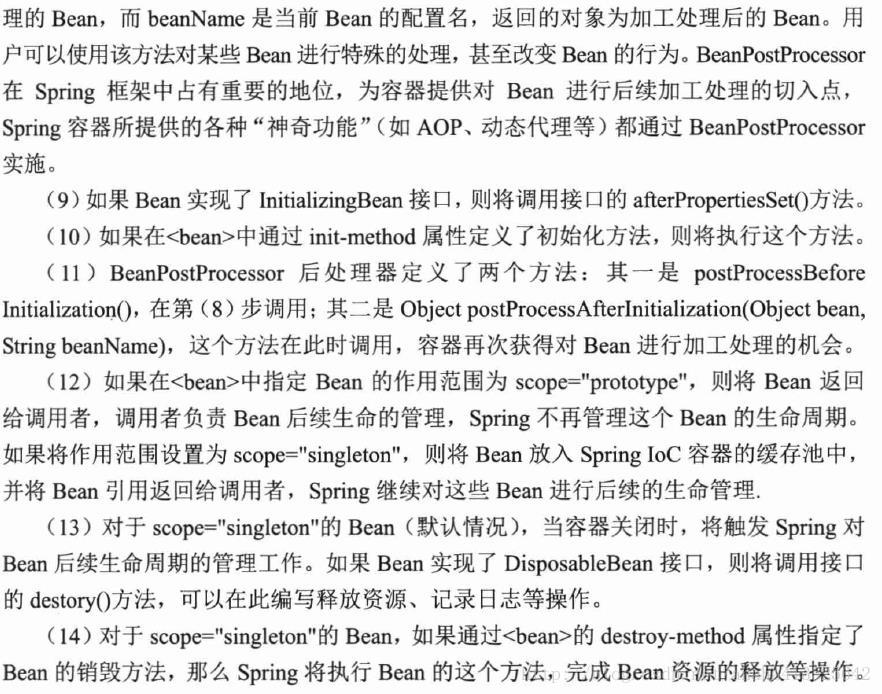
可以将这些方法分为4类
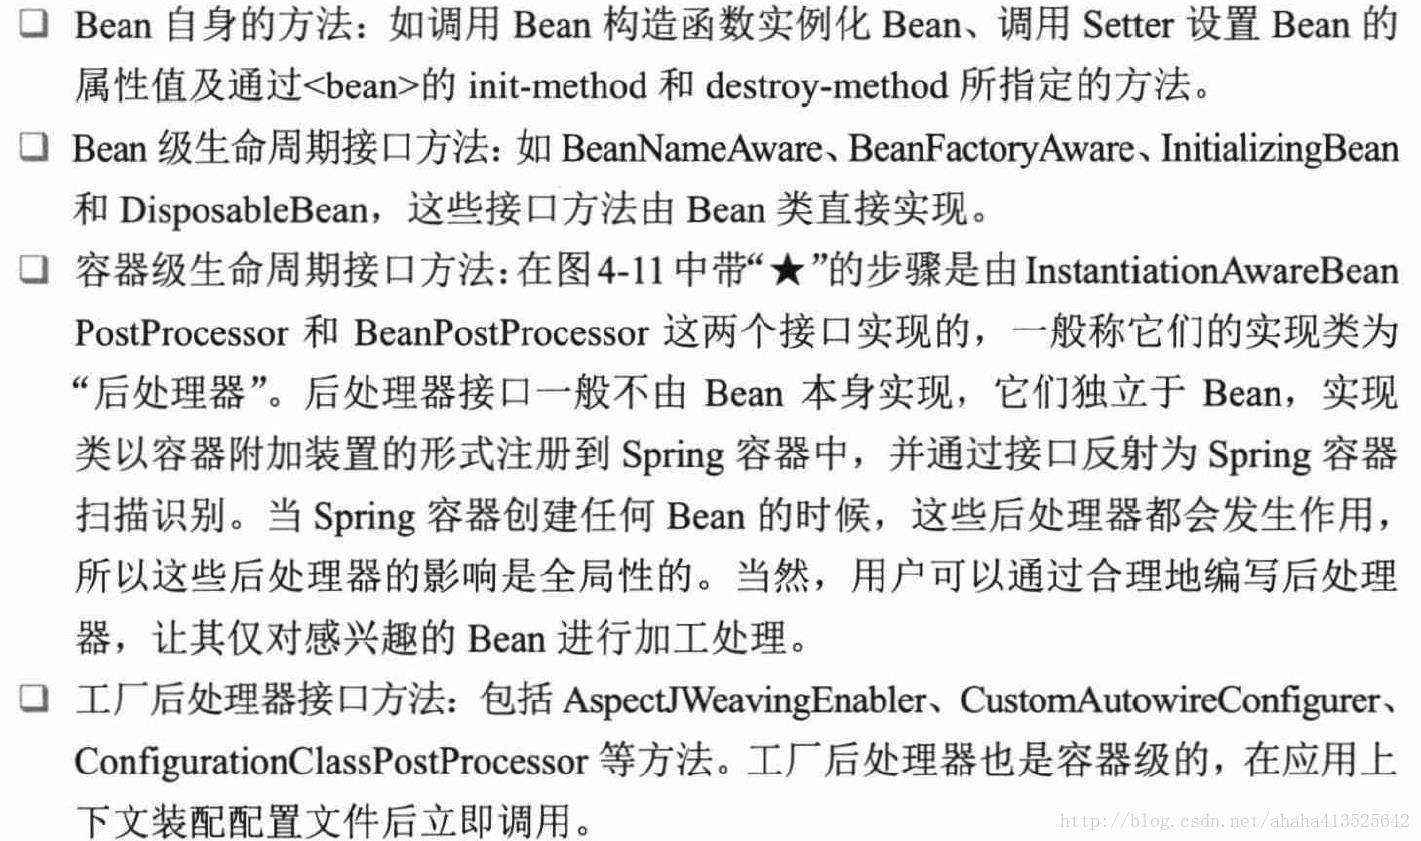
Spring容器可以注册多个后处理器,只要它们同时实现org.springframework.core.Ordered接口,容器将按特定的顺序依次调用这些后处理器。图4-11中带星号的步骤都可能调用多个后处理器进行一系列加工操作
Bean生命周期的实例
实现各种生命周期控制访问的Car
package com.smart;

import org.springframework.beans.BeansException;
import org.springframework.beans.factory.BeanFactory;
import org.springframework.beans.factory.BeanFactoryAware;
import org.springframework.beans.factory.BeanNameAware;
import org.springframework.beans.factory.DisposableBean;
import org.springframework.beans.factory.InitializingBean;

public class Car implements BeanFactoryAware, BeanNameAware, InitializingBean, DisposableBean {
    private String brand;
    private String color;
    private int maxSpeed;
    private String name;
    private BeanFactory beanFactory;
    private String beanName;

    public Car() {
        System.out.println("调用Car()构造函数。");
    }

    public String getBrand() {
        return brand;
    }

    public void setBrand(String brand) {
        System.out.println("调用setBrand()设置属性。");
        this.brand = brand;
    }

    public String getColor() {
        return color;
    }

    public String toString() {
        return "brand:" + brand + "/color:" + color + "/maxSpeed:"+ maxSpeed;
    }

    public void setColor(String color) {
        this.color = color;
    }

    public int getMaxSpeed() {
        return maxSpeed;
    }

    public void setMaxSpeed(int maxSpeed) {
        this.maxSpeed = maxSpeed;
    }

    public void introduce(){
        System.out.println("introduce:"+this.toString());
    }


    // BeanFactoryAware接口方法
    public void setBeanFactory(BeanFactory beanFactory) throws BeansException {
        System.out.println("调用BeanFactoryAware.setBeanFactory()。");
        this.beanFactory = beanFactory;
    }

    // BeanNameAware接口方法
    public void setBeanName(String beanName) {
        System.out.println("调用BeanNameAware.setBeanName()。");
        this.beanName = beanName;
    }

    // InitializingBean接口方法
    public void afterPropertiesSet() throws Exception {
        System.out.println("调用InitializingBean.afterPropertiesSet()。");
    }

    // DisposableBean接口方法
    public void destroy() throws Exception {
        System.out.println("调用DisposableBean.destory()。");
    }
    //通过<bean>的init-method属性指定的初始化方法
    public void myInit() {
        System.out.println("调用myInit(),将maxSpeed设置为240。");
        this.maxSpeed = 240;
    }
    //通过<bean>的destory-method属性指定的销毁方法
    public void myDestory() {
        System.out.println("调用myDestroy()。");
    }

}
MyInstantiationAwareBeanPostProcessor实现类继承InstantiationAwareBeanPostProcessorAdapter
package com.smart.beanfactory;

import org.springframework.beans.BeansException;
import org.springframework.beans.PropertyValues;
import org.springframework.beans.factory.config.InstantiationAwareBeanPostProcessorAdapter;

import java.beans.PropertyDescriptor;

public class MyInstantiationAwareBeanPostProcessor extends InstantiationAwareBeanPostProcessorAdapter {
     //接口方法:在实例化Bean前调用
    public Object postProcessBeforeInitialization(Class beanClass, String beanName) throws BeansException {
        //仅对容器中的car Bean处理
        if("car".equals(beanName)){
            System.out.println("InstantiationAwareBeanPostProcessor.postProcessBeforeInitialization");
        }
        return  null;
    }
    //接口方法,在实例化Bean后调用


    public boolean postProcessAfterInstantiation(Object bean, String beanName) throws BeansException {
        //仅对容器中的car Bean处理
        if("car".equals(beanName)){
            System.out.println("InstantiationAwareBeanPostProcessor.postProcessAfterInstantiation");
        }
        return true;
    }
    //接口方法:在设置某个属性时调用

    public PropertyValues postProcessPropertyValues(PropertyValues pvs, PropertyDescriptor[] pds, Object bean, String beanName) throws BeansException {
        //仅对容器中的car Bean处理,还可以通过pdst入参进行过滤
        //仅对car的某个特定属性进行处理
        if("car".equals(beanName)){
            System.out.println("InstantiationAwareBeanPostProcessor.postProcessPropertyValues");
        }
        return pvs;
    }
}
还提供了一个BeanPostProcessor事项类,在该实现类中仅对car Bean进行处理,对配置文件所提供的属性设置值进行判断,并执行相应的“补缺补漏”操作
public class MyBeanPostProcessor implements BeanPostProcessor{

    public Object postProcessAfterInitialization(Object bean, String beanName) throws BeansException {
        if(beanName.equals("car")){
            Car car = (Car)bean;
            if(car.getMaxSpeed() >= 200){
                System.out.println("调用MyBeanPostProcessor.postProcessAfterInitialization(),将maxSpeed调整为200。");
                car.setMaxSpeed(200);
            }
        }
        return bean;

    }

    public Object postProcessBeforeInitialization(Object bean, String beanName) throws BeansException {
        if(beanName.equals("car")){
            Car car = (Car)bean;
            if(car.getColor() == null){
                System.out.println("调用MyBeanPostProcessor.postProcessBeforeInitialization(),color为空,设置为默认黑色。");
                car.setColor("黑色");
            }
        }
        return bean;
    }
}
让容器装载配置文件,将MyInstantiationAwareBeanPostProcessor和MyBeanPostProcessor这两个后处理器注册到BeanFactory容器中,通过addBeanPostProcessor()方法
public class BeanLifeCycle {
private static void LifeCycleInBeanFactory(){
//①下面两句装载配置文件并启动容器
org.springframework.core.io.Resource res = new ClassPathResource("com/smart/beanfactory/beans.xml");
BeanFactory bf= new DefaultListableBeanFactory();
XmlBeanDefinitionReader reader=new XmlBeanDefinitionReader((DefaultListableBeanFactory)bf);
reader.loadBeanDefinitions(res);
//②向容器中注册MyBeanPostProcessor后处理器
((ConfigurableBeanFactory)bf).addBeanPostProcessor(new MyBeanPostProcessor());
//③向容器中注册MyInstantiationAwareBeanPostProcessor后处理器
((ConfigurableBeanFactory)bf).addBeanPostProcessor(new MyInstantiationAwareBeanPostProcessor());
//④第一次从容器中获取car,将触发容器实例化该Bean,这将引发Bean生命周期方法的调用。
Car car1=(Car)bf.getBean("car");
car1.introduce();
car1.setColor("红色");
//⑤第二次从容器中获取car,直接从缓存池中获取
Car car2 = (Car)bf.getBean("car");
//⑥查看car1和car2是否指向同一引用
System.out.println("car1==car2:"+(car1==car2));
//⑦关闭容器
((DefaultListableBeanFactory)bf).destroySingletons();
}
public static void main(String[] args) {
LifeCycleInBeanFactory();
}
}
beans.xml配置Car
  <bean id="car" class="com.smart.Car"
          init-method="myInit"
          destroy-method="myDestory"
          p:color="黑色"
          p:brand="红旗CA72"
          p:maxSpeed="200"
            />
输出结果大致如下
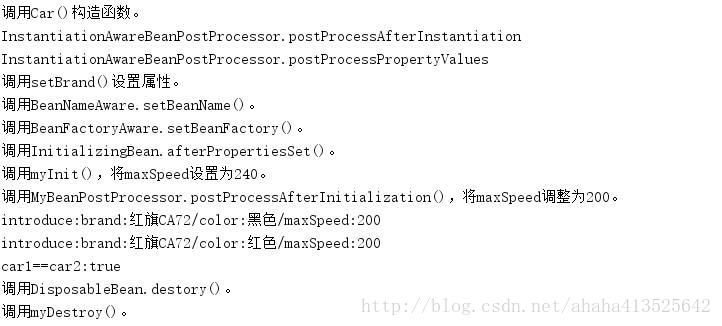
这就验证了之前介绍的Bean生命周期 完整过程
Application中Bean的生命周期
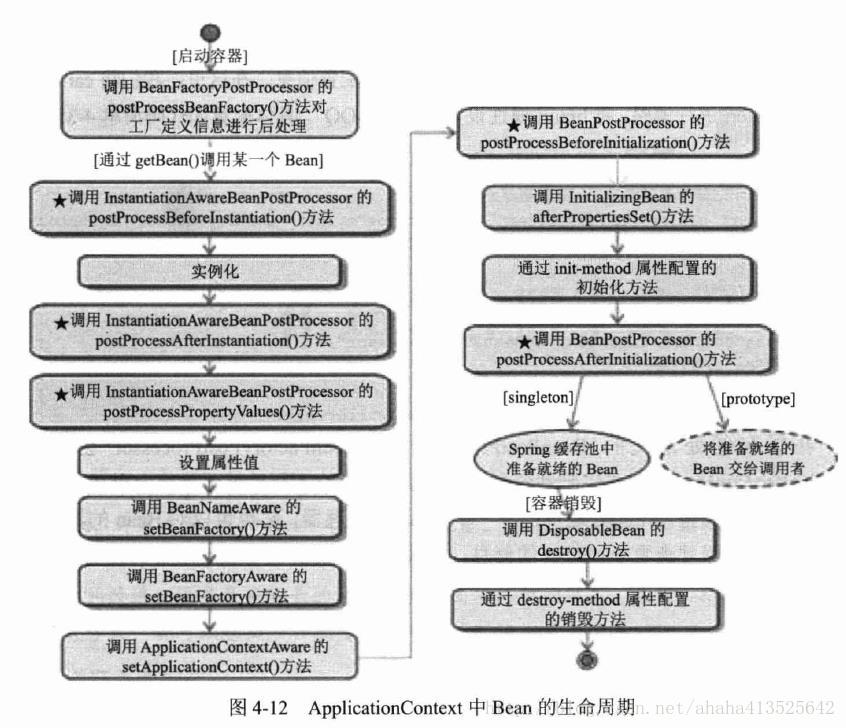
与BeanFactory类似,不同的是,如果Bean实现了org.springframework.context.ApplicationContextAware接口,则会增加一个调用该接口方法setApplicationContext()的步骤
ApplicationContext和BeanFactory另一个最大的不同在于:
ApplicationContext会利用Java反射机制自动识别出配置文件中定义的BeanPostProcessor,InstantiationAwareBeanPostProcessor和BeanFactoryPostProcessor并自动将它们注册到context中
BeanFactory需要在代码中通过调用addBeanPostProcessor()方法进行注册
在ApplicationContext中,只需在配置文件中通过<bean>定义工厂处理器和Bean后处理器,它们就会按预期的方式运行。
下面是使用工厂后处理器(BeanFactoryPostProcessor)的实例
public class MyBeanFactoryPostProcessor implements BeanFactoryPostProcessor{
   //对car<bean>的brand属性配置信息进行加工操作
    public void postProcessBeanFactory(ConfigurableListableBeanFactory bf)throws BeansException{
        BeanDefinition bd=bf.getBeanDefinition("car");
        bd.getPropertyValues().addPropertyValue("brand","特斯拉modelS");
        System.out.println("调用BeanFactoryPostProcessor.postProcessBeanFactory");
    }
}
ApplicationContext在启动时,将首先为配置文件中的每个<bean>生成一个BeanDefination对象,它是<bean>在Spring容器中的内部表示。当配置文件中所有的<bean>都被解析成BeanDefinition时,ApplicationContext将调用BeanFactoryPostProcessor的方法,通过程序的方式调整Bean 的配置信息
<beans xmlns="http://www.springframework.org/schema/beans"
       xmlns:xsi="http://www.w3.org/2001/XMLSchema-instance" xmlns:p="http://www.springframework.org/schema/p"
       xsi:schemaLocation="http://www.springframework.org/schema/beans
       http://www.springframework.org/schema/beans/spring-beans-4.0.xsd">
    <!-- 这个brand属性的值将被BeanFactoryPostProcessor更改掉-->
    <bean id="car" class="com.smart.Car"
                      init-method="myInit"
                      destroy-method="myDestory"
                      p:color="黑色"
                      p:brand="红旗CA72"
                      p:maxSpeed="200"
    />
    <!--注册Bean后处理器-->
    <bean id="myBeanPostProcessor" class="com.smart.context.MyBeanPostProcessor"/>
    <!-- 工厂后处理器-->
    <bean id="myBeanFactoryPostProcessor" class="com.smart.context.MyBeanFactoryPostProcessor" />
</beans>


 111
111

 被折叠的 条评论
为什么被折叠?
被折叠的 条评论
为什么被折叠?
 到【灌水乐园】发言


