


Nginx 模块概述
Nginx 模块有三种角色:
- 处理请求并产生输出的 Handler 模块;
- 处理由 Handler 产生的输出的 Filter(滤波器)模块;
- 当出现多个后台服务器时,Load-balancer (负载均衡器)模块负责选择其中一个后台服务器发送请求;
通常,服务器启动时,任何
Handler 模块都有可能去处理配置文件中的
location 定义。若出现多个
Handler 模块被配置成需要处理某一特定的
location 时,最终只有其中一个
Handler 模块是成功的。
Handler 模块有三种返回方式:
- 接收请求,并成功返回;
- 接收请求,但是出错返回;
- 拒绝请求,使默认的 Handler 模块处理该请求;
若
Handler 模块没有产生错误返回时,则会调用
Filter 模块。每个
location 配置里都可以添加多个
Filter 模块 ,因此响应可以被压缩和分块。
Filter 模块之间的处理顺序是在编译时就已经确定的。
Filter 模块采用“
CHAIN OF RESPONSIBILITY”链式的设计模式。当有请求到达时,请求依次经过这条链上的全部
Filter 模块,一个
Filter 被调用并处理,接下来调用下一个
Filter,直到最后一个
Filter 被调用完成,
Nginx 才真正完成响应流程。
总结如下,典型的处理形式如下:
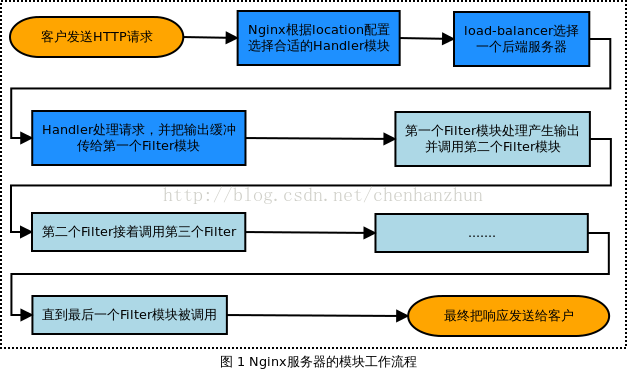
- Client sends HTTP request → Nginx chooses the appropriate handler based on the location config →
- (if applicable) load-balancer picks a backend server →
- Handler does its thing and passes each output buffer to the first filter →
- First filter passes the output to the second filter → second to third → third to fourth → etc.
- → Final response sent to client
模块最多可以定义三个配置结构:
main、
server、
location。绝大多数模块仅需要一个
location 配置。名称约定如下以
ngx_http_<module name>_(main|srv|loc)_conf_t为例的
dav module:
- typedef struct {
- ngx_uint_t methods;
- ngx_flag_t create_full_put_path;
- ngx_uint_t access;
- } ngx_http_dav_loc_conf_t;
- /* Nginx 模块的数据结构 */
- #define NGX_MODULE_V1 0, 0, 0, 0, 0, 0, 1
- #define NGX_MODULE_V1_PADDING 0, 0, 0, 0, 0, 0, 0, 0
- struct ngx_module_s {
- /* 模块类别由type成员决定,ctx_index表示当前模块在type类模块中的序号 */
- ngx_uint_t ctx_index;
- /* index 区别与ctx_index,index表示当前模块在所有模块中的序号 */
- ngx_uint_t index;
- /* spare 序列保留变量,暂时不被使用 */
- ngx_uint_t spare0;
- ngx_uint_t spare1;
- ngx_uint_t spare2;
- ngx_uint_t spare3;
- /* 当前模块的版本 */
- ngx_uint_t version;
- /* ctx指向特定类型模块的公共接口,例如在HTTP模块中,ctx指向ngx_http_module_t结构体 */
- void *ctx;
- /* 处理nginx.conf中的配置项 */
- ngx_command_t *commands;
- /* type表示当前模块的类型 */
- ngx_uint_t type;
- /* 下面的7个函数指针是在Nginx启动或停止时,分别调用的7中方法 */
- /* 在master进程中回调init_master */
- ngx_int_t (*init_master)(ngx_log_t *log);
- /* 初始化所有模块时回调init_module */
- ngx_int_t (*init_module)(ngx_cycle_t *cycle);
- /* 在worker进程提供正常服务之前回调init_process初始化进程 */
- ngx_int_t (*init_process)(ngx_cycle_t *cycle);
- /* 初始化多线程 */
- ngx_int_t (*init_thread)(ngx_cycle_t *cycle);
- /* 退出多线程 */
- void (*exit_thread)(ngx_cycle_t *cycle);
- /* 在worker进程停止服务之前回调exit_process */
- void (*exit_process)(ngx_cycle_t *cycle);
- /* 在master进程退出之前回调exit_master */
- void (*exit_master)(ngx_cycle_t *cycle);
- /* 保留字段,未被使用 */
- uintptr_t spare_hook0;
- uintptr_t spare_hook1;
- uintptr_t spare_hook2;
- uintptr_t spare_hook3;
- uintptr_t spare_hook4;
- uintptr_t spare_hook5;
- uintptr_t spare_hook6;
- uintptr_t spare_hook7;
- };
模块配置指令
模块指令存储在一个
ngx_command_t 类型的静态数组结构中,例如:
- static ngx_command_t ngx_http_circle_gif_commands[] = {
- { ngx_string("circle_gif"),
- NGX_HTTP_LOC_CONF|NGX_CONF_NOARGS,
- ngx_http_circle_gif,
- NGX_HTTP_LOC_CONF_OFFSET,
- 0,
- NULL },
- { ngx_string("circle_gif_min_radius"),
- NGX_HTTP_MAIN_CONF|NGX_HTTP_SRV_CONF|NGX_HTTP_LOC_CONF|NGX_CONF_TAKE1,
- ngx_conf_set_num_slot,
- NGX_HTTP_LOC_CONF_OFFSET,
- offsetof(ngx_http_circle_gif_loc_conf_t, min_radius),
- NULL },
- ...
- ngx_null_command
- };
- struct ngx_command_s {
- /* 配置项名称 */
- ngx_str_t name;
- /* 配置项类型,type将指定配置项可以出现的位置以及携带参数的个数 */
- ngx_uint_t type;
- /* 处理配置项的参数 */
- char *(*set)(ngx_conf_t *cf, ngx_command_t *cmd, void *conf);
- /* 在配置文件中的偏移量,conf与offset配合使用 */
- ngx_uint_t conf;
- ngx_uint_t offset;
- /* 配置项读取后的处理方法,必须指向ngx_conf_post_t 结构 */
- void *post;
- };
- NGX_HTTP_MAIN_CONF: directive is valid in the main config
- NGX_HTTP_SRV_CONF: directive is valid in the server (host) config
- NGX_HTTP_LOC_CONF: directive is valid in a location config
- NGX_HTTP_UPS_CONF: directive is valid in an upstream config
- NGX_CONF_NOARGS: directive can take 0 arguments
- NGX_CONF_TAKE1: directive can take exactly 1 argument
- NGX_CONF_TAKE2: directive can take exactly 2 arguments
- …
- NGX_CONF_TAKE7: directive can take exactly 7 arguments
- NGX_CONF_FLAG: directive takes a boolean ("on" or "off")
- NGX_CONF_1MORE: directive must be passed at least one argument
- NGX_CONF_2MORE: directive must be passed at least two arguments
- char *(*set)(ngx_conf_t *cf, ngx_command_t *cmd, void *conf);
- cf :指向ngx_conf_t 结构的指针,该结构包括从配置指令传递的参数;
- cmd:指向当前ngx_command_t 结构;
- conf:指向模块配置结构;
为了方便实现对配置指令参数的读取,
Nginx 已经默认提供了对一些标准类型的参数进行读取的函数,可以直接赋值给
set 字段使用。下面是一部分已经实现的
set 类型函数,更多可参考文件
core/ngx_conf_file.h:
- ngx_conf_set_flag_slot : 把 "on" 或 "off" 解析为 1 或 0;
- ngx_conf_set_str_slot : 解析字符串并保存 ngx_str_t 类型;
- ngx_conf_set_num_slot: 解析一个数字并将其保存为int 类型;
- ngx_conf_set_size_slot: 解析数据大小 ("8k", "1m", etc.) 并将其保存为size_t;
conf :用于指示配置项所处内存的相对偏移量,仅在
type 中没有设置
NGX_DIRECT_CONF 和
NGX_MAIN_CONF 时才生效。对于
HTTP 模块,
conf 必须设置,它的取值如下:
- NGX_HTTP_MAIN_CONF_OFFSET:使用create_main_conf 方法产生的结构体来存储解析出的配置项参数;
- NGX_HTTP_SRV_CONF_OFFSET:使用 create_srv_conf 方法产生的结构体来存储解析出的配置项参数;
- NGX_HTTP_LOC_CONF_OFFSET:使用 create_loc_conf 方法产生的结构体来存储解析出的配置项参数;
offset :表示当前配置项在整个存储配置项的结构体中的偏移位置。
模块上下文
这是一个静态的
ngx_http_module_t 结构,它的名称是
ngx_http_<module name>_module_ctx。以下是该结构的定义,具体可查阅文件
http/ngx_http_config.h:
- preconfiguration
- postconfiguration
- creating the main conf (i.e., do a malloc and set defaults)
- initializing the main conf (i.e., override the defaults with what's in nginx.conf)
- creating the server conf
- merging it with the main conf
- creating the location conf
- merging it with the server conf
- typedef struct{/* 可以把不需要调用的函数指针设置为 NULL */
- /* 解析配置文件之前被调用 */
- ngx_int_t (*preconfiguration)(ngx_conf_t *cf);
- /* 完成配置文件的解析后被调用 */
- ngx_int_t (*postconfiguration)(ngx_conf_t *cf);
- /* 创建存储main级别的全局配置项的结构体(直属于http块) */
- void *(*create_main_conf)(ngx_conf_t *cf);
- /* 初始化main级别的配置项 */
- char *(*init_main_conf)(ngx_conf_t *cf);
- /* 创建存储srv级别的配置项的结构体(直属于server块) */
- void *(*create_srv_conf)(ngx_conf_t *cf);
- /* 合并main级别与srv级别下的同名配置项 */
- char *(*merge_srv_conf)(ngx_conf_t *cf, void *prev, void *conf);
- /* 创建存储loc级别的配置项的结构体(直属于location块) */
- void *(*create_loc_conf)(ngx_conf_t *cf);
- /* 合并srv级别与loc级别下的同名配置项 */
- char *(*merge_loc_conf)(ngx_conf_t *cf, void *prev, void *conf);
- }ngx_http_module_t;
在以上的结构内容中,大多数模块只使用最后两项:
ngx_http_<module name>_create_loc_conf和
ngx_http_<module name >_merge_loc_conf;例如:
- static ngx_http_module_t ngx_http_circle_gif_module_ctx = {
- NULL, /* preconfiguration */
- NULL, /* postconfiguration */
- NULL, /* create main configuration */
- NULL, /* init main configuration */
- NULL, /* create server configuration */
- NULL, /* merge server configuration */
- ngx_http_circle_gif_create_loc_conf, /* create location configuration */
- ngx_http_circle_gif_merge_loc_conf /* merge location configuration */
- };
create_loc_conf 函数
该函数是传入一个
ngx_conf_t 结构的参数,返回新创建模块的配置结构,在这里是返回:
ngx_http_circle_gif_loc_conf_t
- static void *
- ngx_http_circle_gif_create_loc_conf(ngx_conf_t *cf)
- {
- ngx_http_circle_gif_loc_conf_t *conf;
- conf = ngx_pcalloc(cf->pool, sizeof(ngx_http_circle_gif_loc_conf_t));
- if (conf == NULL) {
- return NGX_CONF_ERROR;
- }
- conf->min_radius = NGX_CONF_UNSET_UINT;
- conf->max_radius = NGX_CONF_UNSET_UINT;
- return conf;
- }
merge_loc_conf 函数
- static char *
- ngx_http_circle_gif_merge_loc_conf(ngx_conf_t *cf, void *parent, void *child)
- {
- ngx_http_circle_gif_loc_conf_t *prev = parent;
- ngx_http_circle_gif_loc_conf_t *conf = child;
- ngx_conf_merge_uint_value(conf->min_radius, prev->min_radius, 10);
- ngx_conf_merge_uint_value(conf->max_radius, prev->max_radius, 20);
- if (conf->min_radius < 1) {
- ngx_conf_log_error(NGX_LOG_EMERG, cf, 0,
- "min_radius must be equal or more than 1");
- return NGX_CONF_ERROR;
- }
- if (conf->max_radius < conf->min_radius) {
- ngx_conf_log_error(NGX_LOG_EMERG, cf, 0,
- "max_radius must be equal or more than min_radius");
- return NGX_CONF_ERROR;
- }
- return NGX_CONF_OK;
- }
模块的定义
对任何开发模块,都需要定义一个
ngx_module_t 类型的变量来说明这个模块本身的信息,它告诉了
Nginx 这个模块的一些信息。这个变量是
ngx_http_<module name>_module;例如:更多例子可查找文件
core/ngx_conf_file.h;
- ngx_module_t ngx_http_<module name>_module = {
- NGX_MODULE_V1,
- &ngx_http_<module name>_module_ctx, /* module context */
- ngx_http_<module name>_commands, /* module directives */
- NGX_HTTP_MODULE, /* module type */
- NULL, /* init master */
- NULL, /* init module */
- NULL, /* init process */
- NULL, /* init thread */
- NULL, /* exit thread */
- NULL, /* exit process */
- NULL, /* exit master */
- NGX_MODULE_V1_PADDING
- };
Handler 模块
Handler 模块必须提供一个真正的处理函数,这个函数负责处理来自客户端的请求。该函数既可以选择自己直接生成内容,也可以选择拒绝处理,并由后续的
Handler 去进行处理,或者是选择丢给后续的
Filter 模块进行处理。以下是该函数的原型:
其中
r 是
request 结构
http 请求,包含客户端请求所有的信息,例如:
request method, URI, and headers。 该函数处理成功返回
NGX_OK,处理发生错误返回
NGX_ERROR,拒绝处理(留给后续的
Handler 进行处理)返回
NGX_DECLINE。 返回
NGX_OK 也就代表给客户端的响应已经生成,否则返回
NGX_ERROR 就发生错误了。
- typedef ngx_int_t (*ngx_http_handler_pt)(ngx_http_request_t *r);
Handler 模块处理过程中做了四件事情:
获取 location 配置、
生成合适的响应、
发送响应的 header 头部、
发送响应的 body 包体。
获取 location 配置
获取
location 配置 指向调用
ngx_http_get_module_loc_conf 函数即可,该函数传入的参数是
request 结构和 自定义的
module 模块。例如:
circle gif模块;
- static ngx_int_t
- ngx_http_circle_gif_handler(ngx_http_request_t *r)
- {
- ngx_http_circle_gif_loc_conf_t *circle_gif_config;
- circle_gif_config = ngx_http_get_module_loc_conf(r, ngx_http_circle_gif_module);
- ...
- }
生成合适的响应
这里主要是 request 结构,其定义如下:更多可参考文件
http/ngx_http_request.h;
- typedef struct {
- ...
- /* the memory pool, used in the ngx_palloc functions */
- ngx_pool_t *pool;
- ngx_str_t uri;
- ngx_str_t args;
- ngx_http_headers_in_t headers_in;
- ...
- } ngx_http_request_t;
- uri 是 request 请求的路径,e.g. "/query.cgi".
- args 是请求串参数中问号后面的参数(e.g. "name=john").
- headers_in 包含有用的stuff,例如:cookies 和browser 信息。
发送响应的 header 头部
发送响应头部有函数
ngx_http_send_header(r) 实现。响应的
header 头部在
headers_out 结构中,定义如下:更多可参考文件
http/ngx_http_request.h;
- typedef stuct {
- ...
- ngx_uint_t status;
- size_t content_type_len;
- ngx_str_t content_type;
- ngx_table_elt_t *content_encoding;
- off_t content_length_n;
- time_t date_time;
- time_t last_modified_time;
- ..
- } ngx_http_headers_out_t;
- r->headers_out.status = NGX_HTTP_OK;
- r->headers_out.content_length_n = 100;
- r->headers_out.content_type.len = sizeof("image/gif") - 1;
- r->headers_out.content_type.data = (u_char *) "image/gif";
- ngx_http_send_header(r);
- r->headers_out.content_encoding = ngx_list_push(&r->headers_out.headers);
- if (r->headers_out.content_encoding == NULL) {
- return NGX_ERROR;
- }
- r->headers_out.content_encoding->hash = 1;
- r->headers_out.content_encoding->key.len = sizeof("Content-Encoding") - 1;
- r->headers_out.content_encoding->key.data = (u_char *) "Content-Encoding";
- r->headers_out.content_encoding->value.len = sizeof("deflate") - 1;
- r->headers_out.content_encoding->value.data = (u_char *) "deflate";
- ngx_http_send_header(r);
发送响应的 body 包体
到此,该模块已经产生响应,并把它存储在内存中。发送包体的步骤是:首先分配响应特殊的缓冲区,然后分配缓冲区链接到
chain link,然后在
chain link 调用发送函数。
1、chain links 是 Nginx 使 Handler 模块在缓冲区中产生响应。在 chain 中每个 chain link 有一个指向下一个 link 的指针。首先,模块声明缓冲区 buffer 和 chain link:
- ngx_buf_t *b;
- ngx_chain_t out;
- b = ngx_pcalloc(r->pool, sizeof(ngx_buf_t));
- if (b == NULL) {
- ngx_log_error(NGX_LOG_ERR, r->connection->log, 0,
- "Failed to allocate response buffer.");
- return NGX_HTTP_INTERNAL_SERVER_ERROR;
- }
- b->pos = some_bytes; /* first position in memory of the data */
- b->last = some_bytes + some_bytes_length; /* last position */
- b->memory = 1; /* content is in read-only memory */
- /* (i.e., filters should copy it rather than rewrite in place) */
- b->last_buf = 1; /* there will be no more buffers in the request */
- out.buf = b;
- out.next = NULL;
Handler 模块真正的处理函数通过两种方式挂载到处理过程中:按处理阶段挂载;按需挂载。
按处理阶段挂载
为了更精细地控制对于客户端请求的处理过程, Nginx 把这个处理过程划分成了11个阶段。依次列举如下:- NGX_HTTP_POST_READ_PHASE:
- 读取请求内容阶段
- NGX_HTTP_SERVER_REWRITE_PHASE:
- Server请求地址重写阶段
- NGX_HTTP_FIND_CONFIG_PHASE:
- 配置查找阶段:
- NGX_HTTP_REWRITE_PHASE:
- Location请求地址重写阶段
- NGX_HTTP_POST_REWRITE_PHASE:
- 请求地址重写提交阶段
- NGX_HTTP_PREACCESS_PHASE:
- 访问权限检查准备阶段
- NGX_HTTP_ACCESS_PHASE:
- 访问权限检查阶段
- NGX_HTTP_POST_ACCESS_PHASE:
- 访问权限检查提交阶段
- NGX_HTTP_TRY_FILES_PHASE:
- 配置项try_files处理阶段
- NGX_HTTP_CONTENT_PHASE:
- 内容产生阶段
- NGX_HTTP_LOG_PHASE:
- 日志模块处理阶段
- NGX_HTTP_FIND_CONFIG_PHASE
- NGX_HTTP_POST_ACCESS_PHASE
- NGX_HTTP_POST_REWRITE_PHASE
- NGX_HTTP_TRY_FILES_PHASE
按需挂载
以这种方式挂载的 Handler 也被称为 content handler。当一个请求进来以后, Nginx 从 NGX_HTTP_POST_READ_PHASE 阶段开始依次执行每个阶段中所有 Handler。执行到 NGX_HTTP_CONTENT_PHASE 阶段时,如果这个 location 有一个对应的 content handler 模块,那么就去执行这个 content handler 模块真正的处理函数。否则继续依次执行 NGX_HTTP_CONTENT_PHASE 阶段中所有 content phase handlers,直到某个函数处理返回 NGX_OK 或者 NGX_ERROR。但是使用这个方法挂载上去的 handler 有一个特点是必须在 NGX_HTTP_CONTENT_PHASE 阶段才能被执行。如果你想自己的 handler 更早的阶段被执行,那就不要使用这种挂载方式。 以下是例子:- circle gif ngx_command_t looks like this:
- { ngx_string("circle_gif"),
- NGX_HTTP_LOC_CONF|NGX_CONF_NOARGS,
- ngx_http_circle_gif,
- 0,
- 0,
- NULL }
- static char *
- ngx_http_circle_gif(ngx_conf_t *cf, ngx_command_t *cmd, void *conf)
- {
- ngx_http_core_loc_conf_t *clcf;
- clcf = ngx_http_conf_get_module_loc_conf(cf, ngx_http_core_module);
- clcf->handler = ngx_http_circle_gif_handler;
- return NGX_CONF_OK;
- }
Handler 模块编写
Handler 模块编写步骤如下:- 编写模块基本结构:包括模块的定义,模块上下文结构,模块的配置结构等;
- 实现 handler 的挂载函数;根据模块的需求选择正确的挂载方式;
- 编写 handler 处理函数;模块的功能主要通过这个函数来完成;
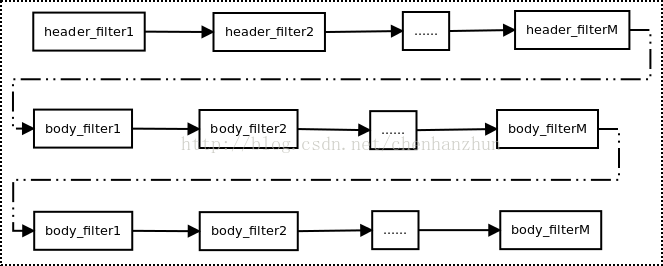
Filter 模块
Filter 处理由 Handler 模块产生的响应。 Filter 模块包括过滤头部( Header Filter)和过滤包体( Body Filter ), Filter 模块过滤头部处理 HTTP 的头部( HTTP headers), Filter 包体处理响应内容( response content),这两个阶段可以对 HTTP 响应头部和内容进行修改。Filter 模块相关结构
Filter 模块是采用链表形式的,其基本结构是
ngx_chain_t 和
ngx_buf_t;这两种结构定义如下:
- typedef struct ngx_chain_s ngx_chain_t;
- struct ngx_chain_s {
- ngx_buf_t *buf;
- ngx_chain_t *next;
- };
- struct ngx_buf_s {
- u_char *pos; /* 当前buffer真实内容的起始位置 */
- u_char *last; /* 当前buffer真实内容的结束位置 */
- off_t file_pos; /* 在文件中真实内容的起始位置 */
- off_t file_last; /* 在文件中真实内容的结束位置 */
- u_char *start; /* buffer内存的开始分配的位置 */
- u_char *end; /* buffer内存的结束分配的位置 */
- ngx_buf_tag_t tag; /* buffer属于哪个模块的标志 */
- ngx_file_t *file; /* buffer所引用的文件 */
- /* 用来引用替换过后的buffer,以便当所有buffer输出以后,
- * 这个影子buffer可以被释放。
- */
- ngx_buf_t *shadow;
- /* the buf's content could be changed */
- unsigned temporary:1;
- /*
- * the buf's content is in a memory cache or in a read only memory
- * and must not be changed
- */
- unsigned memory:1;
- /* the buf's content is mmap()ed and must not be changed */
- unsigned mmap:1;
- unsigned recycled:1; /* 内存可以被输出并回收 */
- unsigned in_file:1; /* buffer的内容在文件中 */
- /* 马上全部输出buffer的内容, gzip模块里面用得比较多 */
- unsigned flush:1;
- /* 基本上是一段输出链的最后一个buffer带的标志,标示可以输出,
- * 有些零长度的buffer也可以置该标志
- */
- unsigned sync:1;
- /* 所有请求里面最后一块buffer,包含子请求 */
- unsigned last_buf:1;
- /* 当前请求输出链的最后一块buffer */
- unsigned last_in_chain:1;
- /* shadow链里面的最后buffer,可以释放buffer了 */
- unsigned last_shadow:1;
- /* 是否是暂存文件 */
- unsigned temp_file:1;
- /* 统计用,表示使用次数 */
- /* STUB */ int num;
- };
Filter 过滤头部
header filter 包含三个基本步骤:- 决定是否处理响应;
- 对响应进行处理;
- 调用下一个 filter;
例如下面的
"not modified" header filter:其中
headers_out 结构可参考文件
http/ngx_http_request.h;
- static
- ngx_int_t ngx_http_not_modified_header_filter(ngx_http_request_t *r)
- {
- time_t if_modified_since;
- if_modified_since = ngx_http_parse_time(r->headers_in.if_modified_since->value.data,
- r->headers_in.if_modified_since->value.len);
- /* step 1: decide whether to operate */
- if (if_modified_since != NGX_ERROR &&
- if_modified_since == r->headers_out.last_modified_time) {
- /* step 2: operate on the header */
- r->headers_out.status = NGX_HTTP_NOT_MODIFIED;
- r->headers_out.content_type.len = 0;
- ngx_http_clear_content_length(r);
- ngx_http_clear_accept_ranges(r);
- }
- /* step 3: call the next filter */
- return ngx_http_next_header_filter(r);
- }
Filter 过滤包体
Filter 包体只能在 chain link缓冲区 buffer 中操作。模块必须决定是否修改输入缓冲区,或分配新的缓冲区替换当前缓冲区,或是在当前缓冲区之后还是之前插入新的缓冲区。很多模块接收多个缓冲区,导致这些模块在不完整的 chain 缓冲区中操作。 Filter 包体操作如下:- static ngx_int_t ngx_http_chunked_body_filter(ngx_http_request_t *r, ngx_chain_t *in);
- /*
- * Let's take a simple example.
- * Suppose we want to insert the text "<l!-- Served by Nginx -->" to the end of every request.
- * First, we need to figure out if the response's final buffer is included in the buffer chain we were given.
- * Like I said, there's not a fancy API, so we'll be rolling our own for loop:
- */
- ngx_chain_t *chain_link;
- int chain_contains_last_buffer = 0;
- chain_link = in;
- for ( ; ; ) {
- if (chain_link->buf->last_buf)
- chain_contains_last_buffer = 1;
- if (chain_link->next == NULL)
- break;
- chain_link = chain_link->next;
- }
- /*
- * Now let's bail out if we don't have that last buffer:
- */
- if (!chain_contains_last_buffer)
- return ngx_http_next_body_filter(r, in);
- /*
- * Super, now the last buffer is stored in chain_link.
- * Now we allocate a new buffer:
- */
- ngx_buf_t *b;
- b = ngx_calloc_buf(r->pool);
- if (b == NULL) {
- return NGX_ERROR;
- }
- /*
- * And put some data in it:
- */
- b->pos = (u_char *) "<!-- Served by Nginx -->";
- b->last = b->pos + sizeof("<!-- Served by Nginx -->") - 1;
- /*
- * And hook the buffer into a new chain link:
- */
- ngx_chain_t *added_link;
- added_link = ngx_alloc_chain_link(r->pool);
- if (added_link == NULL)
- return NGX_ERROR;
- added_link->buf = b;
- added_link->next = NULL;
- /*
- * Finally, hook the new chain link to the final chain link we found before:
- */
- chain_link->next = added_link;
- /*
- * And reset the "last_buf" variables to reflect reality:
- */
- chain_link->buf->last_buf = 0;
- added_link->buf->last_buf = 1;
- /*
- * And pass along the modified chain to the next output filter:
- */
- return ngx_http_next_body_filter(r, in);
- /*
- * The resulting function takes much more effort than what you'd do with, say, mod_perl ($response->body =~ s/$/<!-- Served by mod_perl -->/),
- * but the buffer chain is a very powerful construct, allowing programmers to process data incrementally so that the client gets something as soon as possible.
- * However, in my opinion, the buffer chain desperately needs a cleaner interface so that programmers can't leave the chain in an inconsistent state.
- * For now, manipulate it at your own risk.
- */
Filter 模块挂载
Filters 模块和
Handler 模块一样,也是挂载到
post-configuration ,如下面代码所示:
其中
ngx_http_chunked_filter_init 处理如下定义:
- static ngx_http_module_t ngx_http_chunked_filter_module_ctx = {
- NULL, /* preconfiguration */
- ngx_http_chunked_filter_init, /* postconfiguration */
- ...
- };
- static ngx_int_t
- ngx_http_chunked_filter_init(ngx_conf_t *cf)
- {
- ngx_http_next_header_filter = ngx_http_top_header_filter;
- ngx_http_top_header_filter = ngx_http_chunked_header_filter;
- ngx_http_next_body_filter = ngx_http_top_body_filter;
- ngx_http_top_body_filter = ngx_http_chunked_body_filter;
- return NGX_OK;
- }
- ngx_int_t
- ngx_http_send_header(ngx_http_request_t *r)
- {
- ...
- return ngx_http_top_header_filter(r);
- }
- ngx_int_t
- ngx_http_output_filter(ngx_http_request_t *r, ngx_chain_t *in)
- {
- ngx_int_t rc;
- ngx_connection_t *c;
- c = r->connection;
- rc = ngx_http_top_body_filter(r, in);
- if (rc == NGX_ERROR) {
- /* NGX_ERROR may be returned by any filter */
- c->error = 1;
- }
- return rc;
- }
开发 Nginx 新模块
把自己开发的模块编译到 N
ginx 中需要编写两个文件:
- "config",该文件会被 ./configure 包含;
- "ngx_http_<your module>_module.c",该文件是定义模块的功能;
config 文件的编写如下:
- /*
- * "config" for filter modules:
- */
- ngx_addon_name=ngx_http_<your module>_module /* 模块的名称 */
- HTTP_AUX_FILTER_MODULES="$HTTP_AUX_FILTER_MODULES ngx_http_<your module>_module" /* 保存所有 HTTP 模块*/
- NGX_ADDON_SRCS="$NGX_ADDON_SRCS $ngx_addon_dir/ngx_http_<your module>_module.c" /* 指定新模块的源码路径 */
- /*
- * "config" for other modules:
- */
- ngx_addon_name=ngx_http_<your module>_module
- HTTP_MODULES="$HTTP_MODULES ngx_http_<your module>_module"
- NGX_ADDON_SRCS="$NGX_ADDON_SRCS $ngx_addon_dir/ngx_http_<your module>_module.c"
关于
"ngx_http_<your module>_module.c" 文件的编写,可参考上面的
Handler 模块,同时可参考
Nginx 现有的模块:
src/http/modules/;
例如下面的
“Hello World ”
代码
:
- #include <ngx_config.h>
- #include <ngx_core.h>
- #include <ngx_http.h>
- typedef struct
- {
- ngx_str_t hello_string;
- ngx_int_t hello_counter;
- }ngx_http_hello_loc_conf_t;
- static ngx_int_t ngx_http_hello_init(ngx_conf_t *cf);
- static void *ngx_http_hello_create_loc_conf(ngx_conf_t *cf);
- static char *ngx_http_hello_string(ngx_conf_t *cf, ngx_command_t *cmd,
- void *conf);
- static char *ngx_http_hello_counter(ngx_conf_t *cf, ngx_command_t *cmd,
- void *conf);
- static ngx_command_t ngx_http_hello_commands[] = {
- {
- ngx_string("hello_string"),
- NGX_HTTP_LOC_CONF|NGX_CONF_NOARGS|NGX_CONF_TAKE1,
- ngx_http_hello_string,
- NGX_HTTP_LOC_CONF_OFFSET,
- offsetof(ngx_http_hello_loc_conf_t, hello_string),
- NULL },
- {
- ngx_string("hello_counter"),
- NGX_HTTP_LOC_CONF|NGX_CONF_FLAG,
- ngx_http_hello_counter,
- NGX_HTTP_LOC_CONF_OFFSET,
- offsetof(ngx_http_hello_loc_conf_t, hello_counter),
- NULL },
- ngx_null_command
- };
- /*
- static u_char ngx_hello_default_string[] = "Default String: Hello, world!";
- */
- static int ngx_hello_visited_times = 0;
- static ngx_http_module_t ngx_http_hello_module_ctx = {
- NULL, /* preconfiguration */
- ngx_http_hello_init, /* postconfiguration */
- NULL, /* create main configuration */
- NULL, /* init main configuration */
- NULL, /* create server configuration */
- NULL, /* merge server configuration */
- ngx_http_hello_create_loc_conf, /* create location configuration */
- NULL /* merge location configuration */
- };
- ngx_module_t ngx_http_hello_module = {
- NGX_MODULE_V1,
- &ngx_http_hello_module_ctx, /* module context */
- ngx_http_hello_commands, /* module directives */
- NGX_HTTP_MODULE, /* module type */
- NULL, /* init master */
- NULL, /* init module */
- NULL, /* init process */
- NULL, /* init thread */
- NULL, /* exit thread */
- NULL, /* exit process */
- NULL, /* exit master */
- NGX_MODULE_V1_PADDING
- };
- static ngx_int_t
- ngx_http_hello_handler(ngx_http_request_t *r)
- {
- ngx_int_t rc;
- ngx_buf_t *b;
- ngx_chain_t out;
- ngx_http_hello_loc_conf_t* my_conf;
- u_char ngx_hello_string[1024] = {0};
- ngx_uint_t content_length = 0;
- ngx_log_error(NGX_LOG_EMERG, r->connection->log, 0, "ngx_http_hello_handler is called!");
- my_conf = ngx_http_get_module_loc_conf(r, ngx_http_hello_module);
- if (my_conf->hello_string.len == 0 )
- {
- ngx_log_error(NGX_LOG_EMERG, r->connection->log, 0, "hello_string is empty!");
- return NGX_DECLINED;
- }
- if (my_conf->hello_counter == NGX_CONF_UNSET
- || my_conf->hello_counter == 0)
- {
- ngx_sprintf(ngx_hello_string, "%s", my_conf->hello_string.data);
- }
- else
- {
- ngx_sprintf(ngx_hello_string, "%s Visited Times:%d", my_conf->hello_string.data,
- ++ngx_hello_visited_times);
- }
- ngx_log_error(NGX_LOG_EMERG, r->connection->log, 0, "hello_string:%s", ngx_hello_string);
- content_length = ngx_strlen(ngx_hello_string);
- /* we response to 'GET' and 'HEAD' requests only */
- if (!(r->method & (NGX_HTTP_GET|NGX_HTTP_HEAD))) {
- return NGX_HTTP_NOT_ALLOWED;
- }
- /* discard request body, since we don't need it here */
- rc = ngx_http_discard_request_body(r);
- if (rc != NGX_OK) {
- return rc;
- }
- /* set the 'Content-type' header */
- /*
- *r->headers_out.content_type.len = sizeof("text/html") - 1;
- *r->headers_out.content_type.data = (u_char *)"text/html";
- */
- ngx_str_set(&r->headers_out.content_type, "text/html");
- /* send the header only, if the request type is http 'HEAD' */
- if (r->method == NGX_HTTP_HEAD) {
- r->headers_out.status = NGX_HTTP_OK;
- r->headers_out.content_length_n = content_length;
- return ngx_http_send_header(r);
- }
- /* allocate a buffer for your response body */
- b = ngx_pcalloc(r->pool, sizeof(ngx_buf_t));
- if (b == NULL) {
- return NGX_HTTP_INTERNAL_SERVER_ERROR;
- }
- /* attach this buffer to the buffer chain */
- out.buf = b;
- out.next = NULL;
- /* adjust the pointers of the buffer */
- b->pos = ngx_hello_string;
- b->last = ngx_hello_string + content_length;
- b->memory = 1; /* this buffer is in memory */
- b->last_buf = 1; /* this is the last buffer in the buffer chain */
- /* set the status line */
- r->headers_out.status = NGX_HTTP_OK;
- r->headers_out.content_length_n = content_length;
- /* send the headers of your response */
- rc = ngx_http_send_header(r);
- if (rc == NGX_ERROR || rc > NGX_OK || r->header_only) {
- return rc;
- }
- /* send the buffer chain of your response */
- return ngx_http_output_filter(r, &out);
- }
- static void *ngx_http_hello_create_loc_conf(ngx_conf_t *cf)
- {
- ngx_http_hello_loc_conf_t* local_conf = NULL;
- local_conf = ngx_pcalloc(cf->pool, sizeof(ngx_http_hello_loc_conf_t));
- if (local_conf == NULL)
- {
- return NULL;
- }
- ngx_str_null(&local_conf->hello_string);
- local_conf->hello_counter = NGX_CONF_UNSET;
- return local_conf;
- }
- /*
- static char *ngx_http_hello_merge_loc_conf(ngx_conf_t *cf, void *parent, void *child)
- {
- ngx_http_hello_loc_conf_t* prev = parent;
- ngx_http_hello_loc_conf_t* conf = child;
- ngx_conf_merge_str_value(conf->hello_string, prev->hello_string, ngx_hello_default_string);
- ngx_conf_merge_value(conf->hello_counter, prev->hello_counter, 0);
- return NGX_CONF_OK;
- }*/
- static char *
- ngx_http_hello_string(ngx_conf_t *cf, ngx_command_t *cmd, void *conf)
- {
- ngx_http_hello_loc_conf_t* local_conf;
- local_conf = conf;
- char* rv = ngx_conf_set_str_slot(cf, cmd, conf);
- ngx_conf_log_error(NGX_LOG_EMERG, cf, 0, "hello_string:%s", local_conf->hello_string.data);
- return rv;
- }
- static char *ngx_http_hello_counter(ngx_conf_t *cf, ngx_command_t *cmd,
- void *conf)
- {
- ngx_http_hello_loc_conf_t* local_conf;
- local_conf = conf;
- char* rv = NULL;
- rv = ngx_conf_set_flag_slot(cf, cmd, conf);
- ngx_conf_log_error(NGX_LOG_EMERG, cf, 0, "hello_counter:%d", local_conf->hello_counter);
- return rv;
- }
- static ngx_int_t
- ngx_http_hello_init(ngx_conf_t *cf)
- {
- ngx_http_handler_pt *h;
- ngx_http_core_main_conf_t *cmcf;
- cmcf = ngx_http_conf_get_module_main_conf(cf, ngx_http_core_module);
- h = ngx_array_push(&cmcf->phases[NGX_HTTP_CONTENT_PHASE].handlers);
- if (h == NULL) {
- return NGX_ERROR;
- }
- *h = ngx_http_hello_handler;
- return NGX_OK;
- }
写好上面的两个文件后,在编译 Nginx 时,步骤如下:
- ./configure --add-module=path/to/your/new/module/directory
- make
- make install
参考资料:
《
nginx模块开发篇》


 1096
1096


 被折叠的 条评论
为什么被折叠?
被折叠的 条评论
为什么被折叠?
 到【灌水乐园】发言


