一。首先得解决上网问题啊。我用的是64位系统,要装32位的库才能用iNode。(当时只是会在线装,离线不懂,求赐教)
1.安装32位库的命令:sudo apt-get install ia32-libs* (ps:如果刚装系统要更新一下源,命令:sudo apt-get update)
2.iNode客户端: (点击图片另存为,然后把名字改为h3c802.1xclient.tar.gz即可)
3.安装客户端(不能在ntfs文件系统格式下进行,先把他复制到非ntfs分区下):解压,接着按照他里面的Readme.doc做就好了
加入遇到
linux1x: error while loading shared libraries: libstdc++-libc6.2-2.so.3: cannot open shared object file: No such file or directory
这个问题,解决办法很多,我当时是下载了一个libstdc++-libc6.2-2.so.3,然后放到/usr/lib下面就ok了
libstdc++-libc6.2-2.so.3: (ps,下载方法同上,文件名改为libstdc++-libc6.2-2.so.3)
至此,上网问题解决。
二.作为一个中国人肯定要中文输入法啊,ubuntu11.04英文版默认已经装好了,如果没有装好就尝试一下命令:
sudo apt-get install ibus
sudo apt-get install ibus-pinyin
接着就到System -> administration -> language support 里选择 keyboard input method 为 ibus
还不够,我希望他能开机自动启动,我的解决办法是:
点击菜单System >> Preferences >> Startup Applications,然后点add
Command: /usr/bin/ibus-daemon -d
其他的随意填
至此,输入法问题解决。
三.作为一个java开发者,肯定要配置java环境,ubuntu11.04 下需要添加新的源,我的解决办法如下:
按住ALT+F2组合键,输入
gksu /usr/bin/software-properties-gtk
点Run,然后点other software>>add,输入deb http://archive.canonical.com/ubuntu maverick partner
完了之后要更新一下源。
接着就可以安装了,我是要装jdk的,sudo apt-get install sun-java6-jdk (ps:安装过程中到了configuring sun-java6-jre这步,发现无法按ok,其实按一下TAB就可以了按ok了。。。)
如果不是开发者,直接装jre好了,sudo apt-get install sun-java6-jre sun-java6-plugin
然后就是去下载eclipse:http://www.eclipse.org/downloads/
试了一下,用命令行编译运行java没问题,用eclipse同样没问题。done!
三.install ROR
按照这个来做:http://toranbillups.com/blog/archive/2010/09/01/How-to-install-Rails-3.0-and-Ruby-1.9.2-on-Ubuntu
Install RVM 1.0.1
First be sure to do a quick update before you get started.
sudo apt-get update
Next install curl and git so we can pull down ruby via rvm
sudo apt-get install curl git-core
Next you need to get the tar.gz for rvm 1.0.1
http://rvm.beginrescueend.com/releases/rvm-1.0.1.tar.gz
extract the contents and cd into the extracted directory when finished
tar xvzf rvm-1.0.1.tar.gz
Once inside the extracted directory run the installer from the command line
./install
After this is complete you need to edit your .bashrc file. First cd ~ and then Type "gedit .bashrc". Put the following at the bottom of the file.
[[ -s "$HOME/.rvm/scripts/rvm" ]] && source "$HOME/.rvm/scripts/rvm"
after you complete the above and save your changes, close gedit. Next close your terminal window and re-open it. Now if you type "rvm -v" you should see a valid version 1.x
Install Ruby 1.8.7
First you need to pull down a few development packages
sudo apt-get install libruby1.8 zlib1g-dev libssl-dev libreadline5-dev build-essential
Next you need to install ruby 1.8.7 through rvm
rvm install ruby-1.8.7
After this is complete you need to set ruby 1.8.7 as the default for rvm
rvm use ruby-1.8.7 --default
Install rubygems and other dev essentials
first you need to add the ubuntu-on-rails ppa repository, sometimes they have newer versions of some Ruby components.
sudo add-apt-repository ppa:ubuntu-on-rails
After you add this be sure to do another update
sudo apt-get update
Next install the essential ruby packages
sudo apt-get install ruby rubygems irb ri rdoc rake
And a few more packages, odds are you will need them anyway
sudo apt-get install build-essential ruby1.8-dev libopenssl-ruby
After all the packages above are installed, add the gem path to your global PATH, so that executables new gems can be easily called from the command line.
export PATH=/var/lib/gems/1.8/bin:$PATH
After you run the above command, close the terminal window and re-open it.
Install Sqlite3
Install the sqlite development packages
sudo apt-get install sqlite3 libsqlite3-dev
Install the sqlite gem
gem install sqlite3-ruby
Install Ruby 1.9.2
Next you need to install ruby 1.9.2 through rvm
rvm install ruby-1.9.2
After this is complete you need to set ruby 1.9.2 as the default for rvm.
rvm use ruby-1.9.2 --default
Install Rails 3.0.0
no such file to load -- zlib
ERROR: While executing gem ... (NameError)
uninitialized constant Gem::Commands::UpdateCommand
rvm package install zlib //The rvm package command was renamed to rvm pkg in v1.6.25
rvm remove 1.9.1
rvm install 1.9.1 -C --with-zlib-dir=$rvm_path/usr然后继续即可
gem install rails --version 3.0.0 这里我改为3.0.7
After you have both rails 3 and ruby 1.9.2 up and running, install the sqlite gem again.
gem install sqlite3-ruby
Now you should have a fully functional rails 3 + ruby 1.9.2 development environment! You can verify this by doing a simple "ruby -v" and "rails -v" from the command line.
四. android环境配置
ps:要先装了java(二)
详细看官网教程,很详细http://developer.android.com/sdk/installing.html
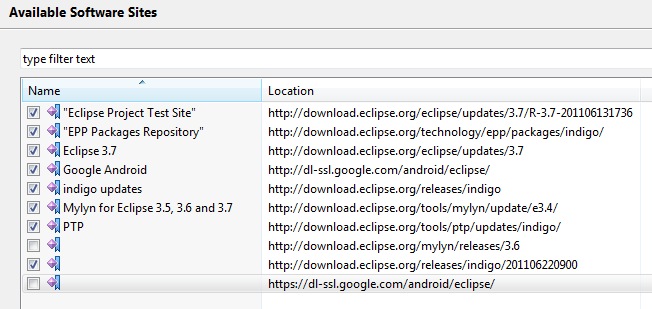
其中我在装ADT的时候出问题了,提示:
Cannot complete the install because one or more required items could not be found. Software being installed: Android Development Tools 12.0.0.v201106281929-138431 (com.android.ide.eclipse.adt.feature.group 12.0.0.v201106281929-138431) Missing requirement: Android Development Tools 12.0.0.v201106281929-138431 (com.android.ide.eclipse.adt.feature.group 12.0.0.v201106281929-138431) requires 'org.eclipse.wst.sse.core 0.0.0' but it could not be found
解决办法:

按照这个吧path加进去就好了。
如果直接拷贝android的sdk去你指定的文件夹,可能会出现权限问题,发生的问题有可能是:
1:
Failed to create the SD card.
Failed to create sdcard in the AVD folder.
1:解决办法很简单,把sdk目录下的tools权限更改成可执行。
sudo chmod -R ugo+x tools/*
最好加上r权限~
五.开机自动挂载ntfs分区
只需要安装ntfs configuration tool
sudo apt-get install ntfs-config ntfs-3g
然后点System->administration->ntfs configuration tool进行设置即可。
桌面不显示已挂载的盘的方法:
在终端输入gconf-editor,找到/apps/nautilus/desktop/volumes_visible,设置为false即可
六.触摸板登录前可以用,登录后不能用
用这条命令:
gconftool-2 --set --type boolean /desktop/gnome/peripherals/touchpad/touchpad_enabled true


 412
412


 被折叠的 条评论
为什么被折叠?


