


转载请注明出处
智能公交调度系统-系统结合了GPS GIS GPRS 等,将车辆的状态信息实时传到调度中心,调度中心可以自动调度和监控车辆。通过将GPS接入后台在通过消息中间件将消息发送到前端,前端可以实时看到车辆运行状态、运行轨迹等信息。该县的公交数量有280辆,我们采用BlazeDS(免费)完全可以胜任,LCDS(商业)比较昂贵,但性能好。
那就简单介绍一下是以Flex为前台,结合BlazeDS和ActiveMQ以及Spring实现接收JMS消息的方法(publish/subscribe模式)。在消息订阅上采用UDP还是TCP根据具体情况具体选择,UDP传输速度快,TCP传输速度不如UDP,但可靠性好。视频传输、聊天软件大多采用的都是UDP。
具体的实现方式是:
1.用Spring中配置的Sender bean的send()方法向ActiveMQ发送JMS消息;
2.用Spring中配置的Receiver bean 的receive()方法从ActiveMQ接收消息;
3.然后通过BlazeDS的messaging模式将消息发送到Flex的消息订阅者上(推送到客户端)。
本例需要用到的环境包括:FlexPlugin、MyEclipse、ActiveMQ、BlazeDS
一.Blazeds
blazeDS采用amf协议。该协议可以传输Object,Array, Date, XML。由于AMF采用二进制编码,这种方式可以高度压缩数据,因此非常适合用来传递大量的资料。数据量越大,FlashRemoting的传输效能就越高,远远超过WebService。至于XML,LoadVars和loadVariables(),它们使用纯文本的传输方式,效能就更不能与FlashRemoting相提并论了。
将下载的blazeds.war 拷贝到tomcat webapp目录下,运行tomcat。Tomcat webapp目录下会生成blazeds文件夹。
二.ActiveMQ
ActiveMQ是Apache出品,最流行的、功能强大的即时通讯和集成模式的开源服务器。ActiveMQ 是一个完全支持JMS1.1和J2EE 1.4规范的 JMS Provider实现。提供客户端支持跨语言和协议,带有易于在充分支持JMS 1.1和1.4使用J2EE企业集成模式和许多先进的功能。
到官网下载activeMQ5.9 修改activeMQ conf文件夹下activemq.xml配置文件,加入UDP传输方式(<transportConnector name="udp" uri="udp://0.0.0.0:8123" /> )
activemq.xml
- <!--     Licensed to the Apache Software Foundation (ASF) under one or more
    contributor license agreements.  See the NOTICE file distributed with
    this work for additional information regarding copyright ownership.
    The ASF licenses this file to You under the Apache License, Version 2.0
    (the "License"); you may not use this file except in compliance with
    the License.  You may obtain a copy of the License at

    http://www.apache.org/licenses/LICENSE-2.0

    Unless required by applicable law or agreed to in writing, software
    distributed under the License is distributed on an "AS IS" BASIS,
    WITHOUT WARRANTIES OR CONDITIONS OF ANY KIND, either express or implied.
    See the License for the specific language governing permissions and
    limitations under the License.

  -->
- <!--  START SNIPPET: example
  -->
- <beans xmlns="http://www.springframework.org/schema/beans" xmlns:xsi="http://www.w3.org/2001/XMLSchema-instance" xsi:schemaLocation="http://www.springframework.org/schema/beans http://www.springframework.org/schema/beans/spring-beans.xsd http://activemq.apache.org/schema/core http://activemq.apache.org/schema/core/activemq-core.xsd">
- <!--  Allows us to use system properties as variables in this configuration file
  -->
- <bean class="org.springframework.beans.factory.config.PropertyPlaceholderConfigurer">
- <property name="locations">
  <value>file:${activemq.conf}/credentials.properties</value>
  </property>
  </bean>
- <!--  Allows log searching in hawtio console
  -->
  <bean id="logQuery" class="org.fusesource.insight.log.log4j.Log4jLogQuery" lazy-init="false" scope="singleton" init-method="start" destroy-method="stop" />
- <!--         The <broker> element is used to configure the ActiveMQ broker.

  -->
- <broker xmlns="http://activemq.apache.org/schema/core" brokerName="localhost" dataDirectory="${activemq.data}">
- <destinationPolicy>
- <policyMap>
- <policyEntries>
- <policyEntry topic=">">
- <!--  The constantPendingMessageLimitStrategy is used to prevent
                         slow topic consumers to block producers and affect other consumers
                         by limiting the number of messages that are retained
                         For more information, see:

                         http://activemq.apache.org/slow-consumer-handling.html


  -->
- <pendingMessageLimitStrategy>
  <constantPendingMessageLimitStrategy limit="1000" />
  </pendingMessageLimitStrategy>
  </policyEntry>
  </policyEntries>
  </policyMap>
  </destinationPolicy>
- <!--             The managementContext is used to configure how ActiveMQ is exposed in
            JMX. By default, ActiveMQ uses the MBean server that is started by
            the JVM. For more information, see:

            http://activemq.apache.org/jmx.html

  -->
- <managementContext>
  <managementContext createConnector="false" />
  </managementContext>
- <!--             Configure message persistence for the broker. The default persistence
            mechanism is the KahaDB store (identified by the kahaDB tag).
            For more information, see:

            http://activemq.apache.org/persistence.html

  -->
- <persistenceAdapter>
  <kahaDB directory="${activemq.data}/kahadb" />
  </persistenceAdapter>
- <!--             The systemUsage controls the maximum amount of space the broker will
            use before disabling caching and/or slowing down producers. For more information, see:
            http://activemq.apache.org/producer-flow-control.html

  -->
- <systemUsage>
- <systemUsage>
- <memoryUsage>
  <memoryUsage percentOfJvmHeap="70" />
  </memoryUsage>
- <storeUsage>
  <storeUsage limit="100 gb" />
  </storeUsage>
- <tempUsage>
  <tempUsage limit="50 gb" />
  </tempUsage>
  </systemUsage>
  </systemUsage>
- <!--             The transport connectors expose ActiveMQ over a given protocol to
            clients and other brokers. For more information, see:

            http://activemq.apache.org/configuring-transports.html

  -->
- <transportConnectors>
- <!--  DOS protection, limit concurrent connections to 1000 and frame size to 100MB
  -->
  <transportConnector name="openwire" uri="tcp://0.0.0.0:61616?maximumConnections=1000&wireFormat.maxFrameSize=104857600" />
  <transportConnector name="udp" uri="udp://0.0.0.0:8123" />
  <transportConnector name="amqp" uri="amqp://0.0.0.0:5672?maximumConnections=1000&wireFormat.maxFrameSize=104857600" />
  <transportConnector name="stomp" uri="stomp://0.0.0.0:61613?maximumConnections=1000&wireFormat.maxFrameSize=104857600" />
  <transportConnector name="mqtt" uri="mqtt://0.0.0.0:1883?maximumConnections=1000&wireFormat.maxFrameSize=104857600" />
  <transportConnector name="ws" uri="ws://0.0.0.0:61614?maximumConnections=1000&wireFormat.maxFrameSize=104857600" />
  </transportConnectors>
- <!--  destroy the spring context on shutdown to stop jetty
  -->
- <shutdownHooks>
  <bean xmlns="http://www.springframework.org/schema/beans" class="org.apache.activemq.hooks.SpringContextHook" />
  </shutdownHooks>
  </broker>
- <!--         Enable web consoles, REST and Ajax APIs and demos
        The web consoles requires by default login, you can disable this in the jetty.xml file

        Take a look at ${ACTIVEMQ_HOME}/conf/jetty.xml for more details

  -->
  <import resource="jetty.xml" />
  </beans>
- <!--  END SNIPPET: example
  -->
三.创建 web project(j2ee 5.0)
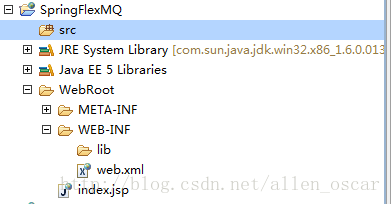
将tomcat blazeds文件夹中的文件覆盖掉 工程SpringFlexMQ WebRoot下的文件。
四.Web.xml配置
  <?xml version="1.0" encoding="UTF-8" ?>
- <web-app version="2.5" xmlns="http://java.sun.com/xml/ns/javaee" xmlns:xsi="http://www.w3.org/2001/XMLSchema-instance" xsi:schemaLocation="http://java.sun.com/xml/ns/javaee http://java.sun.com/xml/ns/javaee/web-app_2_5.xsd">
- <welcome-file-list>
  <welcome-file>index.jsp</welcome-file>
  </welcome-file-list>
- <listener>
  <listener-class>flex.messaging.HttpFlexSession</listener-class>
  </listener>
- <servlet>
  <servlet-name>flex</servlet-name>
  <servlet-class>org.springframework.web.servlet.DispatcherServlet</servlet-class>
- <init-param>
  <param-name>contextConfigLocation</param-name>
  <param-value>classpath*:applicationContext.xml</param-value>
  </init-param>
  <load-on-startup>1</load-on-startup>
  </servlet>
- <servlet-mapping>
  <servlet-name>flex</servlet-name>
  <url-pattern>/messagebroker/*</url-pattern>
  </servlet-mapping>
- <servlet>
  <servlet-name>MessageBrokerServlet</servlet-name>
  <servlet-class>flex.messaging.MessageBrokerServlet</servlet-class>
- <init-param>
  <param-name>services.configuration.file</param-name>
  <param-value>/WEB-INF/flex/services-config.xml</param-value>
  </init-param>
  <load-on-startup>1</load-on-startup>
  </servlet>
- <servlet>
  <servlet-name>ControlServlet1</servlet-name>
  <servlet-class>com.test.jms.servlet.ControlServlet1</servlet-class>
  </servlet>
- <servlet-mapping>
  <servlet-name>ControlServlet1</servlet-name>
  <url-pattern>/ControlServlet1</url-pattern>
  </servlet-mapping>
  </web-app>
SSH整合的时候会注册spring 的ContextLoaderListene,但在这里给去掉了。似乎不是完美,这些问题以后会慢慢解决。
五.工程建好以后可以看到flex文件夹里的四个配置文件,修改配置文件。
1.messaging-config.xml
  <?xml version="1.0" encoding="UTF-8" ?>
- <service id="message-service" class="flex.messaging.services.MessageService">
- <adapters>
  <adapter-definition id="actionscript" class="flex.messaging.services.messaging.adapters.ActionScriptAdapter" default="true" />
- <!--  <adapter-definition id="jms" class="flex.messaging.services.messaging.adapters.JMSAdapter"/>
  -->
  </adapters>
- <default-channels>
  <channel ref="my-polling-amf" />
  <channel ref="my-streaming-amf" />
  </default-channels>
  </service>
  <?xml version="1.0" encoding="UTF-8" ?>
- <service id="proxy-service" class="flex.messaging.services.HTTPProxyService">
- <properties>
- <connection-manager>
  <max-total-connections>100</max-total-connections>
  <default-max-connections-per-host>2</default-max-connections-per-host>
  </connection-manager>
  <allow-lax-ssl>true</allow-lax-ssl>
  </properties>
- <adapters>
  <adapter-definition id="http-proxy" class="flex.messaging.services.http.HTTPProxyAdapter" default="true" />
  <adapter-definition id="soap-proxy" class="flex.messaging.services.http.SOAPProxyAdapter" />
  </adapters>
- <default-channels>
  <channel ref="my-amf" />
  </default-channels>
  <destination id="DefaultHTTP" />
  </service>
  <?xml version="1.0" encoding="UTF-8" ?>
- <service id="remoting-service" class="flex.messaging.services.RemotingService">
- <adapters>
  <adapter-definition id="java-object" class="flex.messaging.services.remoting.adapters.JavaAdapter" default="true" />
  </adapters>
- <default-channels>
  <channel ref="my-amf" />
  </default-channels>
  </service>
  <?xml version="1.0" encoding="UTF-8" ?>
- <services-config>
- <services>
  <service-include file-path="remoting-config.xml" />
  <service-include file-path="proxy-config.xml" />
  <service-include file-path="messaging-config.xml" />
  </services>
- <services>
- <default-channels>
  <channel ref="my-amf" />
  </default-channels>
  </services>
- <security>
  <login-command class="flex.messaging.security.TomcatLoginCommand" server="Tomcat" />
- <!--  Uncomment the correct app server
        <login-command class="flex.messaging.security.TomcatLoginCommand" server="JBoss">
		<login-command class="flex.messaging.security.JRunLoginCommand" server="JRun"/>
        <login-command class="flex.messaging.security.WeblogicLoginCommand" server="Weblogic"/>
        <login-command class="flex.messaging.security.WebSphereLoginCommand" server="WebSphere"/>

  -->
- <!--
        <security-constraint id="basic-read-access">
            <auth-method>Basic</auth-method>
            <roles>
                <role>guests</role>
                <role>accountants</role>
                <role>employees</role>
                <role>managers</role>
            </roles>
        </security-constraint>

  -->
  </security>
- <channels>
- <channel-definition id="my-amf" class="mx.messaging.channels.AMFChannel">
  <endpoint url="http://{server.name}:{server.port}/{context.root}/messagebroker/amf" class="flex.messaging.endpoints.AMFEndpoint" />
  </channel-definition>
- <channel-definition id="my-secure-amf" class="mx.messaging.channels.SecureAMFChannel">
  <endpoint url="https://{server.name}:{server.port}/{context.root}/messagebroker/amfsecure" class="flex.messaging.endpoints.SecureAMFEndpoint" />
- <properties>
  <add-no-cache-headers>false</add-no-cache-headers>
  </properties>
  </channel-definition>
- <channel-definition id="my-polling-amf" class="mx.messaging.channels.AMFChannel">
  <endpoint url="http://{server.name}:{server.port}/{context.root}/messagebroker/amfpolling" class="flex.messaging.endpoints.AMFEndpoint" />
- <properties>
  <polling-enabled>true</polling-enabled>
  <polling-interval-seconds>4</polling-interval-seconds>
  </properties>
  </channel-definition>
- <channel-definition id="my-streaming-amf" class="mx.messaging.channels.StreamingAMFChannel">
  <endpoint url="http://{server.name}:{server.port}/{context.root}/messagebroker/streamingamf" class="flex.messaging.endpoints.StreamingAMFEndpoint" />
- <properties>
  <idle-timeout-minutes>0</idle-timeout-minutes>
  <max-streaming-clients>100</max-streaming-clients>
  <server-to-client-heartbeat-millis>5000</server-to-client-heartbeat-millis>
- <user-agent-settings>
  <user-agent match-on="MSIE" kickstart-bytes="2048" max-streaming-connections-per-session="100" />
  <user-agent match-on="Firefox" kickstart-bytes="2048" max-streaming-connections-per-session="100" />
  </user-agent-settings>
  </properties>
  </channel-definition>
  </channels>
- <logging>
- <target class="flex.messaging.log.ConsoleTarget" level="Error">
- <properties>
  <prefix>[BlazeDS]</prefix>
  <includeDate>false</includeDate>
  <includeTime>false</includeTime>
  <includeLevel>false</includeLevel>
  <includeCategory>false</includeCategory>
  </properties>
- <filters>
  <pattern>Endpoint.*</pattern>
  <pattern>Service.*</pattern>
  <pattern>Configuration</pattern>
  </filters>
  </target>
  </logging>
- <system>
- <redeploy>
  <enabled>false</enabled>
  </redeploy>
  </system>
  </services-config>
六.Spring的配置文件applicationContext.xml
  <?xml version="1.0" encoding="UTF-8" ?>
- <beans xmlns="http://www.springframework.org/schema/beans" xmlns:xsi="http://www.w3.org/2001/XMLSchema-instance" xmlns:aop="http://www.springframework.org/schema/aop" xmlns:tx="http://www.springframework.org/schema/tx" xmlns:context="http://www.springframework.org/schema/context" xmlns:flex="http://www.springframework.org/schema/flex" xmlns:amq="http://activemq.apache.org/schema/core" xsi:schemaLocation="http://www.springframework.org/schema/beans http://www.springframework.org/schema/beans/spring-beans-3.0.xsd http://www.springframework.org/schema/context http://www.springframework.org/schema/context/spring-context-3.0.xsd http://www.springframework.org/schema/tx http://www.springframework.org/schema/tx/spring-tx-3.0.xsd http://www.springframework.org/schema/aop http://www.springframework.org/schema/aop/spring-aop-3.0.xsd http://www.springframework.org/schema/flex http://www.springframework.org/schema/flex/spring-flex-1.0.xsd http://activemq.apache.org/schema/core http://activemq.apache.org/schema/core/activemq-core-5.2.0.xsd">
- <!-- 配置 messagebroker
  -->
- <flex:message-broker id="_messageBroker">
  <flex:message-service default-channels="my-streaming-amf,my-polling-amf" />
  </flex:message-broker>
- <!--  配置消息信道,相当于之前 messaging-config.xml文件中信道配置
  -->
  <flex:message-destination id="market-data-feed" channels="my-streaming-amf,my-polling-amf" allow-subtopics="true" subtopic-separator="." />
  <bean class="org.springframework.flex.servlet.MessageBrokerHandlerAdapter" />
  <bean id="Reciver" class="com.test.jms.util.Receive" />
  <bean id="Sender" class="com.test.jms.util.Sender" />
  <flex:remoting-destination ref="Reciver" />
  <flex:remoting-destination ref="Sender" />
  </beans>
七.Java后台代码
1. Sender.java
package com.test.jms.util;


import javax.jms.Connection;
import javax.jms.ConnectionFactory;
import javax.jms.Destination;
import javax.jms.JMSException;
import javax.jms.MessageProducer;
import javax.jms.Session;
import org.apache.activemq.ActiveMQConnection;
import org.apache.activemq.ActiveMQConnectionFactory;
public class Sender {


	public void send(String s) {

		try {
		// 连接工厂,负责创建Connection
		ConnectionFactory connectionFactory = null;
		// 负责创建 Session
		Connection connection = null;
		// 创建 MessageProducer(用来发消息) 和 MessageConsumer(用来接收消息)
		Session session = null;
		// 消息的目的地
		Destination destination = null;
		connectionFactory = new ActiveMQConnectionFactory(ActiveMQConnection.DEFAULT_USER,ActiveMQConnection.DEFAULT_PASSWORD, "udp://192.168.1.22:8123");
		connection = connectionFactory.createConnection();
		connection.start();
		session = connection.createSession(Boolean.FALSE,Session.AUTO_ACKNOWLEDGE);
		// 创建Topic,名字为myTopic
		destination = session.createTopic("myTopic");
		MessageProducer message_producer = session.createProducer(destination);
		// 通过消息生产者发出消息
		message_producer.send(session.createTextMessage(s));

		} catch (JMSException e) {
			e.printStackTrace();
		}
	}
}
2. Receive.java
package com.test.jms.util;


import javax.jms.Connection;
import javax.jms.ConnectionFactory;
import javax.jms.Destination;
import javax.jms.JMSException;
import javax.jms.Message;
import javax.jms.MessageConsumer;
import javax.jms.MessageListener;
import javax.jms.TextMessage;
import javax.jms.Session;
import flex.messaging.MessageBroker;
import flex.messaging.messages.AsyncMessage;
import flex.messaging.messages.AcknowledgeMessage;
import flex.messaging.messages.CommandMessage;
import flex.messaging.util.UUIDUtils;
import org.apache.activemq.ActiveMQConnection;
import org.apache.activemq.ActiveMQConnectionFactory;
import flex.messaging.endpoints.Endpoint;

public class Receive {

	private static ConnectionFactory connectionFactory = null;
	private static Connection connection = null;
	private static Session session = null;
	private static Destination destination = null;
    private static MessageConsumer messageConsumer = null;

	public void doReceive() {

		try {
		connectionFactory = new ActiveMQConnectionFactory(ActiveMQConnection.DEFAULT_USER,ActiveMQConnection.DEFAULT_PASSWORD, "udp://192.168.1.22:8123");
		connection = connectionFactory.createConnection();
		connection.start();
		session = connection.createSession(Boolean.FALSE,Session.AUTO_ACKNOWLEDGE);
		destination = session.createTopic("myTopic");
		if (messageConsumer == null) {

			messageConsumer = session.createConsumer(destination);
		    //重写MessageListener类的onMessage方法
			messageConsumer.setMessageListener(new MessageListener() {

				public void onMessage(Message message) {

					try {
					TextMessage textMessage = (TextMessage) message;
					String msg = null;
					msg = textMessage.getText();
					System.out.println(msg);
			        // 获取消息代理,此处的参数就是Spring配置文件中配置的messagebroker的id
					MessageBroker messageBroker = MessageBroker.getMessageBroker("_messageBroker");
				    String clientID = UUIDUtils.createUUID();
			        //创建AsyncMessage类的对象是为了Flex端用Messaging模式接收消息
				    AsyncMessage asynMsg = new AsyncMessage();
	                // 设置消息的地址,这个必须跟Spring配置文件中信道的destination一致
	 		    	asynMsg.setDestination("market-data-feed");
	 		    	//flex 可以通过header过滤消息
					asynMsg.setHeader("msg","new");
					asynMsg.setClientId(clientID);
			        asynMsg.setMessageId(UUIDUtils.createUUID());
					asynMsg.setTimestamp(System.currentTimeMillis());
					asynMsg.setBody(msg);
				    messageBroker.routeMessageToService(asynMsg, null);

					} catch (JMSException e) {
			             e.printStackTrace();
					try {
					        connection.close();
					    } catch (JMSException e1) {
					       e1.printStackTrace();
					    }
					}

			    }
		   });
	    }
	    } catch (Exception e) {

	    }
    }
}
3. ControlServlet1.java
package com.test.jms.servlet;


import java.io.IOException;
import java.io.PrintWriter;

import javax.servlet.ServletContext;
import javax.servlet.ServletException;
import javax.servlet.http.HttpServlet;
import javax.servlet.http.HttpServletRequest;
import javax.servlet.http.HttpServletResponse;

import org.springframework.context.ApplicationContext;
import org.springframework.web.context.WebApplicationContext;
import org.springframework.web.context.support.WebApplicationContextUtils;


public class ControlServlet1 extends HttpServlet {


	public void init() throws ServletException {


	}

	public void doGet(HttpServletRequest request, HttpServletResponse response)
			throws ServletException, IOException {

		     doPost(request,response);
	}


	public void doPost(HttpServletRequest request, HttpServletResponse response)
			throws ServletException, IOException {


	}

}
八.前台Flex的代码
<?xml version="1.0" encoding="utf-8"?>
<s:Application xmlns:fx="http://ns.adobe.com/mxml/2009"
			   xmlns:s="library://ns.adobe.com/flex/spark"
			   xmlns:mx="library://ns.adobe.com/flex/mx"
			   minWidth="955" minHeight="600" creationComplete="init();">

	<fx:Script>
		<![CDATA[
			import mx.controls.Alert;
			import mx.messaging.events.MessageEvent;
			import mx.messaging.events.MessageFaultEvent;
			import mx.rpc.events.FaultEvent;
			import mx.messaging.ChannelSet;
			import mx.messaging.channels.AMFChannel;
			import mx.messaging.channels.SecureStreamingAMFChannel;
			import mx.messaging.channels.StreamingAMFChannel;

			protected function init():void{

				//调用后台的Receive类中的doReceive方法,实现订阅和监听消息
				ReceiveMessage.doReceive();
				//给我们定义的consumer对象指定一个信道,我们定义了两种信道,在services-config.xml文件中,此处选用my-streaming-amf
				consumer.subscribe();
			}

			//按钮点击触发的操作
			protected function btnSendMessage_clickHandler(event:MouseEvent):void
			{

				Send.send(myinput.text);
				myinput.text="";

			}
			//点击按钮后操作失败的处理
			protected function Send_faultHandler(event:FaultEvent):void
			{
				Alert.show("send is fail,because:"+ event.fault.toString());

			}
			//收到消息的失败处理
			protected function ReceiveMessage_faultHandler(event:FaultEvent):void
			{
				Alert.show("receive is fail,because:"+ event.fault.toString());

			}
			//生产者收到消息的错误处理
			protected function consumer_faultHandler(event:MessageFaultEvent):void
			{
				Alert.show("error");
				Alert.show(event.faultString);

			}
			//生产者收到消息后的处理
			protected function consumer_messageHandler(event:MessageEvent):void
			{

				txtMessage.text = txtMessage.text + event.message.body.toString() + "\n";
			}

		]]>
	</fx:Script>
	<fx:Declarations>
		<!-- 将非可视元素(例如服务、值对象)放在此处 -->
		<!--此处定义一个consumer,需要使用它来订阅消息,订阅了以后才能接收到后台发来的数据。这里的关键是要定义destination,destination的值和后台messaging-config.xml定义的  destination的值相同-->
		<s:Consumer  channelSet="{cs}"  id="consumer" destination="market-data-feed" fault="consumer_faultHandler(event)" message="consumer_messageHandler(event)"  />
		<!--此处定义个接收消息的类,与后台的接收消息的POJO对应,通过它来定义consumer和调用监听方法-->
		<s:RemoteObject id="ReceiveMessage" channelSet="{amf_channel}" destination="Reciver"
						fault="ReceiveMessage_faultHandler(event)"/>
		<!--此处定义个发送消息的类,与后台的发送消息的POJO对应,通过它向ActiveMQ发送消息-->
		<s:RemoteObject id="Send" channelSet="{amf_channel}" destination="Sender"
						fault="Send_faultHandler(event)"/>

		<s:AMFChannel id="myamfChannel"
					  url="http://192.168.1.22:8088/SpringFlexMQ/messagebroker/amf"/>
		<mx:ChannelSet  id="amf_channel" channels="{[myamfChannel]}"/>

		<s:ChannelSet id="cs">
			<s:StreamingAMFChannel url="http://192.168.1.22:8088/SpringFlexMQ/messagebroker/streamingamf"/>
		</s:ChannelSet>
	</fx:Declarations>
	<mx:VBox height="100%" horizontalAlign="center" width="100%" verticalAlign="middle" chromeColor="#9F9F9F" dropShadowVisible="true" backgroundColor="#6A232F" backgroundAlpha="0.6">
		<mx:VBox width="438" verticalAlign="middle" horizontalAlign="center" paddingBottom="5" paddingTop="5" paddingLeft="5" paddingRight="5" backgroundColor="#87194D" focusColor="#6C1D2A" cornerRadius="10">
			 <s:VGroup horizontalAlign="center" gap="11" paddingBottom="5" paddingTop="5" paddingLeft="5" paddingRight="5" contentBackgroundColor="#EDEDED">

				<mx:TextArea id="txtMessage" x="62" y="100" width="408" height="249" dropShadowVisible="true" text="" borderColor="#97515D" chromeColor="#F0BABA" contentBackgroundColor="#F2FCFA"/>

				<s:TextInput id="myinput" x="0" y="250" width="408" height="42" contentBackgroundColor="#F4F9F8" borderColor="#8B3B3B"/>

				<mx:Button id="btnSendMessage" x="0" y="302" label="Send"   click="btnSendMessage_clickHandler(event)" chromeColor="#97D2EB" paddingBottom="0"/>
			</s:VGroup>
		</mx:VBox>
	</mx:VBox>

</s:Application>
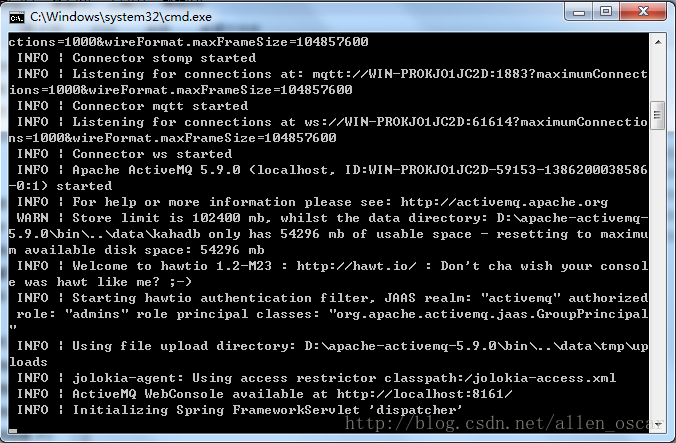
九.启动ActiveMQ
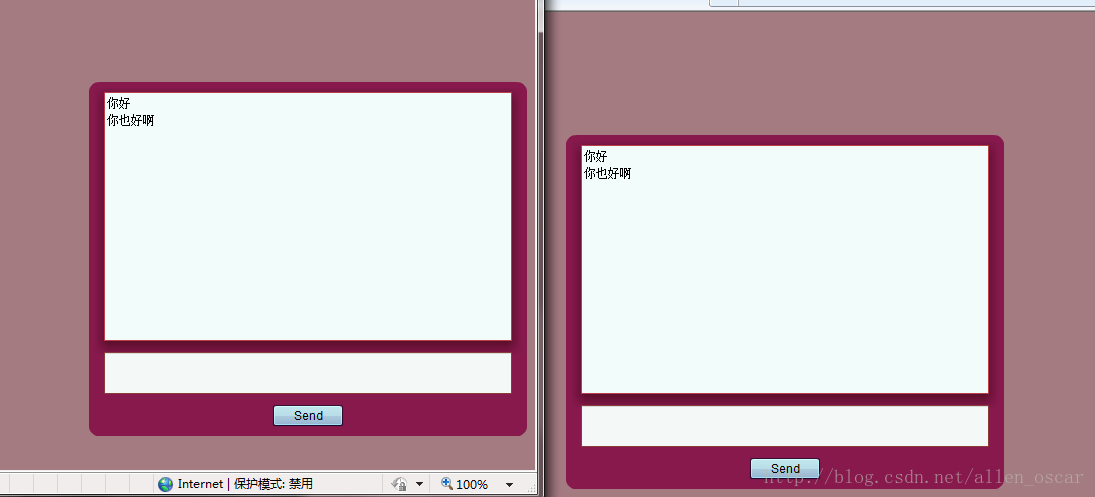
十.启动程序
十一.总结
1. ActiveMQ如何将对象推送到前端,前端又是如何接受对象?
2. Spring如何更有效地管理ActiveMQ?
3. 如何实现订阅的信息筛选?
4. jar包下载地址http://download.csdn.net/detail/allen_gang/6659767


 1570
1570


 被折叠的 条评论
为什么被折叠?
被折叠的 条评论
为什么被折叠?
 到【灌水乐园】发言


