


Q:Android Native层Binder.transact()函数调用 Binder.onTransact() 函数失败?
在Android Native层调用Camera.h中的api实现一个截屏功能的应用时,发现通过gCamera->setListener(new ScreenCaptureListener())设置到Camera的mListener的用于接收Camera预览数据的回调函数没有被调用,导致截屏失败?
注:
Camera类文件汇总:
libcamera_client.so
Camera
ICamera
ICameraClient
ICameraService
CameraBase
CameraHardwareInterfacelibcameraservice.so
CameraService
CameraClient
Camera2Client
A: 原因分析
梳理Camera预览的整个正确流程应该如下:
//TODO:Camera从上往下设置调用层次图1.
Native demo -> Camera -> CameraService -> CameraClient -> CameraHardwareInterface -> CameraHal_Module -> XCDipHardware_einstein -> PipManager
//TODO:Camera从下往上回调调用层次图2.
SN -> XCDipHardware_einstein -> CameraClient -> ICameraClient -> Camera -> SCREENSHOT_MAIN
其LOG如下:
01-01 23:13:40.855 D/XCDipHardware_einstein( 1154): call processLoop.
01-01 23:13:40.865 D/XCDipHardware_einstein( 1154): [XCDipHardware] handlePreviewData call datacb.
01-01 23:13:40.865 V/CameraClient( 1154): __data_cb
01-01 23:13:40.865 D/CameraClient( 1154): dataCallback(16, 0x10 )
01-01 23:13:40.865 D/CameraClient( 1154): CameraClient::handlepreviewData.
01-01 23:13:40.865 V/ICameraClient( 1154): dataCallback
01-01 23:13:40.865 D/ICameraClient( 1154): Bp tid: 4090111104, pid: 1154.
01-01 23:13:40.865 V/ICameraClient( 2879): DATA_CALLBACK
01-01 23:13:40.865 D/ICameraClient( 2879): Bn tid: 2915554048, pid: 2879.
01-01 23:13:40.865 D/Camera ( 2879): Camera::dataCallback
01-01 23:13:40.865 D/Camera ( 2879): Callback tid: 2915554048, pid: 2879.
01-01 23:13:40.865 I/SCREENSHOT_MAIN( 2879): ScreenCaptureListener::postData. offset = 0, size = 1228800,
但是在回传采集到的图像数据的过程中,ICameraClient中的BpCameraClient调用完remote()->transact(DATA_CALLBACK, data, &reply, IBinder::FLAG_ONEWAY)函数后,并没有接着调用到BnCameraClient::onTransact的DATA_CALLBACK,而是直接BpCameraClient dataCallback call transact finished.
从这儿来看,好像是Android的Binder调用出现了问题!
关于IBinder及其transact函数,在网上找到如下说明:
IBinder
android.os.IBinder
Class Overview
Base interface for a remotable object, the core part of a lightweight remote procedure call mechanism designed for high performance when performing in-process and cross-process calls. This interface describes the abstract protocol for interacting with a remotable object. Do not implement this interface directly, instead extend from
Binder
.
The key IBinder API is
transact()
matched by
Binder.onTransact()
. These methods allow you to send a call to an IBinder object and receive a call coming in to a Binder object, respectively. This transaction API is synchronous, such that a call to
transact()
does not return until the target has returned from
Binder.onTransact()
. this is the expected behavior when calling an object that exists in the local process, and the underlying inter-process communication (IPC) mechanism ensures that these same semantics apply when going across processes.The system maintains a pool of transaction threads in each process that it runs in. These threads are used to dispatch all IPCs coming in from other processes. For example, when an IPC is made from process A to process B, the calling thread in A blocks in transact() as it sends the transaction to process B. The next available pool thread in B receives the incoming transaction, calls Binder.onTransact() on the target object, and replies with the result Parcel. Upon receiving its result, the thread in process A returns to allow its execution to continue. In effect, other processes appear to use as additional threads that you did not create executing in your own process.
Binder通信过程中,transact()和Binder.onTransact()在不同的两个进程中被调用,从我录出来的log中发现,transact()函数跑在系统的mediaserver进程中,而Binder.onTransact()应该是跑在我的demo进程中的,这些API原本都应该是同步的,当mediaserver进程的调用线程把transaction发送给demo进程之后,自身就应该阻塞在transact()中,demo进程中的空闲线程然后接收过来的transaction,并对目标对象调用Binder.onTransact(),并用结果Parcel回复,mediaserver进程中的线程收到后,继续从阻塞的地方开始执行。
但是现在发现,我的这个demo程序中出现两个问题:
1. Transact()函数被调用后直接返回了,并没有阻塞住?
2. Transact()函数调用后,我的demo进程并没有去执行Binder.ontransact()函数,说明要么是我的demo进程或者其相关线程些时不存在或者是阻塞住了?
为什么transact()函数调用后并没有阻塞住?
看ICameraClient.cpp档中的BpCameraClient:: dataCallback()函数
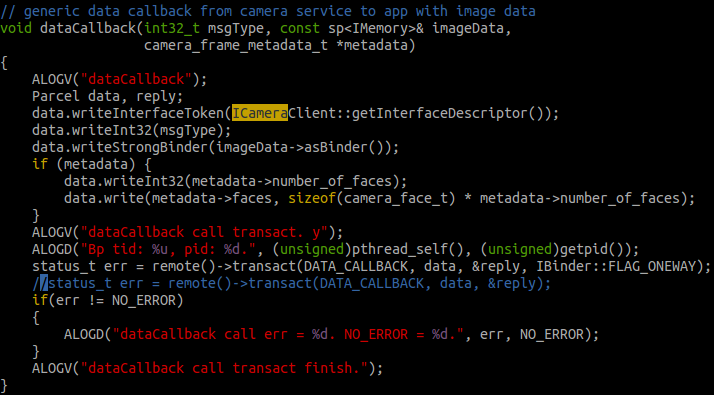
图3 BpCameraClient:: dataCallback()函数
检测返回值err,log并没有打印,说明返回值正确;检测Binder.transact()的参数IBinder::FLAG_ONEWAY,官网解释:

图4 Binder参数FLAG_ONEWAY
在Binder.transact()中加多这个参数,这个函数就是一个异步调用,会立刻返回,我做了一个测试,将这个参数去掉,再次运行时发现图3最后一行log确实没有输出来,BpBinder调用线程阻塞住,但是demo程序依然没有图像输出来!说明Binder失败的原因不在这儿!
Demo进程中相关线程阻塞或者不存在?
在demo程序运行卡住时,我在系统中使用
shell@pitaya:/data/capture # debuggerd64
ps | grep screenshot | busybox awk '{print $2}'
Sending request to dump task 2994.
Tombstone written to: /data/tombstones/tombstone_00
打印出当前demo进程状态信息,发现demo进程只有一个主线程
pid: 2994, tid: 2994, name: screenshot >>> /system/bin/screenshot <<<
这个线程堆栈如下:
backtrace:
#00 pc 0000000000019a5c /system/lib64/libc.so (syscall+28)
#01 pc 00000000000202b0 /system/lib64/libc.so (pthread_mutex_lock+252)
#02 pc 000000000001efb4 /system/lib64/libc.so (__pthread_cond_timedwait_relative(pthread_cond_t*, pthread_mutex_t*, timespec const*)+116)
#03 pc 000000000001f028 /system/lib64/libc.so (__pthread_cond_timedwait(pthread_cond_t*, pthread_mutex_t*, timespec const*, int)+68)
#04 pc 00000000000031b4 /system/bin/screenshot
可以看出,当前它正阻塞在gAvailableCV.waitRelative(gAvailableLock, 1000*1000000)函数中, 于是我用pthread_create函数另起了一个线程去执行Camera::connect()函数,依然是这样的。
说明Bn端的Binder消息并不是在主线程或者我们自己使用pthread_create创建的线程中处理的,也就是说我们的进程中并没有处理Binder Bp端和Bn端消息的线程,那么该如何创建这两个线程呢?
在Binder通信机制中,一个服务如果要使用Binder,就必须做两件事:
1. 打开binder设备;
2. 创建一个looper循环,然后等待请求。
在ICameraClient类及其派生类Camera和我们调用Camera接口的demo中,都没有看到做这两件事的代码,
看看Camera与ICameraClient有关系的代码:
class Camera :  public CameraBase<Camera>, public BnCameraClient{}
class BnCameraClient : public BnInterface<ICameraClient>{}
class ICameraClient : public IInterface{}
看起来,BnInterface似乎是打开Binder设备的
template<typename INTERFACE>
class BnInterface : public INTERFACE, public BBinder
{
public:
    virtual sp<IInterface>      queryLocalInterface(const String16& _descriptor);
    virtual const String16&     getInterfaceDescriptor() const;
protected:
    virtual IBinder*            onAsBinder();
};
兑现后变成
class BnInterface : public ICameraClient, public BBinder
BBinder, BpBinder, 是不是和BnXXX以及BpXXX对应的呢?找到它定义的地方:
BBinder::BBinder()
    : mExtras(NULL)
{
    //也没有打开Binder设备?
}
说明Binder机制在自身初始化过程中,并没有主动去打开Binder设备!
回到Android工程中,去找main_mediaserver中是如何使用Binder的:
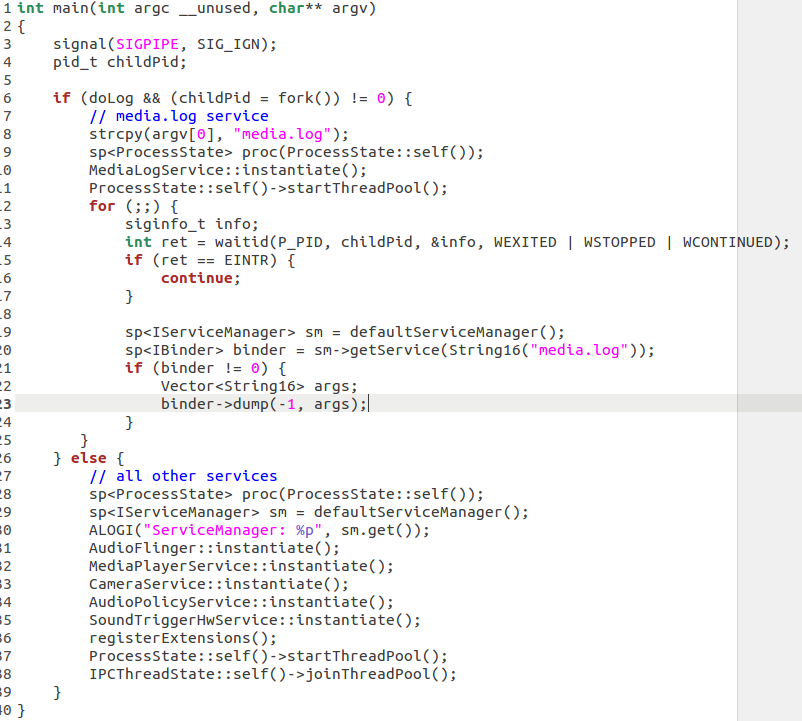
图5 main_systemserver main函数
第一个调用的函数是ProcessState::self(),然后赋值给了proc变量,程序运行完,proc会自动delete内部的内容,所以就自动释放了先前分配的资源。
ProcessState位置在ProcessState位置在frameworks/native/libs/binder/ProcessState.cpp
sp<ProcessState> ProcessState::self()
{
    if (gProcess != NULL) return gProcess; //第一次进来肯定不走这儿
    AutoMutex _l(gProcessMutex);  //锁保护
    if (gProcess == NULL) gProcess = new ProcessState;   //创建一个ProcessState对象
return gProcess;   //这里返回的是指针,但是函数返回的是sp<xxx>,所以把sp<xxx>看成是XXX*是可以的
}
再来看看ProcessState构造函数
ProcessState::ProcessState()
    : mDriverFD(open_driver())  //Android很多代码都是这么写的,稍不留神就没看见这里调用了一个很重要的函数
    , mVMStart(MAP_FAILED)//映射内存的起始地址
    , mManagesContexts(false)
    , mBinderContextCheckFunc(NULL)
    , mBinderContextUserData(NULL)
    , mThreadPoolStarted(false)
    , mThreadPoolSeq(1)
{
    if (mDriverFD >= 0) {
    //BIDNER_VM_SIZE定义为(1*1024*1024) - (4096 *2) 1M-8K
         mVMStart = mmap(0, BINDER_VM_SIZE, PROT_READ, MAP_PRIVATE | MAP_NORESERVE,
             mDriverFD, 0);//这个需要你自己去man mmap的用法了,不过大概意思就是
        //将fd映射为内存,这样内存的memcpy等操作就相当于write/read(fd)了
    }
    ...
}
open_driver,就是打开/dev/binder这个设备,这个是android在内核中搞的一个专门用于完成进程间通讯而设置的一个虚拟的设备, 就是内核的提供的一个机制.
static int open_driver()
{
      int fd = open("/dev/binder", O_RDWR);//打开/dev/binder
      if (fd >= 0) {
          ....
          size_t maxThreads = 15;
          //通过ioctl方式告诉内核,这个fd支持最大线程数是15个。
          result = ioctl(fd, BINDER_SET_MAX_THREADS, &maxThreads);
      }
      return fd;
}
sp proc(ProcessState::self())这儿应该是打开Binder设备的操作.
打开binder设备的地方是和进程相关的,一个进程打开一个就可以了。
那么,在哪里进行类似的消息循环looper操作呢?
sp<ProcessState> proc(ProcessState::self());这儿应该是打开Binder设备的操作, 那么
ProcessState::self()->startThreadPool();
IPCThreadState::self()->joinThreadPool();
应该是进行类似消息循环的looper的操作啦!
看看startThreadPool:
void ProcessState::startThreadPool()
{
  ...
    spawnPooledThread(true);
}

void ProcessState::spawnPooledThread(bool isMain)
{
    sp<Thread> t = new PoolThread(isMain);isMain是TRUE
    //创建线程池,然后run起来,和java的Thread何其像也。
    t->run(buf);
 }
PoolThread从Thread类中派生,那么此时会产生一个线程吗?看看PoolThread和Thread的构造
PoolThread::PoolThread(bool isMain)
        : mIsMain(isMain)
{

}

Thread::Thread(bool canCallJava)//canCallJava默认值是true
    :   mCanCallJava(canCallJava),
        mThread(thread_id_t(-1)),
        mLock("Thread::mLock"),
        mStatus(NO_ERROR),
        mExitPending(false), mRunning(false)
{

}
这个时候还没有创建线程, 然后调用PoolThread::run,实际调用了基类的run:
status_t Thread::run(const char* name, int32_t priority, size_t stack)
{
    bool res;
    if (mCanCallJava) {
        res = createThreadEtc(_threadLoop,//线程函数是_threadLoop
                 this, name, priority, stack, &mThread);
    }
}
终于,在run函数中,创建线程了。从此主线程执行
IPCThreadState::self()->joinThreadPool();新开的线程执行_threadLoop
int Thread::_threadLoop(void* user)
{
    Thread* const self = static_cast<Thread*>(user);
    sp<Thread> strong(self->mHoldSelf);
    wp<Thread> weak(strong);
    self->mHoldSelf.clear();

    do {
        ...
        if (result && !self->mExitPending) {
            result = self->threadLoop();哇塞,调用自己的threadLoop
        }
    }
我们是PoolThread对象,所以调用PoolThread的threadLoop函数
virtual bool PoolThread ::threadLoop()
{
    //mIsMain为true。
   //而且注意,这是一个新的线程,
   //所以必然会创建一个新的IPCThreadState对象(记得线程本地存储吗?TLS),然后
    IPCThreadState::self()->joinThreadPool(mIsMain);
    return false;
}
主线程和工作线程都调用了joinThreadPool,看看这个干嘛了!
void IPCThreadState::joinThreadPool(bool isMain)
{
    mOut.writeInt32(isMain ? BC_ENTER_LOOPER : BC_REGISTER_LOOPER);
    status_t result;
    do {
        int32_t cmd;
        result = talkWithDriver();
        result = executeCommand(cmd);
    } while (result != -ECONNREFUSED && result != -EBADF);

    mOut.writeInt32(BC_EXIT_LOOPER);
    talkWithDriver(false);
}
有loop了,但是好像是有两个线程都执行了这个啊!这里有两个消息循环.
下面看看executeCommand
status_t IPCThreadState::executeCommand(int32_t cmd)
{
    BBinder* obj;
    RefBase::weakref_type* refs;
    status_t result = NO_ERROR;
    case BR_TRANSACTION:
    {
        binder_transaction_data tr;
        result = mIn.read(&tr, sizeof(tr));
        //来了一个命令,解析成BR_TRANSACTION,然后读取后续的信息
        Parcel reply;
        if (tr.target.ptr) {
            //这里用的是BBinder。
            sp<BBinder> b((BBinder*)tr.cookie);
            const status_t error = b->transact(tr.code, buffer, &reply, 0);
        }
    }
}
让我们看看BBinder的transact函数干嘛了
status_t BBinder::transact(
    uint32_t code, const Parcel& data, Parcel* reply, uint32_t flags)
{
    //调用自己的onTransact函数
    err = onTransact(code, data, reply, flags);
    return err;
}
BnCameraClient从BBinder派生,所以会调用到它的onTransact函数
然后BnCameraClient的onTransact函数收取命令,然后派发到派生类Camera的函数,由它完成实际的工作。
从上面的分析来看,我的demo程序进程中需要调用
sp<ProcessState> proc(ProcessState::self());来打开Binder设备,还需要调用
ProcessState::self()->startThreadPool();
IPCThreadState::self()->joinThreadPool();
来创建Binder消息处理线程,该线程为一个loop循环处理线程。
在demo进程中添加这三句后,BpCameraClient果然就可以呼叫到BnCameraClient中去了,在串口中输入:
Busybox ps –T命令查看当前demo进程中的线程状态:
3151 0 0:00 /system/bin/screenshot
3152 0 0:00 {Binder_1} /system/bin/screenshot
3154 0 0:00 {Binder_2} /system/bin/screenshot
发现此时screenshot进程确实有三个进程,其中两个为Binder线程,进一步打印出当前demo进程状态信息,发现demo进程中现在有三个线程了:
5 pid: 2994, tid: 2994, name: screenshot >>> /system/bin/screenshot <<<
687 pid: 2994, tid: 2995, name: Binder_1 >>> /system/bin/screenshot <<<
2019 pid: 2994, tid: 2997, name: Binder_2 >>> /system/bin/screenshot <<<
Screenshot为demo主线程,Binder_1堆栈如下:
backtrace:
#00 pc 000000000006104c /system/lib64/libc.so (nanosleep+4)
#01 pc 0000000000037e00 /system/lib64/libc.so (sleep+40)
#02 pc 0000000000002c64 /system/bin/screenshot
#03 pc 0000000000028af0 /system/lib64/libcamera_client.so (android::Camera::dataCallback(int, android::s
#04 pc 000000000002e8dc /system/lib64/libcamera_client.so (android::BnCameraClient::onTransact(unsigned
#05 pc 0000000000021bac /system/lib64/libbinder.so (android::BBinder::transact(unsigned int, android::Pa
#06 pc 000000000002a04c /system/lib64/libbinder.so (android::IPCThreadState::executeCommand(int)+876)
#07 pc 000000000002a22c /system/lib64/libbinder.so (android::IPCThreadState::getAndExecuteCommand()+92)
#08 pc 000000000002a2a0 /system/lib64/libbinder.so (android::IPCThreadState::joinThreadPool(bool)+76)
#09 pc 0000000000031bd0 /system/lib64/libbinder.so
#10 pc 00000000000169c0 /system/lib64/libutils.so (android::Thread::_threadLoop(void*)+208)
#11 pc 000000000001620c /system/lib64/libutils.so
#12 pc 000000000001f168 /system/lib64/libc.so (__pthread_start(void*)+52)
#13 pc 000000000001b370 /system/lib64/libc.so (__start_thread+16)
Binder_1是BBinder消息处理线程。
Binder_2堆栈如下:
backtrace:
#00 pc 000000000006173c /system/lib64/libc.so (__ioctl+4)
#01 pc 0000000000088a48 /system/lib64/libc.so (ioctl+100)
#02 pc 00000000000299a4 /system/lib64/libbinder.so (android::IPCThreadState::talkWithDriver(bool)+164)
#03 pc 000000000002a1e8 /system/lib64/libbinder.so (android::IPCThreadState::getAndExecuteCommand()+24
#04 pc 000000000002a2a0 /system/lib64/libbinder.so (android::IPCThreadState::joinThreadPool(bool)+76)
#05 pc 0000000000031bd0 /system/lib64/libbinder.so
#06 pc 00000000000169c0 /system/lib64/libutils.so (android::Thread::_threadLoop(void*)+208)
#07 pc 000000000001620c /system/lib64/libutils.so
#08 pc 000000000001f168 /system/lib64/libc.so (__pthread_start(void*)+52)
#09 pc 000000000001b370 /system/lib64/libc.so (__start_thread+16)
它应该就是BpBinder向Binder设备发送消息的线程。


 252
252


 被折叠的 条评论
为什么被折叠?
被折叠的 条评论
为什么被折叠?
 到【灌水乐园】发言


