


步骤其实为host.layout()
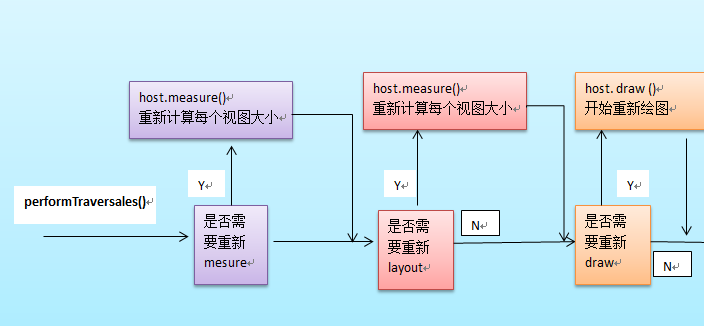
图来之http://blog.csdn.net/qinjuning/article/details/7110211中,仅供学习参考。
二、下面我从以下四方面流程分析按onMesarue-》onFinishInflate-》onLayout-》onDraw过程。
一:mesarue()过程
主要作用:为整个View树计算实际的大小,即设置实际的高(对应属性:mMeasuredHeight)和宽(对应属性:
mMeasureWidth),每个View的控件的实际宽高都是由父视图和本身视图决定的。
具体的调用链如下:
ViewRoot根对象地属性mView(其类型一般为ViewGroup类型)调用measure()方法去计算View树的大小,回调
View/ViewGroup对象的onMeasure()方法,该方法实现的功能如下:
1、设置本View视图的最终大小,该功能的实现通过调用setMeasuredDimension()方法去设置实际的高(对应属性:
mMeasuredHeight)和宽(对应属性:mMeasureWidth) ;
2 、如果该View对象是个ViewGroup类型,需要重写该onMeasure()方法,对其子视图进行遍历的measure()过程。
3、 对每个子视图的measure()过程,是通过调用父类ViewGroup.java类里的measureChildWithMargins()方法去
实现,该方法内部只是简单地调用了View对象的measure()方法。(由于measureChildWithMargins()方法只是一个过渡
层更简单的做法是直接调用View对象的measure()方法)。
1.1实例重写设置自身大小如下:
	@Override
	public void onMeasure(int widthMeasureSpec, int heightMeasureSpec) {
		super.onMeasure(widthMeasureSpec, heightMeasureSpec);
		final int widthMode = MeasureSpec.getMode(widthMeasureSpec);
		final int widthSize = MeasureSpec.getSize(widthMeasureSpec);
		final int heightMode = MeasureSpec.getMode(heightMeasureSpec);
		final int heightSize = MeasureSpec.getSize(高度值);//高度值你可以设根据实际开发传入
		setMeasuredDimension(widthSize, heightSize);
	}
二、 layout布局过程:
主要作用 :自身视图通过mesarue 设置了大小,而可以通过onLayout设置子视图位置。
具体的调用链如下:
host.layout()开始View树的布局,继而回调给View/ViewGroup类中的layout()方法。具体流程如下
1 、layout方法会设置该View视图位于父视图的坐标轴,即mLeft,mTop,mLeft,mBottom(调用setFrame()函数去实现)
接下来回调onLayout()方法(如果该View是ViewGroup对象,需要实现该方法,对每个子视图进行布局) ;
2、如果该View是个ViewGroup类型,需要遍历每个子视图chiildView,调用该子视图的layout()方法去设置它的坐标值。
2.1实例View子视图设置位置如下:
@Override
	protected void onLayout(boolean changed, int left, int top, int right,
			int bottom) {
		final View[] buttons = mButtons;
		final View parent = (View) getParent();// fill parent mode
		final int height = parent.getHeight();
		final int width = parent.getWidth();
		final int paddingLeft = 10;
	//	final int paddingLeft = mPaddingLeft;
		int buttonWidth;
		int buttonHeight;
		int widthInc;
		int heightInc;
		//mPaddingTop
		if (ROWS * mButtonHeight + (ROWS - 1) * 10< height) {
			//mPaddingLeft
			buttonWidth = (width - 10 * (COLUMNS - 1)) / COLUMNS;
			//mPaddingTop
			buttonHeight = (height - 10 * (ROWS - 1)) / ROWS;
			widthInc = width / COLUMNS;
			heightInc = height / ROWS;
			mWidth = width;
			mHeight = height;
		} else {
			buttonWidth = mButtonWidth;
			buttonHeight = mButtonHeight;
			widthInc = mWidthInc;
			heightInc = mHeightInc;
		}

		int i = 0;
		// The last row is bottom aligned.
		//int y = (bottom - top) - mHeight + mPaddingTop;
		int y = (bottom - top) - mHeight + 10;
		for (int row = 0; row < ROWS; row++) {
			int x = paddingLeft;
			for (int col = 0; col < COLUMNS && i < NUM_CHILDREN; col++) {
				View button = buttons[i];
				button.layout(x, y, x + buttonWidth, y + buttonHeight);
				/*
				 * if(button instanceof Button){ Button btn = (Button)button;
				 * int size = buttonHeight/6; btn.setTextSize(size > 32 ? 32 :
				 * size); btn.setGravity(Gravity.CENTER); }
				 */
				x += widthInc;
				i++;
			}
			y += heightInc;
		}
	}
三 onDraw绘画流程详解:
由ViewRoot对象的performTraversals()方法调用draw()方法发起绘制该View树,值得注意的是每次发起绘图时,并不
会重新绘制每个View树的视图,而只会重新绘制那些“需要重绘”的视图,View类内部变量包含了一个标志位DRAWN,当该
视图需要重绘时,就会为该View添加该标志位,draw方法可以去重新父类,实现绘画动作。
3.1实例View子视图设置位置如下:
	@Override
	protected void onDraw(Canvas cns) {
		// TODO Auto-generated method stub
		Drawable drawable = getDrawable();
		Log.i("ZYN", "--->onDraw");
		super.onDraw(cns);//调用系统用游标绘画

	}
四 onFinishInflate绘画流程详解:
在View绘画结束会回传View通过onFinishInflate通知,在实际开发中你可以在这里设置每个子View大小和数值。
4.1实例View子视图设置位置如下:
	@Override
	protected void onFinishInflate() {
		super.onFinishInflate();
		COLUMNS=3;
		if (mButtons == null) {
			NUM_CHILDREN = getChildCount();
			mButtons = new View[NUM_CHILDREN];
			//得到行数
			ROWS = NUM_CHILDREN / COLUMNS
					+ (NUM_CHILDREN % COLUMNS > 0 ? 1 : 0);
		}
		final View[] buttons = mButtons;
		for (int i = 0; i < NUM_CHILDREN; i++) {
			buttons[i] = getChildAt(i);
			// Measure the button to get initialized.
			buttons[i]
					.measure(MeasureSpec.UNSPECIFIED, MeasureSpec.UNSPECIFIED);
		}
		// Cache the measurements.
		final View child = buttons[0];
		mButtonWidth = child.getMeasuredWidth();
		mButtonHeight = child.getMeasuredHeight();
		mWidthInc = mButtonWidth + 10 + 10;
		mHeightInc = mButtonHeight + 10 + 10;
//		mWidthInc = mButtonWidth + mPaddingLeft + mPaddingRight;
//		mHeightInc = mButtonHeight + mPaddingTop + mPaddingBottom;
		mWidth = COLUMNS * mWidthInc;
		mHeight = ROWS * mHeightInc;
	}


 4万+
4万+


 被折叠的 条评论
为什么被折叠?
被折叠的 条评论
为什么被折叠?
 到【灌水乐园】发言


