


写在开头:本系列文章基于Adam Nathan的书《101 Windows Phone 7 Apps》,需要有一定的C#基础,对XAML语法和Silverlight的了解,以及对WP编程一个总体上的认识。
Windows Phone操作系统以其独特的,令人耳目一新的清新风格的界面正逐渐为广大消费者所接受,也慢慢得到开发者的认同,不管喜不喜欢微软,大多数人对诺基亚还是多少有点感情的,下面就让我们一起走进WP开发世界。
1.解构Windows Phone应用程序项目
一个默认的Windows Phone项目初始状况下其文件目录如下:
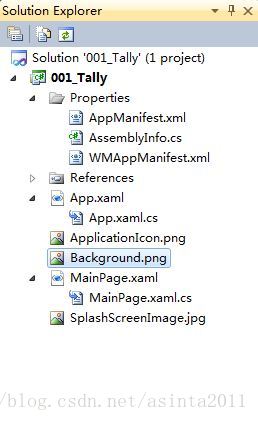
可以看到一个典型的WP项目基本包含这些内容:
1.1 应用程序配置WMAppManifest.xml和AppManifest.xml
1.1.1 WMAppManifest.xml
这个文件主要是向系统描述你的应用程序,其内容初始如下:
<?xml version="1.0" encoding="utf-8"?>
<Deployment xmlns="http://schemas.microsoft.com/windowsphone/2009/deployment" AppPlatformVersion="7.1">
  <App xmlns="" ProductID="{feb84070-d8e9-4354-a60c-57cb82007883}" Title="_001_Tally" RuntimeType="Silverlight" Version="1.0.0.0" Genre="apps.normal"  Author="_001_Tally author" Description="Sample description" Publisher="_001_Tally">
    <IconPath IsRelative="true" IsResource="false">ApplicationIcon.png</IconPath>
    <Capabilities>
      <Capability Name="ID_CAP_GAMERSERVICES"/>
      <Capability Name="ID_CAP_IDENTITY_DEVICE"/>
      <Capability Name="ID_CAP_IDENTITY_USER"/>
      <Capability Name="ID_CAP_LOCATION"/>
      <Capability Name="ID_CAP_MEDIALIB"/>
      <Capability Name="ID_CAP_MICROPHONE"/>
      <Capability Name="ID_CAP_NETWORKING"/>
      <Capability Name="ID_CAP_PHONEDIALER"/>
      <Capability Name="ID_CAP_PUSH_NOTIFICATION"/>
      <Capability Name="ID_CAP_SENSORS"/>
      <Capability Name="ID_CAP_WEBBROWSERCOMPONENT"/>
      <Capability Name="ID_CAP_ISV_CAMERA"/>
      <Capability Name="ID_CAP_CONTACTS"/>
      <Capability Name="ID_CAP_APPOINTMENTS"/>
    </Capabilities>
    <Tasks>
      <DefaultTask  Name ="_default" NavigationPage="MainPage.xaml"/>
    </Tasks>
    <Tokens>
      <PrimaryToken TokenID="_001_TallyToken" TaskName="_default">
        <TemplateType5>
          <BackgroundImageURI IsRelative="true" IsResource="false">Background.png</BackgroundImageURI>
          <Count>0</Count>
          <Title>_001_Tally</Title>
        </TemplateType5>
      </PrimaryToken>
    </Tokens>
  </App>
</Deployment>
比较重要的元素依次有:
App中包含了应用的ID号,应用标题,Silverlight项目/XNA项目,版本号,普通App/游戏App,作者,描述和出版方信息;
Capbilities中包含了该应用程序所需要具有的访问手机的权限,一般来说提交应用时应用商店是有工具来检测你的程序需要哪些权限,去掉不必要的权限要求(但是模拟器调试时一定要保留网络权限);
Tokens中对瓷贴名Title的声明。
1.1.2 AppManifest.xml
这个文件主要是为Silverlight项目必须的,一般来说不需要更改这个文件的内容:
<Deployment xmlns="http://schemas.microsoft.com/client/2007/deployment"
        xmlns:x="http://schemas.microsoft.com/winfx/2006/xaml">
    <Deployment.Parts>
    </Deployment.Parts>
</Deployment>
1.2 应用程序图标ApplicationIcon.png、Background.png和SplashScreenImage.jpg
这几种图标或图案的属性“生成动作”应该设置为“Content”。
1.2.1 ApplicationIcon.png
称为主图标,即在应用程序栏中安装后出现的图标;
设计标准是62*62像素大小,各边保留12像素的边距,所以实际可用的空间是38*38像素(游戏应用的标准为173*173,参见Background.png)。
1.2.2 Background.png
称为瓷贴图标,当用户将应用固定到开始界面时出现的图标;
设计标准是173*173像素大小,上边距47像素,下边距53像素,左右各50像素,这是为了为左下角的文字保留空间。
1.2.3 SplashScreenImage.jpg
应用启动画面,大小一定是480*800像素大小。
1.2.4 如何使图标适应系统主题?
主要要设置图标背景为透明,图案为完全的白色
1.3 主页面MainPage.xaml和主页面后台代码MainPage.xaml.cs
1.3.1 MainPage.xaml
第一部分:
<phone:PhoneApplicationPage
    x:Class="_001_Tally.MainPage"
    xmlns="http://schemas.microsoft.com/winfx/2006/xaml/presentation"
    xmlns:x="http://schemas.microsoft.com/winfx/2006/xaml"
    xmlns:phone="clr-namespace:Microsoft.Phone.Controls;assembly=Microsoft.Phone"
    xmlns:shell="clr-namespace:Microsoft.Phone.Shell;assembly=Microsoft.Phone"
    xmlns:d="http://schemas.microsoft.com/expression/blend/2008"
    xmlns:mc="http://schemas.openxmlformats.org/markup-compatibility/2006"
    mc:Ignorable="d" d:DesignWidth="480" d:DesignHeight="768"
    FontFamily="{StaticResource PhoneFontFamilyNormal}"
    FontSize="{StaticResource PhoneFontSizeNormal}"
    Foreground="{StaticResource PhoneForegroundBrush}"
    SupportedOrientations="Portrait" Orientation="Portrait"
shell:SystemTray.IsVisible="True">几个比较重要的风格分别是字体、字号和前景色,这里都使用了内置的静态资源,为了与系统主题切换相适应,避免了硬编码的缺陷。
然后是方向控制,现在的状态是仅支持竖直方向。
第二部分顺序分别定义了网格属性、标题面板属性(包括应用名称和页面标题)、内容面板属性和应用程序栏(被注释的)。
1.3.2 MainPage.xaml.cs
这里是主页面的逻辑处理文件。
1.4 应用程序页面App.xaml和应用程序后台代码App.xaml.cs
1.4.1 App.xaml
这个文件主要负责应用程序级的任务。
<Application
    x:Class="_001_Tally.App"
    xmlns="http://schemas.microsoft.com/winfx/2006/xaml/presentation"
    xmlns:x="http://schemas.microsoft.com/winfx/2006/xaml"
    xmlns:phone="clr-namespace:Microsoft.Phone.Controls;assembly=Microsoft.Phone"
    xmlns:shell="clr-namespace:Microsoft.Phone.Shell;assembly=Microsoft.Phone">

    <!--Application Resources-->
    <Application.Resources>
    </Application.Resources>

    <Application.ApplicationLifetimeObjects>
        <!--Required object that handles lifetime events for the application-->
        <shell:PhoneApplicationService
            Launching="Application_Launching" Closing="Application_Closing"
            Activated="Application_Activated" Deactivated="Application_Deactivated"/>
    </Application.ApplicationLifetimeObjects>

</Application>
此外就是在Resources中进行自定义资源和风格。
1.4.2 App.xaml.cs
这个文件中最重要的部分是应用程序生命周期的四个函数:
        private void Application_Launching(object sender, LaunchingEventArgs e)
        {
        }
        private void Application_Activated(object sender, ActivatedEventArgs e)
        {
        }
        private void Application_Deactivated(object sender, DeactivatedEventArgs e)
        {
        }
        private void Application_Closing(object sender, ClosingEventArgs e)
        {
        }
1.5 汇集信息AssembleInfo.cs
这个文件的内容不需要可以去设置,提交应用商店的时候会相应做出更改。
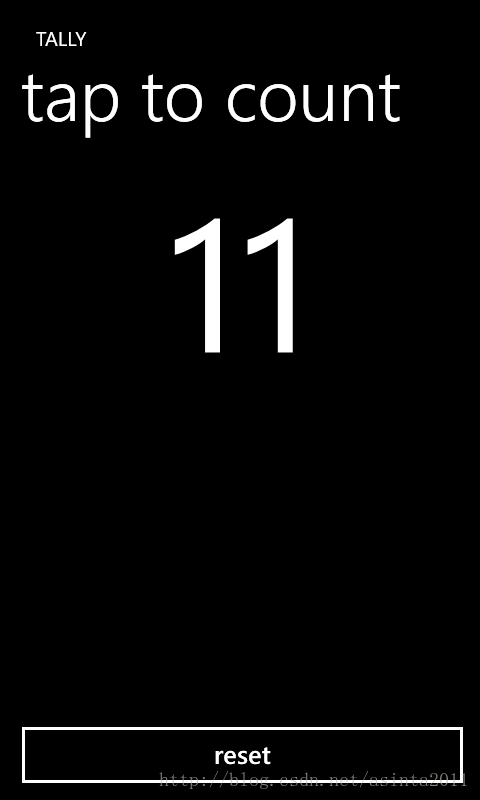
2.第一个练习:Tally
这个练习在于处理单击屏幕消息,独立存储设置的用法,基本的界面布局。
2.1 界面
    <Grid x:Name="LayoutRoot" Background="Transparent">
        <Grid.RowDefinitions>
            <RowDefinition Height="Auto"/>
            <RowDefinition Height="*"/>
            <RowDefinition Height="Auto" />
        </Grid.RowDefinitions>

        <!--Row 0  the header-->
        <StackPanel x:Name="TitlePanel" Grid.Row="0" Margin="24,24,0,12">
            <TextBlock x:Name="ApplicationTitle" Text="TALLY" Style="{StaticResource PhoneTextNormalStyle}"/>
            <TextBlock x:Name="PageTitle" Text="tap to count" Margin="-3,-8,0,0" Style="{StaticResource PhoneTextTitle1Style}"/>
        </StackPanel>
        <!--Row 1 the Content-->
        <TextBlock  x:Name="tallyCnt" Grid.Row="1" Text="0" TextAlignment="Center"/>
        <!--Row 2 the Button-->
        <Button  Grid.Row="2" Name="tallyBtn" Margin="10,10,5,5" Height="80" Content="reset" Click="tallyBtn_Click"/>
    </Grid>
2.2 后台代码
    public partial class MainPage : PhoneApplicationPage
    {
        // Constructor
        int count = 0;
        private IsolatedStorageSettings savedCount;

        public MainPage()
        {
            InitializeComponent();
            savedCount =  IsolatedStorageSettings.ApplicationSettings;
        }

        private void tallyBtn_Click(object sender, RoutedEventArgs e)
        {
            this.count = 0;
            this.tallyCnt.Text = this.count.ToString("N0");
        }

        protected override void OnMouseLeftButtonDown(MouseButtonEventArgs e)
        {
            base.OnMouseLeftButtonDown(e);
            this.count++;
            this.tallyCnt.Text = this.count.ToString("N0");
        }

        protected override void OnNavigatedFrom(System.Windows.Navigation.NavigationEventArgs e)
        {
            base.OnNavigatedFrom(e);
            //Save the count
            if (savedCount.Contains("SavedCount"))
            {
                savedCount["SavedCount"] = (object)this.count;
            }
            else
            {
                savedCount.Add("SavedCount", (object)this.count);
            }
            savedCount.Save();
        }

        protected override void OnNavigatedTo(System.Windows.Navigation.NavigationEventArgs e)
        {
            base.OnNavigatedTo(e);
            //Rertieve the count
            if (savedCount.Contains("SavedCount"))
            {
                this.count = (int)savedCount["SavedCount"];
            }
            else
            {
                savedCount.Add("SavedCount", (object)this.count);
            }
            this.tallyCnt.Text = this.count.ToString("N0");
        }
    }
其实使用数据绑定技术更为简单和安全,但是目前我们就这么做吧。
2.2.1 独立存储设置IsolatedStorageSettings
首先引进命名空间:
using System.IO.IsolatedStorage;private IsolatedStorageSettings savedCount;
savedCount = IsolatedStorageSettings.ApplicationSettings;
之后就可以对savedCount进行保存和读取操作了,这是基于键值对的模式进行访问的。
保存:
savedCount.Save();2.2.2 截图


 2万+
2万+


 被折叠的 条评论
为什么被折叠?
被折叠的 条评论
为什么被折叠?
 到【灌水乐园】发言


