


以输入号码归属地为例,当输入正确的时候没有反应,当输入的号码归属地为空的时候号码框会抖动
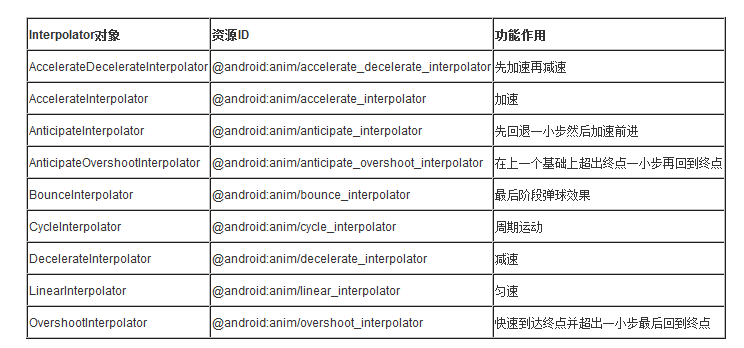
插补器:interpolator(循环插补器cycleInterpolator)Interpolator可以限定一个动画的变化率。 这样的话,可以对基本的动画效果(比如透明、缩放、位移、旋转)进行加速、减速、重复等。文本框的抖动就是样式不断的重复,产生的效果。插补器主要有一下一些
实现文本框的抖动范例
res/anim目录下面分别放两个文件一个是shake.xml和一个cycle_7.xml的文件,前者是动画的效果,后面似乎引入的插补器
res/anim/shake.xml动画文件
<?xml version="1.0" encoding="utf-8"?>
<!--
     Copyright (C) 2007 The Android Open Source Project

     Licensed under the Apache License, Version 2.0 (the "License");
     you may not use this file except in compliance with the License.
     You may obtain a copy of the License at

          http://www.apache.org/licenses/LICENSE-2.0

     Unless required by applicable law or agreed to in writing, software
     distributed under the License is distributed on an "AS IS" BASIS,
     WITHOUT WARRANTIES OR CONDITIONS OF ANY KIND, either express or implied.
     See the License for the specific language governing permissions and
     limitations under the License.
-->

<translate xmlns:android="http://schemas.android.com/apk/res/android"
    android:duration="1000"
    android:fromXDelta="0"
    android:interpolator="@anim/cycle_7"
    android:toXDelta="10" />
res/anim/cycle_7.xml插补器
<?xml version="1.0" encoding="utf-8"?>
<!-- Copyright (C) 2007 The Android Open Source Project

     Licensed under the Apache License, Version 2.0 (the "License");
     you may not use this file except in compliance with the License.
     You may obtain a copy of the License at

          http://www.apache.org/licenses/LICENSE-2.0

     Unless required by applicable law or agreed to in writing, software
     distributed under the License is distributed on an "AS IS" BASIS,
     WITHOUT WARRANTIES OR CONDITIONS OF ANY KIND, either express or implied.
     See the License for the specific language governing permissions anda
     limitations under the License.
-->

<cycleInterpolator xmlns:android="http://schemas.android.com/apk/res/android" android:cycles="7" />
逻辑代码
package com.ldw.safe.Activity;

import android.app.Activity;
import android.os.Bundle;
import android.text.Editable;
import android.text.TextUtils;
import android.text.TextWatcher;
import android.view.View;
import android.view.animation.Animation;
import android.view.animation.AnimationUtils;
import android.widget.EditText;
import android.widget.TextView;

import com.ldw.safe.R;
import com.ldw.safe.db.dao.AddressDao;

/*
 * 归属地穿页面
 */
public class AddressActivity extends Activity {

	private EditText etNumber;
	private TextView tvResult;
	@Override
    protected void onCreate(Bundle savedInstanceState) {
        super.onCreate(savedInstanceState);
        setContentView(R.layout.activity_address);

        etNumber = (EditText) findViewById(R.id.et_number);
        tvResult = (TextView) findViewById(R.id.tv_result);

        //监听EditText的实时变化,输入数字,edit会发生变化
        etNumber.addTextChangedListener(new TextWatcher(){

        	//发生变化前的回调函数
			@Override
			public void beforeTextChanged(CharSequence s, int start, int count,
					int after) {
				// TODO Auto-generated method stub

			}

			//发生变化的回调函数
			@Override
			public void onTextChanged(CharSequence s, int start, int before,
					int count) {
				//监听文本的实时变化
				String address = AddressDao.getAddress(s.toString());
				tvResult.setText(address);

			}

			//发生变化以后的回调函数
			@Override
			public void afterTextChanged(Editable s) {
				// TODO Auto-generated method stub

			}

        });
	}

	/*
	 * 开始查询
	 */
	public void query(View v){
		String number = etNumber.getText().toString().trim();
		if(!TextUtils.isEmpty(number)){
			String address = AddressDao.getAddress(number);
			tvResult.setText(address);
		}else{
			//没有填东西的时候会震动,使用插补器实现
			Animation shake = AnimationUtils.loadAnimation(this, R.anim.shake);
			etNumber.startAnimation(shake);
		}
	}


}


 1329
1329


 被折叠的 条评论
为什么被折叠?
被折叠的 条评论
为什么被折叠?
 到【灌水乐园】发言


