关于Android布局中 android:layout_centerHorizontal,android:layout_centerVertical的用法


今天在看网上的大神写的新浪微博客户端的页面代码时,在一个relativelayout里面看见了


 android:layout_centerVertical="true" 这一段


于是乎这段代码所起的作用让我产生了兴趣,关注的焦点就是:这段代码所作用的结果。
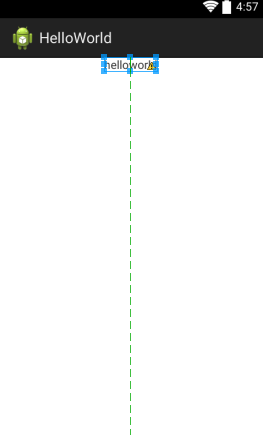
当时我在看eclipse开发工机的xml的视图页面的时候,发现有了这句话之后,相应的RelativeLayout中间出现了一条绿线,我的直观感受就是这句话应该是作用于这个RelativeLayout中的控件的。
但是本着科学的态度,我又查了查,发现网上的资料很少,最后我使出了杀手锏:自己实践!
结果出乎我的意料:
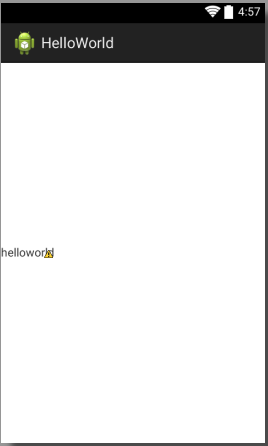
其实这句话的作用是:让这个相对布局,处于它父控件的垂直方向的中心。并不是指定自己内部控件处于垂直方向的中心
之前看了一个大神些的文章:http://blog.csdn.net/softkexin/article/details/5933589 
这篇文章的就是讲RelativeLayout中的一些属性的作用的
最后又三句:”
android:layout_centerInParent="true"  --将控件置于父控件的中心位置
android:layout_centerHorizontal="true"  --将控件置于水平方向的中心位置
android:layout_centerVertical="true"  --将控件置于垂直方向的中心位置

这三句的后面两个的说明应该改为:
android:layout_centerHorizontal="true"  --将控件置于父控件水平方向的中心位置
android:layout_centerVertical="true"  --将控件置于父控件垂直方向的中心位置
下面这是android:layout_centerVertical="true"效果截图:


对应的代码:
<?xml version="1.0" encoding="utf-8"?>
<RelativeLayout xmlns:android="http://schemas.android.com/apk/res/android"
    android:layout_width="match_parent"
    android:layout_height="match_parent"
    android:orientation="vertical" >


    <RelativeLayout
        android:layout_width="wrap_content"
        android:layout_height="wrap_content"
        android:layout_centerVertical="true" >


        <TextView
            android:layout_width="wrap_content"
            android:layout_height="wrap_content"
            android:text="helloworld" />
    </RelativeLayout>


</RelativeLayout>


下面这是android:layout_centerHorizontal="true"效果截图:


对应的代码:
<?xml version="1.0" encoding="utf-8"?>
<RelativeLayout xmlns:android="http://schemas.android.com/apk/res/android"
    android:layout_width="match_parent"
    android:layout_height="match_parent"
    android:orientation="vertical" >


    <RelativeLayout
        android:layout_width="wrap_content"
        android:layout_height="wrap_content"
        android:layout_centerHorizontal="true" >


        <TextView
            android:layout_width="wrap_content"
            android:layout_height="wrap_content"
            android:text="helloworld" />
    </RelativeLayout>


</RelativeLayout>


至于android:layout_centerInParent="true",这个属性其实就相当于把上面两个属性综合了一下,跟同时指定前两个为true是相同的效果。
还有一点需要补充:这些属性,只有在父控件为RelativeLayout时才会出现,也就是说,父控件是相对布局的时候子控件就会有这三个属性,
不管子控件是什么布局也好,什么TextView,Button也好,都会有这些属性。
而这时作为父控件的RelativeLayout本身,是不具有这些属性的。也就是说,一旦一个控件可以指定这三个属性,那么它应该就是某个RelativeLayout的子控件。当然,这只是我目前得出的结论,到底正确与否还不是很清楚,但是这都是目前我基于实践得出来的结论,至少在当前,可以作为参考。


    最后谈一点自己的感想:
            学习这个东西,真的是要多思考,这样才能触类旁通,还要有钻研的精神,实事求是的态度,我之所以会对这个属性的显示结果感到好奇,也有很大一部分原因,在于我不久前研究了android:gravity与android:layout_gravity的区别,gravity是作用于这个控件的子控件的;而layout_gravity则是作用于使用这个属性的控件本身的,它是指定让自己处于父控件的什么位置上(靠左,靠右,居中);当我看见android:layout_centerVertical=true这个属性出现在的控件是一个RelativeLayout中时,我的第一反应就是这个属性是作用在子控件上的,然后我又去视图编辑器里面看,发现有了这个属性相对布局本身中间多了一条绿色的横线。就主观来推测的话,至少我是认为,这个横线说明这个布局里面的控件排列遵循这条横线。这样就得出了有了这个属性,布局内部控件要在竖直方向上居中的结论,但是我想到:layout_gravity不是作用于子控件的,而是作用于自身的,指定自身相对于父控件的位置,这样的话,让我直接联想到的就是:带有"layout_"这样的属性,应该都是作用于自身才对,有的朋友可能要问了:为什么要作用于自身?
其实我想到的原因很简单,google的设计人员,跟我们一样,也喜欢简单易用的原则,那么如果带有"layout_"这样名字的属性,既有作用于子控件的,又有作用于自身的,那样的话,使用起来感觉很混乱,而且也不方便编程人员的记忆,从这个角度讲android布局本身的易用性也会打折扣,作为全世界最优秀的软件设计人员,不可能犯这么二的错误吧~
      所以我就抱着试试看的态度,进行了这两个属性的试验,结果果然跟自己的第一印象不同。也验证了我的另一个推测:带有"layout_"字样的属性,一般情况下都是作用于自身的。
    总结一下我一开始的话,学习这个东西真的要多思考(比如知道了android:gravity与android:layout_gravity的作用范围区别之后,看到带有"layout_"字样的属性的时候就要注意,与不带"layout_"的同名属性之间的区别是不是跟gravity的情况类似),还要有钻研精神(比如在网上找了很多的资料,但是没有一个讲的特别清楚的情况下,要做好自己调查的思想准备,因为这样才能真正掌握),实事求是的态度(比如我在这个例子中的表现,一开始就先入为主的感觉作用范围是什么,这样的推测的方式不能说不好,因为很多时候我们的推测也都是有依据的,很多时候也会做出正确的推测,但是之后要有一个实事求是的态度去看待,不能自己推测之后就主观臆断,不能怕麻烦,怕动手浪费时间,其实自己去求真的结果很可能是你的做法不仅没有浪费时间,而且还为以后节省了很多的时间)。
   好了,废话一大堆,希望这篇文章可以帮到一些也遇到同样问题的朋友~谢谢~~^o^


  • 1
    点赞
  • 3
    收藏
    觉得还不错? 一键收藏
  • 0
    评论
AbsoluteLayout, RelativeLayout) res/layout/main.xml 代码 <?xml version="1.0" encoding="utf-8"?> <!-- layout_width - 宽。fill_parent: 宽度跟着父元素走;wrap_content: 宽度跟着本身的内容走;直接指定一个 px 值来设置宽 layout_height - 高。fill_parent: 高度跟着父元素走;wrap_content: 高度跟着本身的内容走;直接指定一个 px 值来设置高 --> <!-- LinearLayout - 线形布局。 orientation - 容器内元素的排列方式。vertical: 子元素们垂直排列;horizontal: 子元素们水平排列 gravity - 内容的排列形式。常用的有 top, bottom, left, right, center 等,详见文档 --> <LinearLayout xmlns:android="http://schemas.android.com/apk/res/android" android:orientation="vertical" android:gravity="right" android:layout_width="fill_parent" android:layout_height="fill_parent"> <!-- FrameLayout - 层叠式布局。以左上角为起点,将 FrameLayout 内的元素一层覆盖一层地显示 --> <FrameLayout android:layout_height="wrap_content" android:layout_width="fill_parent"> <TextView android:layout_width="wrap_content" android:layout_height="wrap_content" android:text="FrameLayout"> </TextView> <TextView android:layout_width="wrap_content" android:layout_height="wrap_content" android:text="Frame Layout"> </TextView> </FrameLayout> <TextView android:layout_width="wrap_content" android:layout_height="wrap_content" android:text="@string/hello" /> <!-- TableLayout - 表格式布局。 TableRow - 表格内的行,行内每一个元素算作一列 collapseColumns - 设置 TableLayout 内的 TableRow 需要隐藏的列的列索引,多个用“,”隔开 stretchColumns - 设置 TableLayout 内的 TableRow 需要拉伸(该列会拉伸到所有可用空间)的列的列索引,多个用“,”隔开 shrinkColumns - 设置 TableLayout 内的 TableRow 需要收缩(为了使其他列不会被挤到屏幕外,此列会自动收缩)的列的列索引,多个用“,”隔开 --> <TableLayout android:id="@+id/TableLayout01" android:layout_width="fill_parent" android:layout_height="wrap_content" android:collapseColumns="1"> <TableRow android:id="@+id/TableRow01" android:layout_width="fill_parent" android:layout_height="wrap_content"> <TextView android:layout_width="wrap_content" android:layout_weight="1" android:layout_height="wrap_content" android:text="行1列1" /> <TextView android:layout_width="wrap_content" android:layout_weight="1" android:layout_height="wrap_content" android:text="行1列2" /> <TextView android:layout_width="wrap_content" android:layout_weight="1" android:layout_height="wrap_content" android:text="行1列3" /> </TableRow> <TableRow android:id="@+id/TableRow01" android:layout_width="wrap_content" android:layout_height="wrap_content"> <TextView android:layout_width="wrap_content" android:layout_height="wrap_content" android:text="行2列1" /> </TableRow> </TableLayout> <!-- AbsoluteLayout - 绝对定位布局layout_x - x 坐标。以左上角为顶点 layout_y - y 坐标。以左上角为顶点 --> <AbsoluteLayout android:layout_height="wrap_content" android:layout_width="fill_parent"> <TextView android:layout_width="wrap_content" android:layout_height="wrap_content" android:text="AbsoluteLayout" android:layout_x="100px" android:layout_y="100px" /> </AbsoluteLayout> <!-- RelativeLayout - 相对定位布局layout_centerInParent - 将当前元素放置到其容器内的水平方向和垂直方向的央位置(类似的属性有 :layout_centerHorizontal, layout_alignParentLeft 等) layout_marginLeft - 设置当前元素相对于其容器的左侧边缘的距离 layout_below - 放置当前元素到指定的元素的下面 layout_alignRight - 当前元素与指定的元素右对齐 --> <RelativeLayout android:id="@+id/RelativeLayout01" android:layout_width="fill_parent" android:layout_height="fill_parent"> <TextView android:layout_width="wrap_content" android:id="@+id/abc" android:layout_height="wrap_content" android:text="centerInParent=true" android:layout_centerInParent="true" /> <TextView android:layout_width="wrap_content" android:layout_height="wrap_content" android:text="marginLeft=20px" android:layout_marginLeft="20px" /> <TextView android:layout_width="wrap_content" android:layout_height="wrap_content" android:text="xxx" android:layout_below="@id/abc" android:layout_alignRight="@id/abc" /> </RelativeLayout> </LinearLayout> res/values/strings.xml <?xml version="1.0" encoding="utf-8"?> <resources> <string name="hello">Hello Layout</string> <string name="app_name">webabcd_layout</string> </resources> Main.java 代码 package com.webabcd.layout; import android.app.Activity; import android.os.Bundle; public class Main extends Activity { /** Called when the activity is first created. */ @Override public void onCreate(Bundle savedInstanceState) { super.onCreate(savedInstanceState); setContentView(R.layout.main); } }
这段代码定义了一个垂直排列的LinearLayout,其包含一个RelativeLayout作为顶部栏,里面包括一个居显示的TextView和一个右侧对齐的ImageView。 具体解释如下: - LinearLayout:定义了一个垂直排列的布局。 - android:orientation="vertical":设置LinearLayout的方向为垂直。 - android:layout_width="match_parent":设置LinearLayout的宽度为match_parent,即与父容器宽度相同。 - android:layout_height="match_parent":设置LinearLayout的高度为match_parent,即与父容器高度相同。 - RelativeLayout:定义了一个相对布局。 - android:layout_width="wrap_content":设置RelativeLayout的宽度为包裹内容。 - android:layout_height="48dp":设置RelativeLayout的高度为48dp。 - android:background="@android:color/holo_red_light":设置RelativeLayout的背景颜色为淡红色。 - TextView:定义了一个文本视图。 - android:layout_width="wrap_content":设置TextView的宽度为包裹内容。 - android:layout_height="wrap_content":设置TextView的高度为包裹内容。 - android:text="商品详情":设置TextView的文本内容为“商品详情”。 - android:textSize="24sp":设置TextView的文本大小为24sp。 - android:layout_centerVertical="true":设置TextView在垂直方向上居对齐。 - android:layout_centerHorizontal="true":设置TextView在水平方向上居对齐。 - ImageView:定义了一个图像视图。 - android:id="@+id/iv_me":为ImageView设置一个唯一的标识符,以便在代码引用。 - android:layout_width="wrap_content":设置ImageView的宽度为包裹内容。 - android:layout_height="wrap_content":设置ImageView的高度为包裹内容。 - android:src="@mipmap/icon_shopping_car":设置ImageView的图像源为指定的图片资源。 - android:layout_alignParentRight="true":设置ImageView在父容器的右侧对齐。 - android:layout_centerVertical="true":设置ImageView在垂直方向上居对齐。 - android:padding="12dp":设置ImageView的内边距为12dp。

“相关推荐”对你有帮助么?

  • 非常没帮助
  • 没帮助
  • 一般
  • 有帮助
  • 非常有帮助
提交
评论
添加红包

请填写红包祝福语或标题

红包个数最小为10个

红包金额最低5元

当前余额3.43前往充值 >
需支付:10.00
成就一亿技术人!
领取后你会自动成为博主和红包主的粉丝 规则
hope_wisdom
发出的红包
实付
使用余额支付
点击重新获取
扫码支付
钱包余额 0

抵扣说明:

1.余额是钱包充值的虚拟货币,按照1:1的比例进行支付金额的抵扣。
2.余额无法直接购买下载,可以购买VIP、付费专栏及课程。

余额充值