


网络编程
1. 请求网络图片
网络交互就是基于HTTP协议请求和响应的过程。XMPP协议用于即时通讯。
示例:res\layout\activity_main.xml
<RelativeLayout xmlns:android="http://schemas.android.com/apk/res/android"
    xmlns:tools="http://schemas.android.com/tools"
    android:layout_width="match_parent"
    android:layout_height="match_parent"
    tools:context=".MainActivity" >

    <Button
        android:layout_width="wrap_content"
        android:layout_height="wrap_content"
        android:text="请求图片"
        android:onClick="click"/>

    <ImageView
        android:id="@+id/iv"
        android:layout_width="wrap_content"
        android:layout_height="wrap_content"
        android:layout_centerInParent="true"
        />

</RelativeLayout>
src/cn.itcast.imageviewer/MainActivity.java
package cn.itcast.imageviewer;
import java.io.InputStream;
import java.net.HttpURLConnection;
import java.net.URL;
import android.app.Activity;
import android.graphics.Bitmap;
import android.graphics.BitmapFactory;
import android.os.Bundle;
import android.view.View;
import android.widget.ImageView;
import android.widget.Toast;
public class MainActivity extends Activity {
@Override
protected void onCreate(Bundle savedInstanceState) {
super.onCreate(savedInstanceState);
setContentView(R.layout.activity_main);
}
public void click(View v){
//向服务器发送Http请求去请求图片
String path = "http://192.168.1.100:8080/sh.jpg";
try{
//1. 把网址封装成url对象
URL url = new URL(path);
//2. 打开一个连接对象
HttpURLConnection conn = (HttpURLConnection) url.openConnection();
//3. 给连接对象做设置
conn.setRequestMethod("GET");
conn.setConnectTimeout(8000);
conn.setReadTimeout(8000);
//4. 发送请求,建立连接
conn.connect();
//5. 获取响应码,如果为200开头,说明请求成功
if(conn.getResponseCode() == 200){
//获取服务器的流,服务器返回的数据是通过流写给客户端的,也就是说,流里就是请求的图片
InputStream is = conn.getInputStream();
//读取流里的数据,把数据构造成一个图片对象
Bitmap bm = BitmapFactory.decodeStream(is);
//把图片显示至屏幕
ImageView iv = (ImageView) findViewById(R.id.iv);
iv.setImageBitmap(bm);
}else{
Toast.makeText(this, "请求失败啦啦啦", 0).show();
}
}catch(Exception e){
e.printStackTrace();
}
}
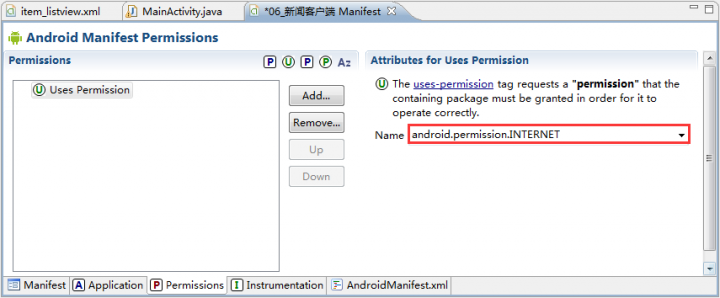
}添加权限:
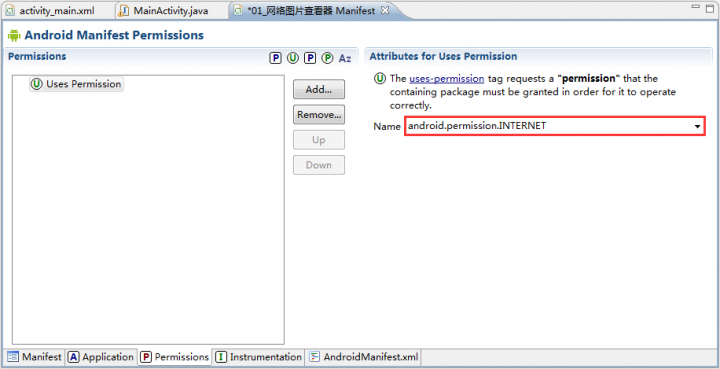
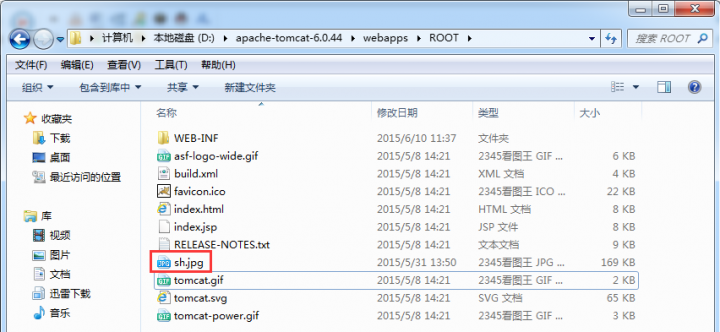
在Tomcat服务器webapps\ROOT存放图片:
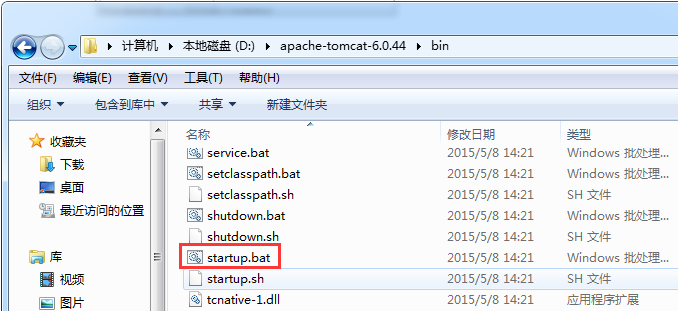
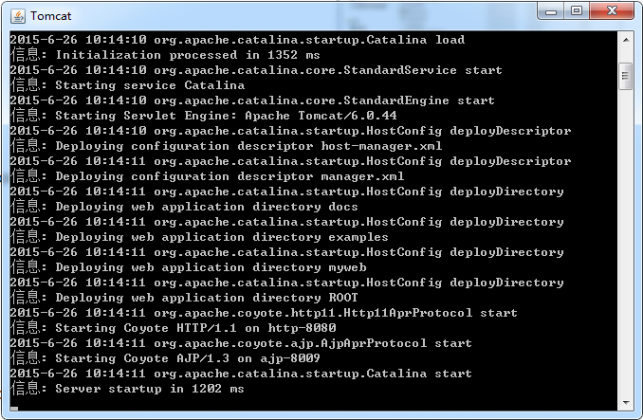
运行结果:双击start.bat,启动tomcat。
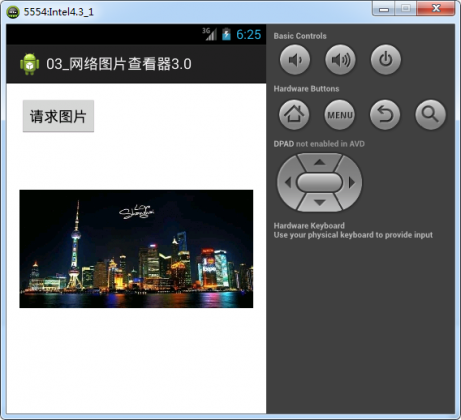
启动2.3.3版本模拟器,图片显示成功:

Handler机制让子线程刷新UI,如果上面的示例运行在4.3版本的模拟器上,就会报警告:

在Android中,主线程是绝对不能阻塞的。因为,网络请求是耗时操作,主线程处于阻塞状态,用户任何操作都无效,处于类似于死机的状态。此时,点击HOME键有效,点击返回键、菜单键都没有反应。因为,返回键和菜单键是由当前应用程序自行处理,HOME键是由系统处理。应用程序可以阻塞自己的主线程,不可能阻塞Android系统。
为了保证用户体验良好,所有的耗时操作都不要写在主线程里,包括:请求网络、加载数据(数据库)和资源。
ANR:Application Not Responding,应用长时间不能响应用户操作。
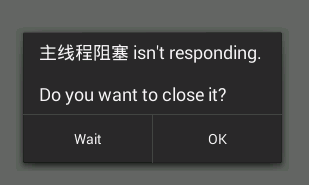

查看出现ANR的原因,导出data/anr/traces.txt文件,打开。

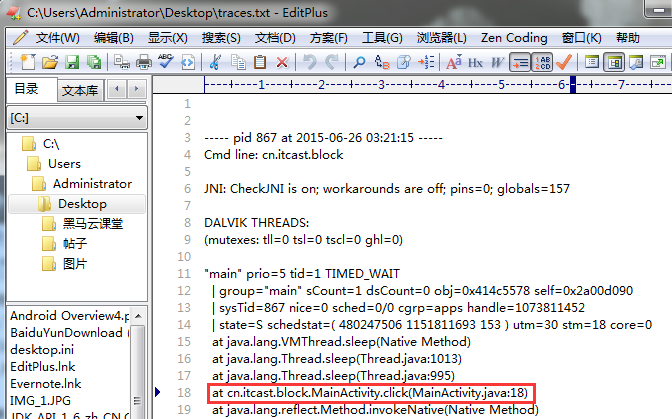
ANR无法调试,解决方法就是在主线程中不要做耗时操作。
只有主线程可以刷新UI,主线程又称UI线程。这样做,是为了线程安全,只有一个线程可以刷新UI,如果有多个线程同时刷新UI,就可能出现线程安全导致UI刷新混乱的问题。
如果我们在MainActivity.java中启动一个线程进行网络请求,再次执行该应用程序就会报警告,如下:
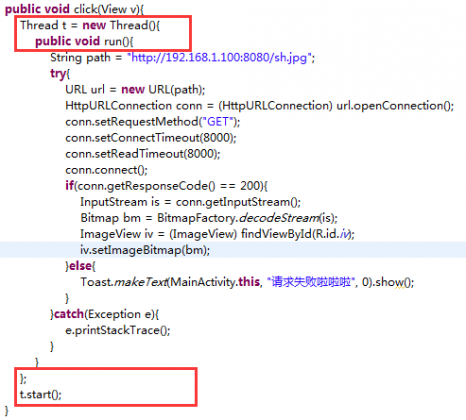
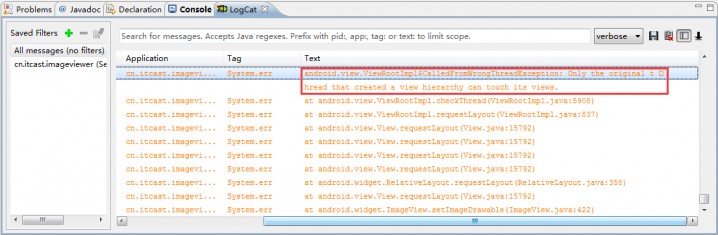
通过异常可以看出来,刷新UI的代码必须在主线程中执行,但是请求图片的代码又由于不能引起阻塞,只能在子线程中执行,而且只有请求完图片之后才能刷新UI,这时候就形成了矛盾。Android里面提供了一种机制能够解决这个问题,也就是Handler机制。
2. Handler机制
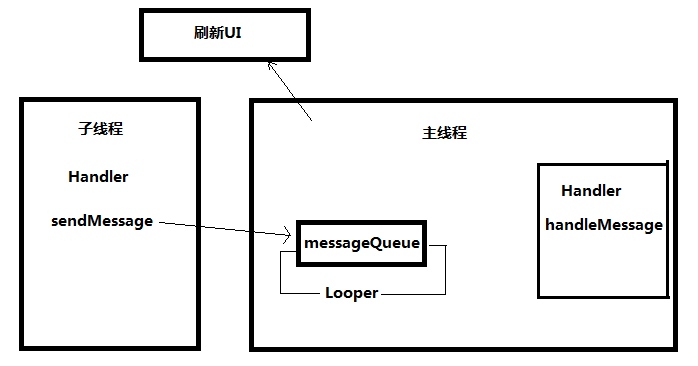
主线程创建的时候,主线程中有一个消息队列MessageQueue,用来存放消息。还有一个Looper用来不断检测MessageQueue是否有消息。如果有消息就交给消息处理器Handler,Handler中有一个方法handleMessage,用来处理消息,这个方法是在主线程调用。那么,这个方法就可以刷新UI。如此,子线程想要刷新UI,只需调用Handler的sendMessag方法,将消息发送到MessageQueue即可。
示例:src/cn.itcast.imageviewer2/MainActivity.java
package cn.itcast.imageviewer2;

import java.io.InputStream;
import java.net.HttpURLConnection;
import java.net.URL;

import android.app.Activity;
import android.graphics.Bitmap;
import android.graphics.BitmapFactory;
import android.os.Bundle;
import android.os.Handler;
import android.os.Message;
import android.view.View;
import android.widget.ImageView;
import android.widget.Toast;

public class MainActivity extends Activity {

        Handler handler = new Handler(){
                //程序员需要重写handlerMessage方法,刷新UI
                @Override
                public void handleMessage(Message msg) {
                        switch(msg.what){
                        case 1:
                                //判断消息是成功消息还是失败消息
                                ImageView iv = (ImageView) findViewById(R.id.iv);
                                iv.setImageBitmap((Bitmap)msg.obj);
                                break;
                        case 2:
                                Toast.makeText(MainActivity.this, "请求失败啦啦啦", 0).show();
                                break;
                        }
                }
        };

        @Override
        protected void onCreate(Bundle savedInstanceState) {
                super.onCreate(savedInstanceState);
                setContentView(R.layout.activity_main);
        }

        public void click(View v){
                Thread t = new Thread(){
                        public void run(){
                                String path = "http://192.168.1.100:8080/sh.jpg";
                                try{
                                        URL url = new URL(path);
                                        HttpURLConnection conn = (HttpURLConnection) url.openConnection();
                                        conn.setRequestMethod("GET");
                                        conn.setConnectTimeout(8000);
                                        conn.setReadTimeout(8000);
                                        conn.connect();
                                        if(conn.getResponseCode() == 200){
                                                InputStream is = conn.getInputStream();
                                                Bitmap bm = BitmapFactory.decodeStream(is);
                                                //创建消息对象
                                                Message msg = new Message();
                                                //消息对象可以携带数据
                                                msg.obj = bm;
                                                msg.what = 1;
                                                //发送消息至主线程的消息队列
                                                handler.sendMessage(msg);
                                        }else{
                                                Message msg = new Message();
                                                msg.what = 2;
                                                handler.sendMessage(msg);
                                                //由于Message没有携带任何数据,所以上面3句可以用下面1句替换。
                                                //handler.sendEmptyMessage(2);
                                        }
                                }catch(Exception e){
                                        e.printStackTrace();
                                }
                        }
                };
                t.start();
        }
}
运行结果:

添加缓存功能的图片查看器,为了提升效率,查看图片后,缓存起来,便于下次查看图片不必在通过网络请求。
代码:src/cn.itcast.imageviewer3/MainActivity.java
package cn.itcast.imageviewer3;
import java.io.File;
import java.io.FileOutputStream;
import java.io.InputStream;
import java.net.HttpURLConnection;
import java.net.URL;
import android.app.Activity;
import android.graphics.Bitmap;
import android.graphics.BitmapFactory;
import android.os.Bundle;
import android.os.Handler;
import android.os.Message;
import android.view.View;
import android.widget.ImageView;
import android.widget.Toast;
public class MainActivity extends Activity {
Handler handler = new Handler(){
@Override
public void handleMessage(Message msg) {
switch(msg.what){
case 1:
ImageView iv = (ImageView) findViewById(R.id.iv);
iv.setImageBitmap((Bitmap)msg.obj);
break;
case 2:
Toast.makeText(MainActivity.this, "请求失败啦啦啦", 0).show();
break;
}
}
};
@Override
protected void onCreate(Bundle savedInstanceState) {
super.onCreate(savedInstanceState);
setContentView(R.layout.activity_main);
}
public void click(View v){
final String path = "http://192.168.1.100:8080/sh.jpg";
final File file = new File(getCacheDir(),getFileName(path));
if(file.exists()){
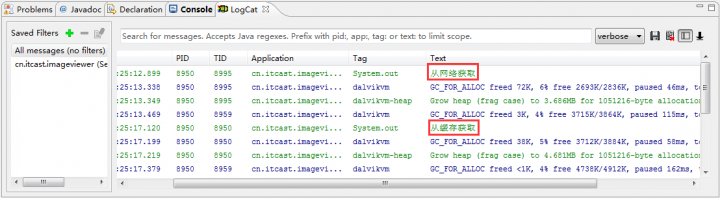
System.out.println("从缓存获取");
Bitmap bm = BitmapFactory.decodeFile(file.getAbsolutePath());
ImageView iv = (ImageView) findViewById(R.id.iv);
iv.setImageBitmap(bm);
}else{
Thread t = new Thread(){
public void run(){
try{
System.out.println("从网络获取");
URL url = new URL(path);
HttpURLConnection conn = (HttpURLConnection) url.openConnection();
conn.setRequestMethod("GET");
conn.setConnectTimeout(8000);
conn.setReadTimeout(8000);
conn.connect();
if(conn.getResponseCode() == 200){
InputStream is = conn.getInputStream();
//需要自己开启文件输出流,读取流里数据的同时,把数据写到本地
byte[] b = new byte[1024];
int len;
FileOutputStream fos = new FileOutputStream(file);
while((len = is.read(b)) != -1){
fos.write(b, 0, len);
}
fos.close();
//流里数据已经读取完毕,这行代码无法再构造图片了
//Bitmap bm = BitmapFactory.decodeStream(is);
Bitmap bm = BitmapFactory.decodeFile(file.getAbsolutePath());
Message msg = new Message();
msg.obj = bm;
msg.what = 1;
handler.sendMessage(msg);
}else{
Message msg = new Message();
msg.what = 2;
handler.sendMessage(msg);
}
}catch(Exception e){
e.printStackTrace();
}
}
};
t.start();
}
}
public String getFileName(String path){
int index = path.lastIndexOf("/");
return path.substring(index+1);
}
}运行结果:
第一次,从网络获取。第二次再次点击按钮,从缓存获取。
3. 获取开源代码
在程序开发中,会遇到很多问题。例如,请求图片过程中遇到断网,网速慢,图片过大内存不够等等情况。由于这些情况大部分项目都会遇到,所以网上有很多写好的现成的模块。不要重新发明轮子,可以直接拿来用。
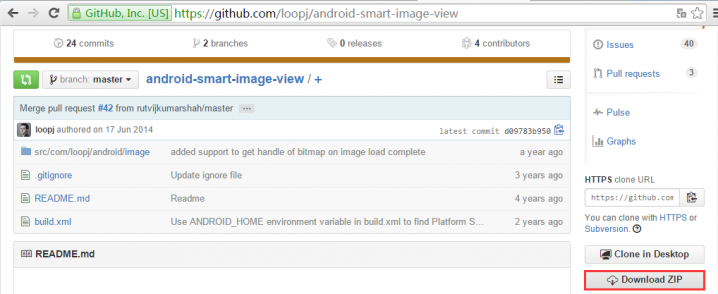
好的开源网站: http://code.google.com http://github.com
搜索,下载源码,解压,复制到我们自己的应用程序项目中。

res\layout\activity_main.xml
<RelativeLayout xmlns:android="http://schemas.android.com/apk/res/android"
xmlns:tools="http://schemas.android.com/tools"
android:layout_width="match_parent"
android:layout_height="match_parent"
tools:context=".MainActivity" >
<Button
android:layout_width="wrap_content"
android:layout_height="wrap_content"
android:text="请求网络图片"
android:onClick="click"
/>
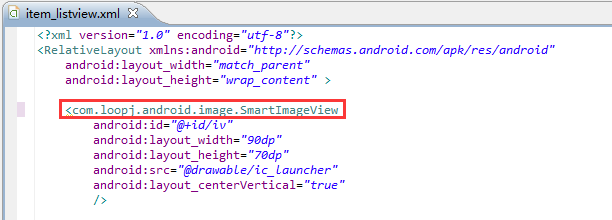
<com.loopj.android.image.SmartImageView
android:id="@+id/iv"
android:layout_width="wrap_content"
android:layout_height="wrap_content"
android:src="@drawable/ic_launcher"
android:layout_centerInParent="true"
/>
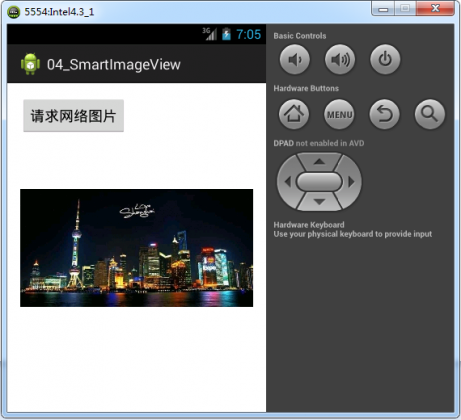
</RelativeLayout>SmartImageView是自定义控件,以后会有专门的课程讲解。
src/cn.itcast.smartimageview/MainActivity.java
package cn.itcast.smartimageview;

import android.app.Activity;
import android.os.Bundle;
import android.view.View;

import com.loopj.android.image.SmartImageView;

public class MainActivity extends Activity {

        @Override
        protected void onCreate(Bundle savedInstanceState) {
                super.onCreate(savedInstanceState);
                setContentView(R.layout.activity_main);
        }

    public void click(View v){
            String path = "http://192.168.1.100:8080/sh.jpg";

            SmartImageView iv = (SmartImageView) findViewById(R.id.iv);
            iv.setImageUrl(path);
    }
}
添加权限:
运行结果:
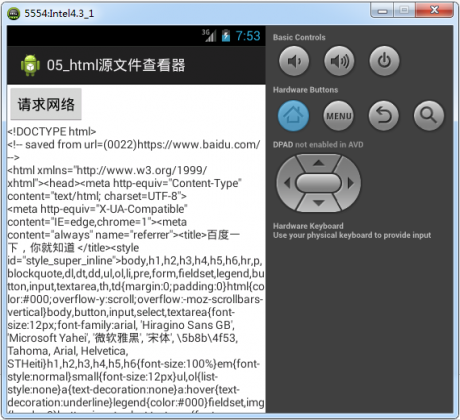
4. Html源文件查看器
代码:res\layout\activity_main.xml
<RelativeLayout xmlns:android="http://schemas.android.com/apk/res/android"
    xmlns:tools="http://schemas.android.com/tools"
    android:layout_width="match_parent"
    android:layout_height="match_parent"
    tools:context=".MainActivity" >

    <Button
        android:layout_width="wrap_content"
        android:layout_height="wrap_content"
        android:text="请求网络"
        android:onClick="click"/>

    <ScrollView
        android:layout_width="match_parent"
        android:layout_height="match_parent"
        >
            <TextView
                android:id="@+id/tv"
                android:layout_width="match_parent"
                android:layout_height="match_parent"
                />
    </ScrollView>
</RelativeLayout>
src/cn.itcast.htmlviewer.tool/Tools.java
package cn.itcast.htmlviewer.tool;
import java.io.ByteArrayOutputStream;
import java.io.IOException;
import java.io.InputStream;
public class Tools {
public static String getTextFromStream(InputStream is){
try{
byte[] b = new byte[1024];
int len;
ByteArrayOutputStream bos = new ByteArrayOutputStream();
while((len = is.read(b)) != -1){
bos.write(b,0,len);
}
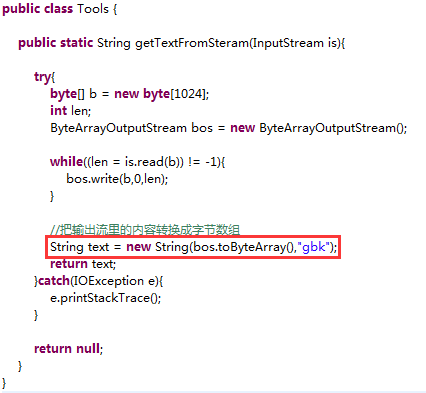
//把输出流里的内容转换成字节数组
String text = new String(bos.toByteArray());
return text;
}catch(IOException e){
e.printStackTrace();
}
return null;
}
}src/cn.itcast.htmlviewer/MainActivity.java
package cn.itcast.htmlviewer;

import java.io.InputStream;
import java.net.HttpURLConnection;
import java.net.URL;

import android.app.Activity;
import android.os.Bundle;
import android.os.Handler;
import android.os.Message;
import android.view.View;
import android.widget.TextView;
import cn.itcast.htmlviewer.tool.Tools;

public class MainActivity extends Activity {

        Handler handler = new Handler(){
                @Override
                public void handleMessage(Message msg) {
                        TextView tv = (TextView) findViewById(R.id.tv);
                        tv.setText((String)msg.obj);
                }
        };

        @Override
        protected void onCreate(Bundle savedInstanceState) {
                super.onCreate(savedInstanceState);
                setContentView(R.layout.activity_main);
        }

        public void click(View v){
                Thread t = new Thread(){
                        public void run(){
                                String path = "http://192.168.1.100:8080/baidu.html";
                                try{
                                        URL url = new URL(path);
                                        HttpURLConnection conn = (HttpURLConnection) url.openConnection();
                                        conn.setRequestMethod("GET");
                                        conn.setConnectTimeout(8000);
                                        conn.setReadTimeout(8000);

                                        //先发送请求,再获取响应码,getResponseCode方法自身会发送请求消息
                                        if(conn.getResponseCode() == 200){
                                                InputStream is = conn.getInputStream();
                                                String text = Tools.getTextFromStream(is);

                                                //如果消息池中没有消息,new一个,如果有,复用这条空闲消息
                                                Message msg = handler.obtainMessage();
                                                msg.obj = text;
                                                handler.sendMessage(msg);
                                        }
                                }catch(Exception e){
                                        e.printStackTrace();
                                }
                        }
                };
                t.start();
        }
}
添加权限:

运行结果:
如果html文件为gbk编码:
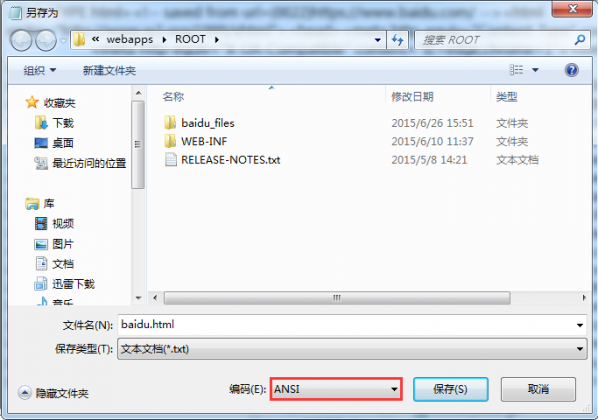
那么Tools.java中代码只要进行如下修改即可:
新闻客户端布局
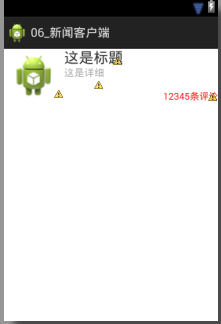
res\layout\item_listview.xml
<?xml version="1.0" encoding="utf-8"?>
<RelativeLayout xmlns:android="http://schemas.android.com/apk/res/android"
android:layout_width="match_parent"
android:layout_height="wrap_content" >
<ImageView
android:id="@+id/iv"
android:layout_width="90dp"
android:layout_height="70dp"
android:src="@drawable/ic_launcher"
android:layout_centerVertical="true"
/>
<!-- android:singleLine是为了让过长的标题不会导致换行,影响美观 -->
<TextView
android:id="@+id/tv_title"
android:layout_width="wrap_content"
android:layout_height="wrap_content"
android:textSize="22sp"
android:text="这是标题"
android:singleLine="true"
android:layout_toRightOf="@+id/iv"
/>
<!-- android:lines表示如果文本过长,最多显示几行 -->
<TextView
android:id="@+id/tv_detail"
android:layout_width="wrap_content"
android:layout_height="wrap_content"
android:textSize="15sp"
android:text="这是详细"
android:lines="2"
android:textColor="@android:color/darker_gray"
android:layout_toRightOf="@+id/iv"
android:layout_below="@id/tv_title"
/>
<TextView
android:id="@+id/tv_comment"
android:layout_width="wrap_content"
android:layout_height="wrap_content"
android:text="12345条评论"
android:textColor="#ff0000"
android:layout_alignParentRight="true"
android:layout_below="@id/tv_detail"
/>
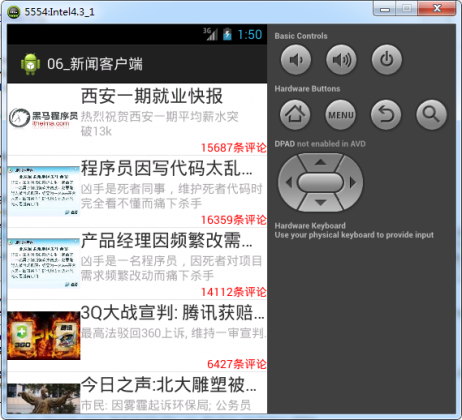
</RelativeLayout>效果:
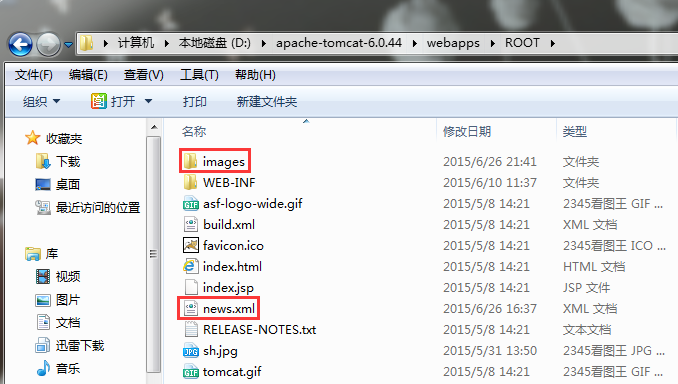
获取新闻信息,将news.xml和images文件夹存放在Tomcat服务器中。
News.xml
<?xml version="1.0" encoding="UTF-8" ?>
<newslist>
        <news>
                <title>西安一期就业快报</title>
                <detail>热烈祝贺西安一期平均薪水突破13k</detail>
                <comment>15687</comment>
                <image>http://192.168.1.100:8080/images/6.jpg</image>
        </news>
        <news>
                <title>程序员因写代码太乱被杀害</title>
                <detail>凶手是死者同事,维护死者代码时完全看不懂而痛下杀手</detail>
                <comment>16359</comment>
                <image>http://192.168.1.100:8080/images/7.jpg</image>
        </news>
        <news>
                <title>产品经理因频繁改需求被杀害</title>
                <detail>凶手是一名程序员,因死者对项目需求频繁改动而痛下杀手</detail>
                <comment>14112</comment>
                <image>http://192.168.1.100:8080/images/7.jpg</image>
        </news>
        <news>
                <title>3Q大战宣判: 腾讯获赔500万</title>
                <detail>最高法驳回360上诉, 维持一审宣判.</detail>
                <comment>6427</comment>
                <image>http://192.168.1.100:8080/images/1.jpg</image>
        </news>
        <news>
                <title>今日之声:北大雕塑被戴口罩</title>
                <detail>市民: 因雾霾起诉环保局; 公务员谈"紧日子": 坚决不出去.</detail>
                <comment>681</comment>
                <image>http://192.168.1.100:8080/images/2.jpg</image>
        </news>
        <news>
                <title>奥巴马见达赖是装蒜</title>
                <detail>外文局: 国际民众认可中国大国地位;法院: "流量清零"未侵权.</detail>
                <comment>1359</comment>
                <image>http://192.168.1.100:8080/images/3.jpg</image>
        </news>
        <news>
                <title>轻松一刻: 我要沉迷学习不自拔</title>
                <detail>放假时我醒了不代表我起床了, 如今我起床了不代表我醒了!</detail>
                <comment>11616</comment>
                <image>http://192.168.1.100:8080/images/4.jpg</image>
        </news>
        <news>
                <title>男女那些事儿</title>
                <detail>"妈, 我在东莞被抓, 要2万保释金, 快汇钱到xxx!"</detail>
                <comment>10339</comment>
                <image>http://192.168.1.100:8080/images/5.jpg</image>
        </news>
        <news>
                <title>赵帅哥语录一</title>
                <detail>少壮不努力,老大做IT</detail>
                <comment>14612</comment>
                <image>http://192.168.1.100:8080/images/8.jpg</image>
        </news>
        <news>
                <title>赵帅哥语录二</title>
                <detail>问君能有几多愁,恰似调完代码改需求</detail>
                <comment>13230</comment>
                <image>http://192.168.1.100:8080/images/8.jpg</image>
        </news>
        <news>
                <title>赵帅哥语录三</title>
                <detail>觉得我帅的人工资一般都比较高</detail>
                <comment>9928</comment>
                <image>http://192.168.1.100:8080/images/8.jpg</image>
        </news>
        <news>
                <title>今日之声:北大雕塑被戴口罩</title>
                <detail>市民: 因雾霾起诉环保局; 公务员谈"紧日子": 坚决不出去.</detail>
                <comment>681</comment>
                <image>http://192.168.1.100:8080/images/2.jpg</image>
        </news>
        <news>
                <title>奥巴马见达赖是装蒜</title>
                <detail>外文局: 国际民众认可中国大国地位;法院: "流量清零"未侵权.</detail>
                <comment>1359</comment>
                <image>http://192.168.1.100:8080/images/3.jpg</image>
        </news>
</newslist>
src/cn.itcast.news.domain/News.java
package cn.itcast.news.domain;

public class News {

        private String title;
        private String detail;
        private String comment;
        private String imageUrl;

        public String getTitle() {
                return title;
        }
        public void setTitle(String title) {
                this.title = title;
        }
        public String getDetail() {
                return detail;
        }
        public void setDetail(String detail) {
                this.detail = detail;
        }
        public String getComment() {
                return comment;
        }
        public void setComment(String comment) {
                this.comment = comment;
        }
        public String getImageUrl() {
                return imageUrl;
        }
        public void setImageUrl(String imageUrl) {
                this.imageUrl = imageUrl;
        }
}
src/cn.itcast.news/MainActivity.java
package cn.itcast.news;

import java.io.InputStream;
import java.net.HttpURLConnection;
import java.net.URL;
import java.util.ArrayList;
import java.util.List;

import org.xmlpull.v1.XmlPullParser;

import android.app.Activity;
import android.os.Bundle;
import android.util.Xml;
import cn.itcast.news.domain.News;

public class MainActivity extends Activity {

        List<News> newsList;

        @Override
        protected void onCreate(Bundle savedInstanceState) {
                super.onCreate(savedInstanceState);
                setContentView(R.layout.activity_main);

                getNewsInfo();
        }

        private void getNewsInfo(){
                Thread t = new Thread(){
                        public void run(){
                                String path = "http://192.168.1.100:8080/news.xml";
                                try{
                                        URL url = new URL(path);
                                        HttpURLConnection conn = (HttpURLConnection)url.openConnection();
                                        conn.setRequestMethod("GET");
                                        conn.setConnectTimeout(8000);
                                        conn.setReadTimeout(8000);

                                        if(conn.getResponseCode() == 200){
                                                //获取服务器返回的流,流里就是xml文件
                                                InputStream is = conn.getInputStream();
                                                parserNewsInfo(is);
                                        }
                                }catch(Exception e){
                                        e.printStackTrace();
                                }
                        }
                };
                t.start();
        }

        private void parserNewsInfo(InputStream is){
                XmlPullParser xp = Xml.newPullParser();
                try{
                        xp.setInput(is,"utf-8");
                        int type = xp.getEventType();
                        News news = null;
                        while(type != XmlPullParser.END_DOCUMENT){
                                switch(type){
                                        case XmlPullParser.START_TAG:
                                                if("newslist".equals(xp.getName())){
                                                        newsList = new ArrayList<News>();
                                                }else if("news".equals(xp.getName())){
                                                        news = new News();
                                                }else if("title".equals(xp.getName())){
                                                        String title = xp.nextText();
                                                        news.setTitle(title);
                                                }else if("detail".equals(xp.getName())){
                                                        String detail = xp.nextText();
                                                        news.setDetail(detail);
                                                }else if("comment".equals(xp.getName())){
                                                        String comment = xp.nextText();
                                                        news.setComment(comment);
                                                }else if("image".equals(xp.getName())){
                                                        String image = xp.nextText();
                                                        news.setImageUrl(image);
                                                }
                                                break;
                                        case XmlPullParser.END_TAG:
                                                if("news".equals(xp.getName())){
                                                        newsList.add(news);
                                                }
                                                break;
                                }
                                type = xp.next();
                        }
                }catch(Exception e){
                        e.printStackTrace();
                }
        }
}
把新闻信息显示至界面
修改res\layout\item_listview.xml中的ImageView标签为SmartImageView标签,便于显示图片。
src/cn.itcast.news/MainActivity.java
package cn.itcast.news;

import java.io.InputStream;
import java.net.HttpURLConnection;
import java.net.URL;
import java.util.ArrayList;
import java.util.List;
import org.xmlpull.v1.XmlPullParser;
import android.app.Activity;
import android.os.Bundle;
import android.os.Handler;
import android.os.Message;
import android.util.Xml;
import android.view.View;
import android.view.ViewGroup;
import android.widget.BaseAdapter;
import android.widget.ListView;
import android.widget.TextView;
import cn.itcast.news.domain.News;

import com.loopj.android.image.SmartImageView;

public class MainActivity extends Activity {

        List<News> newsList;
        Handler handler = new Handler(){
                @Override
                public void handleMessage(Message msg) {
                        ListView lv = (ListView)findViewById(R.id.lv);
                        lv.setAdapter(new MyAdapter());
                }
        };
        @Override
        protected void onCreate(Bundle savedInstanceState) {
                super.onCreate(savedInstanceState);
                setContentView(R.layout.activity_main);

                getNewsInfo();
                //由于getNewsInfo方法中是开启了一个子线程,与主线程并行。所以当listview显示内容时,newsList还没来得及创建,所以lv设置显示内容的代码不能运行在这里。要保证运行在xml解析完毕之后。
                //ListView lv = (ListView)findViewById(R.id.lv);
                //lv.setAdapter(new MyAdapter());
        }

        class MyAdapter extends BaseAdapter{

                @Override
                public int getCount() {
                        //之所以系统需要知道条目数量,是因为屏幕右侧的控制条显示基于此数据而定
                        return newsList.size();
                }

                @Override
                public Object getItem(int position) {
                        return null;
                }

                @Override
                public long getItemId(int position) {
                        return 0;
                }

                //视图保存器
                class ViewHolder{
                        TextView tv_title;
                        TextView tv_detail;
                        TextView tv_comment;
                        SmartImageView siv;
                }

                @Override
                public View getView(int position, View convertView, ViewGroup parent) {
                        View v = null;

                        ViewHolder vh = null;
                        News news = newsList.get(position);

                        if(convertView == null){
                                v = View.inflate(MainActivity.this, R.layout.item_listview, null);

                                vh = new ViewHolder();
                                //如果缓存为空,那么需要填充新的View对象,同时找到布局文件中的所有组件,并封装至ViewHolder对象中
                                vh.tv_title = (TextView)v.findViewById(R.id.tv_title);
                                vh.tv_detail = (TextView)v.findViewById(R.id.tv_detail);
                                vh.tv_comment = (TextView)v.findViewById(R.id.tv_comment);
                                vh.siv = (SmartImageView) v.findViewById(R.id.iv);

                                //把ViewHolder对象存入View对象中,缓存View对象,同时缓存了ViewHolder对象
                                v.setTag(vh);
                        }else{
                                v = convertView;
                                //从缓存中取出ViewHolder对象,这个对象中就封装了布局文件中所有的组件对象,那么就不需要再次findViewById了
                                vh = (ViewHolder)v.getTag();
                        }

                        vh.tv_title.setText(news.getTitle());
                        vh.tv_detail.setText(news.getDetail());
                        vh.tv_comment.setText(news.getComment() + "条评论");
                        vh.siv.setImageUrl(news.getImageUrl());

                        return v;
                }
        }

        private void getNewsInfo(){
                Thread t = new Thread(){
                        public void run(){
                                String path = "http://192.168.1.100:8080/news.xml";
                                try{
                                        URL url = new URL(path);
                                        HttpURLConnection conn = (HttpURLConnection)url.openConnection();
                                        conn.setRequestMethod("GET");
                                        conn.setConnectTimeout(8000);
                                        conn.setReadTimeout(8000);

                                        if(conn.getResponseCode() == 200){
                                                InputStream is = conn.getInputStream();
                                                parserNewsInfo(is);
                                        }
                                }catch(Exception e){
                                        e.printStackTrace();
                                }
                        }
                };
                t.start();
        }

        private void parserNewsInfo(InputStream is){
                XmlPullParser xp = Xml.newPullParser();
                try{
                        xp.setInput(is,"utf-8");

                        int type = xp.getEventType();

                        News news = null;

                        while(type != XmlPullParser.END_DOCUMENT){
                                switch(type){
                                        case XmlPullParser.START_TAG:
                                                if("newslist".equals(xp.getName())){
                                                        newsList = new ArrayList<News>();
                                                }else if("news".equals(xp.getName())){
                                                        news = new News();
                                                }else if("title".equals(xp.getName())){
                                                        String title = xp.nextText();
                                                        news.setTitle(title);
                                                }else if("detail".equals(xp.getName())){
                                                        String detail = xp.nextText();
                                                        news.setDetail(detail);
                                                }else if("comment".equals(xp.getName())){
                                                        String comment = xp.nextText();
                                                        news.setComment(comment);
                                                }else if("image".equals(xp.getName())){
                                                        String image = xp.nextText();
                                                        news.setImageUrl(image);
                                                }
                                                break;
                                        case XmlPullParser.END_TAG:
                                                if("news".equals(xp.getName())){
                                                        newsList.add(news);
                                                }
                                                break;
                                }
                                type = xp.next();
                        }
                }catch(Exception e){
                        e.printStackTrace();
                }

                //xml解析完毕,发送消息,通知主线程,设置lv的显示内容
                handler.sendEmptyMessage(1);
        }
}
添加权限:
运行结果:
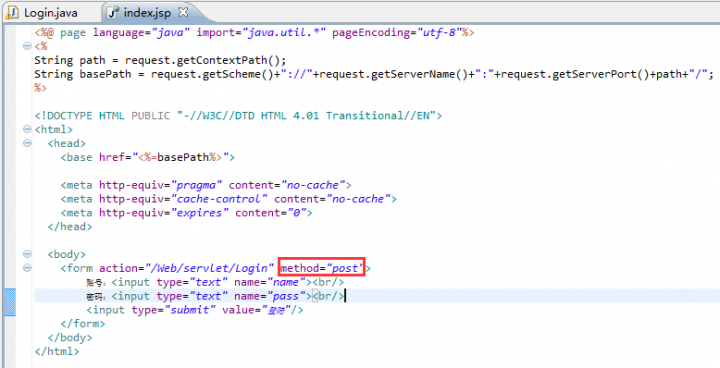
使用get方式提交表单
使用MyEclipse,新建一个Servlet:Login.java,把该Web项目部署到Tomcat服务器上。
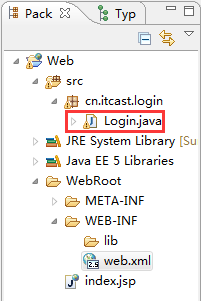
src/cn.itcast.login/Login.java
package cn.itcast.login;
import java.io.IOException;
import javax.servlet.ServletException;
import javax.servlet.ServletOutputStream;
import javax.servlet.http.HttpServlet;
import javax.servlet.http.HttpServletRequest;
import javax.servlet.http.HttpServletResponse;
public class Login extends HttpServlet {
public void doGet(HttpServletRequest request, HttpServletResponse response)
throws ServletException, IOException {
String name = request.getParameter("name");
String pass = request.getParameter("pass");
ServletOutputStream os = response.getOutputStream();
if("asd".equals(name)&&"123".equals(pass)){
os.write("登陆成功".getBytes("utf-8"));
}else{
os.write("登陆失败".getBytes("utf-8"));
}
}
public void doPost(HttpServletRequest request, HttpServletResponse response)
throws ServletException, IOException {
doGet(request, response);
}
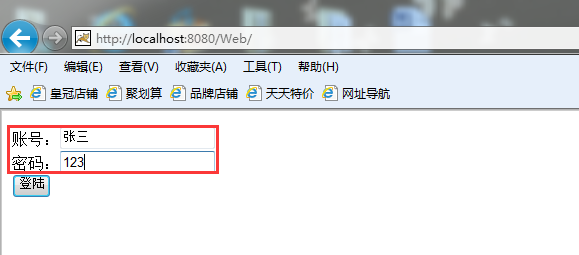
}WebRoot/index.jsp
<%@ page language="java" import="java.util.*" pageEncoding="utf-8"%>
<!DOCTYPE HTML PUBLIC "-//W3C//DTD HTML 4.01 Transitional//EN">
<html>
<head>
</head>
<body>
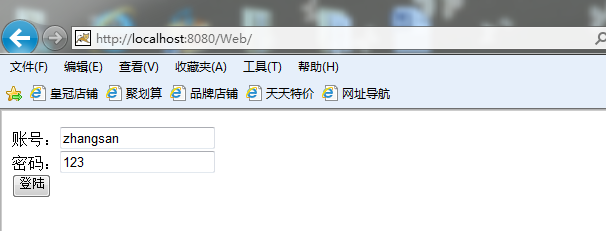
<form action="/Web/servlet/Login" method=get>
账号:<input type="text" name="name"><br/>
密码:<input type="text" name="pass"><br/>
<input type="submit" value="登陆"/>
</form>
</body>
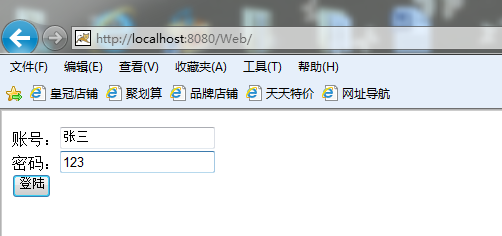
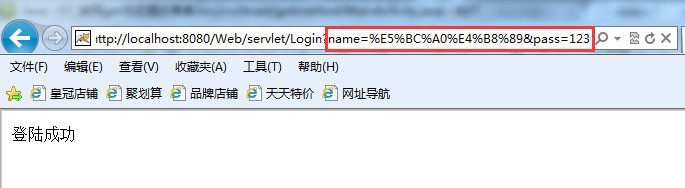
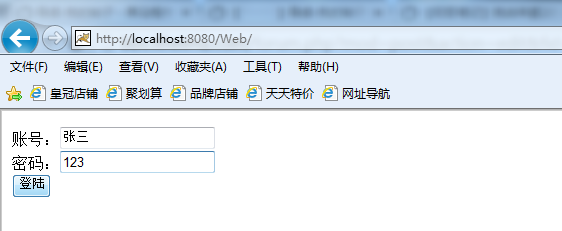
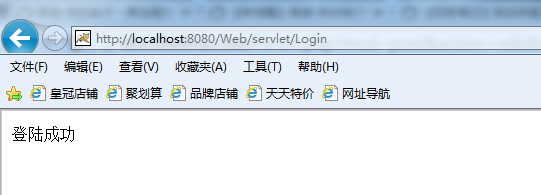
</html>打开浏览器,输入地址,然后输入用户名和密码,提交。
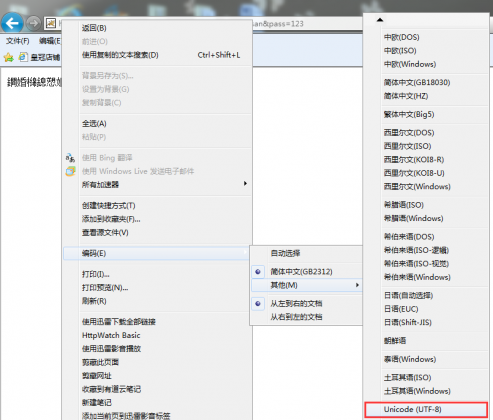
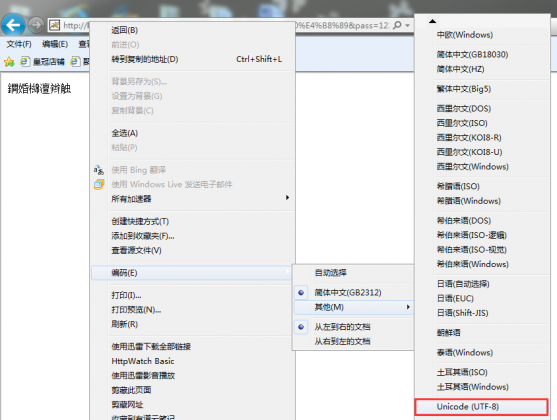
将浏览器编码改为UTF-8。
结果如下:
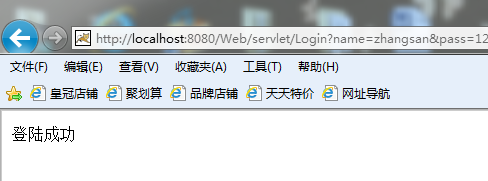
Android之Get方式提交数据:
res\layout\activity_main.xml
<LinearLayout xmlns:android="http://schemas.android.com/apk/res/android"
    xmlns:tools="http://schemas.android.com/tools"
    android:layout_width="match_parent"
    android:layout_height="match_parent"
    tools:context=".MainActivity"
    android:orientation="vertical">

    <EditText
        android:id="@+id/et_name"
        android:layout_width="match_parent"
        android:layout_height="wrap_content"/>

    <EditText
        android:id="@+id/et_pass"
        android:layout_width="match_parent"
        android:layout_height="wrap_content"/>

    <Button
        android:layout_width="wrap_content"
        android:layout_height="wrap_content"
        android:text="登陆"
        android:onClick="click"
        />
</LinearLayout>
src/cn.itcast.getmethod.tool/Tools.java
package cn.itcast.getmethod.tool;

import java.io.ByteArrayOutputStream;
import java.io.IOException;
import java.io.InputStream;

public class Tools {

        public static String getTextFromStream(InputStream is){

                try{
                        byte[] b = new byte[1024];
                        int len;
                        ByteArrayOutputStream bos = new ByteArrayOutputStream();

                        while((len = is.read(b)) != -1){
                                bos.write(b,0,len);
                        }

                        //把输出流里的内容转换成字节数组
                        String text = new String(bos.toByteArray());
                        return text;
                }catch(IOException e){
                        e.printStackTrace();
                }

                return null;
        }
}
src/cn.itcast.getmethod/MainActivity.java
package cn.itcast.getmethod;
import java.io.InputStream;
import java.net.HttpURLConnection;
import java.net.URL;
import android.app.Activity;
import android.os.Bundle;
import android.os.Handler;
import android.os.Message;
import android.view.View;
import android.widget.EditText;
import android.widget.Toast;
import cn.itcast.getmethod.tool.Tools;
public class MainActivity extends Activity {
Handler handler = new Handler(){
@Override
public void handleMessage(Message msg) {
Toast.makeText(MainActivity.this, (String)msg.obj, 0).show();
}
};
@Override
protected void onCreate(Bundle savedInstanceState) {
super.onCreate(savedInstanceState);
setContentView(R.layout.activity_main);
}
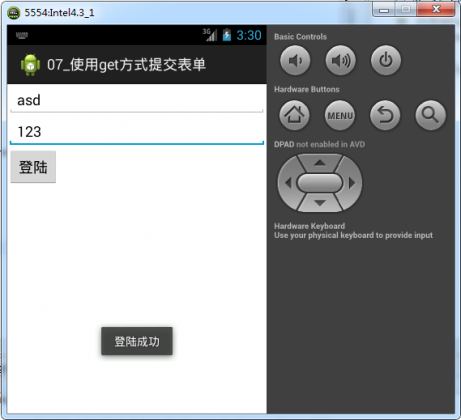
public void click(View v){
EditText et_name = (EditText)findViewById(R.id.et_name);
EditText et_pass = (EditText)findViewById(R.id.et_pass);
String name = et_name.getText().toString();
String pass = et_pass.getText().toString();
//在url后面拼接要提交的数据
final String path = "http://localhost:8080/Web/servlet/Login?name=" + name + "&pass=" + pass;
Thread t = new Thread(){
public void run(){
URL url;
try {
url = new URL(path);
HttpURLConnection conn = (HttpURLConnection)url.openConnection();
conn.setRequestMethod("GET");
conn.setConnectTimeout(8000);
conn.setReadTimeout(8000);
if(conn.getResponseCode() == 200){
InputStream is = conn.getInputStream();
String text = Tools.getTextFromStream(is);
Message msg = handler.obtainMessage();
msg.obj = text;
handler.sendMessage(msg);
}
} catch (Exception e) {
e.printStackTrace();
}
}
};
t.start();
}
}添加权限:
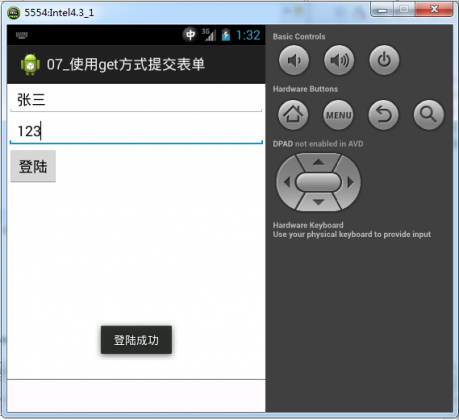
运行结果:
提交表单的乱码问题
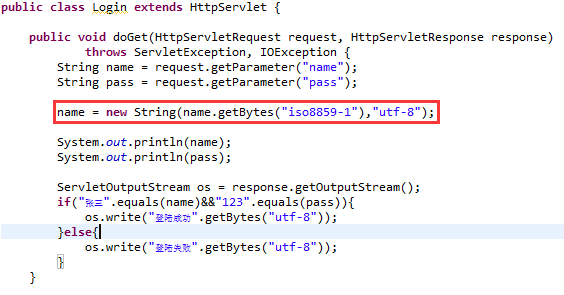
将Login.java中“zhangsan”修改为“张三”,并且打印出接收到的用户名及密码。
src/cn.itcast.login/Login.java
package cn.itcast.login;
import java.io.IOException;
import javax.servlet.ServletException;
import javax.servlet.ServletOutputStream;
import javax.servlet.http.HttpServlet;
import javax.servlet.http.HttpServletRequest;
import javax.servlet.http.HttpServletResponse;
public class Login extends HttpServlet {
public void doGet(HttpServletRequest request, HttpServletResponse response)
throws ServletException, IOException {
String name = request.getParameter("name");
String pass = request.getParameter("pass");
System.out.println(name);
System.out.println(pass);
ServletOutputStream os = response.getOutputStream();
if("张三".equals(name)&&"123".equals(pass)){
os.write("登陆成功".getBytes("utf-8"));
}else{
os.write("登陆失败".getBytes("utf-8"));
}
}
public void doPost(HttpServletRequest request, HttpServletResponse response)
throws ServletException, IOException {
doGet(request, response);
}
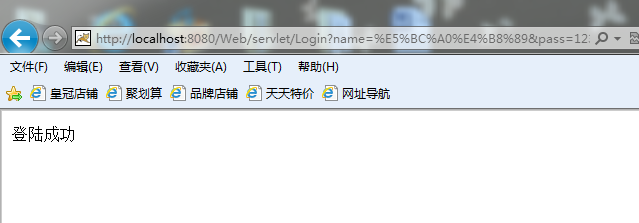
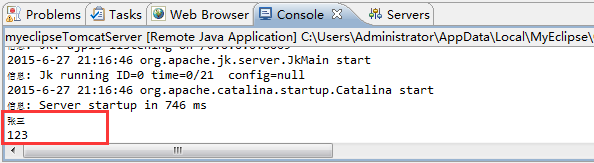
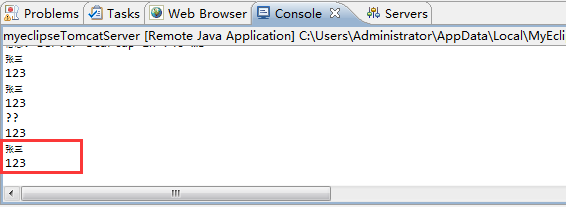
} 重新部署,运行。结果如下:
将浏览器编码调整为UTF-8。
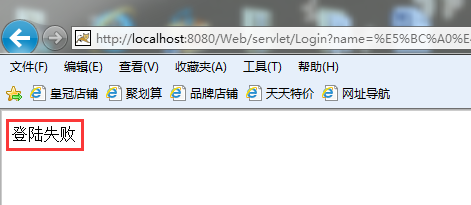
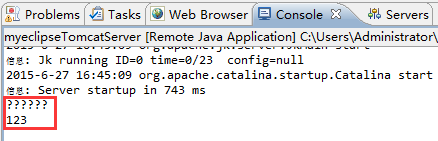
可以看到,打印出来的为乱码。原因在于浏览器提交表单的时候,会把“张三”用UTF-8编码变成字节数组,然后传给服务器。服务器拿到这些字节以后,因为getParameter默认使用iso8859-1编码把读取到的字节数组构造成字符串,导致乱码。因此,解决方案为,首先使用iso8859-1把字符串重新转换成字节数组,然后再用utf-8构造成字符串即可。
重新部署,运行,结果如下:
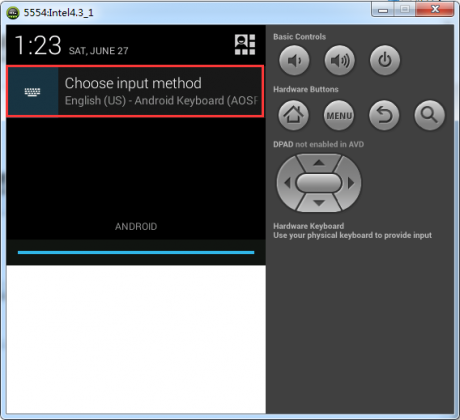
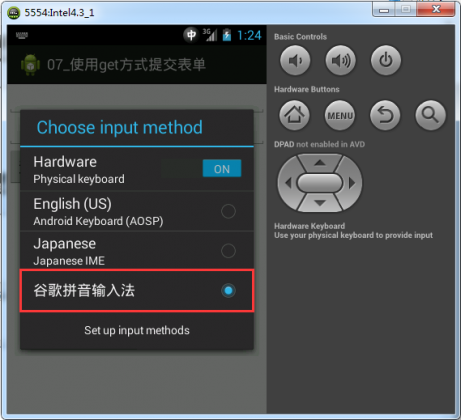
尝试通过手机端发送中文的情况,如下:输入中文,首先选择谷歌拼音输入法。
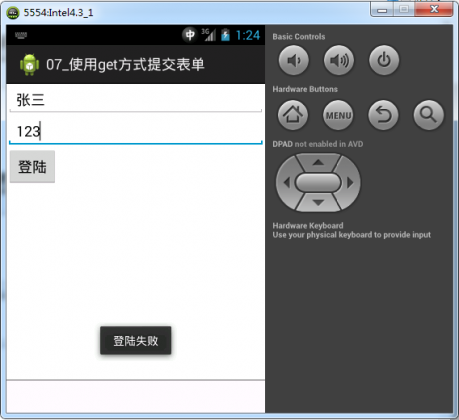
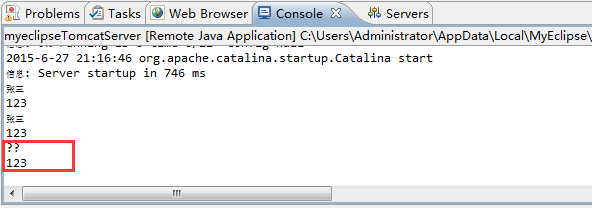
由上面的图片可以看到,依然存在乱码问题。原因在于浏览器提交的数据都是经过URL编码的,所以,通过代码提交的数据就需要手动编码。
修改后,运行结果:
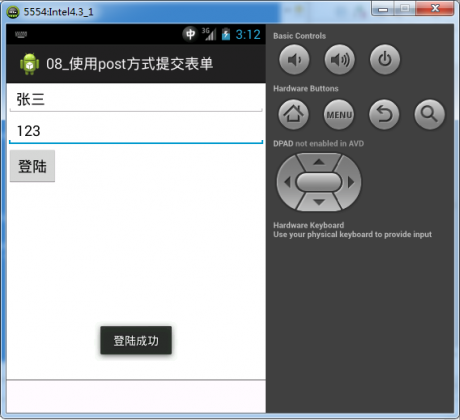
使用post方式提交表单,修改表单为post提交方式:
通过代码实现post提交请求,一方面通过流的方式将数据传输给服务器,一方面是给post请求头添加额外属性。
src/cn.itcast.postmethod/MainActivity.java
package cn.itcast.postmethod;
import java.io.InputStream;
import java.io.OutputStream;
import java.net.HttpURLConnection;
import java.net.URL;
import java.net.URLEncoder;
import android.app.Activity;
import android.os.Bundle;
import android.os.Handler;
import android.os.Message;
import android.view.View;
import android.widget.EditText;
import android.widget.Toast;
import cn.itcast.getmethod.tool.Tools;
public class MainActivity extends Activity {
Handler handler = new Handler(){
@Override
public void handleMessage(Message msg) {
Toast.makeText(MainActivity.this, (String)msg.obj, 0).show();
}
};
@Override
protected void onCreate(Bundle savedInstanceState) {
super.onCreate(savedInstanceState);
setContentView(R.layout.activity_main);
}
public void click(View v){
EditText et_name = (EditText)findViewById(R.id.et_name);
EditText et_pass = (EditText)findViewById(R.id.et_pass);
final String name = et_name.getText().toString();
final String pass = et_pass.getText().toString();
final String path = "http://192.168.1.100:8080/Web/servlet/Login";
Thread t = new Thread(){
public void run(){
URL url;
try {
url = new URL(path);
HttpURLConnection conn = (HttpURLConnection)url.openConnection();
conn.setRequestMethod("POST");
conn.setConnectTimeout(8000);
conn.setReadTimeout(8000);
//post请求头需要添加额外属性
conn.setRequestProperty("Content-type", "application/x-www-form-urlencoded");
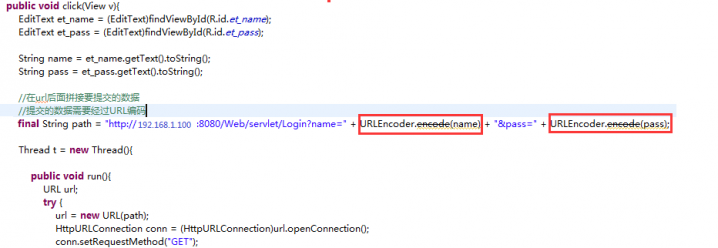
String content = "name=" + URLEncoder.encode(name) + "&pass=" + pass;
conn.setRequestProperty("Content-Length", content.length() + "");
//开启请求头的流,把要提交的数据写入流中
//设置打开连接对象输出流
conn.setDoOutput(true);
OutputStream os = conn.getOutputStream();
os.write(content.getBytes());
if(conn.getResponseCode() == 200){
InputStream is = conn.getInputStream();
String text = Tools.getTextFromStream(is);
Message msg = handler.obtainMessage();
msg.obj = text;
handler.sendMessage(msg);
}
} catch (Exception e) {
e.printStackTrace();
}
}
};
t.start();
}
} 运行结果:
1. 网络图片查看器
- 确定图片的网址
- 发送http请求
URL url = new URL(address);
//获取连接对象,并没有建立连接
HttpURLConnection conn = (HttpURLConnection) url.openConnection();
//设置连接和读取超时
conn.setConnectTimeout(5000);
conn.setReadTimeout(5000);
//设置请求方法,注意必须大写
conn.setRequestMethod("GET");
//建立连接,发送get请求
//conn.connect();
//建立连接,然后获取响应吗,200说明请求成功
conn.getResponseCode();- 服务器的图片是以流的形式返回给浏览器的
//拿到服务器返回的输入流
InputStream is = conn.getInputStream();
//把流里的数据读取出来,并构造成图片
Bitmap bm = BitmapFactory.decodeStream(is);- 把图片设置为ImageView的显示内容
ImageView iv = (ImageView) findViewById(R.id.iv);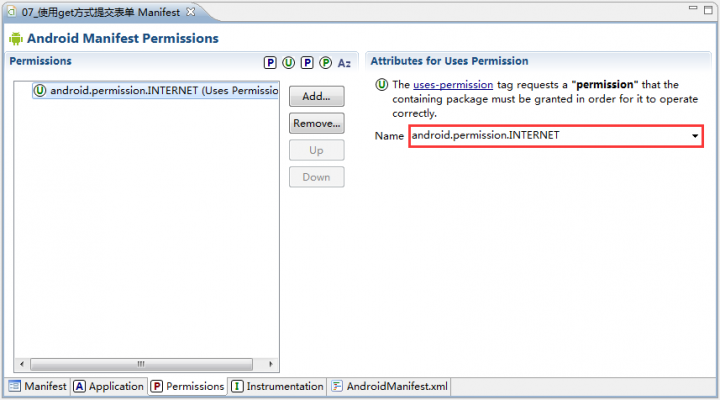
iv.setImageBitmap(bm);- 添加网络权限
1.1 主线程不能被阻塞
- 在Android中,主线程被阻塞会导致应用不能刷新ui界面,不能响应用户操作,用户体验将非常差
- 主线程阻塞时间过长,系统会抛出ANR异常
- ANR:Application Not Response;应用无响应
- 任何耗时操作都不可以写在主线程
- 因为网络交互属于耗时操作,如果网速很慢,代码会阻塞,所以网络交互的代码不能运行在主线程
1.2 只有主线程能刷新ui
- 刷新ui的代码只能运行在主线程,运行在子线程是没有任何效果的
- 如果需要在子线程中刷新ui,使用消息队列机制
1.3 消息队列
- Looper一旦发现Message Queue中有消息,就会把消息取出,然后把消息扔给Handler对象,Handler会调用自己的handleMessage方法来处理这条消息
- handleMessage方法运行在主线程
- 主线程创建时,消息队列和轮询器对象就会被创建,但是消息处理器对象,需要使用时,自行创建
//消息队列
Handler handler = new Handler(){
    //主线程中有一个消息轮询器looper,不断检测消息队列中是否有新消息,
    //如果发现有新消息,自动调用此方法,注意此方法是在主线程中运行的
    public void handleMessage(android.os.Message msg) {

    }
};- 在子线程中往消息队列里发消息
//创建消息对象
Message msg = new Message();
//消息的obj属性可以赋值任何对象,通过这个属性可以携带数据
msg.obj = bm;
//what属性相当于一个标签,用于区分出不同的消息,从而运行不能的代码
msg.what = 1;
//发送消息
handler.sendMessage(msg);- 通过switch语句区分不同的消息
public void handleMessage(android.os.Message msg) {
            switch (msg.what) {
            //如果是1,说明属于请求成功的消息
            case 1:
                ImageView iv = (ImageView) findViewById(R.id.iv);
                Bitmap bm = (Bitmap) msg.obj;
                iv.setImageBitmap(bm);
                break;
            case 2:
                Toast.makeText(MainActivity.this, "请求失败", 0).show();
                break;
            }
        }
public class MainActivity extends Activity {
static ImageView iv;
static MainActivity ma;
static Handler handler = new Handler(){
//此方法在主线程中调用,可以用来刷新ui
public void handleMessage(android.os.Message msg) {
//处理消息时,需要知道到底是成功的消息,还是失败的消息
switch (msg.what) {
case 1:
//把位图对象显示至imageview
iv.setImageBitmap((Bitmap)msg.obj);
break;
case 0:
Toast.makeText(ma, "请求失败", 0).show();
break;
}
}
};
@Override
protected void onCreate(Bundle savedInstanceState) {
super.onCreate(savedInstanceState);
setContentView(R.layout.activity_main);
iv = (ImageView) findViewById(R.id.iv);
ma = this;
}
public void click(View v){
Thread t = new Thread(){
@Override
public void run() {
//下载图片
//1.确定网址
String path = "http://192.168.13.13:8080/dd.jpg";
try {
//2.把网址封装成一个url对象
URL url = new URL(path);
//3.获取客户端和服务器的连接对象,此时还没有建立连接
HttpURLConnection conn = (HttpURLConnection) url.openConnection();
//4.对连接对象进行初始化
//设置请求方法,注意大写
conn.setRequestMethod("GET");
//设置连接超时
conn.setConnectTimeout(5000);
//设置读取超时
conn.setReadTimeout(5000);
//5.发送请求,与服务器建立连接
conn.connect();
//如果响应码为200,说明请求成功
if(conn.getResponseCode() == 200){
//获取服务器响应头中的流,流里的数据就是客户端请求的数据
InputStream is = conn.getInputStream();
//读取出流里的数据,并构造成位图对象
Bitmap bm = BitmapFactory.decodeStream(is);
// ImageView iv = (ImageView) findViewById(R.id.iv);
// //把位图对象显示至imageview
// iv.setImageBitmap(bm);
Message msg = new Message();
//消息对象可以携带数据
msg.obj = bm;
msg.what = 1;
//把消息发送至主线程的消息队列
handler.sendMessage(msg);
}
else{
// Toast.makeText(MainActivity.this, "请求失败", 0).show();
Message msg = handler.obtainMessage();
msg.what = 0;
handler.sendMessage(msg);
}
} catch (Exception e) {
// TODO Auto-generated catch block
e.printStackTrace();
}
}
};
t.start();
}
}1.4 案例1:网络图片查看器
public class MainActivity extends Activity {

    static ImageView iv;
    static MainActivity ma;
    static Handler handler = new Handler(){
        //此方法在主线程中调用,可以用来刷新ui
        public void handleMessage(android.os.Message msg) {
            //处理消息时,需要知道到底是成功的消息,还是失败的消息
            switch (msg.what) {
            case 1:
                //把位图对象显示至imageview
                iv.setImageBitmap((Bitmap)msg.obj);
                break;

            case 0:
                Toast.makeText(ma, "请求失败", 0).show();
                break;
            }

        }
    };
    @Override
    protected void onCreate(Bundle savedInstanceState) {
        super.onCreate(savedInstanceState);
        setContentView(R.layout.activity_main);
        iv = (ImageView) findViewById(R.id.iv);
        ma = this;
    }

    public void click(View v){
        Thread t = new Thread(){
            @Override
            public void run() {
                //下载图片
                //1.确定网址
                String path = "http://192.168.13.13:8080/dd.jpg";
                try {
                    //2.把网址封装成一个url对象
                    URL url = new URL(path);
                    //3.获取客户端和服务器的连接对象,此时还没有建立连接
                    HttpURLConnection conn = (HttpURLConnection) url.openConnection();
                    //4.对连接对象进行初始化
                    //设置请求方法,注意大写
                    conn.setRequestMethod("GET");
                    //设置连接超时
                    conn.setConnectTimeout(5000);
                    //设置读取超时
                    conn.setReadTimeout(5000);
                    //5.发送请求,与服务器建立连接
                    conn.connect();
                    //如果响应码为200,说明请求成功
                    if(conn.getResponseCode() == 200){
                        //获取服务器响应头中的流,流里的数据就是客户端请求的数据
                        InputStream is = conn.getInputStream();
                        //读取出流里的数据,并构造成位图对象
                        Bitmap bm = BitmapFactory.decodeStream(is);

//                      ImageView iv = (ImageView) findViewById(R.id.iv);
//                      //把位图对象显示至imageview
//                      iv.setImageBitmap(bm);

                        Message msg = new Message();
                        //消息对象可以携带数据
                        msg.obj = bm;
                        msg.what = 1;
                        //把消息发送至主线程的消息队列
                        handler.sendMessage(msg);

                    }
                    else{
//                      Toast.makeText(MainActivity.this, "请求失败", 0).show();

                        Message msg = handler.obtainMessage();
                        msg.what = 0;
                        handler.sendMessage(msg);
                    }
                } catch (Exception e) {
                    // TODO Auto-generated catch block
                    e.printStackTrace();
                }
            }
        };
        t.start();
    }
}1.5 加入缓存图片的功能
- 把服务器返回的流里的数据读取出来,然后通过文件输入流写至本地文件
//1.拿到服务器返回的输入流
InputStream is = conn.getInputStream();
//2.把流里的数据读取出来,并构造成图片

FileOutputStream fos = new FileOutputStream(file);
byte[] b = new byte[1024];
int len = 0;
while((len = is.read(b)) != -1){
    fos.write(b, 0, len);
}- 创建bitmap对象的代码改成
Bitmap bm = BitmapFactory.decodeFile(file.getAbsolutePath());- 每次发送请求前检测一下在缓存中是否存在同名图片,如果存在,则读取缓存
public class MainActivity extends Activity {

    static ImageView iv;
    static MainActivity ma;
    static Handler handler = new Handler(){
        //此方法在主线程中调用,可以用来刷新ui
        public void handleMessage(android.os.Message msg) {
            //处理消息时,需要知道到底是成功的消息,还是失败的消息
            switch (msg.what) {
            case 1:
                //把位图对象显示至imageview
                iv.setImageBitmap((Bitmap)msg.obj);
                break;

            case 0:
                Toast.makeText(ma, "请求失败", 0).show();
                break;
            }

        }
    };
    @Override
    protected void onCreate(Bundle savedInstanceState) {
        super.onCreate(savedInstanceState);
        setContentView(R.layout.activity_main);
        iv = (ImageView) findViewById(R.id.iv);
        ma = this;
    }

    public void click(View v){
        //下载图片
        //1.确定网址
        final String path = "http://192.168.13.13:8080/dd.jpg";
        final File file = new File(getCacheDir(), getFileName(path));
        //判断,缓存中是否存在该文件
        if(file.exists()){
            //如果缓存存在,从缓存读取图片
            System.out.println("从缓存读取的");
            Bitmap bm = BitmapFactory.decodeFile(file.getAbsolutePath());
            iv.setImageBitmap(bm);
        }
        else{
            //如果缓存不存在,从网络下载
            System.out.println("从网上下载的");
            Thread t = new Thread(){
                @Override
                public void run() {

                    try {
                        //2.把网址封装成一个url对象
                        URL url = new URL(path);
                        //3.获取客户端和服务器的连接对象,此时还没有建立连接
                        HttpURLConnection conn = (HttpURLConnection) url.openConnection();
                        //4.对连接对象进行初始化
                        //设置请求方法,注意大写
                        conn.setRequestMethod("GET");
                        //设置连接超时
                        conn.setConnectTimeout(5000);
                        //设置读取超时
                        conn.setReadTimeout(5000);
                        //5.发送请求,与服务器建立连接
                        conn.connect();
                        //如果响应码为200,说明请求成功
                        if(conn.getResponseCode() == 200){
                            //获取服务器响应头中的流,流里的数据就是客户端请求的数据
                            InputStream is = conn.getInputStream();

                            //读取服务器返回的流里的数据,把数据写到本地文件,缓存起来

                            FileOutputStream fos = new FileOutputStream(file);
                            byte[] b = new byte[1024];
                            int len = 0;
                            while((len = is.read(b)) != -1){
                                fos.write(b, 0, len);
                            }
                            fos.close();

                            //读取出流里的数据,并构造成位图对象
                            //流里已经没有数据了
//                          Bitmap bm = BitmapFactory.decodeStream(is);
                            Bitmap bm = BitmapFactory.decodeFile(file.getAbsolutePath());


                            Message msg = new Message();
                            //消息对象可以携带数据
                            msg.obj = bm;
                            msg.what = 1;
                            //把消息发送至主线程的消息队列
                            handler.sendMessage(msg);

                        }
                        else{
//                          Toast.makeText(MainActivity.this, "请求失败", 0).show();

                            Message msg = handler.obtainMessage();
                            msg.what = 0;
                            handler.sendMessage(msg);
                        }
                    } catch (Exception e) {
                        // TODO Auto-generated catch block
                        e.printStackTrace();
                    }
                }
            };
            t.start();
        }


    }

    public String getFileName(String path){
        int index = path.lastIndexOf("/");
        return path.substring(index + 1);
    }

}
1.6 案例2:带缓存的网络图片查看器
public class MainActivity extends Activity {

    static ImageView iv;
    static MainActivity ma;
    static Handler handler = new Handler(){
        //此方法在主线程中调用,可以用来刷新ui
        public void handleMessage(android.os.Message msg) {
            //处理消息时,需要知道到底是成功的消息,还是失败的消息
            switch (msg.what) {
            case 1:
                //把位图对象显示至imageview
                iv.setImageBitmap((Bitmap)msg.obj);
                break;

            case 0:
                Toast.makeText(ma, "请求失败", 0).show();
                break;
            }

        }
    };
    @Override
    protected void onCreate(Bundle savedInstanceState) {
        super.onCreate(savedInstanceState);
        setContentView(R.layout.activity_main);
        iv = (ImageView) findViewById(R.id.iv);
        ma = this;
    }

    public void click(View v){
        //下载图片
        //1.确定网址
        final String path = "http://192.168.13.13:8080/dd.jpg";
        final File file = new File(getCacheDir(), getFileName(path));
        //判断,缓存中是否存在该文件
        if(file.exists()){
            //如果缓存存在,从缓存读取图片
            System.out.println("从缓存读取的");
            Bitmap bm = BitmapFactory.decodeFile(file.getAbsolutePath());
            iv.setImageBitmap(bm);
        }
        else{
            //如果缓存不存在,从网络下载
            System.out.println("从网上下载的");
            Thread t = new Thread(){
                @Override
                public void run() {

                    try {
                        //2.把网址封装成一个url对象
                        URL url = new URL(path);
                        //3.获取客户端和服务器的连接对象,此时还没有建立连接
                        HttpURLConnection conn = (HttpURLConnection) url.openConnection();
                        //4.对连接对象进行初始化
                        //设置请求方法,注意大写
                        conn.setRequestMethod("GET");
                        //设置连接超时
                        conn.setConnectTimeout(5000);
                        //设置读取超时
                        conn.setReadTimeout(5000);
                        //5.发送请求,与服务器建立连接
                        conn.connect();
                        //如果响应码为200,说明请求成功
                        if(conn.getResponseCode() == 200){
                            //获取服务器响应头中的流,流里的数据就是客户端请求的数据
                            InputStream is = conn.getInputStream();

                            //读取服务器返回的流里的数据,把数据写到本地文件,缓存起来

                            FileOutputStream fos = new FileOutputStream(file);
                            byte[] b = new byte[1024];
                            int len = 0;
                            while((len = is.read(b)) != -1){
                                fos.write(b, 0, len);
                            }
                            fos.close();

                            //读取出流里的数据,并构造成位图对象
                            //流里已经没有数据了
//                          Bitmap bm = BitmapFactory.decodeStream(is);
                            Bitmap bm = BitmapFactory.decodeFile(file.getAbsolutePath());


                            Message msg = new Message();
                            //消息对象可以携带数据
                            msg.obj = bm;
                            msg.what = 1;
                            //把消息发送至主线程的消息队列
                            handler.sendMessage(msg);

                        }
                        else{
//                          Toast.makeText(MainActivity.this, "请求失败", 0).show();

                            Message msg = handler.obtainMessage();
                            msg.what = 0;
                            handler.sendMessage(msg);
                        }
                    } catch (Exception e) {
                        // TODO Auto-generated catch block
                        e.printStackTrace();
                    }
                }
            };
            t.start();
        }


    }

    public String getFileName(String path){
        int index = path.lastIndexOf("/");
        return path.substring(index + 1);
    }

}
1.7 案例3:开源图片查看器
public class MainActivity extends Activity {

    @Override
    protected void onCreate(Bundle savedInstanceState) {
        super.onCreate(savedInstanceState);
        setContentView(R.layout.activity_main);
    }

    public void click(View v){
        //下载图片
        //1.确定网址
        String path = "http://192.168.13.13:8080/dd.jpg";
        //2.找到智能图片查看器对象
        SmartImageView siv = (SmartImageView) findViewById(R.id.iv);
        //3.下载并显示图片
        siv.setImageUrl(path);
    }

}
2. 获取开源代码的网站
- code.google.com
- github.com
- 在github搜索smart-image-view
- 下载开源项目smart-image-view
- 使用自定义组件时,标签名字要写包名
<com.loopj.android.image.SmartImageView/>- SmartImageView的使用
SmartImageView siv = (SmartImageView) findViewById(R.id.siv);
siv.setImageUrl("http://192.168.1.102:8080/dd.jpg");
3. 新闻客户端
public class MainActivity extends Activity {

    List<News> newsList;
    Handler handler = new Handler(){
        public void handleMessage(android.os.Message msg) {
            ListView lv = (ListView) findViewById(R.id.lv);
            lv.setAdapter(new MyAdapter());
        }
    };
    @Override
    protected void onCreate(Bundle savedInstanceState) {
        super.onCreate(savedInstanceState);
        setContentView(R.layout.activity_main);

        getNewsInfo();
//      ListView lv = (ListView) findViewById(R.id.lv);
//      //要保证在设置适配器时,新闻xml文件已经解析完毕了
//      lv.setAdapter(new MyAdapter());
    }

    class MyAdapter extends BaseAdapter{

        //得到模型层中元素的数量,用来确定listview需要有多少个条目
        @Override
        public int getCount() {
            // TODO Auto-generated method stub
            return newsList.size();
        }
        @Override
        //返回一个View对象,作为listview的条目显示至界面
        public View getView(int position, View convertView, ViewGroup parent) {

            News news = newsList.get(position);
            View v = null;
            ViewHolder mHolder;
            if(convertView == null){
                v = View.inflate(MainActivity.this, R.layout.item_listview, null);
                mHolder = new ViewHolder();
                //把布局文件中所有组件的对象封装至ViewHolder对象中
                mHolder.tv_title = (TextView) v.findViewById(R.id.tv_title);
                mHolder.tv_detail = (TextView) v.findViewById(R.id.tv_detail);
                mHolder.tv_comment = (TextView) v.findViewById(R.id.tv_comment);
                mHolder.siv = (SmartImageView) v.findViewById(R.id.iv);
                //把ViewHolder对象封装至View对象中
                v.setTag(mHolder);
            }
            else{
                v = convertView;
                mHolder = (ViewHolder) v.getTag();
            }
            //给三个文本框设置内容
            mHolder.tv_title.setText(news.getTitle());

            mHolder.tv_detail.setText(news.getDetail());

            mHolder.tv_comment.setText(news.getComment() + "条评论");

            //给新闻图片imageview设置内容
            mHolder.siv.setImageUrl(news.getImageUrl());
            return v;
        }

        class ViewHolder{
            //条目的布局文件中有什么组件,这里就定义什么属性
            TextView tv_title;
            TextView tv_detail;
            TextView tv_comment;
            SmartImageView siv;
        }

        @Override
        public Object getItem(int position) {
            return null;
        }

        @Override
        public long getItemId(int position) {
            return 0;
        }
    }
    private void getNewsInfo() {
        Thread t = new Thread(){
            @Override
            public void run() {
                String path = "http://192.168.13.13:8080/news.xml";
                try {
                    URL url = new URL(path);
                    HttpURLConnection conn = (HttpURLConnection) url.openConnection();
                    conn.setRequestMethod("GET");
                    conn.setConnectTimeout(5000);
                    conn.setReadTimeout(5000);
                    //发送http GET请求,获取相应码
                    if(conn.getResponseCode() == 200){
                        InputStream is = conn.getInputStream();
                        //使用pull解析器,解析这个流
                        parseNewsXml(is);
                    }
                } catch (Exception e) {
                    // TODO Auto-generated catch block
                    e.printStackTrace();
                }
            }
        };
        t.start();
    }

    private void parseNewsXml(InputStream is) {
        XmlPullParser xp = Xml.newPullParser();
        try {
            xp.setInput(is, "utf-8");
            //对节点的事件类型进行判断,就可以知道当前节点是什么节点
            int type = xp.getEventType();
            News news = null;
            while(type != XmlPullParser.END_DOCUMENT){
                switch (type) {
                case XmlPullParser.START_TAG:
                    if("newslist".equals(xp.getName())){
                        newsList = new ArrayList<News>();
                    }
                    else if("news".equals(xp.getName())){
                        news = new News();
                    }
                    else if("title".equals(xp.getName())){
                        String title = xp.nextText();
                        news.setTitle(title);
                    }
                    else if("detail".equals(xp.getName())){
                        String detail = xp.nextText();
                        news.setDetail(detail);
                    }
                    else if("comment".equals(xp.getName())){
                        String comment = xp.nextText();
                        news.setComment(comment);
                    }
                    else if("image".equals(xp.getName())){
                        String image = xp.nextText();
                        news.setImageUrl(image);
                    }
                    break;
                case XmlPullParser.END_TAG:
                    if("news".equals(xp.getName())){
                        newsList.add(news);
                    }
                    break;

                }
                //解析完当前节点后,把指针移动至下一个节点,并返回它的事件类型
                type = xp.next();
            }

            //发消息,让主线程设置listview的适配器,如果消息不需要携带数据,可以发送空消息
            handler.sendEmptyMessage(1);

//          for (News n : newsList) {
//              System.out.println(n.toString());
//          }
        } catch (Exception e) {
            // TODO Auto-generated catch block
            e.printStackTrace();
        }

    }

}
3.1 案例5:新闻客户端
public class MainActivity extends Activity {

    List<News> newsList;
    Handler handler = new Handler(){
        public void handleMessage(android.os.Message msg) {
            ListView lv = (ListView) findViewById(R.id.lv);
            lv.setAdapter(new MyAdapter());
        }
    };
    @Override
    protected void onCreate(Bundle savedInstanceState) {
        super.onCreate(savedInstanceState);
        setContentView(R.layout.activity_main);

        getNewsInfo();
//      ListView lv = (ListView) findViewById(R.id.lv);
//      //要保证在设置适配器时,新闻xml文件已经解析完毕了
//      lv.setAdapter(new MyAdapter());
    }

    class MyAdapter extends BaseAdapter{

        //得到模型层中元素的数量,用来确定listview需要有多少个条目
        @Override
        public int getCount() {
            // TODO Auto-generated method stub
            return newsList.size();
        }
        @Override
        //返回一个View对象,作为listview的条目显示至界面
        public View getView(int position, View convertView, ViewGroup parent) {

            News news = newsList.get(position);
            View v = null;
            ViewHolder mHolder;
            if(convertView == null){
                v = View.inflate(MainActivity.this, R.layout.item_listview, null);
                mHolder = new ViewHolder();
                //把布局文件中所有组件的对象封装至ViewHolder对象中
                mHolder.tv_title = (TextView) v.findViewById(R.id.tv_title);
                mHolder.tv_detail = (TextView) v.findViewById(R.id.tv_detail);
                mHolder.tv_comment = (TextView) v.findViewById(R.id.tv_comment);
                mHolder.siv = (SmartImageView) v.findViewById(R.id.iv);
                //把ViewHolder对象封装至View对象中
                v.setTag(mHolder);
            }
            else{
                v = convertView;
                mHolder = (ViewHolder) v.getTag();
            }
            //给三个文本框设置内容
            mHolder.tv_title.setText(news.getTitle());

            mHolder.tv_detail.setText(news.getDetail());

            mHolder.tv_comment.setText(news.getComment() + "条评论");

            //给新闻图片imageview设置内容
            mHolder.siv.setImageUrl(news.getImageUrl());
            return v;
        }

        class ViewHolder{
            //条目的布局文件中有什么组件,这里就定义什么属性
            TextView tv_title;
            TextView tv_detail;
            TextView tv_comment;
            SmartImageView siv;
        }

        @Override
        public Object getItem(int position) {
            return null;
        }

        @Override
        public long getItemId(int position) {
            return 0;
        }
    }
    private void getNewsInfo() {
        Thread t = new Thread(){
            @Override
            public void run() {
                String path = "http://192.168.13.13:8080/news.xml";
                try {
                    URL url = new URL(path);
                    HttpURLConnection conn = (HttpURLConnection) url.openConnection();
                    conn.setRequestMethod("GET");
                    conn.setConnectTimeout(5000);
                    conn.setReadTimeout(5000);
                    //发送http GET请求,获取相应码
                    if(conn.getResponseCode() == 200){
                        InputStream is = conn.getInputStream();
                        //使用pull解析器,解析这个流
                        parseNewsXml(is);
                    }
                } catch (Exception e) {
                    // TODO Auto-generated catch block
                    e.printStackTrace();
                }
            }
        };
        t.start();
    }

    private void parseNewsXml(InputStream is) {
        XmlPullParser xp = Xml.newPullParser();
        try {
            xp.setInput(is, "utf-8");
            //对节点的事件类型进行判断,就可以知道当前节点是什么节点
            int type = xp.getEventType();
            News news = null;
            while(type != XmlPullParser.END_DOCUMENT){
                switch (type) {
                case XmlPullParser.START_TAG:
                    if("newslist".equals(xp.getName())){
                        newsList = new ArrayList<News>();
                    }
                    else if("news".equals(xp.getName())){
                        news = new News();
                    }
                    else if("title".equals(xp.getName())){
                        String title = xp.nextText();
                        news.setTitle(title);
                    }
                    else if("detail".equals(xp.getName())){
                        String detail = xp.nextText();
                        news.setDetail(detail);
                    }
                    else if("comment".equals(xp.getName())){
                        String comment = xp.nextText();
                        news.setComment(comment);
                    }
                    else if("image".equals(xp.getName())){
                        String image = xp.nextText();
                        news.setImageUrl(image);
                    }
                    break;
                case XmlPullParser.END_TAG:
                    if("news".equals(xp.getName())){
                        newsList.add(news);
                    }
                    break;

                }
                //解析完当前节点后,把指针移动至下一个节点,并返回它的事件类型
                type = xp.next();
            }

            //发消息,让主线程设置listview的适配器,如果消息不需要携带数据,可以发送空消息
            handler.sendEmptyMessage(1);

//          for (News n : newsList) {
//              System.out.println(n.toString());
//          }
        } catch (Exception e) {
            // TODO Auto-generated catch block
            e.printStackTrace();
        }

    }

}
4. Html源文件查看器
- 发送GET请求
URL url = new URL(path);
//获取连接对象
HttpURLConnection conn = (HttpURLConnection) url.openConnection();
//设置连接属性
conn.setRequestMethod("GET");
conn.setConnectTimeout(5000);
conn.setReadTimeout(5000);
//建立连接,获取响应吗
if(conn.getResponseCode() == 200){

}- 获取服务器返回的流,从流中把html源码读取出来
byte[] b = new byte[1024];
int len = 0;
ByteArrayOutputStream bos = new ByteArrayOutputStream();
while((len = is.read(b)) != -1){
    //把读到的字节先写入字节数组输出流中存起来
    bos.write(b, 0, len);
}
//把字节数组输出流中的内容转换成字符串
//默认使用utf-8
text = new String(bos.toByteArray());
4.1 乱码的处理
- 乱码的出现是因为服务器和客户端码表不一致导致
//手动指定码表
text = new String(bos.toByteArray(), "gb2312");
4.2 案例4:HTML源文件查看器
public class MainActivity extends Activity {

    Handler handler = new Handler(){
        public void handleMessage(android.os.Message msg) {
            TextView tv = (TextView) findViewById(R.id.tv);
            tv.setText((String)msg.obj);
        }
    };
    @Override
    protected void onCreate(Bundle savedInstanceState) {
        super.onCreate(savedInstanceState);
        setContentView(R.layout.activity_main);
    }

    public void click(View v){
        Thread t = new Thread(){
            @Override
            public void run() {
                String path = "http://192.168.13.13:8080/baidu.html";
                try {
                    URL url = new URL(path);
                    //获取连接对象,此时还未建立连接
                    HttpURLConnection conn = (HttpURLConnection) url.openConnection();
                    conn.setRequestMethod("GET");
                    conn.setConnectTimeout(5000);
                    conn.setReadTimeout(5000);
                    //先建立连接,然后获取响应码
                    if(conn.getResponseCode() == 200){
                        //拿到服务器返回的输入流,流里的数据就是html的源文件
                        InputStream is = conn.getInputStream();
                        //从流里把文本数据取出来
                        String text = Utils.getTextFromStream(is);

                        //发送消息,让主线程刷新ui,显示源文件
                        Message msg = handler.obtainMessage();
                        msg.obj = text;
                        handler.sendMessage(msg);
                    }
                } catch (Exception e) {
                    // TODO Auto-generated catch block
                    e.printStackTrace();
                }
            }
        };
        t.start();
    }

}
5. 提交数据
5.1 GET方式提交数据
- get方式提交的数据是直接拼接在url的末尾
final String path = "http://192.168.1.104/Web/servlet/CheckLogin?name=" + name + "&pass=" + pass;- 发送get请求,代码和之前一样
URL url = new URL(path);
HttpURLConnection conn = (HttpURLConnection) url.openConnection();
conn.setRequestMethod("GET");
conn.setReadTimeout(5000);
conn.setConnectTimeout(5000);
if(conn.getResponseCode() == 200){

}- 浏览器在发送请求携带数据时会对数据进行URL编码,我们写代码时也需要为中文进行URL编码
String path = "http://192.168.1.104/Web/servlet/CheckLogin?name=" + URLEncoder.encode(name) + "&pass=" + pass;5.2 案例6:使用get方式提交数据
public class MainActivity extends Activity {

    @Override
    protected void onCreate(Bundle savedInstanceState) {
        super.onCreate(savedInstanceState);
        setContentView(R.layout.activity_main);
    }

    Handler handler = new Handler(){
        public void handleMessage(android.os.Message msg) {
            Toast.makeText(MainActivity.this, (String)msg.obj, 0).show();
        }
    };

    public void click(View v){
        EditText et_name = (EditText) findViewById(R.id.et_name);
        EditText et_pass = (EditText) findViewById(R.id.et_pass);

        final String name = et_name.getText().toString();
        final String pass = et_pass.getText().toString();

        Thread t = new Thread(){
            @Override
            public void run() {
                //提交的数据需要经过url编码,英文和数字编码后不变
                @SuppressWarnings("deprecation")
                String path = "http://192.168.13.13/Web2/servlet/LoginServlet?name=" + URLEncoder.encode(name) + "&pass=" + pass;

                try {
                    URL url = new URL(path);
                    HttpURLConnection conn = (HttpURLConnection) url.openConnection();
                    conn.setRequestMethod("GET");
                    conn.setConnectTimeout(5000);
                    conn.setReadTimeout(5000);

                    if(conn.getResponseCode() == 200){
                        InputStream is =conn.getInputStream();
                        String text = Utils.getTextFromStream(is);

                        Message msg = handler.obtainMessage();
                        msg.obj = text;
                        handler.sendMessage(msg);
                    }
                } catch (Exception e) {
                    // TODO Auto-generated catch block
                    e.printStackTrace();
                }
            }
        };
        t.start();
    }

}
public class Utils {
public static String getTextFromStream(InputStream is){
byte[] b = new byte[1024];
int len = 0;
//创建字节数组输出流,读取输入流的文本数据时,同步把数据写入数组输出流
ByteArrayOutputStream bos = new ByteArrayOutputStream();
try {
while((len = is.read(b)) != -1){
bos.write(b, 0, len);
}
//把字节数组输出流里的数据转换成字节数组
String text = new String(bos.toByteArray());
return text;
} catch (IOException e) {
// TODO Auto-generated catch block
e.printStackTrace();
}
return null;
}
}5.3 POST方式提交数据
- post提交数据是用流写给服务器的
- 协议头中多了两个属性
- Content-Type: application/x-www-form-urlencoded,描述提交的数据的mimetype
- Content-Length: 32,描述提交的数据的长度
//给请求头添加post多出来的两个属性
String data = "name=" + URLEncoder.encode(name) + "&pass=" + pass;
conn.setRequestProperty("Content-Type", "application/x-www-form-urlencoded");
conn.setRequestProperty("Content-Length", data.length() + "");- 设置允许打开post请求的流
conn.setDoOutput(true);- 获取连接对象的输出流,往流里写要提交给服务器的数据
OutputStream os = conn.getOutputStream();
os.write(data.getBytes());
5.4 案例7:使用post方式提交数据
public class MainActivity extends Activity {

    @Override
    protected void onCreate(Bundle savedInstanceState) {
        super.onCreate(savedInstanceState);
        setContentView(R.layout.activity_main);
    }

    Handler handler = new Handler(){
        public void handleMessage(android.os.Message msg) {
            Toast.makeText(MainActivity.this, (String)msg.obj, 0).show();
        }
    };

    public void click(View v){
        EditText et_name = (EditText) findViewById(R.id.et_name);
        EditText et_pass = (EditText) findViewById(R.id.et_pass);

        final String name = et_name.getText().toString();
        final String pass = et_pass.getText().toString();

        Thread t = new Thread(){
            @Override
            public void run() {
                //提交的数据需要经过url编码,英文和数字编码后不变
                @SuppressWarnings("deprecation")
                String path = "http://192.168.13.13/Web2/servlet/LoginServlet";

                try {
                    URL url = new URL(path);
                    HttpURLConnection conn = (HttpURLConnection) url.openConnection();
                    conn.setRequestMethod("POST");
                    conn.setConnectTimeout(5000);
                    conn.setReadTimeout(5000);

                    //拼接出要提交的数据的字符串
                    String data = "name=" + URLEncoder.encode(name) + "&pass=" + pass;
                    //添加post请求的两行属性
                    conn.setRequestProperty("Content-Type", "application/x-www-form-urlencoded");
                    conn.setRequestProperty("Content-Length", data.length() + "");

                    //设置打开输出流
                    conn.setDoOutput(true);
                    //拿到输出流
                    OutputStream os = conn.getOutputStream();
                    //使用输出流往服务器提交数据
                    os.write(data.getBytes());
                    if(conn.getResponseCode() == 200){
                        InputStream is = conn.getInputStream();
                        String text = Utils.getTextFromStream(is);

                        Message msg = handler.obtainMessage();
                        msg.obj = text;
                        handler.sendMessage(msg);
                    }
                } catch (Exception e) {
                    // TODO Auto-generated catch block
                    e.printStackTrace();
                }
            }
        };
        t.start();
    }
}
6. 网络请求
6.1 主线程阻塞
- UI停止刷新,应用无法响应用户操作
- 耗时操作不应该在主线程进行
ANR
- application not responding
- 应用无响应异常
- 主线程阻塞时间过长,就会抛出ANR
主线程又称UI线程,因为只有在主线程中,才能刷新UI
6.2 消息队列机制
- 主线程创建时,系统会同时创建消息队列对象(MessageQueue)和消息轮询器对象(Looper)
- 轮询器的作用,就是不停的检测消息队列中是否有消息(Message)
- 消息队列一旦有消息,轮询器会把消息对象传给消息处理器(Handler),处理器会调用handleMessage方法来处理这条消息,handleMessage方法运行在主线程中,所以可以刷新ui
- 总结:只要消息队列有消息,handleMessage方法就会调用
- 子线程如果需要刷新ui,只需要往消息队列中发一条消息,触发handleMessage方法即可
- 子线程使用处理器对象的sendMessage方法发送消息


 2805
2805


 被折叠的 条评论
为什么被折叠?
被折叠的 条评论
为什么被折叠?
 到【灌水乐园】发言


