


超级新手一枚,没有搞过windows的任何开发。以下内容都是对着API自己看的。
昨晚的学习成果:
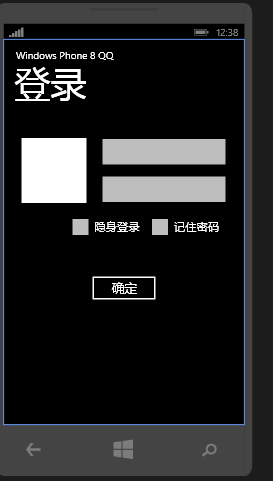
布局文件:
<phone:PhoneApplicationPage x:Class="SmartQQ.Phone.MyPage"
                            xmlns="http://schemas.microsoft.com/winfx/2006/xaml/presentation"
                            xmlns:x="http://schemas.microsoft.com/winfx/2006/xaml"
                            xmlns:phone="clr-namespace:Microsoft.Phone.Controls;assembly=Microsoft.Phone"
                            xmlns:shell="clr-namespace:Microsoft.Phone.Shell;assembly=Microsoft.Phone"
                            xmlns:d="http://schemas.microsoft.com/expression/blend/2008"
                            xmlns:mc="http://schemas.openxmlformats.org/markup-compatibility/2006"
                            FontFamily="{StaticResource PhoneFontFamilyNormal}"
                            FontSize="{StaticResource PhoneFontSizeNormal}"
                            Foreground="{StaticResource PhoneForegroundBrush}"
                            SupportedOrientations="Portrait"
                            Orientation="Portrait"
                            mc:Ignorable="d"
                            shell:SystemTray.IsVisible="True">

    <!--LayoutRoot 是包含所有页面内容的根网格-->
    <Grid x:Name="LayoutRoot"
          Background="Transparent">
        <Grid.RowDefinitions>
            <RowDefinition Height="Auto" />
            <RowDefinition Height="*" />
        </Grid.RowDefinitions>

        <!--TitlePanel 包含应用程序的名称和页标题-->
        <StackPanel Grid.Row="0"
                    Margin="12,17,0,28">
            <TextBlock Text="Windows Phone 8 QQ"
                       Style="{StaticResource PhoneTextNormalStyle}" />
            <TextBlock Text="登录"
                       Margin="9,-7,0,0"
                       Style="{StaticResource PhoneTextTitle1Style}" />
        </StackPanel>

        <!--ContentPanel - 在此处放置其他内容-->
        <Grid x:Name="ContentPanel"
              Margin="25"
              Grid.Row="1">
            <Grid.RowDefinitions>
                <RowDefinition Height="75"></RowDefinition>
                <RowDefinition Height="75"></RowDefinition>
                <RowDefinition Height="75"></RowDefinition>
                <RowDefinition Height="*"></RowDefinition>
            </Grid.RowDefinitions>
            <Grid.ColumnDefinitions>
                <ColumnDefinition Width="150"></ColumnDefinition>
                <ColumnDefinition Width="*"></ColumnDefinition>
            </Grid.ColumnDefinitions>
            <Border Grid.Column="0"
                    Grid.Row="0"
                    Grid.RowSpan="2"
                    Background="White"
                    Margin="10"></Border>
            <TextBox Grid.Column="1"
                     Grid.Row="0"
                     Margin="10,0,0,0"></TextBox>
            <PasswordBox Grid.Column="1"
                         Grid.Row="1"
                         Margin="10,0,0,0"></PasswordBox>
            <StackPanel Grid.Column="0"
                        Grid.ColumnSpan="2"
                        Grid.Row="2"
                        Orientation="Horizontal">
                <CheckBox Content="隐身登录"
                          Margin="100,0,0,0"></CheckBox>
                <CheckBox Content="记住密码"></CheckBox>
            </StackPanel>
            <Button Content="确定"
                    Grid.Column="0"
                    Grid.ColumnSpan="2"
                    Grid.Row="3"
                    Width="150"
                    Height="70"
                    HorizontalAlignment="Center"
                    Margin="0,50,0,0"
                    VerticalAlignment="Top"></Button>
        </Grid>
    </Grid>

</phone:PhoneApplicationPage>
1、(1)这个是视图外部内容距离视图边框的间距赋值方式:
<frameworkElement Margin="uniform"/>
- or -
<frameworkElement Margin="left+right,top+bottom"/>
- or -
<frameworkElement Margin="left,top,right,bottom"/>
Margin="0,50,0,0" :距离“左,上,右,下”方向控件的距离,类似于android中的LayoutMar...XX属性,既控件的外边距。
(2)这个是视图内部内容距离视图边框的间距赋值方式:
属性:Padding,赋值方式如下:
<control Padding="uniform"/>(一个统一的值,使用在所有的边距上)
- or -
<control Padding="left&right,top&bottom"/>
- or -
<control Padding="left,top,right,bottom"/>
(3)Width跟Height属性能接受的参数为:
<frameworkElement Height="double"/>
-or-
<frameworkElement Height="Auto"/>在WP8中的Auto类似与warpcontent。
(4)Grid的属性
创建一个包含三行的 Grid。第一行的
Height
设置为值 Auto,使高度基于该行中内容的大小平均分配。第二行和第三行的高度分别设置为 2* 和
*。第二行获取剩余空间的 2/3,而第三行获取剩余空间的 1/3。
<Grid.RowDefinitions>
    <RowDefinition Height="Auto" />
    <RowDefinition Height="2*" />
    <RowDefinition Height="*"/>
</Grid.RowDefinitions>
2、
HorizontalAlignment:这个属性是设置控件在父视图中水平对齐特征。参数:Left,Center,Right,Stretch(可伸展的)
VerticalAlignmengt 同上HorizontalContentAlignment :这个属性是设置控件控件中内容的水平对齐特征。
VertivalContentAlignment同上参数如下
| Left | 0 | An element(n. 元素;要素;原理;成分;自然环境) aligned(adj. 对齐的;均衡的) to the left of the layout slot for the parent element. |
| Center | 1 | An element aligned to the center of the layout slot for the parent element. |
| Right | 2 | An element aligned to the right of the layout slot for the parent element. |
| Stretch | 3 | An element stretched to fill the entire(全部的) layout slot(位置) of the parent element. |
3、相对于第一条针对视图外部的间距,
4、Grid.ColumnSpan="2"这个属性是让该视图在Grid视图中占两列,就是说可以横放在两列的分界线上
初步体会就是WP8布局的时候首先要想清楚整个界面分成多少行多少列。


 2136
2136


 被折叠的 条评论
为什么被折叠?
被折叠的 条评论
为什么被折叠?
 到【灌水乐园】发言


