


首先来看看我们来看看创建自定义控件所需要的原材料:
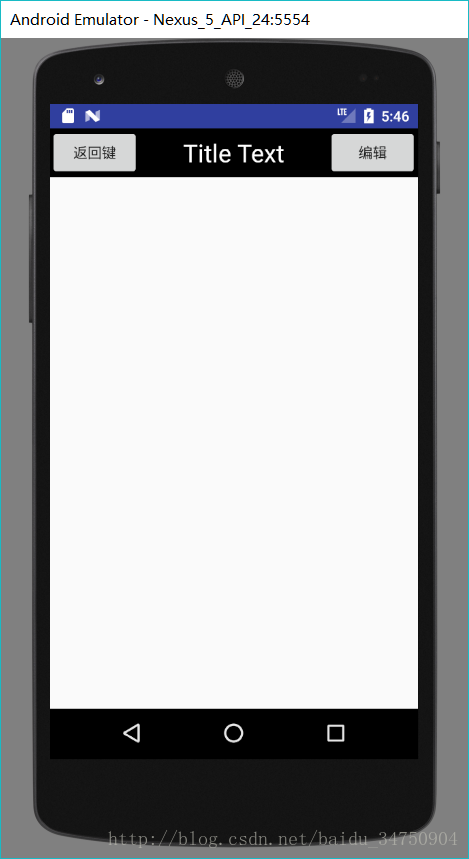
我们这里自定义的是一个ActionBar,如下图所示:
第一步、我们要在MainActivity中把原来自带的ActionBar擦除。代码如下:
package com.example.actionbar;

import android.support.v7.app.ActionBar;
import android.support.v7.app.AppCompatActivity;
import android.os.Bundle;

public class MainActivity extends AppCompatActivity {

    @Override
    protected void onCreate(Bundle savedInstanceState) {
        super.onCreate(savedInstanceState);
        setContentView(R.layout.activity_main);
        ActionBar actionBar = getSupportActionBar();
        if (actionBar!=null){
            actionBar.hide();
        }
    }
}
- 第二步、创建一个布局,title_layout.xml,里面是可以被随意调用的样式,代码如下:
<?xml version="1.0" encoding="utf-8"?>
<LinearLayout xmlns:android="http://schemas.android.com/apk/res/android"
    android:layout_width="match_parent"
    android:layout_height="wrap_content"
    android:background="#000">

    <Button
        android:layout_gravity="center"
        android:id="@+id/title_back"
        android:layout_width="wrap_content"
        android:layout_height="wrap_content"
        android:text="返回键" />
    <TextView
        android:gravity="center"
        android:id="@+id/title_text"
        android:layout_gravity="center"
        android:textSize="24sp"
        android:textColor="#fff"
        android:layout_weight="1"
        android:text="Title Text"
        android:layout_width="0dp"
        android:layout_height="wrap_content" />
    <Button
        android:layout_gravity="center"
        android:id="@+id/title_edit"
        android:layout_width="wrap_content"
        android:layout_height="wrap_content"
        android:text="编辑" />
</LinearLayout>- 第三步、创建一个自定义控件的类,继承LinearLayout,并且重写其中带有两个参数的类。然后在构造函数中需要对标题栏布局进行动态加载,这就可以通过LayoutInflate来实现了,其中,声明出多数情况下都都会被重复用到的控件,TitleLayout.java,代码如下:
package com.example.actionbar;

import android.app.Activity;
import android.content.Context;
import android.util.AttributeSet;
import android.view.LayoutInflater;
import android.view.View;
import android.widget.Button;
import android.widget.LinearLayout;
import android.widget.Toast;

/**
 * 项目名:  ViewPager
 * 包名:    com.example.actionbar
 * 创建者:  Dujiang0311
 * 创建时间:2017/4/28 12:43
 * 描述:    创建一个自定义控件
 */

public class TitleLayout extends LinearLayout {
    public TitleLayout(Context context, AttributeSet attrs) {
        super(context, attrs);
        LayoutInflater.from(context).inflate(R.layout.title_layout,this);
        Button tBack = (Button) findViewById(R.id.title_back);
        Button tEdit = (Button) findViewById(R.id.title_edit);
        tBack.setOnClickListener(new OnClickListener() {
            @Override
            public void onClick(View v) {
                ((Activity)getContext()).finish();
            }
        });
        tEdit.setOnClickListener(new OnClickListener() {
            @Override
            public void onClick(View v) {
                Toast.makeText(getContext(), "点击了编辑按钮", Toast.LENGTH_SHORT).show();
            }
        });
    }
}
- 第四步、就可以在想调用的时候调用了,不过布局文件需要添加自定义的控件哟:activity_main.xml的代码如下:
<?xml version="1.0" encoding="utf-8"?>
<LinearLayout xmlns:android="http://schemas.android.com/apk/res/android"
    android:layout_width="match_parent"
    android:layout_height="match_parent">

    <com.example.actionbar.TitleLayout
        android:layout_width="match_parent"
        android:layout_height="wrap_content" />

</LinearLayout>


 3525
3525


 被折叠的 条评论
为什么被折叠?
被折叠的 条评论
为什么被折叠?
 到【灌水乐园】发言


