


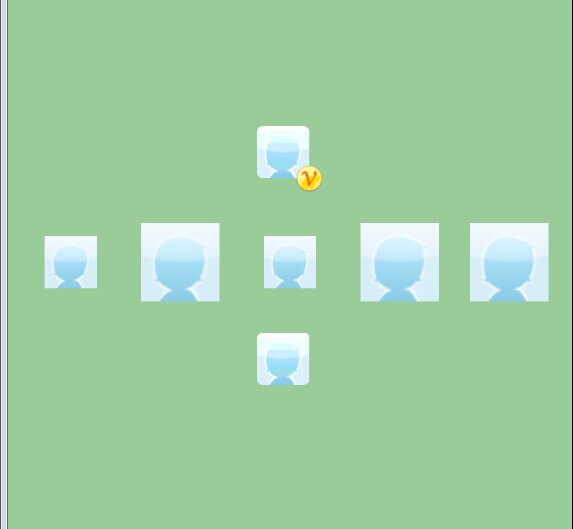
先上效果图:
Layout文件:
<RelativeLayout xmlns:android="http://schemas.android.com/apk/res/android"
    xmlns:tools="http://schemas.android.com/tools"
    android:layout_width="match_parent"
    android:layout_height="match_parent"
    android:background="#99CC99"
    tools:context=".MainActivity" >


    <ImageView
        android:id="@+id/img1"
        android:layout_centerInParent="true"
        android:layout_width="50dp"
        android:layout_height="50dp"
        android:adjustViewBounds="true"
        android:scaleType="centerInside"
        android:src="@drawable/portrait"
        />

    <ImageView
        android:id="@+id/img5"
        android:layout_centerVertical="true"
        android:layout_toLeftOf="@id/img1"
        android:layout_marginRight="20dp"
        android:layout_width="50dp"
        android:layout_height="50dp"
        android:adjustViewBounds="true"
        android:scaleType="fitXY"
        android:src="@drawable/portrait"
        />

    <ImageView
        android:id="@+id/img6"
        android:layout_centerVertical="true"
        android:layout_toLeftOf="@id/img5"
        android:layout_marginRight="20dp"
        android:layout_width="50dp"
        android:layout_height="50dp"
        android:adjustViewBounds="true"
        android:scaleType="center"
        android:src="@drawable/portrait"
        />

    <ImageView
        android:id="@+id/img4"
        android:layout_centerVertical="true"
        android:layout_marginLeft="20dp"
        android:layout_toRightOf="@id/img1"
        android:layout_width="50dp"
        android:layout_height="50dp"
        android:adjustViewBounds="true"
        android:scaleType="centerCrop"
        android:src="@drawable/portrait"
        />

     <ImageView
        android:id="@+id/img7"
        android:layout_centerVertical="true"
        android:layout_marginLeft="20dp"
        android:layout_toRightOf="@id/img4"
        android:layout_width="50dp"
        android:layout_height="50dp"
        android:adjustViewBounds="true"
        android:scaleType="fitCenter"
        android:src="@drawable/portrait"
        />


      <ImageView
        android:id="@+id/img2"
        android:layout_marginBottom="20dp"
        android:layout_centerHorizontal="true"
        android:layout_above="@id/img1"
        android:layout_width="wrap_content"
        android:layout_height="wrap_content"
        />

        <ImageView
        android:id="@+id/img3"
        android:layout_marginTop="20dp"
         android:layout_centerHorizontal="true"
        android:layout_below="@id/img1"
        android:layout_width="wrap_content"
        android:layout_height="wrap_content"
        />
</RelativeLayout>
首先介绍两种把资源里的drawable转成bitmap的方式
第一种:
Bitmap bmp=BitmapFactory.decodeResource(this.getResources(), R.drawable.portrait); Drawable d = this.getResources().getDrawable(R.drawable.portrait);
Bitmap bmp = drawableToBitmap(d);
public static Bitmap drawableToBitmap(Drawable drawable) {
Bitmap bitmap = Bitmap.createBitmap(
drawable.getIntrinsicWidth(),
drawable.getIntrinsicHeight(),
Bitmap.Config.ARGB_8888
);
Canvas canvas = new Canvas(bitmap);
//canvas.setBitmap(bitmap);
drawable.setBounds(0, 0, drawable.getIntrinsicWidth(), drawable.getIntrinsicHeight());
drawable.draw(canvas);
return bitmap;
}把Bitmap加上圆角的方法:
private static RectF rrbRectf = new RectF();
	private static Path rrbRath = new Path();
	private static final int RRB_DEFAULT_SIZE = 10;

	public static Bitmap outputBmp(Context ctx, Bitmap src, boolean isCover) {
		Bitmap v = null;
		if (isCover) {
			v = BitmapFactory.decodeResource(ctx.getResources(), R.drawable.v);
		}else{
			v = BitmapFactory.decodeResource(ctx.getResources(), R.drawable.tv);
		}
		Bitmap bmp = null;
		int arcLength = RRB_DEFAULT_SIZE;
		if (src != null && arcLength > 0) {
			int width = src.getWidth();
			int height = src.getHeight();
			// Utils.loge("width:" + width + "height:" + height);
			Bitmap newBitmap = Bitmap.createBitmap(width, height,
					Bitmap.Config.ARGB_4444);
			Canvas canvas = new Canvas(newBitmap);
			rrbRath.reset();
			rrbRectf.set(0, 0, width, height);
			<strong>rrbRath.addRoundRect(rrbRectf, arcLength, arcLength,
					Path.Direction.CW);  //这里是加上圆角</strong>
			canvas.clipPath(rrbRath);
			canvas.drawBitmap(src, 0, 0, new Paint(Paint.ANTI_ALIAS_FLAG));
			if (newBitmap != null && v != null) {
				int width1 = newBitmap.getWidth();
				int height1 = newBitmap.getHeight();
				int width2 = v.getWidth();
				int height2 = v.getHeight();
				bmp = Bitmap.createBitmap(width1 + (width2 / 2), height1
						+ (height2 / 2), Bitmap.Config.ARGB_4444);
				bmp.eraseColor(Color.TRANSPARENT);
				Canvas canvas2 = new Canvas(bmp);
				canvas2.drawBitmap(newBitmap, 0, 0, new Paint(
						Paint.ANTI_ALIAS_FLAG));
				<strong>canvas2.drawBitmap(v, width1 - (width2 / 2), height1
						- (height2 / 2), new Paint(Paint.ANTI_ALIAS_FLAG));  //这里是在图片右下角加上v</strong>
				newBitmap.recycle();
				v.recycle();
				return bmp;
			}
			src.recycle();
		}
		return bmp;

	}
scaletype的种类分为三类matrix(默认)、fit-X类、和center类。matrix就不多说。fit-X类中,
fitStart、fitCenter和fitEnd之间的都是根据需要使原图改变对ImgView进行适应,不剪裁,按matrix进行绘制,但它们
的区别在于基准不同。fitStart的基准为最上角的点(即matrix方式开始的点)fitCenter的基准点为中间的点
(matrix方式中可以使图片居中的点),而fitEnd的基准点为右下角的点(即matrix方式最后绘制点)。center类
中,center、centerCrop、centerInside都是以原图的几何中心点和ImagView的几何中心点为基准,且只绘制
ImagView大小的图像,不同的是是否保持原图大小和绘图的目标不同、采取的手段不同
CENTER /center  按图片的原来size居中显示,当图片长/宽超过View的长/宽,则截取图片的居中部分显示
CENTER_CROP / centerCrop  按比例扩大图片的size居中显示,使得图片长(宽)等于或大于View的长(宽)
CENTER_INSIDE / centerInside  将图片的内容完整居中显示,通过按比例缩小或原来的size使得图片长/宽等于或小于View的长/宽
FIT_CENTER / fitCenter  把图片按比例扩大/缩小到View的宽度,居中显示
FIT_END / fitEnd   把图片按比例扩大/缩小到View的宽度,显示在View的下部分位置
FIT_START / fitStart  把图片按比例扩大/缩小到View的宽度,显示在View的上部分位置
FIT_XY / fitXY  把图片不按比例扩大/缩小到View的大小显示
MATRIX / matrix 用矩阵来绘制,动态缩小放大图片来显示。


 1212
1212

 被折叠的 条评论
为什么被折叠?
被折叠的 条评论
为什么被折叠?
 到【灌水乐园】发言


