


现在看了很多APP,大多用到了抽屉效果,现在就以片刻APP为参考,详细介绍抽屉效果实现的原理。这里介绍一个比较简单的抽屉效果,其它抽屉效果都是大同小异。
整体的效果如图所示:

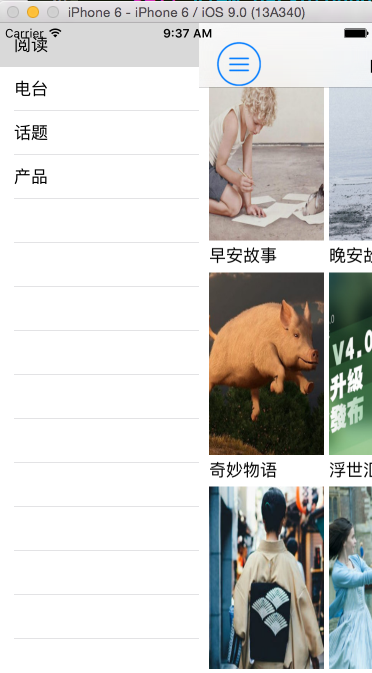
       整个实现的原理:通过点击导航栏侧边图标或者左右手势滑动来同时改变主菜单视图的X坐标和侧边栏视图的视图来实现抽屉效果,主菜单导航控制器的根视图首先默认的侧边的ReadViewController,通过点击侧边不同的cell,用点击的视图控制器来替换主菜单的根控制器,这样就实现了抽屉效果。
     如果要实现抽屉效果,首先需要一个菜单视图,侧边视图,这里菜单;侧边建议都采用用控制器,方便以后更好的功能扩展,功能要比用单纯的视图要强大。
     新建MenuController ,LeftViewController两个控制器;TopicViewController,ReadViewController,RadioViewController,ProductViewController四个跳转控制器,先建立一个继承与ViewController的基类控制器作为这四个控制器共同的父类,方便以后操作。
     关键代码段如下:
Appdelegate.m
#import "AppDelegate.h"
#import "MenuViewController.h"
#import "readViewController.h"
#import "LeftViewController.h"
#import "RadioViewController.h"
#import "ProductViewController.h"
#import "TopicViewController.h"
@interface AppDelegate ()

@end

@implementation AppDelegate


- (BOOL)application:(UIApplication *)application didFinishLaunchingWithOptions:(NSDictionary *)launchOptions {

    self.window = [[UIWindow alloc]initWithFrame:[UIScreen mainScreen].bounds];
    readViewController  *first = [[readViewController alloc]init];
     UINavigationController *nv = [[UINavigationController alloc]initWithRootViewController:first];
   _menu = [[MenuViewController alloc]initWithRootViewcontroll:nv];
    self.window.rootViewController =_menu;
    _menu.leftVC = [[LeftViewController alloc]init];
    NSMutableArray *dataArr = [NSMutableArray arrayWithObjects:@"阅读",@"电台",@"话题",@"产品", nil];
    _menu.leftVC.leftTitleArray  = dataArr;
    [self.window makeKeyAndVisible];
    //创建需要切换的视图控制器
    RadioViewController *radio = [[RadioViewController alloc]init];

    TopicViewController *topic = [[TopicViewController alloc]init];
    ProductViewController *produc = [[ProductViewController alloc]init];
    NSMutableArray *viewC = [NSMutableArray arrayWithObjects:first,radio,topic,produc, nil];
    _menu.leftVC.viewControllers = viewC;

    return YES;
}
MenuViewController.h
#import <UIKit/UIKit.h>
#include "LeftViewController.h"
@interface MenuViewController : UIViewController
//受menu管理的做视图
@property (nonatomic,strong)LeftViewController *leftVC;
//受menu管理的跟视图
@property (nonatomic,strong)UIViewController *rootVC;
//初始化方法
-(instancetype)initWithRootViewcontroll:(UIViewController *)controller;
//用来标记菜单是否打开
@property(nonatomic,assign)BOOL isDispalyMenu;
@end
MenuViewController.m
#import "MenuViewController.h"

@interface MenuViewController ()
@property (strong,nonatomic)UISwipeGestureRecognizer *leftSwipe;
@property (strong,nonatomic)UISwipeGestureRecognizer *rightSwipe;
@end

@implementation MenuViewController
-(instancetype)initWithRootViewcontroll:(UIViewController *)controller{
    if (self = [super init]) {
        self.rootVC = controller;
    }
    return self;
}
#pragma mark -设置左边的视图
-(void)setLeftVC:(LeftViewController *)leftVC{
    _leftVC = leftVC;
}
#pragma mark -设置菜单的跟视图控制器
-(void)setRootVC:(UIViewController *)rootVC{
    //对跟视图进行复制
    _rootVC = rootVC;
    //先判断跟视图不为空,然后才能进行操作
    if(_rootVC){
        UIView *view = _rootVC.view;
        view.frame = self.view.bounds;
        [self.view addSubview:view];
        [view addGestureRecognizer:self.leftSwipe];
        [view addGestureRecognizer:self.rightSwipe];
    }
    [self setDefautMenuImage];
}

//先判断是否有才去用
//2 先判断是否联网,在请求数据
//3 先判断是否有缓存,在加载
-(void)setDefautMenuImage{
    if(self.rootVC == nil){
        return;
    }
    if([self.rootVC isKindOfClass:[UINavigationController class]]){
        UIBarButtonItem *leftBarButtonItem = [[UIBarButtonItem alloc]initWithImage:[UIImage imageNamed:@"menu"] style:UIBarButtonItemStylePlain target:self action:@selector(left:)];
        //先拿到导航控制器
        UINavigationController *fistNv =(UINavigationController *)self.rootVC;
        UIViewController *fists = [[fistNv viewControllers]objectAtIndex:0];
        fists.navigationItem.leftBarButtonItem  = leftBarButtonItem;

    }


}
-(void)left:(UIBarButtonItem *)l{
    UIView *leftV = self.leftVC.view;

    CGRect fram = self.view.frame;
    if (self.isDispalyMenu == NO) {
        //第一步,设置左边菜单的视图
        //原来关闭,

        fram.size.width = 200;
        leftV.frame = fram;//设置菜单的大小,宽度为280
        //要用插入,因为左边的菜单要在menu的视图层的下面,
        //[leftV removeFromSuperview];
       // if ([[[self.view subviews]objectAtIndex:0] isKindOfClass:[UIView class]]) {
            [self.view insertSubview:leftV atIndex:0];
       // }

        //第二步,移动菜单的根视图
        fram = _rootVC.view.frame;
        fram.origin.x = 200;
        [UIView animateWithDuration:1 animations:^{
            _rootVC.view.frame = fram;
        }];
        self.isDispalyMenu = YES;
    }else{
       // [leftV removeFromSuperview];
         [self.view insertSubview:leftV atIndex:0];
        fram.size.width = 0;
        fram = _rootVC.view.frame;
        fram.origin.x = 0;
        [UIView animateWithDuration:0.5 animations:^{
            _rootVC.view.frame = fram;
        }];
        self.isDispalyMenu = NO;
    }
}
- (void)viewDidLoad {
    [super viewDidLoad];
    self.view.backgroundColor = [UIColor redColor];
    [self setDefautMenuImage];
    // 一开始设置菜单为关闭的
    self.isDispalyMenu = NO;

    //初始化向左清扫和向右清扫的手势
    self.leftSwipe = [[UISwipeGestureRecognizer alloc]initWithTarget:self action:@selector(doLeftAction:)];
    [self.rootVC.view addGestureRecognizer:self.leftSwipe];
    self.leftSwipe.direction = UISwipeGestureRecognizerDirectionLeft;

    self.rightSwipe = [[UISwipeGestureRecognizer alloc]initWithTarget:self action:@selector(doRightAction:)];
    [self.rootVC.view addGestureRecognizer:self.rightSwipe];
    self.rightSwipe.direction = UISwipeGestureRecognizerDirectionRight;


}
//向左滑动的手势执行的方法
-(void)doLeftAction:(UISwipeGestureRecognizer *)g{
  //  UIView *leftV = self.leftVC.view;
    CGRect fram = self.view.frame;

    fram.size.width = 0;
    fram = _rootVC.view.frame;
    fram.origin.x = 0;
    [UIView animateWithDuration:0.5 animations:^{
        _rootVC.view.frame = fram;
    }];
    self.isDispalyMenu = NO;
  // [leftV removeFromSuperview];
}
//向右滑动的手势执行的方法
-(void)doRightAction:(UISwipeGestureRecognizer *)g{
    UIView *leftV = self.leftVC.view;
    CGRect fram = self.view.frame;
    fram.size.width = 280;
    leftV.frame = fram;//设置菜单的大小,宽度为280
    //要用插入,因为左边的菜单要在menu的视图层的下面,
    [self.view insertSubview:leftV atIndex:0];

    //第二步,移动菜单的根视图
    fram = _rootVC.view.frame;
    fram.origin.x = 280;
    [UIView animateWithDuration:1 animations:^{
        _rootVC.view.frame = fram;
    }];
    self.isDispalyMenu = YES;

}
- (void)didReceiveMemoryWarning {
    [super didReceiveMemoryWarning];
    // Dispose of any resources that can be recreated.
}
LeftViewController.h
#import <UIKit/UIKit.h>

@interface LeftViewController : UIViewController
@property(strong,nonatomic)NSMutableArray *leftTitleArray;
//用来显示菜单标题的
@property (nonatomic,strong)NSMutableArray *viewControllers;
@end
LeftViewController.m
#import "LeftViewController.h"
#import "AppDelegate.h"
@interface LeftViewController ()<UITableViewDataSource,UITableViewDelegate>

@property(strong,nonatomic)UITableView *listTableV;
@end

@implementation LeftViewController

- (void)viewDidLoad {
    [super viewDidLoad];
    self.view.backgroundColor = [UIColor redColor];
    self.listTableV = [[UITableView alloc]initWithFrame:CGRectMake(0, 0, 200, [UIScreen mainScreen].bounds.size.height) style:UITableViewStylePlain];
    self.listTableV.delegate = self;
    self.listTableV.dataSource = self;
    [self.view addSubview:self.listTableV];

}

- (void)didReceiveMemoryWarning {
    [super didReceiveMemoryWarning];
    // Dispose of any resources that can be recreated.
}


-(UITableViewCell *)tableView:(UITableView *)tableView cellForRowAtIndexPath:(NSIndexPath *)indexPath{
    static NSString *identifier = @"cell";
    UITableViewCell *cell = [tableView dequeueReusableCellWithIdentifier:identifier];
    if (cell==nil) {
        cell = [[UITableViewCell alloc]initWithStyle:UITableViewCellStyleDefault reuseIdentifier:identifier];
    }
    cell.backgroundColor = [UIColor clearColor];
    cell.textLabel.text = self.leftTitleArray[indexPath.row];
    return cell;

}

-(NSInteger)tableView:(UITableView *)tableView numberOfRowsInSection:(NSInteger)section{
    return self.leftTitleArray.count;
}
-(void)tableView:(UITableView *)tableView didSelectRowAtIndexPath:(NSIndexPath *)indexPath{
    //1 先拿到APP
    AppDelegate *app = [UIApplication sharedApplication].delegate;
    MenuViewController *menu =  app.menu;
    //改变menu的跟视图达到切换的效果

    UINavigationController *nav = [[UINavigationController alloc]initWithRootViewController:self.viewControllers[indexPath.row]];
    [menu setRootVC:nav];
    menu.isDispalyMenu = NO;
}
@end
这样就实现抽屉效果了。源码代码Demo
下载地址:http://pan.baidu.com/s/1bqrf7S


 487
487


 被折叠的 条评论
为什么被折叠?
被折叠的 条评论
为什么被折叠?
 到【灌水乐园】发言


