软件测试总结

之前实习做过一段时间测试,现做个总结;

实习测试的是一款CM系统(case 系统),来记录IT部门处理的维修,服务,反馈,预定服务等case;b/s架构,人少小项目,实习时间短,去了已经快完工,主要测试VPN登陆,提交邮件反馈,系统内存分析有无内存泄露等;(eclipse MAT插件)

白盒黑盒都做;

白盒利用:逻辑覆盖法和基本路径法进行设计,给定的人测试逻辑,代码测试各个模块功能,

黑盒主要验证其功能;实现能不能打通;case优先级,备注乱码,邮件自动查找,case跟踪等

1.        接受测试任务,进行需求分析;

2.        按照测试计划搭建测试环境,并保证测试环境的可靠性;

3.        按照测试计划编写测试用例,保证测试用例合理有效;

4.        按照测试用例执行测试,及时发现缺陷,并使用工具进行管理缺陷;

5.        编写和提交测试报告,保证测试进度按计划完成;

6.        参与审核其他测试工程师的测试用例和报告;

7.        学习和推广使用新的测试技术和工具;

8.        负责组织搭建,管理和维护部门的测试环境(测试环境管理和维护方向适用);

9.        参与自动化测试框架设计,各产品自动化测试的设计、实现与维护(自动化测试方向适用);

10.    负责组织对产品进行压力测试(压力测试方向适用);

11.    搭建与维护部门的配置管理环境,制定配置管理工具并指导部门成员使用;进行配置管理流程规范和配置管理工具的宣贯、引导和培训(配置管理方向适用)。


junit测试 from http://blog.csdn.net/wangpeng047/article/details/9631193


1.自动生成测试用例

几乎所有程序员都听说过Junit的大名,但不知真正懂得运用它的人有多少,我便是其中的一个小白。

知道Junit是用来测试的,但却把“宝刀”当成了“菜刀”用。为了从此不再菜鸟,特此总结整理了下Junit的知识点。

一、建立Junit测试类

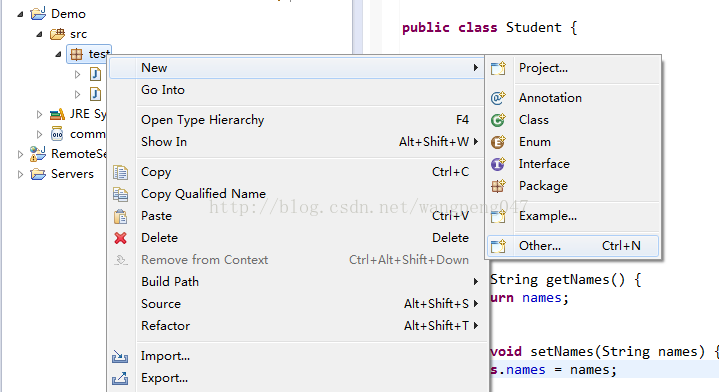
1. 右击test测试包,选择New-->Oher...


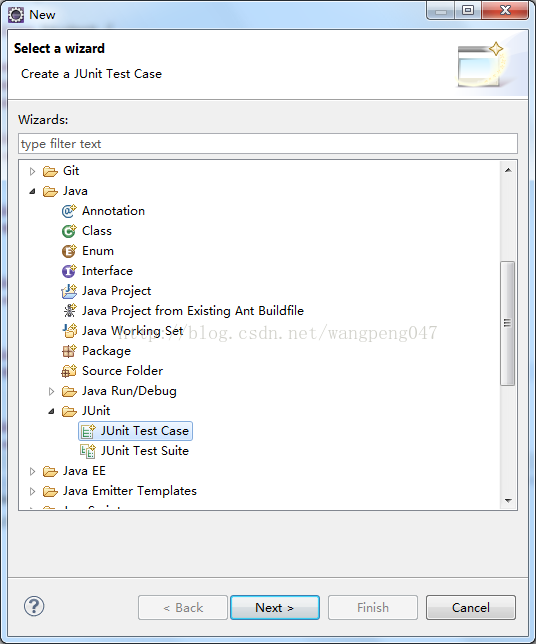
2. 在窗口中找到Junit,选择Junit Test Case

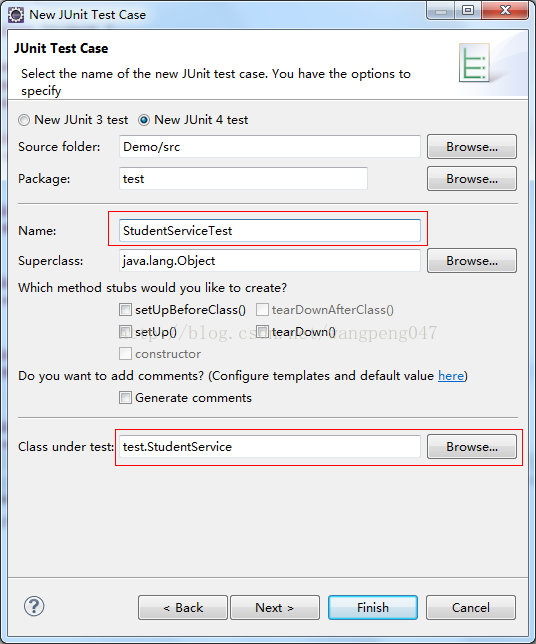
3. 输入名称(Name),命名规则一般建议采用:类名+Test。Browse...选择要测试的类,这里是StudentService。
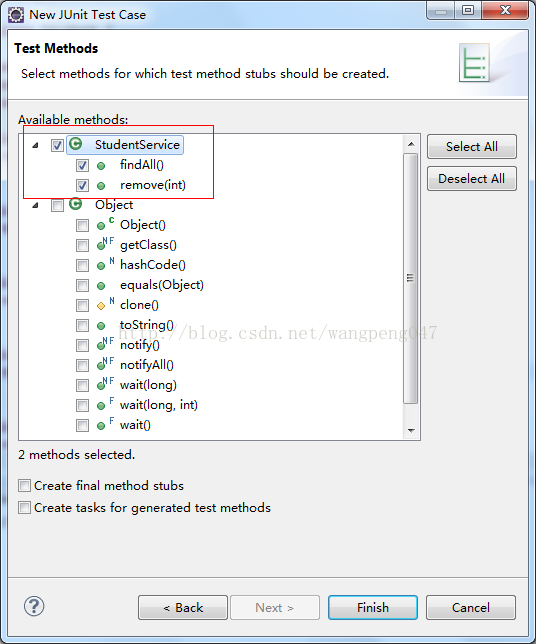
4. 勾选要测试的方法

5. 生成后,效果如下:

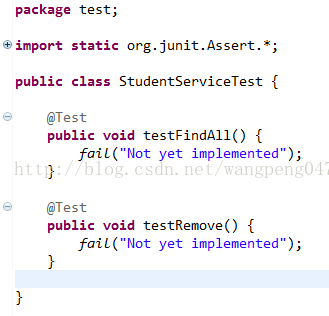
这里import static是引入Assert类中静态属性或静态方法的写法。原来要Assert.fail(),现在只需直接fial()即可,即省略了Assert。


其实不通过Junit新建向导来建立也可以,随便建立一个新类后,只需在方法上加入@Test注解即可。


二主要方法:


二、核心——断言

断言是编写测试用例的核心实现方式,即期望值是多少,测试的结果是多少,以此来判断测试是否通过。

1. 断言核心方法

assertArrayEquals(expecteds, actuals)查看两个数组是否相等。
assertEquals(expected, actual)查看两个对象是否相等。类似于字符串比较使用的equals()方法
assertNotEquals(first, second)查看两个对象是否不相等。
assertNull(object)查看对象是否为空。
assertNotNull(object)查看对象是否不为空。
assertSame(expected, actual)查看两个对象的引用是否相等。类似于使用“==”比较两个对象
assertNotSame(unexpected, actual)查看两个对象的引用是否不相等。类似于使用“!=”比较两个对象
assertTrue(condition)查看运行结果是否为true。
assertFalse(condition)查看运行结果是否为false。
assertThat(actual, matcher)查看实际值是否满足指定的条件
fail()让测试失败

2. 示例


import static org.hamcrest.CoreMatchers.*;
import static org.junit.Assert.*;

import java.util.Arrays;

import org.hamcrest.core.CombinableMatcher;
import org.junit.Test;

public class T2 {

	  @Test
	  public void testAssertArrayEquals() {
	    byte[] expected = "trial".getBytes();
	    byte[] actual = "trial".getBytes();
	    org.junit.Assert.assertArrayEquals("failure - byte arrays not same", expected, actual);
	  }

	  @Test
	  public void testAssertEquals() {
	    org.junit.Assert.assertEquals("failure - strings not same", 5l, 5l);
	  }

	  @Test
	  public void testAssertFalse() {
	    org.junit.Assert.assertFalse("failure - should be false", false);
	  }

	  @Test
	  public void testAssertNotNull() {
	    org.junit.Assert.assertNotNull("should not be null", new Object());
	  }

	  @Test
	  public void testAssertNotSame() {
	    org.junit.Assert.assertNotSame("should not be same Object", new Object(), new Object());
	  }

	  @Test
	  public void testAssertNull() {
	    org.junit.Assert.assertNull("should be null", null);
	  }

	  @Test
	  public void testAssertSame() {
	    Integer aNumber = Integer.valueOf(768);
	    org.junit.Assert.assertSame("should be same", aNumber, aNumber);
	  }

	  // JUnit Matchers assertThat
	  @Test
	  public void testAssertThatBothContainsString() {
	    org.junit.Assert.assertThat("albumen", both(containsString("a")).and(containsString("b")));
	  }

	  @Test
	  public void testAssertThathasItemsContainsString() {
	    org.junit.Assert.assertThat(Arrays.asList("one", "two", "three"), hasItems("one", "three"));
	  }

	  @Test
	  public void testAssertThatEveryItemContainsString() {
	    org.junit.Assert.assertThat(Arrays.asList(new String[] { "fun", "ban", "net" }), everyItem(containsString("n")));
	  }

	  // Core Hamcrest Matchers with assertThat
	  @Test
	  public void testAssertThatHamcrestCoreMatchers() {
	    assertThat("good", allOf(equalTo("good"), startsWith("good")));
	    assertThat("good", not(allOf(equalTo("bad"), equalTo("good"))));
	    assertThat("good", anyOf(equalTo("bad"), equalTo("good")));
	    assertThat(7, not(CombinableMatcher.<Integer> either(equalTo(3)).or(equalTo(4))));
	    assertThat(new Object(), not(sameInstance(new Object())));
	  }
}


三、核心——注解

1. 说明

@Before初始化方法
@After释放资源
@Test测试方法,在这里可以测试期望异常和超时时间
@Ignore忽略的测试方法
@BeforeClass针对所有测试,只执行一次,且必须为static void
@AfterClass针对所有测试,只执行一次,且必须为static void
@RunWith指定测试类使用某个运行器
@Parameters指定测试类的测试数据集合
@Rule允许灵活添加或重新定义测试类中的每个测试方法的行为
@FixMethodOrder指定测试方法的执行顺序

2. 执行顺序

一个测试类单元测试的执行顺序为:

@BeforeClass –> @Before –> @Test –> @After –> @AfterClass

每一个测试方法的调用顺序为:

@Before –> @Test –> @After

3. 示例


import static org.junit.Assert.*;

import org.junit.*;

public class T3 {

	@BeforeClass
	public static void setUpBeforeClass() throws Exception {
		System.out.println("in BeforeClass================");
	}

	@AfterClass
	public static void tearDownAfterClass1() throws Exception {
		System.out.println("in AfterClass=================");
	}

	@Before
	public void before1() {
		System.out.println("in Before");
	}

	@After
	public void after() {
		System.out.println("in After");
	}

	@Test(timeout = 10000)//time 
	public void testadd() {
		JDemo a = new JDemo();
		assertEquals(6, a.add(3, 3));
		System.out.println("in Test ----Add");
	}

	@Test
	public void testdivision() {
		JDemo a = new JDemo();
		assertEquals(1, a.division(6, 2));//和设置不同抛出失败
		System.out.println("in Test ----Division");
	}

	@Ignore
	@Test
	public void test_ignore() {
		JDemo a = new JDemo();
		assertEquals(6, a.add(1, 5));
		System.out.println("in test_ignore");
	}

	@Test
	public void teest_fail() {
		fail();//输出fail
	}
}

class JDemo extends Thread {

	int result;

	public int add(int a, int b) {
		try {
			sleep(1000);
			result = a + b;
		} catch (InterruptedException e) {
		}
		return result;
	}

	public int division(int a, int b) {
		return result = a / b;
	}
}


in BeforeClass================
in Before
in Test ----Add
in After
in Before
in After
in Before
in After
in AfterClass=================


四、实例总结

1. 参数化测试

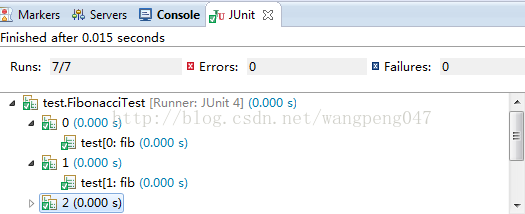
有时一个测试方法,不同的参数值会产生不同的结果,那么我们为了测试全面,会把多个参数值都写出来并一一断言测试,这样有时难免费时费力,这是我们便可以采用参数化测试来解决这个问题。参数化测试就好比把一个“输入值,期望值”的集合传入给测试方法,达到一次性测试的目的。

[java]  view plain  copy
  1. package test;  
  2.   
  3. import static org.junit.Assert.*;  
  4.   
  5. import java.util.Arrays;  
  6.   
  7. import org.junit.Test;  
  8. import org.junit.runner.RunWith;  
  9. import org.junit.runners.Parameterized;  
  10. import org.junit.runners.Parameterized.Parameters;  
  11.   
  12. @RunWith(Parameterized.class)  
  13. public class FibonacciTest {  
  14.   
  15.     @Parameters(name = "{index}: fib({0})={1}")  
  16.     public static Iterable<Object[]> data() {  
  17.         return Arrays.asList(new Object[][] { { 00 }, { 11 }, { 21 },  
  18.                 { 32 }, { 43 }, { 55 }, { 68 } });  
  19.     }  
  20.   
  21.     private int input;  
  22.     private int expected;  
  23.   
  24.     public FibonacciTest(int input, int expected) {  
  25.         this.input = input;  
  26.         this.expected = expected;  
  27.     }  
  28.   
  29.     @Test  
  30.     public void test() {  
  31.         assertEquals(expected, Fibonacci.compute(input));  
  32.     }  
  33. }  
  34.   
  35. class Fibonacci {  
  36.   
  37.     public static int compute(int input) {  
  38.         int result;  
  39.         switch (input) {  
  40.         case 0:  
  41.             result = 0;  
  42.             break;  
  43.         case 1:  
  44.         case 2:  
  45.             result = 1;  
  46.             break;  
  47.         case 3:  
  48.             result = 2;  
  49.             break;  
  50.         case 4:  
  51.             result = 3;  
  52.             break;  
  53.         case 5:  
  54.             result = 5;  
  55.             break;  
  56.         case 6:  
  57.             result = 8;  
  58.             break;  
  59.         default:  
  60.             result = 0;  
  61.         }  
  62.         return result;  
  63.     }  
  64. }  

@Parameters注解参数name,实际是测试方法名称。由于一个test()方法就完成了所有测试,那假如某一组测试数据有问题,那在Junit的结果页面里该如何呈现?因此采用name实际上就是区分每个测试数据的测试方法名。如下图:

2. 打包测试

同样,如果一个项目中有很多个测试用例,如果一个个测试也很麻烦,因此打包测试就是一次性测试完成包中含有的所有测试用例。

[java]  view plain  copy
  1. package test;  
  2.   
  3. import org.junit.runner.RunWith;  
  4. import org.junit.runners.Suite;  
  5.   
  6. @RunWith(Suite.class)  
  7. @Suite.SuiteClasses({ AssertTests.class, FibonacciTest.class, JDemoTest.class })  
  8. public class AllCaseTest {  
  9.   
  10. }  

这个功能也需要使用一个特殊的Runner ,需要向@RunWith注解传递一个参数Suite.class 。同时,我们还需要另外一个注解@Suite.SuiteClasses,来表明这个类是一个打包测试类。并将需要打包的类作为参数传递给该注解就可以了。至于AllCaseTest随便起一个类名,内容为空既可。运行AllCaseTest类即可完成打包测试

3. 异常测试

异常测试与普通断言测试不同,共有三种方法,其中最为灵活的是第三种,可以与断言结合使用

第一种:

[java]  view plain  copy
  1. @Test(expected= IndexOutOfBoundsException.class)   
  2. public void empty() {   
  3.      new ArrayList<Object>().get(0);   
  4. }  

第二种:

[java]  view plain  copy
  1. @Test  
  2. public void testExceptionMessage() {  
  3.     try {  
  4.         new ArrayList<Object>().get(0);  
  5.         fail("Expected an IndexOutOfBoundsException to be thrown");  
  6.     } catch (IndexOutOfBoundsException anIndexOutOfBoundsException) {  
  7.         assertThat(anIndexOutOfBoundsException.getMessage(), is("Index: 0, Size: 0"));  
  8.     }  
  9. }  

第三种:

[java]  view plain  copy
  1. @Rule  
  2. public ExpectedException thrown = ExpectedException.none();  
  3.   
  4. @Test  
  5. public void shouldTestExceptionMessage() throws IndexOutOfBoundsException {  
  6.     List<Object> list = new ArrayList<Object>();  
  7.   
  8.     thrown.expect(IndexOutOfBoundsException.class);  
  9.     thrown.expectMessage("Index: 0, Size: 0");  
  10.     list.get(0);  
  11.     Assert.assertEquals(1, list.get(0));  
  12. }  

在上述几种方法中,无论是expected还是expect都表示期望抛出的异常,假如某一方法,当参数为某一值时会抛出异常,那么使用第一种方法就必须为该参数单独写一个测试方法来测试异常,而无法与其他参数值一同写在一个测试方法里,所以显得累赘。第二种方法虽然解决这个问题,但是写法不仅繁琐也不利于理解。而第三种犯法,不仅能动态更改期望抛出的异常,与断言语句结合的也非常好,因此推荐使用该方法来测试异常。

4. 限时测试

有时为了防止出现死循环或者方法执行过长(或检查方法效率),而需要使用到限时测试。顾名思义,就是超出设定时间即视为测试失败。共有两种写法。

第一种:

[java]  view plain  copy
  1. @Test(timeout=1000)  
  2. public void testWithTimeout() {  
  3.   ...  
  4. }  

第二种:

[java]  view plain  copy
  1. public class HasGlobalTimeout {  
  2.     public static String log;  
  3.   
  4.     @Rule  
  5.     public Timeout globalTimeout = new Timeout(10000); // 10 seconds max per method tested  
  6.   
  7.     @Test  
  8.     public void testInfiniteLoop1() {  
  9.         log += "ran1";  
  10.         for (;;) {  
  11.         }  
  12.     }  
  13.   
  14.     @Test  
  15.     public void testInfiniteLoop2() {  
  16.         log += "ran2";  
  17.         for (;;) {  
  18.         }  
  19.     }  
  20. }  

其中,第二种方法与异常测试的第三种方法的写法类似。也是推荐的写法。


至此,Junit的教程总结性文章已介绍完了。通过系统总结也进一步加深了对Junit的认识,希望也能同样帮助到对Junit还不太理解的朋友。如果大家还有什么好的建议和用法,很欢迎能提出来一起交流。


一、会用Spring测试套件的好处

在开发基于Spring的应用时,如果你还直接使用Junit进行单元测试,那你就错过了Spring为我们所提供的饕餮大餐了。使用Junit直接进行单元测试有以下四大不足:

1)导致多次Spring容器初始化问题

根据JUnit测试方法的调用流程,每执行一个测试方法都会创建一个测试用例的实例并调用setUp()方法。由于一般情况下,我们在setUp()方法中初始化Spring容器,这意味着如果测试用例有多少个测试方法,Spring容器就会被重复初始化多次。虽然初始化Spring容器的速度并不会太慢,但由于可能会在Spring容器初始化时执行加载Hibernate映射文件等耗时的操作,如果每执行一个测试方法都必须重复初始化Spring容器,则对测试性能的影响是不容忽视的;

使用Spring测试套件,Spring容器只会初始化一次

2)需要使用硬编码方式手工获取Bean

在测试用例类中我们需要通过ctx.getBean()方法从Spirng容器中获取需要测试的目标Bean,并且还要进行强制类型转换的造型操作。这种乏味的操作迷漫在测试用例的代码中,让人觉得烦琐不堪;

使用Spring测试套件,测试用例类中的属性会被自动填充Spring容器的对应Bean,无须在手工设置Bean!

3)数据库现场容易遭受破坏

测试方法对数据库的更改操作会持久化到数据库中。虽然是针对开发数据库进行操作,但如果数据操作的影响是持久的,可能会影响到后面的测试行为。举个例子,用户在测试方法中插入一条ID为1的User记录,第一次运行不会有问题,第二次运行时,就会因为主键冲突而导致测试用例失败。所以应该既能够完成功能逻辑检查,又能够在测试完成后恢复现场,不会留下“后遗症”;

使用Spring测试套件,Spring会在你验证后,自动回滚对数据库的操作,保证数据库的现场不被破坏,因此重复测试不会发生问题!

4)不方便对数据操作正确性进行检查

假如我们向登录日志表插入了一条成功登录日志,可是我们却没有对t_login_log表中是否确实添加了一条记录进行检查。一般情况下,我们可能是打开数据库,肉眼观察是否插入了相应的记录,但这严重违背了自动测试的原则。试想在测试包括成千上万个数据操作行为的程序时,如何用肉眼进行检查?

只要你继承Spring的测试套件的用例类,你就可以通过jdbcTemplate(或Dao等)在同一事务中访问数据库,查询数据的变化,验证操作的正确性!

Spring提供了一套扩展于Junit测试用例的测试套件,使用这套测试套件完全解决了以上四个问题,让我们测试Spring的应用更加方便。这个测试套件主要由org.springframework.test包下的若干类组成,使用简单快捷,方便上手。

二、使用方法

1)基本用法

[java]  view plain  copy
  1. package com.test;  
  2.   
  3. import javax.annotation.Resource;  
  4.   
  5. import org.junit.Test;  
  6. import org.junit.runner.RunWith;  
  7. import org.springframework.test.context.ContextConfiguration;  
  8. import org.springframework.test.context.junit4.SpringJUnit4ClassRunner;  
  9.   
  10. @RunWith(SpringJUnit4ClassRunner.class)  
  11. @ContextConfiguration(locations = { "classpath:config/applicationContext-*.xml""classpath:services/ext/service-*.xml" })  
  12. public class UserServiceTest {  
  13.   
  14.     @Resource  
  15.     private IUserService userService;  
  16.   
  17.     @Test  
  18.     public void testAddOpinion1() {  
  19.         userService.downloadCount(1);  
  20.         System.out.println(1);  
  21.     }  
  22.   
  23.     @Test  
  24.     public void testAddOpinion2() {  
  25.         userService.downloadCount(2);  
  26.         System.out.println(2);  
  27.     }  
  28. }  

@RunWith(SpringJUnit4ClassRunner.class) 用于配置spring中测试的环境

@ContextConfiguration(locations = { "classpath:config/applicationContext-*.xml", "classpath:services/ext/service-*.xml" })用于指定配置文件所在的位置

@Resource注入Spring容器Bean对象,注意与@Autowired区别

2)事务用法

[java]  view plain  copy
  1. package com.test;  
  2.   
  3. import javax.annotation.Resource;  
  4.   
  5. import org.junit.Test;  
  6. import org.junit.runner.RunWith;  
  7. import org.springframework.test.annotation.Rollback;  
  8. import org.springframework.test.context.ContextConfiguration;  
  9. import org.springframework.test.context.junit4.SpringJUnit4ClassRunner;  
  10. import org.springframework.test.context.transaction.TransactionConfiguration;  
  11. import org.springframework.transaction.annotation.Transactional;  
  12.   
  13. @RunWith(SpringJUnit4ClassRunner.class)  
  14. @ContextConfiguration(locations = { "classpath:config/applicationContext-*.xml""classpath:services/ext/service-*.xml" })  
  15. @Transactional  
  16. @TransactionConfiguration(transactionManager = "transactionManager")  
  17. //@TransactionConfiguration(transactionManager = "transactionManager", defaultRollback = true)  
  18. public class UserServiceTest {  
  19.   
  20.     @Resource  
  21.     private IUserService userService;  
  22.   
  23.     @Test  
  24. //  @Transactional  
  25.     public void testAddOpinion1() {  
  26.         userService.downloadCount(1);  
  27.         System.out.println(1);  
  28.     }  
  29.   
  30.     @Test  
  31.     @Rollback(false)  
  32.     public void testAddOpinion2() {  
  33.         userService.downloadCount(2);  
  34.         System.out.println(2);  
  35.     }  
  36. }  

@TransactionConfiguration(transactionManager="transactionManager")读取Spring配置文件中名为transactionManager的事务配置,defaultRollback为事务回滚默认设置。该注解是可选的,可使用@Transactional与@Rollback配合完成事务管理。当然也可以使用@Transactional与@TransactionConfiguration配合。

@Transactional开启事务。可放到类或方法上,类上作用于所有方法。

@Rollback事务回滚配置。只能放到方法上。

3)继承AbstractTransactionalJUnit4SpringContextTests

[java]  view plain  copy
  1. package com.test;  
  2.   
  3. import javax.annotation.Resource;  
  4.   
  5. import org.junit.Test;  
  6. import org.springframework.test.context.ContextConfiguration;  
  7. import org.springframework.test.context.junit4.AbstractTransactionalJUnit4SpringContextTests;  
  8. import org.springframework.test.context.transaction.TransactionConfiguration;  
  9.   
  10. @ContextConfiguration(locations = { "classpath:config/applicationContext-*.xml""classpath:services/ext/service-*.xml" })  
  11. @TransactionConfiguration(transactionManager = "transactionManager", defaultRollback = false)  
  12. public class UserServiceTest extends AbstractTransactionalJUnit4SpringContextTests {  
  13.   
  14.     @Resource  
  15.     private IUserService userService;  
  16.   
  17.     @Test  
  18.     public void testAddOpinion1() {  
  19.         userService.downloadCount(1);  
  20.         System.out.println(1);  
  21.     }  
  22.   
  23.     @Test  
  24.     public void testAddOpinion2() {  
  25.         userService.downloadCount(2);  
  26.         System.out.println(2);  
  27.     }  
  28. }  

AbstractTransactionalJUnit4SpringContextTests:这个类为我们解决了在web.xml中配置OpenSessionInview所解决的session生命周期延长的问题,所以要继承这个类。该类已经在类级别预先配置了好了事物支持,因此不必再配置@Transactional和@RunWith

4)继承

[java]  view plain  copy
  1. package com.test;  
  2.   
  3. import org.springframework.test.context.ContextConfiguration;  
  4. import org.springframework.test.context.junit4.AbstractTransactionalJUnit4SpringContextTests;  
  5. import org.springframework.test.context.transaction.TransactionConfiguration;  
  6.   
  7. @ContextConfiguration(locations = { "classpath:config/applicationContext-*.xml""classpath:services/ext/service-*.xml" })  
  8. @TransactionConfiguration(transactionManager = "transactionManager")  
  9. public class BaseTestCase extends AbstractTransactionalJUnit4SpringContextTests {  
  10.   
  11. }  
[java]  view plain  copy
  1. package com.test;  
  2.   
  3. import javax.annotation.Resource;  
  4.   
  5. import org.junit.Test;  
  6. import org.springframework.test.annotation.Rollback;  
  7.   
  8. public class UserServiceTest extends BaseTestCase {  
  9.   
  10.     @Resource  
  11.     private IUserService userService;  
  12.   
  13.     @Test  
  14.     public void testAddOpinion1() {  
  15.         userService.downloadCount(1);  
  16.         System.out.println(1);  
  17.     }  
  18.   
  19.     @Test  
  20.     @Rollback(false)  
  21.     public void testAddOpinion2() {  
  22.         userService.downloadCount(2);  
  23.         System.out.println(2);  
  24.     }  
  25. }  

5)综合

[java]  view plain  copy
  1. @RunWith(SpringJUnit4ClassRunner.class)  
  2. @ContextConfiguration  
  3. @TransactionConfiguration  
  4. @Transactional  
  5. public class PersonDaoTransactionUnitTest extends AbstractTransactionalJUnit4SpringContextTests {  
  6.   
  7.     final Logger logger = LoggerFactory.getLogger(PersonDaoTransactionUnitTest.class);  
  8.   
  9.     protected static int SIZE = 2;  
  10.     protected static Integer ID = new Integer(1);  
  11.     protected static String FIRST_NAME = "Joe";  
  12.     protected static String LAST_NAME = "Smith";  
  13.     protected static String CHANGED_LAST_NAME = "Jackson";  
  14.   
  15.     @Autowired  
  16.     protected PersonDao personDao = null;  
  17.   
  18.     /** 
  19.      * Tests that the size and first record match what is expected before the transaction. 
  20.      */  
  21.     @BeforeTransaction  
  22.     public void beforeTransaction() {  
  23.         testPerson(true, LAST_NAME);  
  24.     }  
  25.   
  26.     /** 
  27.      * Tests person table and changes the first records last name. 
  28.      */  
  29.     @Test  
  30.     public void testHibernateTemplate() throws SQLException {  
  31.         assertNotNull("Person DAO is null.", personDao);  
  32.   
  33.         Collection<Person> lPersons = personDao.findPersons();  
  34.   
  35.         assertNotNull("Person list is null.", lPersons);  
  36.         assertEquals("Number of persons should be " + SIZE + ".", SIZE, lPersons.size());  
  37.   
  38.         for (Person person : lPersons) {  
  39.             assertNotNull("Person is null.", person);  
  40.   
  41.             if (ID.equals(person.getId())) {  
  42.                 assertEquals("Person first name should be " + FIRST_NAME + ".", FIRST_NAME, person.getFirstName());  
  43.                 assertEquals("Person last name should be " + LAST_NAME + ".", LAST_NAME, person.getLastName());  
  44.   
  45.                 person.setLastName(CHANGED_LAST_NAME);  
  46.   
  47.                 personDao.save(person);  
  48.             }  
  49.         }  
  50.     }  
  51.   
  52.     /** 
  53.      * Tests that the size and first record match what is expected after the transaction. 
  54.      */  
  55.     @AfterTransaction  
  56.     public void afterTransaction() {  
  57.         testPerson(false, LAST_NAME);  
  58.     }  
  59.   
  60.     /** 
  61.      * Tests person table. 
  62.      */  
  63.     protected void testPerson(boolean beforeTransaction, String matchLastName) {  
  64.         List<Map<String, Object>> lPersonMaps = simpleJdbcTemplate.queryForList("SELECT * FROM PERSON");  
  65.   
  66.         assertNotNull("Person list is null.", lPersonMaps);  
  67.         assertEquals("Number of persons should be " + SIZE + ".", SIZE, lPersonMaps.size());  
  68.   
  69.         Map<String, Object> hPerson = lPersonMaps.get(0);  
  70.   
  71.         logger.debug((beforeTransaction ? "Before" : "After") + " transaction.  " + hPerson.toString());  
  72.   
  73.         Integer id = (Integer) hPerson.get("ID");  
  74.         String firstName = (String) hPerson.get("FIRST_NAME");  
  75.         String lastName = (String) hPerson.get("LAST_NAME");  
  76.   
  77.         if (ID.equals(id)) {  
  78.             assertEquals("Person first name should be " + FIRST_NAME + ".", FIRST_NAME, firstName);  
  79.             assertEquals("Person last name should be " + matchLastName + ".", matchLastName, lastName);  
  80.         }  
  81.     }  
  82.   
  83. }  

@BeforeTransaction在事务之前执行

@AfterTransaction在事务之后执行

@NotTransactional不开启事务


好了,本篇作为Junit补充就说到这里了,希望大家多多分享经验哦。


  • 4
    点赞
  • 10
    收藏
    觉得还不错? 一键收藏
  • 0
    评论

“相关推荐”对你有帮助么?

  • 非常没帮助
  • 没帮助
  • 一般
  • 有帮助
  • 非常有帮助
提交
评论
添加红包

请填写红包祝福语或标题

红包个数最小为10个

红包金额最低5元

当前余额3.43前往充值 >
需支付:10.00
成就一亿技术人!
领取后你会自动成为博主和红包主的粉丝 规则
hope_wisdom
发出的红包
实付
使用余额支付
点击重新获取
扫码支付
钱包余额 0

抵扣说明:

1.余额是钱包充值的虚拟货币,按照1:1的比例进行支付金额的抵扣。
2.余额无法直接购买下载,可以购买VIP、付费专栏及课程。

余额充值