


前言
Activity的启动过程
我们知道,在Android系统启动时,第一个启动起来的进程就是zygote进程,然后由zygote启动SystemServer,再然后就是启动例如ActivityManagerService、WindowManagerService等系统核心服务,这些服务承载着整个Android系统与客户端程序交互的重担。zygote除了启动系统服务与进程之外,普通的用户进程也由zygote进程fork而来,当一个应用进程启动起来后,就会加载用户在AndroidManifest.xml中配置的默认加载的Activity。此时加载的入口是ActivityThread.main(String[] args)方法,这个方法就是类似于C语言中的main方法一样,是整个应用程序的入口。
在ActivityThread.main(String[] args)这个方法中,主要的功能就是创建Application和创建Activity,并且调用Activity的一些生命周期函数,例如onCreate、onResume等。下面我们就从ActivityThread.main(String[] args)这个入口开始学习吧。
    public static final void main(String[] args) {
        SamplingProfilerIntegration.start();

        Process.setArgV0("<pre-initialized>");

        // 1、创建UI线程的Looper
        Looper.prepareMainLooper();
        if (sMainThreadHandler == null) {
            sMainThreadHandler = new Handler();
        }
        // 2、创建ActivityThread对象,但它并不是线程感觉是封装了UI线程消息循环与操作Activity生命周期的工具类
        ActivityThread thread = new ActivityThread();
        // 3、调用ActivityThread的attach方法,这是核心方法,Application、Activity的创建入口就在这里
        thread.attach(false);

        if (false) {
            Looper.myLooper().setMessageLogging(new
                    LogPrinter(Log.DEBUG, "ActivityThread"));
        }
        // 4、启动UI线程消息循环
        Looper.loop();

        if (Process.supportsProcesses()) {
            throw new RuntimeException("Main thread loop unexpectedly exited");
        }

        thread.detach();
        String name = (thread.mInitialApplication != null)
            ? thread.mInitialApplication.getPackageName()
            : "<unknown>";
        Slog.i(TAG, "Main thread of " + name + " is now exiting");
    }


    // UI线程与Application关联
    private final void attach(boolean system) {
        sThreadLocal.set(this);
        mSystemThread = system;
        // 不是系统进程
        if (!system) {
            ViewRoot.addFirstDrawHandler(new Runnable() {
                public void run() {
                    ensureJitEnabled();
                }
            });
            android.ddm.DdmHandleAppName.setAppName("<pre-initialized>");
            RuntimeInit.setApplicationObject(mAppActivityManagerNativeThread.asBinder());
            // 5、获取ActivityManagerService实例
            IActivityManager mgr = ActivityManagerNative.getDefault();
            try {
                // 6、注意这里,将mAppThread与Application进行管理
                mgr.attachApplication(mAppThread);
            } catch (RemoteException ex) {
            }
        } else {
            // 代码省略
        }
        // 代码省略
    }
public final class ActivityThread {

// 定义mAppThread与mH
final ApplicationThread mAppThread = new ApplicationThread();
    final Looper mLooper = Looper.myLooper();
    final H mH = new H();


    // if the thread hasn't started yet, we don't have the handler, so just
    // save the messages until we're ready.
    private final void queueOrSendMessage(int what, Object obj) {
        queueOrSendMessage(what, obj, 0, 0);
    }

    private final void queueOrSendMessage(int what, Object obj, int arg1) {
        queueOrSendMessage(what, obj, arg1, 0);
    }

    private final void queueOrSendMessage(int what, Object obj, int arg1, int arg2) {
        synchronized (this) {
            if (DEBUG_MESSAGES) Slog.v(
                TAG, "SCHEDULE " + what + " " + mH.codeToString(what)
                + ": " + arg1 + " / " + obj);
            Message msg = Message.obtain();
            msg.what = what;
            msg.obj = obj;
            msg.arg1 = arg1;
            msg.arg2 = arg2;
            // 通过mH来发消息, 处理也在H类中的handleMessage函数中
            mH.sendMessage(msg);
        }
    }


    /// AppcationThread 内部类,负责与ActivityManagerService交互
    private final class ApplicationThread extends ApplicationThreadNative {
        private static final String HEAP_COLUMN = "%17s %8s %8s %8s %8s";
        private static final String ONE_COUNT_COLUMN = "%17s %8d";
        private static final String TWO_COUNT_COLUMNS = "%17s %8d %17s %8d";
        private static final String TWO_COUNT_COLUMNS_DB = "%20s %8d %20s %8d";
        private static final String DB_INFO_FORMAT = "  %8d %8d %14d  %s";

        // Formatting for checkin service - update version if row format changes
        private static final int ACTIVITY_THREAD_CHECKIN_VERSION = 1;

        // 向UI线程发一个resume activity的消息
        public final void scheduleResumeActivity(IBinder token, boolean isForward) {
            queueOrSendMessage(H.RESUME_ACTIVITY, token, isForward ? 1 : 0);
        }

        // we use token to identify this activity without having to send the
        // activity itself back to the activity manager. (matters more with ipc)
        public final void scheduleLaunchActivity(Intent intent, IBinder token, int ident,
                ActivityInfo info, Bundle state, List<ResultInfo> pendingResults,
                List<Intent> pendingNewIntents, boolean notResumed, boolean isForward) {
            ActivityClientRecord r = new ActivityClientRecord();

            r.token = token;
            r.ident = ident;
            r.intent = intent;
            r.activityInfo = info;
            r.state = state;

            r.pendingResults = pendingResults;
            r.pendingIntents = pendingNewIntents;

            r.startsNotResumed = notResumed;
            r.isForward = isForward;

            // 向UI线程发一个H.LAUNCH_ACTIVITY的消息
            queueOrSendMessage(H.LAUNCH_ACTIVITY, r);
        }

        // 省略代码

    } // end ApplicationThread


    // H内部类, ApplicationThread通过H类型的对象向UI线程投递消息
    private final class H extends Handler {
        public static final int LAUNCH_ACTIVITY         = 100;
        public static final int PAUSE_ACTIVITY          = 101;
        public static final int PAUSE_ACTIVITY_FINISHING= 102;
        // 其他code省略
        String codeToString(int code) {
            if (DEBUG_MESSAGES) {
                switch (code) {
                    case LAUNCH_ACTIVITY: return "LAUNCH_ACTIVITY";
                    case PAUSE_ACTIVITY: return "PAUSE_ACTIVITY";
                    case PAUSE_ACTIVITY_FINISHING: return "PAUSE_ACTIVITY_FINISHING";
                    // 代码省略
                }
            }
            return "(unknown)";
        }
        public void handleMessage(Message msg) {
            if (DEBUG_MESSAGES) Slog.v(TAG, ">>> handling: " + msg.what);
            switch (msg.what) {
                case LAUNCH_ACTIVITY: {
                    ActivityClientRecord r = (ActivityClientRecord)msg.obj;

                    r.packageInfo = getPackageInfoNoCheck(
                            r.activityInfo.applicationInfo);
                    // 加载Activity
                    handleLaunchActivity(r, null);
                } break;
                // activity pause
                case PAUSE_ACTIVITY:
                    handlePauseActivity((IBinder)msg.obj, false, msg.arg1 != 0, msg.arg2);
                    maybeSnapshot();
                    break;
                // 代码省略
            }
            if (DEBUG_MESSAGES) Slog.v(TAG, "<<< done: " + msg.what);
        }

    } // end H

} // end ActivityThread好的,我们现在继续关注ActivityManagerService中的attachApplication( mAppThread )。
    public final void attachApplication(IApplicationThread thread) {
        synchronized (this) {
            int callingPid = Binder.getCallingPid();
            final long origId = Binder.clearCallingIdentity();
            // 1、转到了attachApplicationLocked
            attachApplicationLocked(thread, callingPid);
            Binder.restoreCallingIdentity(origId);
        }
    }


    private final boolean attachApplicationLocked(IApplicationThread thread,
            int pid) {

        // 代码省略
        if (localLOGV) Slog.v(
            TAG, "New app record " + app
            + " thread=" + thread.asBinder() + " pid=" + pid);
        try {
            // 2、ApplicationThread绑定Application
            thread.bindApplication(processName, app.instrumentationInfo != null
                    ? app.instrumentationInfo : app.info, providers,
                    app.instrumentationClass, app.instrumentationProfileFile,
                    app.instrumentationArguments, app.instrumentationWatcher, testMode,
                    isRestrictedBackupMode || !normalMode,
                    mConfiguration, getCommonServicesLocked());
            updateLruProcessLocked(app, false, true);
            app.lastRequestedGc = app.lastLowMemory = SystemClock.uptimeMillis();
        } catch (Exception e) {
             return false;
        }

        // 代码省略

        // See if the top visible activity is waiting to run in this process...
        ActivityRecord hr = mMainStack.topRunningActivityLocked(null);
        if (hr != null && normalMode) {
            if (hr.app == null && app.info.uid == hr.info.applicationInfo.uid
                    && processName.equals(hr.processName)) {
                try {
                    // 3、正确启动Activity
                    if (mMainStack.realStartActivityLocked(hr, app, true, true)) {
                        didSomething = true;
                    }
                } catch (Exception e) {
                    Slog.w(TAG, "Exception in new application when starting activity "
                          + hr.intent.getComponent().flattenToShortString(), e);
                    badApp = true;
                }
            } else {
                mMainStack.ensureActivitiesVisibleLocked(hr, null, processName, 0);
            }
        }

        return true;
    }
    // 3中的ActivityStack中的realStartActivityLocked方法
     final boolean realStartActivityLocked(ActivityRecord r,
            ProcessRecord app, boolean andResume, boolean checkConfig)
            throws RemoteException {

        // 代码省略
        try {
            // 代码省略
            // 设置app的dex文件的所在位置,指定包名
            mService.ensurePackageDexOpt(r.intent.getComponent().getPackageName());
            // 1、注意这里调用了ApplicationThread中的scheduleLaunchActivity方法, 这个方法中会给UI线程发一个
            // LAUNCH_ACTIVITY消息,然后会调用ActivityThread的handleLaunchActivity(ActivityClientRecord r, Intent customIntent)函数
            // 在这个函数中会创建Activity,并且调用Activity的onCreate、onResume函数
            app.thread.scheduleLaunchActivity(new Intent(r.intent), r,
                    System.identityHashCode(r),
                    r.info, r.icicle, results, newIntents, !andResume,
                    mService.isNextTransitionForward());

            // 代码省略
        } catch (RemoteException e) {

        }
        // 代码省略

        return true;
}H.LAUNCH_ACTIVITY消息,然后会调用ActivityThread的handleLaunchActivity(ActivityClientRecord r, Intent customIntent)函数,在这个函数中会创建将要启动的Activity,并且调用其生命周期函数onCreate、onResume。ApplicationThread中的scheduleLaunchActivity函数的代码在上文已经给出,下面我们看看ActivityThread的handleLaunchActivity(ActivityClientRecord r, Intent customIntent)函数。
// ActivityThread中的handleLaunchActivity
private final void handleLaunchActivity(ActivityClientRecord r, Intent customIntent) {
        // If we are getting ready to gc after going to the background, well
        // we are back active so skip it.
        unscheduleGcIdler();

        if (localLOGV) Slog.v(
            TAG, "Handling launch of " + r);
        // 1、创建并且加载Activity,调用其onCreate函数
        Activity a = performLaunchActivity(r, customIntent);

        if (a != null) {
            r.createdConfig = new Configuration(mConfiguration);
            Bundle oldState = r.state;
            // 2、调用Activity的onResume方法,使Activity变得可见
            handleResumeActivity(r.token, false, r.isForward);

        }
    }


     private final Activity performLaunchActivity(ActivityClientRecord r, Intent customIntent) {
        // System.out.println("##### [" + System.currentTimeMillis() + "] ActivityThread.performLaunchActivity(" + r + ")");

        ActivityInfo aInfo = r.activityInfo;
        if (r.packageInfo == null) {
            r.packageInfo = getPackageInfo(aInfo.applicationInfo,
                    Context.CONTEXT_INCLUDE_CODE);
        }

        ComponentName component = r.intent.getComponent();
        if (component == null) {
            component = r.intent.resolveActivity(
                mInitialApplication.getPackageManager());
            r.intent.setComponent(component);
        }

        if (r.activityInfo.targetActivity != null) {
            component = new ComponentName(r.activityInfo.packageName,
                    r.activityInfo.targetActivity);
        }

        Activity activity = null;
        try {
            java.lang.ClassLoader cl = r.packageInfo.getClassLoader();
            // 1、创建Activity
            activity = mInstrumentation.newActivity(
                    cl, component.getClassName(), r.intent);
            r.intent.setExtrasClassLoader(cl);
            if (r.state != null) {
                r.state.setClassLoader(cl);
            }
        } catch (Exception e) {
            if (!mInstrumentation.onException(activity, e)) {
                throw new RuntimeException(
                    "Unable to instantiate activity " + component
                    + ": " + e.toString(), e);
            }
        }

        try {
            // 2、创建Application
            Application app = r.packageInfo.makeApplication(false, mInstrumentation);

            if (localLOGV) Slog.v(TAG, "Performing launch of " + r);
            if (localLOGV) Slog.v(
                    TAG, r + ": app=" + app
                    + ", appName=" + app.getPackageName()
                    + ", pkg=" + r.packageInfo.getPackageName()
                    + ", comp=" + r.intent.getComponent().toShortString()
                    + ", dir=" + r.packageInfo.getAppDir());

            if (activity != null) {
                // 构建Context
                ContextImpl appContext = new ContextImpl();
                appContext.init(r.packageInfo, r.token, this);
                appContext.setOuterContext(activity);
                // 获取Activity的title
                CharSequence title = r.activityInfo.loadLabel(appContext.getPackageManager());
                Configuration config = new Configuration(mConfiguration);

                    // 3、Activity与context, Application关联起来
                activity.attach(appContext, this, getInstrumentation(), r.token,
                        r.ident, app, r.intent, r.activityInfo, title, r.parent,
                        r.embeddedID, r.lastNonConfigurationInstance,
                        r.lastNonConfigurationChildInstances, config);

                if (customIntent != null) {
                    activity.mIntent = customIntent;
                }
                r.lastNonConfigurationInstance = null;
                r.lastNonConfigurationChildInstances = null;
                activity.mStartedActivity = false;
                int theme = r.activityInfo.getThemeResource();
                if (theme != 0) {
                    activity.setTheme(theme);
                }

                activity.mCalled = false;
                // 4、回调Activity的onCreate方法
                mInstrumentation.callActivityOnCreate(activity, r.state);
                if (!activity.mCalled) {
                    throw new SuperNotCalledException(
                        "Activity " + r.intent.getComponent().toShortString() +
                        " did not call through to super.onCreate()");
                }
                r.activity = activity;
                r.stopped = true;
                // 5、执行Activity的onStart方法
                if (!r.activity.mFinished) {
                    activity.performStart();
                    r.stopped = false;
                }
                // 代码省略
            }
            r.paused = true;

            mActivities.put(r.token, r);

        } catch (SuperNotCalledException e) {
            throw e;

        } catch (Exception e) {

        }

        return activity;
    }


    final void handleResumeActivity(IBinder token, boolean clearHide, boolean isForward) {
        // If we are getting ready to gc after going to the background, well
        // we are back active so skip it.
        unscheduleGcIdler();

        // 1、最终调用Activity的onResume方法
        ActivityClientRecord r = performResumeActivity(token, clearHide);

        if (r != null) {
            final Activity a = r.activity;

            final int forwardBit = isForward ?
                    WindowManager.LayoutParams.SOFT_INPUT_IS_FORWARD_NAVIGATION : 0;

            // If the window hasn't yet been added to the window manager,
            // and this guy didn't finish itself or start another activity,
            // then go ahead and add the window.
            boolean willBeVisible = !a.mStartedActivity;
            if (!willBeVisible) {
                try {
                    willBeVisible = ActivityManagerNative.getDefault().willActivityBeVisible(
                            a.getActivityToken());
                } catch (RemoteException e) {
                }
            }

            // 2、这里是重点,在这里使DecorView变得可见
            if (r.window == null && !a.mFinished && willBeVisible) {
                // 获取Window,即PhoneWindow类型
                r.window = r.activity.getWindow();
                // 3、获取Window的顶级视图,并且使它可见
                View decor = r.window.getDecorView();
                decor.setVisibility(View.INVISIBLE);
                // 4、获取WindowManager
                ViewManager wm = a.getWindowManager();
                // 5、构建LayoutParams参数
                WindowManager.LayoutParams l = r.window.getAttributes();
                a.mDecor = decor;
                l.type = WindowManager.LayoutParams.TYPE_BASE_APPLICATION;
                l.softInputMode |= forwardBit;
                if (a.mVisibleFromClient) {
                    a.mWindowAdded = true;
                    // 6、将DecorView添加到WindowManager中,最终的操作是通过WindowManagerService的addView来操作
                    wm.addView(decor, l);
                }

            // If the window has already been added, but during resume
            // we started another activity, then don't yet make the
            // window visible.
            } else if (!willBeVisible) {
                if (localLOGV) Slog.v(
                    TAG, "Launch " + r + " mStartedActivity set");
                r.hideForNow = true;
            }

            // 代码省略
    }


    //
 public final ActivityClientRecord performResumeActivity(IBinder token,
            boolean clearHide) {
        ActivityClientRecord r = mActivities.get(token);

        if (r != null && !r.activity.mFinished) {
                try {
                // 代码省略
                // 执行onResume
                r.activity.performResume();

                r.paused = false;
                r.stopped = false;
                r.state = null;
            } catch (Exception e) {

            }
        }
        return r;
    }
如上述代码,在调用ActivityThread的handleLaunchActivity(ActivityClientRecord r, Intent customIntent)后会调用performLaunchActivity函数来创建Activity,并且将Activity与Application关联上,然后调用Activity的onCreate、onStart函数。再之后是调用handleResumeActivity函数,handleResumeActivity函数又调用performResumeActivity函数来回调Activity的onResume函数,之后将Activity的DecorView设置为可见,并且添加到WindowManager中,此时Activity也就显示在屏幕上了。时序图大致如下 :
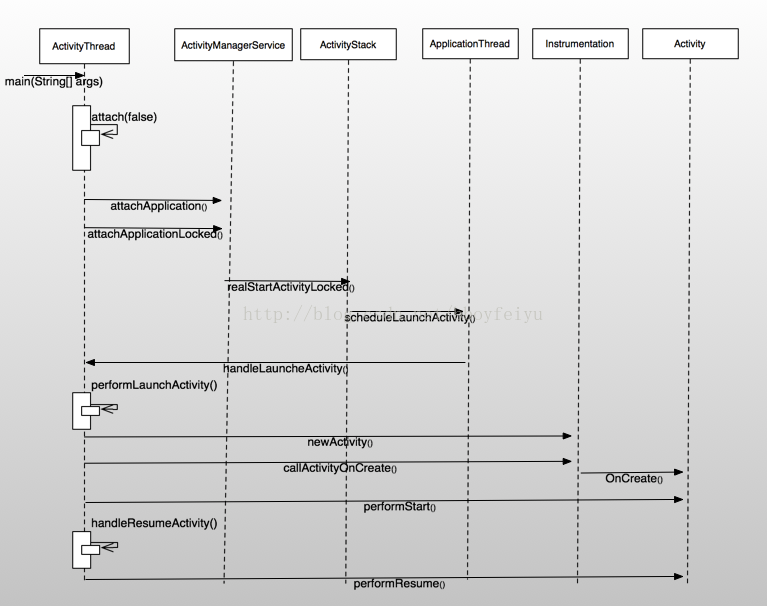
由此,我们可以得出,在Activity的onResume方法中,Activity的内容还是没有可见,执行完OnResume之后才会可见。那么Activity的DecorView又是如何通过WindowManager显示在屏幕上的呢?我们下篇文章再来学习吧~


 2648
2648


 被折叠的 条评论
为什么被折叠?
被折叠的 条评论
为什么被折叠?
 到【灌水乐园】发言


