


ioctl 中幻数使用 范围文件kernel\linux-3.0.y\Documentation\ioctl\ioctl-number.txt
功能:实现简单的字符操作(从用户空间向内核空间写入一串字符;从内核空间读一个字符到内核空间)
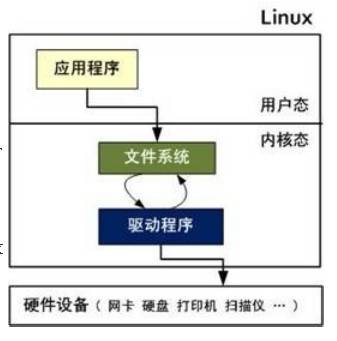
众所周知,字符设备是linux下最基本,也是最常用到的设备,它是学习Linux驱动入门最好的选择,计算机的东西很多都是相通的,掌握了其中一块,其他就可以触类旁通了。在写驱动前,必须先搞清楚字符设备的框架大概是怎样的,弄清楚了流程,才开始动手,不要一开始就动手写代码!
这里所说的框架是参考LLD3上介绍的,内核是基于Linux 2.6,3.0以上的有些地方会不一样(主要是file_operations中的ioctl修改了),但基本上适用,因为我就是在3.0的内核上实现的!字符设备驱动的初始化流程大概如下所示:
定义相关的设备文件结构体(如file_operation()中的相关成员函数的定义)->向内核申请主设备号(建议采用动态方式) ->申请成功后,调用MAJOR()获取主设备号 ->初始化cdev的结构体,调用cdev_init() ->调用cdev_add(),注册cdev到kernel ->注册设备模块:module_init()、module_exit()。
======================================================================================================
编写代码
======================================================================================================
首先定义两个全局变量(主设备号和字符设备hellow):
static int hello_major = 0; /* major device number */
static struct cdev hellow; /* hello device structure */
然后来看看file_operations(),它的定义可以在../include/linux/fs.h下找到,这里只用到了其中的几个成员函数:
/* file operations for hello device */
static struct file_operations hello_ops = {
.owner = THIS_MODULE, /*owner为所有者字段,防止在使用时模块被卸载。一边都设为THIS_MODULE*/
.open = hello_open,
.read = hello_read,
.write = hello_write,
.release = hello_release,
不同于windows驱动程序,Linux设备驱动程序在与硬件设备之间建立了标准的抽象接口。通过这个接口,用户可以像处理普通文件一样,通过open,close,read,write等系统调用对设备进行操作,如此一来也大大简化了linux驱动程序的开发。通过file_operations这个结构体(实际上是一个函数指针的集合),把驱动的操作和设备号联系起来,程序员所要做的工作只是通过file_operations挂接自己的系统调用函数。
接下来就是实现open,close,read,write操作了,这个驱动什么都没干,所以很好理解,用户请求read系统调用时,这个虚拟设备反回相应长度的“A”字符串,用户write时,将内容显示到日志中。这里要注意的是,内核空间中不能使用用户态的malloc,而是使用kmalloc/kfree。而且,用户read/write提供的buf地址也是用户态的,内核自然不能直接访问,需要通过copy_to_user/copy_from_user 进行数据拷贝,具体如下:
/* Open the device */
static int hello_open( struct inode *inode, struct file *filp ){
printk( KERN_NOTICE"Hello device open!\n" );
return 0;
}
/* Close hello_device */
static int hello_release( struct inode *inode, struct file *filp ){
printk( KERN_NOTICE"Hello device close!\n" );
return 0;
}
/* user read from hello device*/
ssize_t hello_read( struct file *flip, char __user *buf, size_t count,loff_t
*f_pos){
ssize_t retval = 0;
char *bank;
bank = kmalloc(count+1, GFP_KERNEL );
if( bank == NULL )
return -1;
memset( bank, 'A',count );
if( copy_to_user( buf, bank, count ) ){
retval = -EFAULT;
goto out;
}
retval += count;
*(bank+count)=0;
printk( KERN_NOTICE"hello: user read %d bytes from me. %s\n",count,bank );
out:
kfree(bank);
return retval;
}
/* write to hello device */
ssize_t hello_write( struct file *filp, const char __user *buf, size_t count,
loff_t *f_pos ){
ssize_t retval = 0;
char *bank = kmalloc( count ,GFP_KERNEL );
if( bank == NULL )
return retval;
if( copy_from_user(bank, buf, count ) ){
retval = -EFAULT;
printk( KERN_NOTICE"hello: write error\n" );
goto out;
}
retval += count;
printk( KERN_NOTICE"hello: user has written %d bytes to me: %s\n",count,
bank );
out:
kfree(bank );
return retval;
}
你可能会注意到open和release函数头中的file和inode结构体,inode是内核内部文件的表示,当其指向一个字符设备时,其中的i_cdev成员既包含了指向cdev结构的指针。而file表示打开的文件描述符,对一个文件,若打开多次,则会有多个file结构,但只有一个inode与之对应。
因为驱动工作在内核空间,不能使用用户空间的libc函数,所以程序中打印语句为内核提供的printk,而非printf,KERN_NOTICE宏其实标记的是日志级别(共有八个)不同级别的消息会记录到不同的地方。如果你运行本模块,可能会发现printk语句并没有输出到控制台,这是正常的,控制台只显示一定级别的消息。当日志级别小于console_loglevel时,消息才能显示出来。你可以通过dmsg命令看到这些信息,也可以通过修改日志级别使之输出到你的虚拟终端。
作好以上准备工作后,接下来就可以开始进行向内核申请主设备号了。设备号是干什么吃的?据LDD记载,对字符设备的访问是通过文件系统内的设备名称进行的。那些被称为特殊文件、设备文件的节点,通常位于/dev目录,如果ls -l 查看该目录,第一列中带有c标志的即为字符设备,有b标志的为块设备。而第5、6列所示的两个数字分别为设备的主、次设备号。通常,主设备号标识设备所用的驱动程序(现在大多设备仍然采用“一个主设备号对应一个驱动程序”的规则),次设备号用于确定设备,比如你有两块网卡,使用同一驱动,主设备号相同,那么他们将由次设备号区分。
/* Module housekeeping */
static int hello_init(void){
int result;
dev_t dev = MKDEV( hello_major, 0 );/*to transfer major as dev_t type*/
/* alloc the major device number dynamicly */
result = alloc_chrdev_region(&dev, 0 ,1, "hello" );
if( result < 0 ){
printk( KERN_NOTICE"Hello: unable to get major %d\n",hello_major );
return result;
}
hello_major = MAJOR(dev);
/* set up devices, in this case, there is only one device */
printk( KERN_NOTICE"hello init. major:%d, minor:%d\n",hello_major,0 );
//printk( KERN_ALERT"hello init: %d, %d\n",hello_major,0 );
hello_setup_cdev(&hellow, 0 , &hello_ops );
return 0;
}
/* Exit routine */
static void hello_exit(void){
/* remove the cdev from kernel */
cdev_del(&hellow );
/* release the device numble alloced earlier */
unregister_chrdev_region( MKDEV( hello_major, 0 ), 1 );
printk( KERN_NOTICE"hello exit. major:%d,minor %d\n",hello_major,0 );
}
这里主设备号的分配由alloc_chrdev_region(第一个参数为dev_t 指针,用来存放设备编号,第二个参数为要使用的第一个次设备号,通常为0,第三个参数为请求的连续设备编号个数)动态分配,当然也可以静态指定一个未被使用的主设备号,相应函数为register_chrdev_region,但不推荐这样做。在模块被卸载时(hello_exit),通过unregister_chrdev_region释放设备号。MKDEV宏将给出的主、次设备号转换成dev_t类型,MAJOR,MINOR分别从dev_t中析取主次设备号。
这里几个函数的原型为:
int register_chrdev_region(dev_t first, unsigned int count, char *name);
int alloc_chrdev_region(dev_t *dev, unsigned int firstminor, unsigned int count, char *name);
void unregister_chrdev_region(dev_t first, unsigned int count);
/* set up the cdev stucture for a device */
static void hello_setup_cdev( struct cdev *dev, int minor, struct
file_operations *fops ){
int err;
int devno = MKDEV( hello_major, minor );
/* initialize the cdev struct */
cdev_init( dev,fops );
dev->owner = THIS_MODULE;
err = cdev_add( dev, devno, 1 ); /* register the cdev in the kernel */
if( err )
printk( KERN_NOTICE"Error %d adding hello%d\n",err ,minor );
}
最后module_init( hello_init ); module_exit( hello_exit );指定了模块初始化和关闭函数。MODULE_LICENSE( "Dual BSD/GPL" ); 指定模块使用的许可证能被内核识别的许可证有GPL、GPL v2、 Dual BSD/GPL、 Dual MPL/GPL、Proprietary(专有)等,如果模块没有显式标记许可证,则会被认定为“专有”,内核加载这样的模块会被“污染”。
/* register the init and exit routine of the module */
module_init( hello_init );
module_exit( hello_exit );
MODULE_AUTHOR( "jabenwang" );
MODULE_LICENSE( "Dual BSD/GPL" );
到这里,这个字符设备驱动已经完成,接下来就是编译它。
======================================================================================================
编译代码
======================================================================================================
这个是我写的makefile文件,在我台机上我没把这个模块加入到内核源码的字符设备目录下,而是放在了用户目录下面。但这个makefile文件对以上两种情况都支持:
#wjb add 2011-10-21
ifneq ($(KERNELRELEASE), )
obj-m := hellow.o
else
KERNELDIR =/lib/modules/$(shell uname -r)/build
PWD :=$(shell pwd)
.PHONY: modules modules_install clean
modules:
$(MAKE) -C $(KERNELDIR) M=$(PWD) modules
modules_install:
$(MAKE) -C $(KERNELDIR) M=$(PWD) modules_install
clean:
$(MAKE) -C $(KERNELDIR) M=$(PWD) clean
endif
======================================================================================================
模块加载&设备文件节点构造:
======================================================================================================
1. 编译成功后,会得到hellow.ko, 这时你就可以通过insmod命令加载模块
# insmod hellow.ko
这时你的日志控制台中会出现hello_init中的打印信息,如果你使用lsmod列出当前已加载模块,会发现hellow模块赫然在目:
root@ubuntu:~/share/hellow# ls
a.out hellow.ko hellow.o Makefile Module.symvers
hellow.c hellow.mod.c main.c Makefile~
hellow.c~ hellow.mod.o main.c~ modules.order
root@ubuntu:~/share/hellow# insmod hellow.ko
root@ubuntu:~/share/hellow# dmesg | tail
[ 3711.851658] hello init. major:251, minor:0
2.要想使用驱动,你需要在/dev 目录下建立设备文件节点,语法是
mknod [options]name {bc} major minor
这里需要知道设备的主、次设备号,何以知之?使用cat /proc/devices | grep hello 你就会得到其主设备号
比如我这里得知hellow的主设备号为251
那么就用下面的命令:
root@ubuntu:~/share/hellow# mknod /dev/hellow c 251 0
c表示字符设备,这样就可以通过该设备文件操作设备了。
======================================================================================================
测试程序:
======================================================================================================
现在就可以通过系统调用操作设备了,我写了一个测试程序来调用: #include <stdio.h>
#include <fcntl.h>
#include <stdlib.h>
#include <string.h>
#include <sys/types.h>
#include <sys/stat.h>
#include <unistd.h>
#include <sys/ioctl.h>
int main(void)
{
int fd, ret;
char *buf = " Hello world !";
char temp[10] = "0";
fd = open ( "/dev/hellow" , O_RDWR);
if ( fd == -1 )
{
perror("open");
exit(0);
}
ret = write( fd, buf,strlen(buf));
if ( ret == -1 )
{
perror("write");
exit(0);
}
ret = read ( fd ,temp, strlen(temp) );
if ( ret == -1)
{
perror("read");
exit(0);
}
close(fd);
return 0;
}
root@ubuntu:~/share/hellow# gcc main.c
生成的目标文件为a.out
运行之:
root@ubuntu:~/share/hellow# ./a.outroot@ubuntu:~/share/hellow# dmesg | tail结果:
[ 4082.930492] Hello device open!
[ 4082.930520] hello: user has written 14 bytes to me: Hello world !
[ 4082.930524] hello: user read 1 bytes from me. A
[ 4082.930829] Hello device close!
当然,如果你想移除这个字符设备,可以输入如下命令:
root@ubuntu:~/share/hellow# rmmod hellow
root@ubuntu:~/share/hellow# dmesg | tail
结果显示如下信息,说明已经移除:
[ 4344.602407] hello exit. major:251,minor 0
平台:VMware 7.0 + Linux ubuntu 3.0.0-12-generic
编译器:gcc
参考资料:LDD 3
功能:实现ioctl功能
在Linux字符设备驱动入门(一)中,我们实现了字符设备的简单读写字符功能,接下来我们要在这个基础上加入ioctl功能。首先,我们先来看看3.0内核下../include/linux/fs.h中file_operations结构体的定义:
struct file_operations {
struct module *owner;
loff_t (*llseek) (struct file *, loff_t, int);
ssize_t (*read) (struct file *, char __user *, size_t, loff_t *);
ssize_t (*write) (struct file *, const char __user *, size_t, loff_t *);
ssize_t (*aio_read) (struct kiocb *, const struct iovec *, unsigned long, loff_t);
ssize_t (*aio_write) (struct kiocb *, const struct iovec *, unsigned long, loff_t);
int (*readdir) (struct file *, void *, filldir_t);
unsigned int (*poll) (struct file *, struct poll_table_struct *);
long (*unlocked_ioctl) (struct file *, unsigned int, unsigned long);
long (*compat_ioctl) (struct file *, unsigned int, unsigned long);
int (*mmap) (struct file *, struct vm_area_struct *);
int (*open) (struct inode *, struct file *);
int (*flush) (struct file *, fl_owner_t id);
int (*release) (struct inode *, struct file *);
int (*fsync) (struct file *, int datasync);
int (*aio_fsync) (struct kiocb *, int datasync);
int (*fasync) (int, struct file *, int);
int (*lock) (struct file *, int, struct file_lock *);
ssize_t (*sendpage) (struct file *, struct page *, int, size_t, loff_t *, int);
unsigned long (*get_unmapped_area)(struct file *, unsigned long, unsigned long, unsigned long, unsigned long);
int (*check_flags)(int);
int (*flock) (struct file *, int, struct file_lock *);
ssize_t (*splice_write)(struct pipe_inode_info *, struct file *, loff_t *, size_t, unsigned int);
ssize_t (*splice_read)(struct file *, loff_t *, struct pipe_inode_info *, size_t, unsigned int);
int (*setlease)(struct file *, long, struct file_lock **);
long (*fallocate)(struct file *file, int mode, loff_t offset,
loff_t len);
};
红色字体已经标出在kernel 3.0中已经完全删除了struct file_operations 中的ioctl 函数指针,剩下unlocked_ioctl和compat_ioctl,取而代之的是unlocked_ioctl,主要改进就是不再需要上大内核锁 (调用之前不再先调用lock_kernel()然后再unlock_kernel())。
所以,在hellow.c中,我们在file_operations中加入成员函数hello_ioctl(红色字体部分):
/* file operations for hello device */
static struct file_operations hello_ops = {
.owner = THIS_MODULE,
.unlocked_ioctl = hello_ioctl,
.open = hello_open,
.read = hello_read,
.write = hello_write,
.release = hello_release,
};
hello_ioctl()的定义如下:
static int hello_ioctl( struct file *file,
unsigned int cmd, unsigned long arg)
{ int temp = 0;
switch(cmd)
{
case HELLO_CMD1:
{
temp = 1;
if(copy_to_user( (int *)arg, &temp, sizeof(int))) return -EFAULT;
break;
}
case HELLO_CMD2:
{
temp = 2;
if(copy_to_user( (int *)arg, &temp, sizeof(int))) return -EFAULT;
break;
}
}
printk( KERN_NOTICE"ioctl CMD%d done!\n",temp);
return 0;
}
这里强调一下cmd的定义:
#define HELLO_MAGIC 'k'
#define HELLO_CMD1 _IO(HELLO_MAGIC,0x1a)
#define HELLO_CMD2 _IO(HELLO_MAGIC,0x1b)
其中'k'为幻数,要按照Linux内核的约定方法为驱动程序选择ioctl编号,应该首先看看include/asm/ioctl.h和Documentation/ioctl-number.txt这两个文件,下面是ioctl.h的部分内容,也是比较重要的:
_IO(type, nr)
_IOR(type, nr, datatype)
_IOW(type, nr, datatype)
_IOWR(type, nr, datatype)
注意对幻数的编号千万不能重复定义,如ioctl-number.txt已经说明‘k'的编号已经被占用的范围为:
'k' 00-0F linux/spi/spidev.h conflict!
'k' 00-05 video/kyro.h conflict!
所以我们在这里分别编号为0x1a和0x1b,到这里,我们已经完成了对ioctl功能的编写,接下来就是在测试程序中利用系统调用来测试它。
=============================================================
ioctl测试程序
=============================================================
#include <stdio.h>
#include <fcntl.h>
#include <stdlib.h>
#include <string.h>
#include <sys/types.h>
#include <sys/stat.h>
#include <unistd.h>
#include <sys/ioctl.h>
#define HELLO_MAGIC 'k' //当然我们也可以定义一个相应的头文件,把ioctl的cmd放进里面,然后再include进 来
#define HELLO_CMD1 _IO(HELLO_MAGIC,0x1a)
#define HELLO_CMD2 _IO(HELLO_MAGIC,0x1b)
int main(void)
{
int ioctl_rdata;
int fd, ret;
fd = open ( "/dev/hellow" , O_RDWR);
if ( fd == -1 )
{
perror("open");
exit(0);
}
ret = ioctl( fd, HELLO_CMD2,&ioctl_rdata);
if ( ret == -1)
{
perror("ioctl");
exit(0);
}
printf("ioctl_rdata= %d \n",ioctl_rdata);
close(fd);
return 0;
}
=============================================================
运行结果
=============================================================
root@ubuntu:~/share/hellow# insmod hellow.ko
root@ubuntu:~/share/hellow# mknod /dev/hellow c 251 0
root@ubuntu:~/share/hellow# ./a.out
ioctl_rdata= 2
root@ubuntu:~/share/hellow# dmesg | tail
[ 2431.126532] hello init. major:251, minor:0
[ 2453.326022] Hello device open!
[ 2453.326047] ioctl CMD2 done!
[ 2453.326487] Hello device close!
转载自http://blog.csdn.net/coolkids_2008/article/details/6982305


 5575
5575


 被折叠的 条评论
为什么被折叠?
被折叠的 条评论
为什么被折叠?
 到【灌水乐园】发言


