


1.下载ElasticSearch
1.1 下载ElasticSearch
1.2 下载ElasticSearch插件headhttps://github.com/mobz/elasticsearch-head/archive/master.zip
2.安装ElasticSearch2.1 解压安装包
将elasticsearch-2.3.5.tar.gz上传到目录/usr/local
解压文件
[root@master ~]#  cd /usr/local
[root@master local]# tar -zxvf elasticsearch-2.3.5.tar.gz
[root@master local]# vi elasticsearch-2.3.5/config/elasticsearch.yml
#集群名称
cluster.name: elasticsearch
#节点名称
node.name: node01
#数据文件的路径
path.data: /path/to/data、
#日志文件的路径
path.logs: /path/to/logs
#本机器的IP地址
network.host: 192.168.41.2
#elasticsearch的HTTP端口号
http.port: 9200
#集群的配置,如果有多个,则用逗号隔开
discovery.zen.ping.unicast.hosts: ["192.168.41.2"]
2.3 修改启动文件
允许root用户启动,修改启动文件,添加下面一行
ES_JAVA_OPTS="-Des.insecure.allow.root=true"[root@master bin]# vi /usr/local/elasticsearch-2.3.5/bin/elasticsearch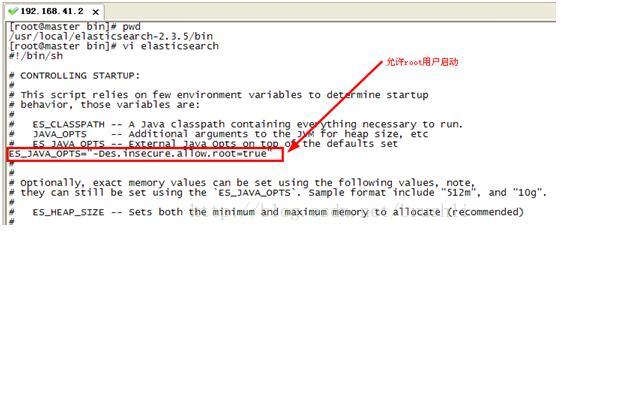
2.4 安装插件head
解压文件elasticsearch-head-master.zip
[root@master _site]# unzip elasticsearch-head-master.zip将解压之后elasticsearch-head-master下面的文件全部拷贝到
/usr/local/elasticsearch-2.3.5/plugins/head/_site/
2.5 启动ES[root@master bin]# ./elasticsearch &
[1] 2662
[root@master bin]# [2017-02-24 23:00:05,050][WARN ][bootstrap ] jvm uses the client vm, make sure to run `java` with the server vm for best performance by adding `-server` to the command line
[2017-02-24 23:00:05,217][WARN ][bootstrap ] running as ROOT user. this is a bad idea!
[2017-02-24 23:00:05,349][WARN ][bootstrap ] unable to install syscall filter: seccomp unavailable: requires kernel 3.5+ with CONFIG_SECCOMP and CONFIG_SECCOMP_FILTER compiled in
[2017-02-24 23:00:07,281][INFO ][node ] [node01] version[2.3.5], pid[2662], build[90f439f/2016-07-27T10:36:52Z]
[2017-02-24 23:00:07,282][INFO ][node ] [node01] initializing ...
[2017-02-24 23:00:10,434][INFO ][plugins ] [node01] modules [reindex, lang-expression, lang-groovy], plugins [head], sites [head]
[2017-02-24 23:00:10,571][INFO ][env ] [node01] using [1] data paths, mounts [[/ (/dev/sda2)]], net usable_space [11gb], net total_space [17.4gb], spins? [possibly], types [ext4]
[2017-02-24 23:00:10,572][INFO ][env ] [node01] heap size [1017.6mb], compressed ordinary object pointers [unknown]
[2017-02-24 23:00:10,572][WARN ][env ] [node01] max file descriptors [4096] for elasticsearch process likely too low, consider increasing to at least [65536]
[2017-02-24 23:00:19,202][INFO ][node ] [node01] initialized
[2017-02-24 23:00:19,202][INFO ][node ] [node01] starting ...
[2017-02-24 23:00:19,824][INFO ][transport ] [node01] publish_address {192.168.41.2:9300}, bound_addresses {192.168.41.2:9300}
[2017-02-24 23:00:19,907][INFO ][discovery ] [node01] elasticsearch/ZBLxvnHXSC6mheg6xCFjtg
[2017-02-24 23:00:23,118][INFO ][cluster.service ] [node01] new_master {node01}{ZBLxvnHXSC6mheg6xCFjtg}{192.168.41.2}{192.168.41.2:9300}, reason: zen-disco-join(elected_as_master, [0] joins received)
[2017-02-24 23:00:23,236][INFO ][http ] [node01] publish_address {192.168.41.2:9200}, bound_addresses {192.168.41.2:9200}
[2017-02-24 23:00:23,240][INFO ][node ] [node01] started
[2017-02-24 23:00:23,410][INFO ][gateway ] [node01] recovered [0] indices into cluster_state
[root@master bin]# ps -ef|grep elasticsearch
root 2662 2238 1 15:00 pts/0 00:01:21 /usr/local/jdk1.8.0_11/bin/java -Xms256m -Xmx1g -Djava.awt.headless=true -XX:+UseParNewGC -XX:+UseConcMarkSweepGC -XX:CMSInitiatingOccupancyFraction=75 -XX:+UseCMSInitiatingOccupancyOnly -XX:+HeapDumpOnOutOfMemoryError -XX:+DisableExplicitGC -Dfile.encoding=UTF-8 -Djna.nosys=true -Des.insecure.allow.root=true -Des.path.home=/usr/local/elasticsearch-2.3.5 -cp /usr/local/elasticsearch-2.3.5/lib/elasticsearch-2.3.5.jar:/usr/local/elasticsearch-2.3.5/lib/* org.elasticsearch.bootstrap.Elasticsearch start[root@master logs]# curl -X GET 'http://192.168.41.2:9200/_cluster/health?pretty=1'
{
"cluster_name" : "elasticsearch",
"status" : "green",
"timed_out" : false,
"number_of_nodes" : 1,
"number_of_data_nodes" : 1,
"active_primary_shards" : 0,
"active_shards" : 0,
"relocating_shards" : 0,
"initializing_shards" : 0,
"unassigned_shards" : 0,
"delayed_unassigned_shards" : 0,
"number_of_pending_tasks" : 0,
"number_of_in_flight_fetch" : 0,
"task_max_waiting_in_queue_millis" : 0,
"active_shards_percent_as_number" : 100.0
}2.8 开放端口
修改防火墙,开放端口9200,9300
[root@master ~]# vi /etc/sysconfig/iptables
# Firewall configuration written by system-config-firewall
# Manual customization of this file is not recommended.
*filter
:INPUT ACCEPT [0:0]
:FORWARD ACCEPT [0:0]
:OUTPUT ACCEPT [0:0]
-A INPUT -m state --state ESTABLISHED,RELATED -j ACCEPT
-A INPUT -p icmp -j ACCEPT
-A INPUT -i lo -j ACCEPT
-A INPUT -m state --state NEW -m tcp -p tcp --dport 22 -j ACCEPT
-A INPUT -m state --state NEW -m tcp -p tcp --dport 80 -j ACCEPT
-A INPUT -m state --state NEW -m tcp -p tcp --dport 9200 -j ACCEPT
-A INPUT -m state --state NEW -m tcp -p tcp --dport 9300 -j ACCEPT
-A INPUT -j REJECT --reject-with icmp-host-prohibited
-A FORWARD -j REJECT --reject-with icmp-host-prohibited
重启防火墙,使得修改立即生效
[root@master ~]# service iptables restart
iptables: Setting chains to policy ACCEPT: filter [ OK ]
iptables: Flushing firewall rules: [ OK ]
iptables: Unloading modules: [ OK ]
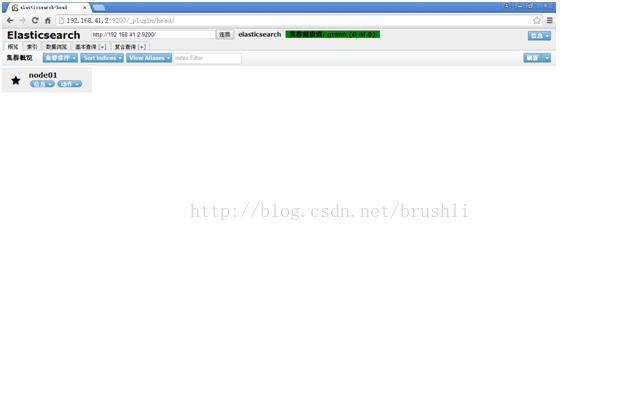
iptables: Applying firewall rules: [ OK ]2.9 查看head插件
谷歌浏览器访问
http://192.168.41.2:9200/_plugin/head/


 589
589


 被折叠的 条评论
为什么被折叠?
被折叠的 条评论
为什么被折叠?
 到【灌水乐园】发言


