


一、c++实例
1.下载与安装thrift工具
http://thrift.apache.org/download/
http://archive.apache.org/dist/thrift/
2.编写Thrift文件(定义接口,结构,异常等),保存为test.thrift
struct User{
1:i64 id,
2:string name,
3:i32 age,
4:bool vip
}
service Test{
i32 add(1:i32 a,2:i32 b)
User getById(1:i64 id)
}
3.生成接口代码
把thrift-0.9.3.exe和test.thrift文件放在同一个目录。
进入DOS命令执行:thrift-0.9.3.exe -r --gen cpp test.thrift
--gen后指定生成的语言,生成的cpp存储在目录gen-cpp下。
生成文件gen-cpp/Test.h、Test.cpp等,如下图。
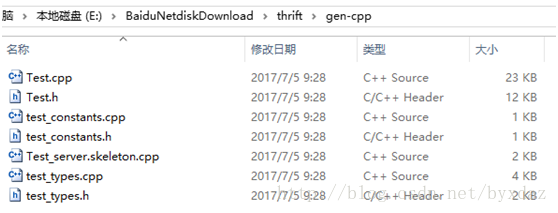
Test_server.skeleton.cpp,就是C++服务端的main函数入口文件,里面使用了TSimpleServer作为TCP服务,性能较低,但是实现简单,比较合适做进程管理类的接口。
4、服务端代码
1)、新建vc工程。
2)、将上面的文件拷贝到工程目录下,Test_server.skeleton.cpp,就是C++服务端的main函数入口文件。
// This autogenerated skeleton file illustrates how to build a server.
// You should copy it to another filename to avoid overwriting it.

#include "Test.h"
#include <thrift/protocol/TBinaryProtocol.h>
#include <thrift/server/TSimpleServer.h>
#include <thrift/transport/TServerSocket.h>
#include <thrift/transport/TBufferTransports.h>

using namespace ::apache::thrift;
using namespace ::apache::thrift::protocol;
using namespace ::apache::thrift::transport;
using namespace ::apache::thrift::server;

using boost::shared_ptr;

class TestHandler : virtual public TestIf {
 public:
  TestHandler() {
    // Your initialization goes here
	  Init();
  }

  int32_t add(const int32_t a, const int32_t b) {
    // Your implementation goes here
    printf("add\n");
	return a+b;
  }

  void getById(User& _return, const int64_t id) {
    // Your implementation goes here
	User *user;
	std::list<User *>::iterator iter = m_listUser.begin(),iterEnd = m_listUser.end();
	for(iter; iter!=iterEnd; iter++)
	{
		user = *iter;
		if(user->id == id)
		{
			_return.id = user->id;
			_return.__set_name(user->name.c_str());
			_return.age = user->age;
			_return.__set_vip(user->vip);
			break;
		}
	}
	printf("getById\n");
  }

protected:
	void Init(){
		m_listUser.clear();
		int n = 0;
		for(n=0; n<10; n++){
			User * user = new User();
			user->id = n+1;
			user->age = 18+n;
			sprintf((char *)user->name.data(),"name_%d",n+1);
			//插入
			m_listUser.push_back(user);
		}


	}
	std::list<User *> m_listUser;
};

int main(int argc, char **argv) {
  int port = 9090;
  shared_ptr<TestHandler> handler(new TestHandler());
  shared_ptr<TProcessor> processor(new TestProcessor(handler));
  shared_ptr<TServerTransport> serverTransport(new TServerSocket(port));
  shared_ptr<TTransportFactory> transportFactory(new TBufferedTransportFactory());
  shared_ptr<TProtocolFactory> protocolFactory(new TBinaryProtocolFactory());

  TSimpleServer server(processor, serverTransport, transportFactory, protocolFactory);
  server.serve();
  return 0;
}
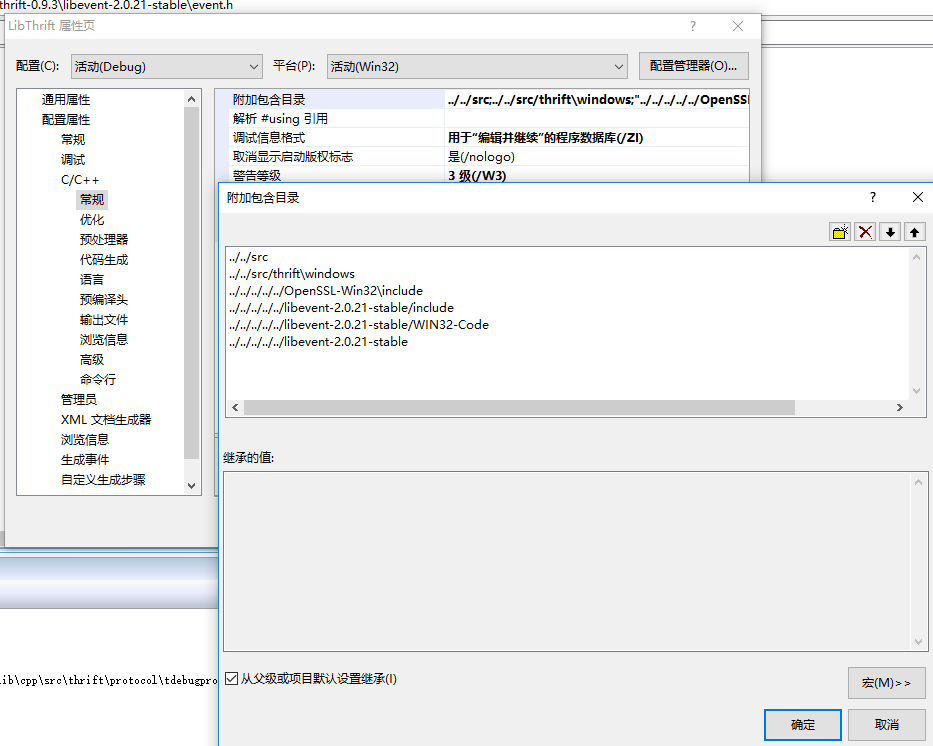
//需要引入thrift对于cpp的lib头文件所在目录,openssl头文件所在目录,boost头文件所在目录。
//需要引用lib文件,LibThrift.lib libeay32MT.libssleay32MT.lib
thrift对于cpp的lib文件所在目录,比如:
e:\libthrift\libthrift-0.9.3\lib\cpp\src\thrift\windows
e:\libthrift\libthrift-0.9.3\lib\cpp\src
//如果用到thrift的异步通讯方式,需要libevent库支持,lib库文件libevent.lib libevent_core.lib libevent_extras.lib。
用VS2008的nmake编译(libevent)C语言代码的方法
1)用vcvars32.bat设置环境变量或直接通过Visual Studio 2008 命令提示进入vc环境
D:\Program Files (x86)\Microsoft Visual Studio 9.0\VC\bin>vcvars32.bat
D:\Program Files (x86)\Microsoft Visual Studio 9.0\VC\bin>"D:\Program Files (x86
)\Microsoft Visual Studio 9.0\Common7\Tools\vsvars32.bat"
Setting environment for using Microsoft Visual Studio 2008 x86 tools.
2)切换到源代码所在的目录
D:\Program Files (x86)\Microsoft Visual Studio 9.0\VC\bin>cd E:\libevent-2.0.21-stable-vs2008
对源代码需要做些修改。
添加宏定义
在libevent-2.0.21-stable文件夹下找到下面三个文件:
event_iocp.c
evthread_win32.c
listener.c
打开并在开头加上宏定义:
#define _WIN32_WINNT 0x0500
因为event_iocp.c里用到<winbase.h>头文件里的函数定义,如InitializeCriticalSectionAndSpinCount,
<windows.h>会包含<winbase.h>,而<winbase.h>这个头文件里这个函数是这样定义的:
#if (_WIN32_WINNT >= 0x0403)
WINBASEAPI
BOOL WINAPI
InitializeCriticalSectionAndSpinCount(
__out LPCRITICAL_SECTION lpCriticalSection,
__in DWORD dwSpinCount
);
WINBASEAPI
DWORD
WINAPI
SetCriticalSectionSpinCount(
__inout LPCRITICAL_SECTION lpCriticalSection,
__in DWORD dwSpinCount
);
#endif
所以要定义_WIN32_WINNT这个宏,而且值要大于0x0403。
如果没有这个宏或不满足条件,编译器会假定这个函数没有定义,
等到链接时再寻找它,这样这个函数的符号就假定返回一个int,
而显示标准库文件里这个函数不是返回int,所以在链接时就会找不到这个函数符号。
注意:宏一定要定义在#include <windows.h>之前,不然还是没有作用。
3)用nmake.exe编译
E:\libevent-2.0.21-stable-vs2008>nmake /f Makefile.nmake
libevent在windows下使用步骤详解
参考http://www.mamicode.com/info-detail-504940.html
5、客户端代码
1)、新建vc工程。
2)、将上面的文件(除Test_server.skeleton.cpp外)拷贝到工程目录下。
3)、编写客户端代码。
// Client.cpp : 定义控制台应用程序的入口点。
//

#include "stdafx.h"
#include <iostream>
#include <thrift/transport/TSocket.h>
#include <thrift/transport/TBufferTransports.h>
#include <thrift/protocol/TBinaryProtocol.h>
#include "Test.h"

using namespace apache::thrift;
using namespace apache::thrift::protocol;
using namespace apache::thrift::transport;

using boost::shared_ptr;
using namespace std;

int main(int argc, char* argv[])
{
	boost::shared_ptr<TSocket> socket(new TSocket("localhost", 9090));
	//对接nonblockingServer时必须的,对普通server端时用boost::shared_ptr<TTransport> transport(new TBufferedTransport(socket));
	//boost::shared_ptr<TTransport> transport(new TFramedTransport(socket));
	boost::shared_ptr<TTransport> transport(new TBufferedTransport(socket));

	boost::shared_ptr<TProtocol> protocol(new TBinaryProtocol(transport));
	TestClient client(protocol);

	try
	{
		//设置发送、接收、连接超时
		socket->setConnTimeout(5000);
		socket->setRecvTimeout(5000);
		socket->setSendTimeout(5000);

		transport->open();

		//insert your code here
		int nResult = client.add(100,200);
		printf("add(%d,%d) = %d\n",100,200,nResult);
		User findUser;
		findUser.id = -100;
		client.getById(findUser,1);
		printf("%s\n",findUser.name.c_str());

		transport->close();

		printf("send success!\n");
	}
	catch (...)
	{
	}

	return 0;
}
//需要引入thrift对于cpp的lib头文件所在目录,openssl头文件所在目录。
//需要引用lib文件,LibThrift.lib libeay32MT.libssleay32MT.lib
二、VS2008上编译thrift的库文件
1、下载thrift-0.9.3.tar.gz源码,源码针对cpp的编译自带的是vs2010版本。
2、需要第三方库boost、libevent、openssl支持。
libevent-2.0.21-stable.tar.gzhttps://github.com/downloads/libevent/libevent/libevent-2.0.21-stable.tar.gz
boost 1.54.0
http://www.boost.org/users/history/version_1_54_0.html
编译好的boost 1.54.0下载地址:https://sourceforge.net/projects/boost/files/boost-binaries/1.54.0
OpenSSL 1.0.0g
http://blog.csdn.net/akof1314/article/details/7241829
3、新建vc工程,编译。
用Project From Existing Code...创建工程。
将 cpp/src/thrift加入工程,修改项目配置类型修改成静态库。
在Solution Explorer中,
去除 qt目录。
添加 boost包含目录、openssl所包含目录。
添加 src为包含目录,不然 #include <thrift/Thrift.h>出错。
VC2008缺少 stdint.h,创建到thrift/windows目录下,并添加为include目录。
下图为程序目录结构
#pragma once
#include <boost/cstdint.hpp>
typedef boost::int8_t int8_t;
typedef boost::uint8_t uint8_t;
typedef boost::int16_t int16_t;
typedef boost::uint16_t uint16_t;
typedef boost::int32_t int32_t;
typedef boost::uint32_t uint32_t;
typedef boost::int64_t int64_t;
typedef boost::uint64_t uint64_t;
#define INT8_MIN ((int8_t)_I8_MIN)
#define INT8_MAX _I8_MAX
#define INT16_MIN ((int16_t)_I16_MIN)
#define INT16_MAX _I16_MAX
#define INT32_MIN ((int32_t)_I32_MIN)
#define INT32_MAX _I32_MAX
#define INT64_MIN ((int64_t)_I64_MIN)
#define INT64_MAX _I64_MAX
#define UINT8_MAX _UI8_MAX
#define UINT16_MAX _UI16_MAX
#define UINT32_MAX _UI32_MAX
#define UINT64_MAX _UI64_MAX
去除VC2010 thrift.sln中没有的文件,无法编译:
Mutex.cpp, PosixThreadFactory.cpp, Monitor.cpp
TEvhttpClientChannel.cpp TEvhttpServer.cpp
TServer.cpp TNonblockingServer.cpp
TSSLSocket.cpp TSSLServerSocket.cpp
TZlibTransport.cpp
加上宏 HAVE_CONFIG_H,或者 force include force_inc.h.
windows/tr1/functional中
#include <functional>
改为
#include <boost/tr1/functional.hpp>
三、vc2015编译thrift-0.10.0
1、thrift-0.10.0包含libthrift和libthriftnb两个工程
libthrift:阻塞thrift rpc
libthriftnb:非阻塞thrift rpc,需要使用libevent库。
编译时,上面只需要openssl库的头文件路径。但在引用thrift库文件时,需要加载openssl库的头文件路径和lib文件路径。
2、编译过程:
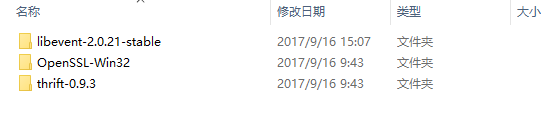
1)、将openssl1.0.1c库文件夹拷贝到与thrift同级目录下。
2)、将libevent-2.0.21-stable库文件夹拷贝到与thrift同级目录下。libevent的版本需要与libthrift中帮助文档中指定的版本一致。
3)、修改thrift--lib--cpp中3rdparty.props文件中,修改boost、libevent、openssl宏。
4)、打开libthrift.sln,编译。
注意:在编译静态库时,需要添加TServerFramework、TConnectedClient文件到工程中,否则不会导出这两个类,在引用thrift文件时,会报找不到函数的链接错误。
3rdparty.props文件
<?xml version="1.0" encoding="utf-8"?>
<Project ToolsVersion="4.0" xmlns="http://schemas.microsoft.com/developer/msbuild/2003">
  <ImportGroup Label="PropertySheets" />
  <PropertyGroup Label="UserMacros">
    <BOOST_ROOT>F:\develop\boost_1_66_0</BOOST_ROOT>
    <OPENSSL_ROOT_DIR>F:\develop\openssl1.0.1c</OPENSSL_ROOT_DIR>
    <LIBEVENT_ROOT>F:\develop\libevent-2.0.21-stable</LIBEVENT_ROOT>
  </PropertyGroup>
  <PropertyGroup />
  <ItemDefinitionGroup />
  <ItemGroup>
    <BuildMacro Include="BOOST_ROOT">
      <Value>$(BOOST_ROOT)</Value>
      <EnvironmentVariable>true</EnvironmentVariable>
    </BuildMacro>
    <BuildMacro Include="OPENSSL_ROOT_DIR">
      <Value>$(OPENSSL_ROOT_DIR)</Value>
      <EnvironmentVariable>true</EnvironmentVariable>
    </BuildMacro>
    <BuildMacro Include="LIBEVENT_ROOT">
      <Value>$(LIBEVENT_ROOT)</Value>
      <EnvironmentVariable>true</EnvironmentVariable>
    </BuildMacro>
  </ItemGroup>
</Project>
<BOOST_ROOT>F:\develop\boost_1_66_0</BOOST_ROOT>
<OPENSSL_ROOT_DIR>F:\develop\openssl1.0.1c</OPENSSL_ROOT_DIR>
<LIBEVENT_ROOT>F:\develop\libevent-2.0.21-stable</LIBEVENT_ROOT>
三个开源库定义宏里面的内容值,根据所在电脑的路径进行修改。修改完成之后重新打开解决方案。
四、libthrift阻塞模式中的服务器,线程中处理服务器代码,以便有空闲时间处理其他业务。
#include "stdafx.h"

// This autogenerated skeleton file illustrates how to build a server.
// You should copy it to another filename to avoid overwriting it.

#include "Test.h"
#include <thrift/protocol/TBinaryProtocol.h>
#include <thrift/transport/TServerSocket.h>
#include <thrift/transport/TBufferTransports.h>
#include <thrift/concurrency/ThreadManager.h>
#include <thrift/concurrency/BoostThreadFactory.h>
#include <thrift/server/TThreadPoolServer.h>
#include <thrift/server/TThreadedServer.h>

using namespace ::apache::thrift;
using namespace ::apache::thrift::protocol;
using namespace ::apache::thrift::transport;
using namespace ::apache::thrift::server;
using namespace ::apache::thrift::concurrency;

class TestHandler : virtual public TestIf {
public:
	TestHandler() {
		// Your initialization goes here
		Init();
	}

	int32_t add(const int32_t a, const int32_t b) {
		// Your implementation goes here
		printf("add\n");
		return a + b;
	}


	void getById(User& _return, const int64_t id) {
		// Your implementation goes here
		User *user;
		std::list<User *>::iterator iter = m_listUser.begin(), iterEnd = m_listUser.end();
		for (iter; iter != iterEnd; iter++)
		{
			user = *iter;
			if (user->id == id)
			{
				_return.id = user->id;
				_return.__set_name(user->name.c_str());
				_return.age = user->age;
				_return.__set_vip(user->vip);
				break;
			}
		}
		printf("getById\n");
	}

protected:
	void Init() {
		m_listUser.clear();
		int n = 0;
		for (n = 0; n < 10; n++) {
			User * user = new User();
			user->id = n + 1;
			user->age = 18 + n;
			sprintf((char *)user->name.data(), "name_%d", n + 1);
			//插入
			m_listUser.push_back(user);
		}
	}

std::list<User *> m_listUser;
};


class TStartObserver : public apache::thrift::server::TServerEventHandler {
public:
	TStartObserver() : awake_(false) {}
	virtual void preServe() {
		apache::thrift::concurrency::Synchronized s(m_);
		awake_ = true;
		m_.notifyAll();
	}
	void waitForService() {
		apache::thrift::concurrency::Synchronized s(m_);
		while (!awake_)
			m_.waitForever();
	}

private:
	apache::thrift::concurrency::Monitor m_;
	bool awake_;
};

int main(int argc, char **argv)
{
	int nRet = 0;
        //start
	int port = 9090;
	boost::shared_ptr<TServer> server;
	boost::shared_ptr<TStartObserver> observer;
	boost::shared_ptr<Thread> serverThread;
	boost::shared_ptr<ThreadManager> threadManager = NULL;
	boost::shared_ptr<TServerTransport> serverTransport;
	try
	{
		boost::shared_ptr<TestHandler> handler(new TestHandler());
		boost::shared_ptr<TProcessor> processor(new TestProcessor(handler));
		serverTransport.reset(new TServerSocket(port));
		boost::shared_ptr<TTransportFactory> transportFactory(new TBufferedTransportFactory());
		boost::shared_ptr<TProtocolFactory> protocolFactory(new TBinaryProtocolFactory());
		threadManager = ThreadManager::newSimpleThreadManager(10);
		boost::shared_ptr<PlatformThreadFactory> threadFactory = boost::shared_ptr<PlatformThreadFactory>(new PlatformThreadFactory());
		threadManager->threadFactory(threadFactory);
		threadManager->start();
		server.reset(new TThreadPoolServer(processor, serverTransport, transportFactory, protocolFactory, threadManager));
		observer.reset(new TStartObserver());
		server->setServerEventHandler(observer);
		serverThread.reset();
		serverThread = threadFactory->newThread(server);
		serverThread->start();
		observer->waitForService();
		printf("done.\n");
	}
	catch (const std::exception& ex)
	{
		printf(ex.what());
		nRet = -3;
	}
	catch (...)
	{
		nRet = -1;
	}

        //模拟其他业务处理
	while (true)
	{
		Sleep(200);
	}


	//stop
	if (server != NULL)
	{
		server->stop();
	}
	if (serverTransport != NULL)
	{
		serverTransport->close();
	}
	if (threadManager != NULL)
	{
		threadManager->stop();
	}
	if (serverThread != NULL)
	{
		serverThread->join();
	}

	return 0;
}


 5703
5703


 被折叠的 条评论
为什么被折叠?
被折叠的 条评论
为什么被折叠?
 到【灌水乐园】发言


