


原文地址:http://www.cnblogs.com/chjf2008/archive/2008/08/11/1265343.html#
摘 要 本文主要阐述了UltraWebGrid 2005控件在实际项目开发中的应用,这里以大庆石化公司炼油厂生产调度系统为例详细描述了UltraWebGrid控件的原理以及它的使用方法和技巧,还特别介绍了以Excel为数据源的绑定方法,以及应用JAVASCRIP实现了光标在UltraWebGrid cell中回车后纵向行走的方法。
关键词 ASP.NET;Microsoft Visual Studio .NET 2003;c#;UltraWebGrid
自公司宣布采用.NET开发项目以来,在不到两年得时间里,已经从战略变成现实。先后开发了总厂设备管理系统、养老保险管理系统、公司调度管理系统、总厂人力资源管理系统等,在这两年ASP.NET项目开发的过程中,UltraWebGrid 控件扮演了非常重要的角色,几乎每个页面都用到了UltraWebGrid控件。DataGrid Web服务器控件以表格式布局显示数据。提供到 ADO.NET 数据集的用户界面,该用户界面显示表格式数据并允许对数据源进行更新。当将UltraWebGrid控件设置为有效的数据源时,该控件被自动填充,同时根据数据的形状创建列和行。UltraWebGrid控件可用于显示单个表或显示一组表之间的分层关系。另外UltraWebGrid控件还拥有不断更新强大的属性编辑器,通过属性设置就可以实现特定的功能。
一、 基本原理
ASP.NET服务器控件包括HTML控件和Web控件,UltraWebGrid属于ASP.NET WEB控件,是基于数据源生成动态网页的数据栅格。它的层次关系如图1所示: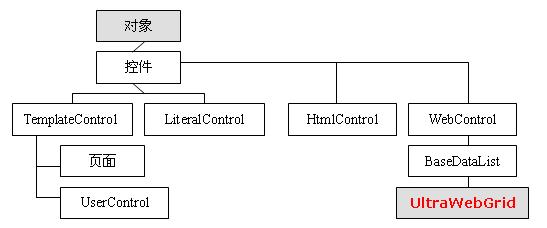
图1 UltraWebGrid所在位置的层次关系图
UltraWebGrid控件可以呈现多列的、完全模板化的表格,目前在多用性方面超出了其他所有数据绑定控件。它提供的用户界面很接近Microsoft Excel 工作表。通过使用UltraWebGrid控件,可以创建简单的数据绑定列来显示从数据源检索的数据,也可以创建模板列来设计单元格内容的布局,最后,基于命令的列使您可以向表格中添加特定的功能。它的基本使用方法如下:
数据绑定。UltraWebGrid Web 服务器控件必须通过其 DataSource 属性绑定到数据源,否则它将无法在页面上呈现。UltraWebGrid的典型数据源为 DataSet 和数据读取器。可使用工具箱中提供的数据源,如 DataSet 或 DataView 类。在微软推出2004和2005的新控件中,数据结构不仅可以是简单的单层结构也可以是有层次的多层结构。UltraWebGrid可以象树控件一样有层次的显示数据。
外观设置。可以通过预置外观和外观浏览器来实现。预置外观是通过选择一个.XML文件(PreSet)来设置整个UltraWebGrid 风格。非常方便快捷,但有时不能完全满足用户的需求。那么就可以通过外观浏览属性生成器来编辑外观。通过这个外观浏览模块可以设置组成UltraWebGrid 的各个元素的样式属性,如backcolor,bordercolor,font等来实现UltraWebGrid外观设置。UltraWebGrid的元素主要包括 header,footer,row,select row,item cell等。
事件模型是对UltraWebGrid 的动作做出响应。可以对这些动作进行编程控制,来实现所需要的功能。事件可分为:客户端事件和服务器端事件,这使它的功能变得更加强大。
特殊功能。通过设置属性来实现UltraWebGrid的一些特殊功能。如只定用户是否可以移动列(AllowColumnMoving),改变列的宽度(AlloColumnSizing),对数据进行排序(AllowSorting),分页(AllowPageing)等。其步骤如图2所示:

图2 控件的基本使用方法
二、 使用方法和技巧
1.添加UltraWebGrid控件
在VS.NET中新建一个Web工程,之后在工具箱中,鼠标右键弹出的菜单中,选择“添加新项”,在自定义工具箱中,选择UltraWebGrid控件(注意选择的是命名空间为Sysetem Web UI webcontrol的命名空间),按“确定”后,就可以在工具箱中出现UltraWebGrid控件了。将UltraWebGrid控件拖拽到ASP.NET WEB页设计器中,进入HTML页将看到导入名称空间:
<%@ import namespace="Sysetem Web UI webcontrol"%>
'注册这个名称空间并为其给定一个TagPrefix,以便于对这个控件库中的控件进行定义
<%@ Register TagPrefix="igtbl" Namespace="Infragistics.WebUI.UltraWebGrid" Assembly="Infragistics.WebUI.UltraWebGrid.v5.1, Version=5.1.20051.37, Culture=neutral, PublicKeyToken=7dd5c3163f2cd0cb"
%>
2.数据绑定
(1)典型数据源绑定:
可以使用 DataSource 属性来绑定 DataTable 对象(或从 DataTable 派生的对象)。在化工信息项目中是这样绑定UltraWebGrid数据源的,定义一个DataSet并实例化一个DataCommand,DataCommand在封装类中已经进行了定义。编写一个绑定函数,在需要绑定UltraWebGrid时调用该函数,实现的代码如下:
DataSet ds=new DataSet();//定义一个DataSet
DataCommand command=new DataCommand();//事例化一个DataCommand
#region 数据绑定
private void WebBind()
{
ds=command.ReturnDataSet("select rownum 序号,k.* from (select * from "+this.ViewState["TableName"].ToString()+" where "+this.ViewState["dp_id"].ToString()+" and bs="+this.DropDownList1.SelectedValue+" order by ord) k ","grid");
ds.Tables["grid"].DefaultView.Sort="序号";
UltraWebGrid1.DataSource=ds.Tables["grid"].DefaultView;
UltraWebGrid1.DataBind();
}
#endregion
其中ds=command.ReturnDataSet("…….”,” grid”)是向ds数据集中添加一个名字为grid的表。然后将这张表作为UltraWebGrid的数据源。
(2)特殊数据源绑定
在做调度管理系统中的数据接口管理模块时,就遇到了要将Excel作为UltraWebGrid 数据源绑定到UltraWebGrid中,运行界面如图3所示。
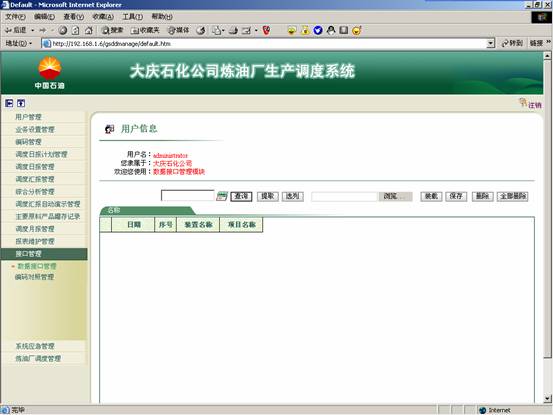
图3 数据接口管理模块的数据源绑定
解决办法如下:在页面中点击“浏览”选择要导入的Excel表后,点击“装载”按钮将Excel中的数据绑定到UltraWebGrid中显示。下面是“装载”按钮中click事件的代码。
String sConnectionString = "Provider=Microsoft.Jet.OLEDB.4.0;" +"Data Source='" + name + "';" +"Extended Properties=Excel 5.0;";
OleDbConnection objConn = new OleDbConnection(sConnectionString);
objConn.Open();
OleDbCommand objCmdSelect =new OleDbCommand("SELECT * FROM [Sheet1$]", objConn);
OleDbDataAdapter objAdapter1 = new OleDbDataAdapter();
objAdapter1.SelectCommand = objCmdSelect;
DataSet objDataset1 = new DataSet();
objAdapter1.Fill(objDataset1, "XLData");
string[] sql_column =ViewState["sql_column"].ToString().Split(",".ToCharArray());
for (int i =0;i<sql_column.Length;i++)
{
objDataset1.Tables[0].Columns[i].ColumnName = sql_column[i].ToString();
}
this.UltraWebGrid1.DataSource = objDataset1.Tables[0].DefaultView;
this.UltraWebGrid1.DataBind();
objConn.Close();
3.绑定列
(1)列的类型
UltraWebGrid列主要分为模板列和绑定列,
模板列:模板列是由<TemplateColumn>标记标识的。可以结合HTML和服务器控件来设计和定义布局。
绑定列:绑定列中包括按钮列(Button)、链接列(Hyperlink)、CheckBox列、下拉列表列(DropdownList)等。
显示效果如图4所示:
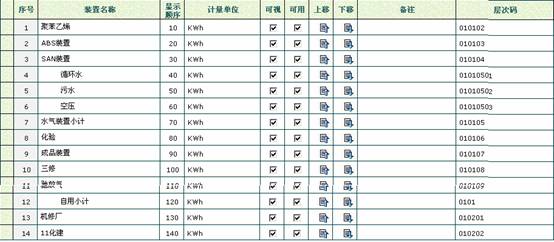
图4 绑定列之后的效果
(2)自动生成列
如果将UltraWebGrid的AutoGenerateColumns属性设为 默认值true ,则UltraWebGrid将自动生成列,生成列的原则是:为数据源中的每个字段创建一列;使用字段名称创建列标题。
(3)手动增加列
如果将UltraWebGrid的AutoGenerateColumns属性设为 false,则需要手动的添加列,点击Add按钮增加新列,然后在BaseColumnName,Key,Caption中输入相应信息,如图5所示:
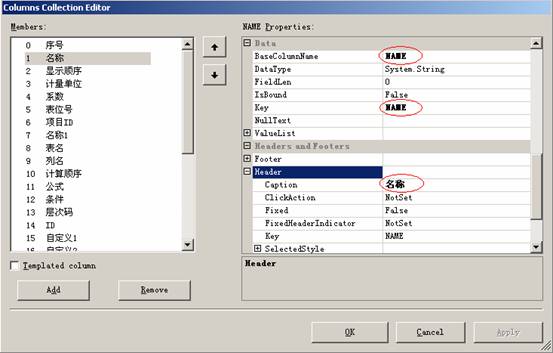
图5 手动增加列操作
4.外观设置
(1)通过Load Layout快速设置UltraWebGrid整体风格
右键点击UltraWebGrid选择属性,弹出属性对话框后,在对话框的下方,点击LoadLayout,进入Style presets界面,在Style下拉列表中选择样式,在选择样式的同时,UltraWebGrid效果在Preview中显示,点Apply应用将此样式应用到UltraWebGrid上。
(2)通过属性设置器设置外观
右键点击UltraWebGrid,选择属性,弹出属性对话框后,在对话框的下方,点击Qick Design
进入快速设计界面选择Appearance Browser,将会看到UltraWebGrid 控件的用户界面包括如图6所示的几种类型的项。在下拉列表中选择要设置的项,在右边的属性栏设置响应的属性,就可以得到你想要得外观了。在这里就不一一介绍了。
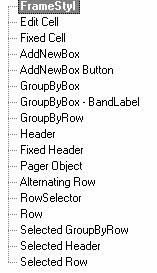
图6 用户界面所包含的类型项
5.事件模型
(1)UpdateCellBatch事件
通过UpdateCellBatch事件对UltraWebGrid中的数据源进行更新。
首先,在UltraWebGrid中增加新行:
Infragistics.WebUI.UltraWebGrid.UltraGridRow rw = new Infragistics.WebUI.UltraWebGrid.UltraGridRow();
UltraWebGrid1.Rows.Add(rw);
然后,在UltraWebGrid中删除激活行:
this.UltraWebGrid1.DisplayLayout.ActiveRow.Delete();
最后,更新修改数据。利用UpdateCellBatch事件记录UltraWebGrid中曾经修改过的数据,然后通过command.Update更新到数据库中。具体操作如下:在UltraWebGrid中添加UpdateCellBatch事件,右键点击UltraWebGrid,选择属性,弹出属性对话框后,在对话框的上方,选择事件选项卡。在事件列表中找到UpdateCellBatch事件,双击进入编程页面,完成事件的添加,在事件中填写如下代码:
if(Request.Params.Get("ButtonUpdate")=="保存")
{
DataRow row=null;
DataTable table=null;
object[] key = new object[2];
key[0] = UltraWebGrid1.Rows[e.Cell.Row.Index].Cells.FromKey("RQ").Value;
key[1] = UltraWebGrid1.Rows[e.Cell.Row.Index].Cells.FromKey("ID").Value;
table = dataSet12.Tables[e.Cell.Band.BaseTableName];
if(table==null)
return;
if (key!=null)
row=table.Rows.Find(key);
if(row!=null)
{
try
{
object newVal=e.Cell.Value;
string ColName=e.Cell.Column.BaseColumnName;
if(newVal==null||newVal.ToString()=="0")
{row[e.Cell.Column.Key]=0;}
else
{row[e.Cell.Column.Key]=newVal;}
}
catch(Exception ex)
{
Response.Write(ex.Message);
dataSet12.RejectChanges();
}
}
}
然后在“存盘”按钮的click事件中添加如下代码:
#region//——存盘
private void ButtonUpdate_Click(object sender, System.EventArgs e)
{
try
{
DataCommand myDataCommand = new DataCommand();
myDataCommand.Update( mySql ,dataSet12.Tables[mySqlTable]);
this.UltraWebGrid1.DataBind();
}
catch(Exception updateError)
{
Response.Write (updateError.StackTrace);
Response.Write ("<br><br>保存过程出错!");
dataSet12.RejectChanges();
}
}
#endregion
这样就实现了数据的更新
(2) ClickCellButton事件
应用ClickCellButton事件实现记录的上移和下移,在UltraWebGrid中添加ClickCellButton事件,方法同上,事件中的核心代码如下:
//上移
if(e.Cell.Column.Key.ToString()=="上移")
{
int i;
i=e.Cell.Row.Index;
if(i>0)
{
this.ViewState["Prev_Ord"]=Convert.ToString(UltraWebGrid1.Rows[i-1].Cells.FromKey("ORD").Text);
this.ViewState["Curr_Ord"]=Convert.ToString(UltraWebGrid1.DisplayLayout.Rows[i].Cells.FromKey("ORD").Text);
string sql="update "+this.ViewState["TableName"].ToString()+" set ord="+this.ViewState["Prev_Ord"].ToString()+" where id="+this.UltraWebGrid1.DisplayLayout.Rows[i].Cells.FromKey("ID").Text;
command.MyCommand(sql);
string sql1="update "+this.ViewState["TableName"].ToString()+" set ord="+this.ViewState["Curr_Ord"]+" where id="+this.UltraWebGrid1.DisplayLayout.Rows[i-1].Cells.FromKey("ID").Text;
command.MyCommand(sql1);
WebBind();
UltraWebGrid1.Rows[i-1].Activate();
UltraWebGrid1.Rows[i-1].Selected=true;
}
}
//下移
else
{
int i;
i=e.Cell.Row.Index;
if(i<UltraWebGrid1.DisplayLayout.Rows.Count-1)
{
this.ViewState["Next_Ord"]=UltraWebGrid1.Rows[i+1].Cells.FromKey("ORD").Text;
this.ViewState["Curr_Ord"]=UltraWebGrid1.DisplayLayout.Rows[i].Cells.FromKey("ORD").Text;
string sql="update "+this.ViewState["TableName"].ToString()+" set ord="+this.ViewState["Next_Ord"].ToString()+" where id="+this.UltraWebGrid1.DisplayLayout.Rows[i].Cells.FromKey("ID").Text;
command.MyCommand(sql);
string sql1="update "+this.ViewState["TableName"].ToString()+" set ord="+this.ViewState["Curr_Ord"].ToString()+" where id="+this.UltraWebGrid1.DisplayLayout.Rows[i+1].Cells.FromKey("ID").Text;
command.MyCommand(sql1);
WebBind();
UltraWebGrid1.Rows[i+1].Activate();
UltraWebGrid1.Rows[i+1].Selected=true;
}
}
command.MyCommand(sql);
string sql1="update "+this.ViewState["TableName"].ToString()+" set ord="+this.ViewState["Curr_Ord"]+" where id="+this.UltraWebGrid1.DisplayLayout.Rows[i-1].Cells.FromKey("ID").Text;
command.MyCommand(sql1);
WebBind();
UltraWebGrid1.Rows[i-1].Activate();
UltraWebGrid1.Rows[i-1].Selected=true;
}
}
//下移
else
{
int i;
i=e.Cell.Row.Index;
if(i<UltraWebGrid1.DisplayLayout.Rows.Count-1)
{
this.ViewState["Next_Ord"]=UltraWebGrid1.Rows[i+1].Cells.FromKey("ORD").Text;
this.ViewState["Curr_Ord"]=UltraWebGrid1.DisplayLayout.Rows[i].Cells.FromKey("ORD").Text;
string sql="update "+this.ViewState["TableName"].ToString()+" set ord="+this.ViewState["Next_Ord"].ToString()+" where id="+this.UltraWebGrid1.DisplayLayout.Rows[i].Cells.FromKey("ID").Text;
command.MyCommand(sql);
string sql1="update "+this.ViewState["TableName"].ToString()+" set ord="+this.ViewState["Curr_Ord"].ToString()+" where id="+this.UltraWebGrid1.DisplayLayout.Rows[i+1].Cells.FromKey("ID").Text;
command.MyCommand(sql1);
WebBind();
UltraWebGrid1.Rows[i+1].Activate();
UltraWebGrid1.Rows[i+1].Selected=true;
}
}
6.特殊功能的实现
UltraWebGrid并不能完全满足用户的要求,在调度项目中就遇到了这样一个问题,用户要求在UltraWebGrid中回车后纵向输入数据(即一列一列的输入数据),然而在UltraWebGrid中回车后是横向走的。下面介绍一下对于这一问题的解决方法:UltraWebGrid与JAVASCRIP相结合实现竖向录入数据,在html中添加如下代码:
<script language="javascript">
document.onkeyup = function keyCode()
{ //设置行激活
var parts;
var cellId;
var cell;
var nextCellId;
var nextCell;
var gridName = "UltraWebGrid1";
var grid = igtbl_getGridById(gridName);
if(event.keyCode==38 )
{ cellId = grid.ActiveCell;
cell = igtbl_getElementById( cellId );
parts = cellId.split("_"); nextCellId = parts[0]+"_"+(parseInt(parts[1])-1)+"_"+parts[2]; nextCell = igtbl_getElementById( nextCellId );
if(nextCell==undefined) return;
igtbl_setActiveCell( gridName,nextCell) igtbl_editCell(event,gridName,nextCell,event.keyCode) } if(event.keyCode==40 )
{ cellId = grid.ActiveCell;
cell = igtbl_getElementById( cellId ); parts = cellId.split("_");
nextCellId = parts[0]+"_"+(parseInt(parts[1])+1)+"_"+parts[2];
nextCell = igtbl_getElementById( nextCellId );
if(nextCell==undefined) return; igtbl_setActiveCell( gridName,nextCell) igtbl_editCell(event,gridName,nextCell,event.keyCode)
}
}
</script>
三、 结语
本文介绍了最值得关注的 .NET 控件之一:DataGrid Web服务器控件。UltraWebGrid 适用于各种不同的现实情况,无论是要处理数据绑定和用户编辑,还是仅涉及静态文本显示,都可以采用 UltraWebGrid。
参考文献:
[1] KARLI WATSON, MARCO BELLINASO 等著.《C#入门经典》.清华大学出版社,2002年
[2] NIKHIL KOTHARI,VANDANA DATYE 等著.《ASP.NET服务器控件与组件开发》.机械工业出版社 ,2003年


 432
432


 被折叠的 条评论
为什么被折叠?
被折叠的 条评论
为什么被折叠?
 到【灌水乐园】发言


