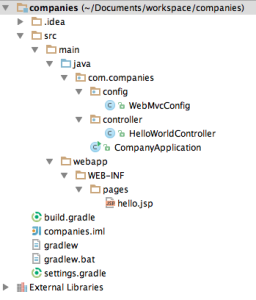
I was planning to write an article about Spring Boot more than a year ago. Finally I have the time and inspiration for this. So prepare yourself for 10 – 15 minutes of high quality Spring tutorial. I’m going to demonstrate Spring Boot basics with Gradle and embedded Tomcat. I use Intellij IDEA instead of Eclipse but this shouldn’t be a problem for those of you who are used to Eclipse.
Introduction to Spring Boot
What’s my goal? I want to develop something very similar to one of my previous tutorials about Spring and Java configurations. It’s a good exercise to compare two different approaches for Spring development.
No doubt, most of you know what is the main aim of Spring Boot. For the rest of readers I want to say that Spring Boot makes developers happier because it takes care of configurations while developers can focus on code production. For more details read official reference.
Gradle build file

For managing dependencies and build of the project I use Gradle. Here is how build.gradle file looks:
buildscript {
    repositories {
        //Required repos
        mavenCentral()
        maven { url "http://repo.spring.io/snapshot" }
        maven { url "http://repo.spring.io/milestone" }
    }
    dependencies {
        //Required dependency for spring-boot plugin
        classpath 'org.springframework.boot:spring-boot-gradle-plugin:1.1.2.BUILD-SNAPSHOT'
    }
}

apply plugin: 'java'
apply plugin: 'war'
apply plugin: 'spring-boot'

war {
    baseName = 'companies'
    version =  '0.1'
}

repositories {
    mavenCentral()
    maven { url "http://repo.spring.io/snapshot" }
    maven { url "http://repo.spring.io/milestone" }
}

dependencies {
    compile 'org.springframework.boot:spring-boot-starter-web'
    //Required dependency for JSP
    providedRuntime 'org.apache.tomcat.embed:tomcat-embed-jasper'
}
If you are new to Gradle, I recommend you to read about it somewhere else, e.g. on official site. It’s really nice and practical tool. It can do everything what Maven do, but without XML!
Spring Boot initialization
Now we can set up Spring Boot on java code level.
package com.companies;

import org.springframework.boot.SpringApplication;
import org.springframework.boot.autoconfigure.EnableAutoConfiguration;
import org.springframework.context.annotation.ComponentScan;
import org.springframework.context.annotation.Configuration;

@Configuration
@ComponentScan
@EnableAutoConfiguration
public class CompanyApplication {

    public static void main(String[] args) {
        SpringApplication.run(CompanyApplication.class, args);
    }

}
That’s it, now you can start developing your business logic. Just kidding, we need to put some extra configs related to view resolving.
package com.companies.config;

import org.springframework.context.annotation.Bean;
import org.springframework.context.annotation.Configuration;
import org.springframework.web.servlet.config.annotation.DefaultServletHandlerConfigurer;
import org.springframework.web.servlet.config.annotation.EnableWebMvc;
import org.springframework.web.servlet.config.annotation.WebMvcConfigurerAdapter;
import org.springframework.web.servlet.view.InternalResourceViewResolver;

@Configuration
@EnableWebMvc
public class WebMvcConfig extends WebMvcConfigurerAdapter{

    @Override
    public void configureDefaultServletHandling(DefaultServletHandlerConfigurer configurer) {
        configurer.enable();
    }

    @Bean
    public InternalResourceViewResolver viewResolver() {
        InternalResourceViewResolver resolver = new InternalResourceViewResolver();
        resolver.setPrefix("WEB-INF/pages/");
        resolver.setSuffix(".jsp");
        return resolver;
    }

}
After you have created the class published above, you can go ahead with controller development.
Controller & View
view sourceprint?01 package com.companies.controller;
package com.companies.controller;

import org.springframework.stereotype.Controller;
import org.springframework.web.bind.annotation.RequestMapping;
import org.springframework.web.bind.annotation.RequestMethod;
import org.springframework.web.servlet.ModelAndView;

@Controller
public class HelloWorldController {

    @RequestMapping(value = "/hello", method = RequestMethod.GET)
    public ModelAndView hello() {
        ModelAndView mav = new ModelAndView();
        mav.setViewName("hello");

        String str = "Hello World!";
        mav.addObject("message", str);

        return mav;
    }

}
And corresponding view hello.jsp for the controller:
<html>
<head>
    <title>Hello world page</title>
</head>
<body>
    <h1>${message}</h1>
</body>
</html>
I hope it wan’t hard to repeat all these steps.
Run Spring Boot application
The last thing we have to do in this tutorial is launch of the application. Hence I use Gradle, and in our build.gradle file I specified that the application needs to be packaged as WAR file – I need to run build and run war file.
Here is how it looks like in IDEA:
Result you can see here: localhost:8080/hello


 5653
5653


 被折叠的 条评论
为什么被折叠?


