


认证是shiro在使用过程中最开始的一个步骤,只有通过了认证才回有下面授权等操作。认证就是shiro获取当前
用户凭据并进行匹配的过程,最朴素的理解就是弄清楚当前用户的到底是谁的过程。这里也是针对在应用层面的总结,因为发现跟到shiro内部东西就很多了,容易迷失自己。
其实shiro认证过程简化的步骤非常简单
1.提交凭据
2.获取验证信息
3.验证凭据和验证信息是否一致
看一下详细的步骤
粗略的跟了一下shiro认证的流程,处理流程如下。
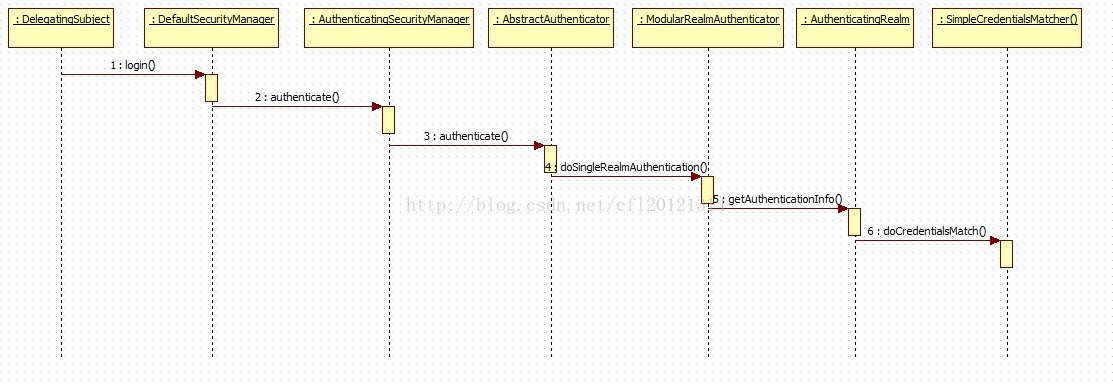
流程中省去了提交表单获取凭据的过程,也省去了在自定义realm的过程,咱们直接看从代理类
DelegatingSubject开始login的过程。
第一步:调用默认securityManager,DefaultSecurityManager这个主要是shiro认证、授权、会话管理等操作的包装类。常见的Facade模式。
第二步:之后调用DefaultSecurityManager继承SessionsSecurityManager执行login方法
第三步:认证管理器AuthenticatingSecurityManager继承RealmSecurityManager执行authenticate方法:
第四步:抽象认证管理器AbstractAuthenticator继承Authenticator, LogoutAware 执行authenticate方法:
第五步:ModularRealmAuthenticator继承AbstractAuthenticator执行doAuthenticate方法
第六步:AuthenticatingRealm继承CachingRealm执行getAuthenticationInfo方法
第七步:最后在调用SimpleCredentialsMatcher的doCredentialsMatch()
我们可以看一下这个doCredentialMatch(),特别有意思。
publicclass SimpleCredentialsMatcher extends CodecSupport implementsCredentialsMatcher {
//log处理
    private static final Logger log =LoggerFactory.getLogger(SimpleCredentialsMatcher.class);

  //得到提交的凭据
    protected ObjectgetCredentials(AuthenticationToken token) {
        return token.getCredentials();
    }

//得到存在于数据库的凭据
    protected ObjectgetCredentials(AuthenticationInfo info) {
        return info.getCredentials();
    }

                 //验证提交的token和存在于数据库中的凭据信息是否一致
    protected boolean equals(ObjecttokenCredentials, Object accountCredentials) {
        if (log.isDebugEnabled()) {
            log.debug("Performingcredentials equality check for tokenCredentials of type [" +
                   tokenCredentials.getClass().getName() + " and accountCredentials oftype [" +
                   accountCredentials.getClass().getName() + "]");
        }
        if (isByteSource(tokenCredentials)&& isByteSource(accountCredentials)) {
            if (log.isDebugEnabled()) {
                log.debug("Bothcredentials arguments can be easily converted to byte arrays.  Performing " +
                        "array equalscomparison");
            }
            byte[] tokenBytes =toBytes(tokenCredentials);
            byte[] accountBytes =toBytes(accountCredentials);
            return Arrays.equals(tokenBytes,accountBytes);
        } else {
            returnaccountCredentials.equals(tokenCredentials);
        }
    }
  //验证是否一致
    public booleandoCredentialsMatch(AuthenticationToken token, AuthenticationInfo info) {
        Object tokenCredentials =getCredentials(token);
        Object accountCredentials =getCredentials(info);
        return equals(tokenCredentials,accountCredentials);
    }

}
这个类应该说不是很复杂,没有各种的设计原则和模式,仅仅是判断。走到最后发现shiro认证在刨去一些调用
和封装之外,落实到最后的还是我们常见的哪些判断、选择、顺序这些常用的代码结构设计。也是一件很有意
思的事情。
走完了一些处理的流程,下面主要针对shiro+spring如何结合使用来整理一下。
整合spring
<!--1.配置shiro的DelegatingFilterProxy,对于shiro里filter的代理,这个类的好处就是通过spring来管理shiro中的filter类 -->
<beanid="shiroFilter"class="org.apache.shiro.spring.web.ShiroFilterFactoryBean">
<propertyname="securityManager" ref="securityManager" />
<propertyname="loginUrl" value="/login.jsp" />
<propertyname="successUrl" value="/login.jsp" />
<propertyname="unauthorizedUrl" value="/error/noperms.jsp" />

<!-- url过滤器 -->
<propertyname="filterChainDefinitions">
<value>
/login.jsp*= anon
/login.do*= anon
/index.jsp*=anon
/error/noperms.jsp*=anon
/*.jsp*= authc
/*.do*= authc
</value>
</property>
</bean>
通过配置将shiro所有的过滤器都交给spring来管理,类似于struts2,shiro的filer有11个。
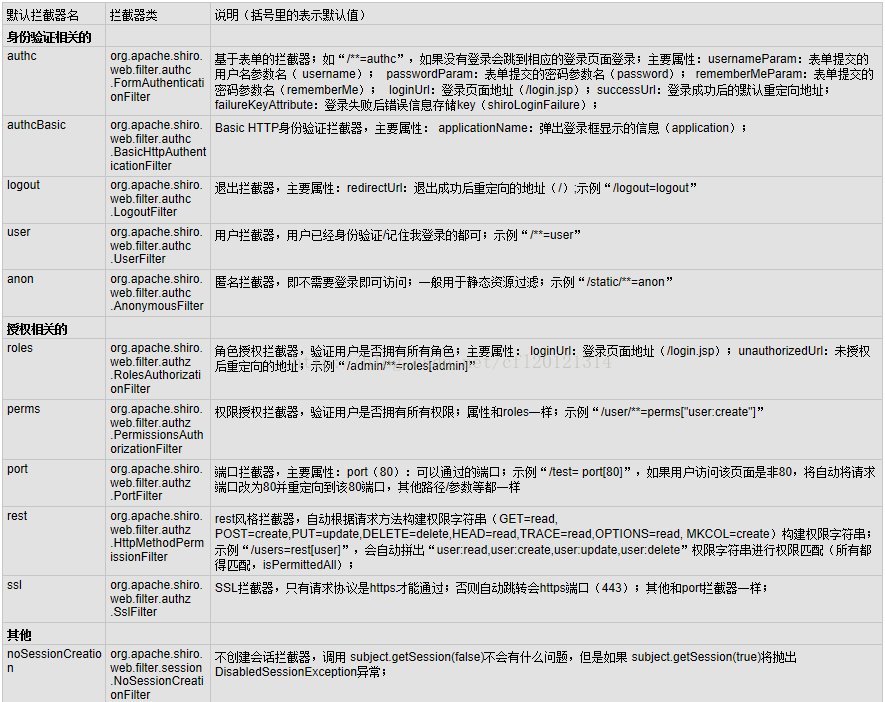
上图表摘自:
<!--        2.配置securityManager,securityManager为调用shiro内部各个realm的入口-->
<beanid="securityManager"class="org.apache.shiro.web.mgt.DefaultWebSecurityManager">
<!--设置自定义realm-->
<propertyname="realm" ref="monitorRealm" />

</bean>
<!--3.自定义Realm继承自AuthorizingRealm -->
<beanid="monitorRealm"class="com.shiro.service.MonitorRealm"></bean>

<!--4.注入securityManager类的arguments属性-->
<beanclass="org.springframework.beans.factory.config.MethodInvokingFactoryBean">
<propertyname="staticMethod"value="org.apache.shiro.SecurityUtils.setSecurityManager" />
<propertyname="arguments" ref="securityManager" />
</bean>
以上主要是shiro认证流程处理,加上后面shiro如何和spring结合使用的配置。主要是这两个部分:
.通过shiro时序图可以发现其实shiro没有想象复杂的,当然其中一些调用类的包装还是挺多的。但是最为基础的认证还是比较简单的,这里仅仅是比较简单的认证。
.shiro和spring的结合主要在于shirofilterfactorybean的配置以及自定义realm的配置。


 2万+
2万+


 被折叠的 条评论
为什么被折叠?
被折叠的 条评论
为什么被折叠?
 到【灌水乐园】发言


