


版权声明:本文为博主原创文章,未经博主允许不得转载。
听说Glide是一个牛逼的图片加载库,作者是bumptech,然后这个库被广泛的应用在谷歌的官方app里,也就是谷歌支持我们使用这个来加载图片库,所以呢就需要响应谷歌的要求,就像网络访问我们用volley,然后大部分安卓开发者都弃用eclipse转战Android studio一样,现在好的图片开源库真是太多了,显然也是各有特点自己适合才是最好的,所以就来学习下这个Glide的图片库,有了Android studio开发真是太方便了 。
。

Android Glide是一个开源的图片加载和缓存处理的第三方框架。使用Android的Glide和Android的Picasso库惊人的相似,基本上会用毕加索的也就会使用这个东东了,个人感觉比Android Picasso好用。Android Glide使自身内部已经实现了缓存策略,使得开发者摆脱Android图片加载的琐碎事务,专注逻辑业务的代码。Android Glide使用便利,短短几行简单明晰的代码,即可完成大多数图片从网络(或者本地)加载、显示的功能需求。
一.为什么要使用Glide
以前还没有出Glide、Picasso和Fresco的时候我们最常用的是使用老牌的图片框架universalImageLoader,universalImageLoader配置相对麻烦,虽然提供了各种配置,但是没有实践过,根本不知道如何配置,网上的介绍也很多,总体感觉就是配置太多了,使用起来也还算比较方便吧,总之来说使用eclipse开发的时候这个框架加载图片感觉是非常的轻松,确实也很少出现oom,这里要给它点个赞,然后也是国产app使用最多的一个图片加载框架了,一般使用volley去发送请求,处理图片时虽然它也带了ImageLoader和NetworkImageView但是很容易出现oom,然后通常使用volley+universalImageLoader。
随着Glide、Picasso和Fresco三个图片加载库的出现,我们就更加喜欢用更方便的图片框架了,universalImageLoader虽然好但是配置多,但是我们使用加载过多的大图片时,Picasso(毕加索)占用的内存会相当的大,所以如果是要加载很多图片那么毕加索可能会OutOfMemoryError的发生,至于Fresco是一个非常强大的图片加载框架,支持webps格式(和jpg一样都是有损压缩格式,webps相同质量图片更节省空间),支持渐进式jpeg,可以轻松的定制image的各种属性,支持多图请求和图片复用,并支持手势缩放和旋转等等(这里不做比较)。
所以具体来看Glide和Picasso,Glide加载图像以及磁盘缓存的方式都要优于Picasso,速度更快,并且Glide更有利于减少OutOfMemoryError的发生,GIF动画是Glide的杀手锏。不过Picasso的图片质量更高。glide从用法上几乎就是另一个picasso,从picasso转移到glide相对改动较少,还有一点就是这个项目是google在维护,我也能给它更多的信任,相比较universalImageLoader,glide可以支持gif和短视频,后期也需要用到,这里不得不谈一下glide优秀的缓存机制了,glide图片缓存默认使用RGB565相当于ARGB8888可以节省不少的空间,支持与activity,fragment,application生命周期的联动,更智能管理图片请求当然还有其他的扩展更多可以看 glide介绍 当然,glide的方法数量比universalImageLoader多了1000多个,遇到64k问题的会比较关注这个。
不说了,反正这些图片加载框架都是相当 的牛逼,你就看着用好了。
二.Glide的使用
上一篇我们讲了毕加索《安卓图片处理Picasso的解析使用》,对着上一篇你就会知道Glide和Picasso的使用差不多。
我们现在就来使用吧,依旧是你想用glide-3.6.1.jar就去下载,放在libs下导入就好了,如果你使用的是AS那么就更加简单了
你有github账号就更加好了,没有那么你就落后了,赶紧去申请一个,没有也可以去github去downLoad ZIP,有你就直接Git clone https://github.com/bumptech/glide.git
repositories {
    mavenCentral()
}

dependencies {
    compile 'com.github.bumptech.glide:glide:3.6.1'
    compile 'com.android.support:support-v4:23.1.1'
}
从这里你发现了好像是需要V4包,好像Picasso不要
Or Maven:
<dependency>
    <groupId>com.github.bumptech.glide</groupId>
    <artifactId>glide</artifactId>
    <version>3.6.1</version>
</dependency>
<dependency>
    <groupId>com.google.android</groupId>
    <artifactId>support-v4</artifactId>
    <version>r7</version>
</dependency>
说明里面也介绍了去代码混淆:在proguard-project.txt或proguard.cfg
-keep public class * implements com.bumptech.glide.module.GlideModule
-keep public enum com.bumptech.glide.load.resource.bitmap.ImageHeaderParser$** {
    **[] $VALUES;
    public *;
}
准备工作完了,那就是你要去代码使用的时候了:
概括一句话也是
Glide在(with)当前上下文中加载(load)一张图片到(into)imageView控件
现在直接上代码,因为和毕加索的使用差不多:
MainActivity.Java
public class MainActivity extends AppCompatActivity {

    @InjectView(R.id.listview)
    ListView listview;
    @InjectView(R.id.single_view_asset)
    ImageView singleViewAsset;
    @InjectView(R.id.single_view_res)
    ImageView singleViewRes;
    private String[] images;

    private  ListViewAdapter mAdapter;
    @Override
    protected void onCreate(Bundle savedInstanceState) {
        super.onCreate(savedInstanceState);
        setContentView(R.layout.content_main);
        ButterKnife.inject(this);
       //加载本地图片
       initLocal();
        //加载网络图片
        initNet();
    }

    private void initNet() {
        getImageUrls();
        mAdapter=new ListViewAdapter(images,MainActivity.this);
        listview.setAdapter(mAdapter);
    }

    private void getImageUrls() {
       images= new String[] {
                "https://img-my.csdn.net/uploads/201407/26/1406383299_1976.jpg",
                "https://img-my.csdn.net/uploads/201407/26/1406383291_6518.jpg",
                "https://img-my.csdn.net/uploads/201407/26/1406383291_8239.jpg",
                "https://img-my.csdn.net/uploads/201407/26/1406383290_9329.jpg",
                "https://img-my.csdn.net/uploads/201407/26/1406383290_1042.jpg",
                "https://img-my.csdn.net/uploads/201407/26/1406383275_3977.jpg",
                "https://img-my.csdn.net/uploads/201407/26/1406383265_8550.jpg",
                "https://img-my.csdn.net/uploads/201407/26/1406383264_3954.jpg",
                "https://img-my.csdn.net/uploads/201407/26/1406383264_4787.jpg",
                "https://img-my.csdn.net/uploads/201407/26/1406383264_8243.jpg",
                "https://img-my.csdn.net/uploads/201407/26/1406383248_3693.jpg",


        };
    }

    private void initLocal() {
        //加载资源图片
        Glide.with(this).load(R.drawable.alipay).into(singleViewRes);
        //加载资产目录图片
        Glide.with(this).load("file:///android_asset/heart.png").into(singleViewAsset);
        //加载sd卡图片文件
        // Glide.with(this).load(new File("XXX")).into(iv_picasso);
    }


}
再看适配器代码:ListViewAdapter.java
/**
 * Created by test1 on 2016/1/27.
 */
public class ListViewAdapter extends BaseAdapter{
    private String images[];
    private Activity mActivity;
    private LayoutInflater mInflat;
        public ListViewAdapter(String[] images,Activity mActivity) {
            this.images = images;
            this.mActivity = mActivity;
            mInflat=LayoutInflater.from(mActivity);
        }


        @Override
    public int getCount() {
        return images.length;
    }

    @Override
    public Object getItem(int position) {
        return images[position];
    }

    @Override
    public long getItemId(int position) {
        return position;
    }

    @Override
    public View getView(int position, View convertView, ViewGroup parent) {
        if(convertView==null){

            convertView=  mInflat.inflate(R.layout.list_item,null,false);
            ImageView iv= (ImageView) convertView.findViewById(R.id.iv);
            Glide.with(mActivity)
                    .load(images[position])
                    .centerCrop()
                    .placeholder(R.mipmap.ic_launcher)
                    .crossFade()
                    .into(iv);
        }

        return convertView;
    }
还有很多方法:像crossFade()默认动画,fitCenter(),placeholder()占位图,error()错误图,空图等可以自己试试;
这里的Glide.with() 不仅可以传 Context ,还可以传Activity 和 Fragment,因为图片加载会和Activity/Fragment的生命周期保持一致,比如Paused状态在暂停加载,在Resumed的时候又自动重新加载。
效果看图:
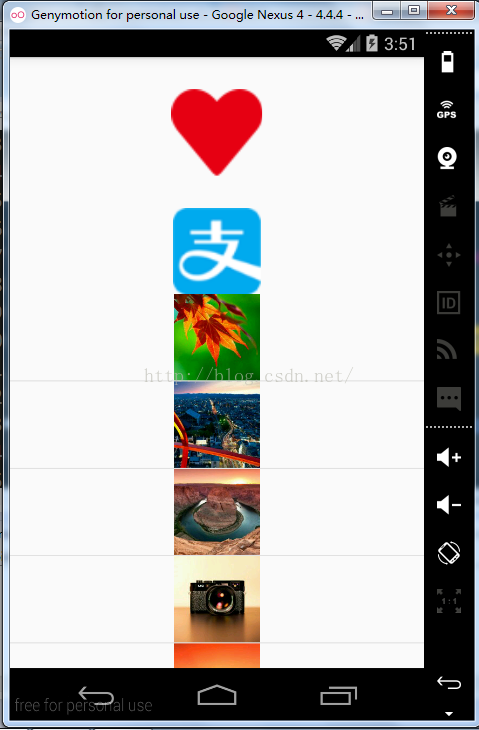
这就是Glide的简单使用。
三.Glide的其他使用
如果想用Okhttp做协议栈可以直接添加 glide-okhttp-integration-1.3.1.jar ,并且在Application 或Activity 的onCreate 方法注册就可以使用okhttp做为协议栈,Volley也是同理;
Glide.get(this).register(GlideUrl.class,InputStream.class,newOkHttpUrlLoader.Factory(newOkHttpClient()));
Glide默认的图片格式是RGB_565所以,要想使用ARGB_8888模式,又想Okhttp做协议栈,就不能用glide-okhttp-integration-1.3.1.jar,直接抽取里面的OkHttpGlideModule类然后,添加builder.setDecodeFormat(DecodeFormat.PREFER_ARGB_8888);
用起来很简单,说下注意点吧:
1.placeholder() 占位图或者失败图都可以直接使用R.color.white 颜色来做;
2.如果加载不出来图片的话可以试试设置下图片的宽高;
3.图片缓存:图片的加载并不是全缓存,而是使用的imageview的大小来的,如果想要全缓存的就可以这样:
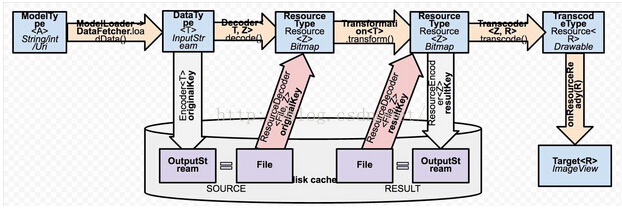
DiskCacheStrategy.NONE什么都不缓存DiskCacheStrategy.SOURCE仅仅只缓存原来的全分辨率的图像DiskCacheStrategy.RESULT仅仅缓存最终的图像,即降低分辨率后的(或者是转换后的)DiskCacheStrategy.ALL缓存所有版本的图像(默认行为)
.diskCacheStrategy(DiskCacheStrategy.ALL)
4.图片加载背景会变成绿色,加载jpg图片会出现的BUG,github上给出解决方案
Glide.with(this).load(url).diskCacheStrategy(DiskCacheStrategy.SOURCE).into(imageView); 或者
Glide.with(this).fromResource().asBitmap().encoder(newBitmapEncoder(Bitmap.CompressFormat.PNG,100)).load(R.drawable.testimg).into(imageView);
5.圆形图片用V4包自带的处理方式:
Glide.with(context).load(imageUrl).asBitmap().fitCenter().diskCacheStrategy(DiskCacheStrategy.SOURCE)
.placeholder(R.drawable.shape_glide_round_place).error(R.drawable.no_face_circle)
.into(newBitmapImageViewTarget(imageView) {
@Override
protected voidsetResource(Bitmap resource) {
RoundedBitmapDrawable circularBitmapDrawable =
RoundedBitmapDrawableFactory.create(context.getResources(),resource);
circularBitmapDrawable.setCircular(true);
imageView.setImageDrawable(circularBitmapDrawable);
}
});
5.动画crossFade()
crossFade() 方法还有另外重载方法 .crossFade(int duration)。如果你想要去减慢(或加快)动画,随时可以传一个毫秒的时间给这个方法。动画默认的持续时间是 300毫秒。
如果你想直接显示图片而没有任何淡入淡出效果,在 Glide 的建造者中调用 .dontAnimate() 。
6.清除缓存:Glide.get(this).clearMemory();
Glide.get(this).clearDiskCache(); 需要在子线程执行
7. 加载暂时不支持显示进度,可以用占位图来显示,把占位图替换成帧动画,还有错误图片,图片缩放以及自定义大小
当加载网络图片时,由于加载过程中图片未能及时显示,此时可能需要设置等待时的图片,通过placeHolder()方法:
当加载图片失败时,通过error(Drawable drawable)方法设置加载失败后的图片显示:
图片的缩放,centerCrop()和fitCenter():
使用centerCrop是利用图片图填充ImageView设置的大小,如果ImageView的Height是match_parent则图片就会被拉伸填充使用fitCenter即缩放图像让图像都测量出来等于或小于 ImageView 的边界范围该图像将会完全显示,但可能不会填满整个 ImageView。
图片自定义显示大小:
8.glide获取bitmap动态设置图片大小,通过viewTarget设置自定义view的图片
1.simpleTarget获取bitmap根据bitmap设定图片显示尺寸:(这里适配屏幕宽度,高度按比例拉伸)
2.simpleTarget获取bitmap指定尺寸:
ViewTarget 更容易实现。.into()
,因为我们的自定义 view 并不继承自
ImageView
。因此,我们必须创建一个
ViewTarget
,并用
.into()
方法:
10.显示本地视频
11.图片加载优先级
Priority.LOWPriority.NORMALPriority.HIGHPriority.IMMEDIATE
四.如何调试Glide加载图片
与其他图片加载库不同,在Glide加载图片的过程中默认是没有任何log输出的。这样使得加载失败的原因难以调试。
为了在异常发生时可以看到它们,你可以打开Glide中处理所有媒体加载响应的类GenericRequest的log开关。很简单,在命令行运行下面的指令即可:
<code class="css" style="padding: 0px; font-family: Menlo, Monaco, Consolas, "Courier New", monospace; font-size: 12px; border: none; background-color: transparent;"><span class="hljs-tag" style="color: rgb(133, 153, 0);">adb</span> <span class="hljs-tag" style="color: rgb(133, 153, 0);">shell</span> <span class="hljs-tag" style="color: rgb(133, 153, 0);">setprop</span> <span class="hljs-tag" style="color: rgb(133, 153, 0);">log</span><span class="hljs-class" style="color: rgb(155, 112, 63);">.tag</span><span class="hljs-class" style="color: rgb(155, 112, 63);">.GenericRequest</span> <span class="hljs-tag" style="color: rgb(133, 153, 0);">DEBUG</span></code>
如果你将DEBUG替换为VERBOSE,还可以看到详细的请求时间日志。
如果你想禁用log输出,执行:
<code class="css" style="padding: 0px; font-family: Menlo, Monaco, Consolas, "Courier New", monospace; font-size: 12px; border: none; background-color: transparent;"><span class="hljs-tag" style="color: rgb(133, 153, 0);">adb</span> <span class="hljs-tag" style="color: rgb(133, 153, 0);">shell</span> <span class="hljs-tag" style="color: rgb(133, 153, 0);">setprop</span> <span class="hljs-tag" style="color: rgb(133, 153, 0);">log</span><span class="hljs-class" style="color: rgb(155, 112, 63);">.tag</span><span class="hljs-class" style="color: rgb(155, 112, 63);">.GenericRequest</span> <span class="hljs-tag" style="color: rgb(133, 153, 0);">ERROR</span></code>调试工作流
为了查看Glide内部引擎是何时、如何加载图片的,你可以启用这些log:
<code class="css" style="padding: 0px; font-family: Menlo, Monaco, Consolas, "Courier New", monospace; font-size: 12px; border: none; background-color: transparent;"><span class="hljs-tag" style="color: rgb(133, 153, 0);">adb</span> <span class="hljs-tag" style="color: rgb(133, 153, 0);">shell</span> <span class="hljs-tag" style="color: rgb(133, 153, 0);">setprop</span> <span class="hljs-tag" style="color: rgb(133, 153, 0);">log</span><span class="hljs-class" style="color: rgb(155, 112, 63);">.tag</span><span class="hljs-class" style="color: rgb(155, 112, 63);">.Engine</span> <span class="hljs-tag" style="color: rgb(133, 153, 0);">VERBOSE</span>
<span class="hljs-tag" style="color: rgb(133, 153, 0);">adb</span> <span class="hljs-tag" style="color: rgb(133, 153, 0);">shell</span> <span class="hljs-tag" style="color: rgb(133, 153, 0);">setprop</span> <span class="hljs-tag" style="color: rgb(133, 153, 0);">log</span><span class="hljs-class" style="color: rgb(155, 112, 63);">.tag</span><span class="hljs-class" style="color: rgb(155, 112, 63);">.EngineJob</span> <span class="hljs-tag" style="color: rgb(133, 153, 0);">VERBOSE</span>
<span class="hljs-tag" style="color: rgb(133, 153, 0);">adb</span> <span class="hljs-tag" style="color: rgb(133, 153, 0);">shell</span> <span class="hljs-tag" style="color: rgb(133, 153, 0);">setprop</span> <span class="hljs-tag" style="color: rgb(133, 153, 0);">log</span><span class="hljs-class" style="color: rgb(155, 112, 63);">.tag</span><span class="hljs-class" style="color: rgb(155, 112, 63);">.DecodeJob</span> <span class="hljs-tag" style="color: rgb(133, 153, 0);">VERBOSE</span></code>
请求监听器
虽然启动调试日志很简单,但前提是你可以访问到设备。为了完善Glide已存在或更复杂的错误日志系统,你可以使用RequestListener类。当加载请求失败时onException()方法就会被调用,并给出造成失败的异常或者null(在解码器无法从它获取到的数据中解码出任何有用的东西时)。你可以通过listener() API为每一个请求添加一个监听器。
确保onException()方法的返回值为false,避免覆盖Glide默认的错误处理(比如加载失败的错误图片占位)。
这里有一个实现快速调试的列子:
<code class="java" style="padding: 0px; font-family: Menlo, Monaco, Consolas, "Courier New", monospace; font-size: 12px; border: none; background-color: transparent;"><span class="hljs-comment" style="color: rgb(147, 161, 161);">// 示例: .listener(new LoggingListener<String, GlideDrawable>()) </span>
<span class="hljs-keyword" style="color: rgb(133, 153, 0);">public</span> <span class="hljs-class"><span class="hljs-keyword" style="color: rgb(133, 153, 0);">class</span> <span class="hljs-title" style="color: rgb(181, 137, 0);">LoggingListener</span><<span class="hljs-title" style="color: rgb(181, 137, 0);">T</span>, <span class="hljs-title" style="color: rgb(181, 137, 0);">R</span>> <span class="hljs-keyword" style="color: rgb(133, 153, 0);">implements</span> <span class="hljs-title" style="color: rgb(181, 137, 0);">RequestListener</span><<span class="hljs-title" style="color: rgb(181, 137, 0);">T</span>, <span class="hljs-title" style="color: rgb(181, 137, 0);">R</span>> </span>{
    <span class="hljs-annotation" style="color: rgb(155, 133, 157);">@Override</span> <span class="hljs-function"><span class="hljs-keyword" style="color: rgb(133, 153, 0);">public</span> <span class="hljs-keyword" style="color: rgb(133, 153, 0);">boolean</span> <span class="hljs-title" style="color: rgb(38, 139, 210);">onException</span><span class="hljs-params" style="color: rgb(102, 0, 102);">(Exception e, Object model, Target target, <span class="hljs-keyword" style="color: rgb(133, 153, 0);">boolean</span> isFirstResource)</span> </span>{
        android.util.Log.d(<span class="hljs-string" style="color: rgb(42, 161, 152);">"GLIDE"</span>, String.format(Locale.ROOT,
                <span class="hljs-string" style="color: rgb(42, 161, 152);">"onException(%s, %s, %s, %s)"</span>, e, model, target, isFirstResource), e);
        <span class="hljs-keyword" style="color: rgb(133, 153, 0);">return</span> <span class="hljs-keyword" style="color: rgb(133, 153, 0);">false</span>;
    }
    <span class="hljs-annotation" style="color: rgb(155, 133, 157);">@Override</span> <span class="hljs-function"><span class="hljs-keyword" style="color: rgb(133, 153, 0);">public</span> <span class="hljs-keyword" style="color: rgb(133, 153, 0);">boolean</span> <span class="hljs-title" style="color: rgb(38, 139, 210);">onResourceReady</span><span class="hljs-params" style="color: rgb(102, 0, 102);">(Object resource, Object model, Target target, <span class="hljs-keyword" style="color: rgb(133, 153, 0);">boolean</span> isFromMemoryCache, <span class="hljs-keyword" style="color: rgb(133, 153, 0);">boolean</span> isFirstResource)</span> </span>{
        android.util.Log.d(<span class="hljs-string" style="color: rgb(42, 161, 152);">"GLIDE"</span>, String.format(Locale.ROOT,
                <span class="hljs-string" style="color: rgb(42, 161, 152);">"onResourceReady(%s, %s, %s, %s, %s)"</span>, resource, model, target, isFromMemoryCache, isFirstResource));
        <span class="hljs-keyword" style="color: rgb(133, 153, 0);">return</span> <span class="hljs-keyword" style="color: rgb(133, 153, 0);">false</span>;
    }
}</code>
确保在发布应用时移除掉所有的调试log!
更多的log指令
<code class="perl" style="padding: 0px; font-family: Menlo, Monaco, Consolas, "Courier New", monospace; font-size: 12px; border: none; background-color: transparent;">cd .../android-sdk/platform-tools
adb shell setprop <span class="hljs-keyword" style="color: rgb(133, 153, 0);">log</span>.tag.AnimatedGifEncoder VERBOSE
adb shell setprop <span class="hljs-keyword" style="color: rgb(133, 153, 0);">log</span>.tag.AssetUriFetcher VERBOSE
adb shell setprop <span class="hljs-keyword" style="color: rgb(133, 153, 0);">log</span>.tag.BitmapEncoder VERBOSE
adb shell setprop <span class="hljs-keyword" style="color: rgb(133, 153, 0);">log</span>.tag.BufferedIs VERBOSE
adb shell setprop <span class="hljs-keyword" style="color: rgb(133, 153, 0);">log</span>.tag.ByteArrayPool VERBOSE
adb shell setprop <span class="hljs-keyword" style="color: rgb(133, 153, 0);">log</span>.tag.CacheLoader VERBOSE
adb shell setprop <span class="hljs-keyword" style="color: rgb(133, 153, 0);">log</span>.tag.ContentLengthStream VERBOSE
adb shell setprop <span class="hljs-keyword" style="color: rgb(133, 153, 0);">log</span>.tag.DecodeJob VERBOSE
adb shell setprop <span class="hljs-keyword" style="color: rgb(133, 153, 0);">log</span>.tag.DiskLruCacheWrapper VERBOSE
adb shell setprop <span class="hljs-keyword" style="color: rgb(133, 153, 0);">log</span>.tag.Downsampler VERBOSE
adb shell setprop <span class="hljs-keyword" style="color: rgb(133, 153, 0);">log</span>.tag.Engine VERBOSE
adb shell setprop <span class="hljs-keyword" style="color: rgb(133, 153, 0);">log</span>.tag.EngineRunnable VERBOSE
adb shell setprop <span class="hljs-keyword" style="color: rgb(133, 153, 0);">log</span>.tag.GenericRequest VERBOSE
adb shell setprop <span class="hljs-keyword" style="color: rgb(133, 153, 0);">log</span>.tag.GifDecoder VERBOSE
adb shell setprop <span class="hljs-keyword" style="color: rgb(133, 153, 0);">log</span>.tag.GifEncoder VERBOSE
adb shell setprop <span class="hljs-keyword" style="color: rgb(133, 153, 0);">log</span>.tag.GifHeaderParser VERBOSE
adb shell setprop <span class="hljs-keyword" style="color: rgb(133, 153, 0);">log</span>.tag.GifResourceDecoder VERBOSE
adb shell setprop <span class="hljs-keyword" style="color: rgb(133, 153, 0);">log</span>.tag.Glide VERBOSE
adb shell setprop <span class="hljs-keyword" style="color: rgb(133, 153, 0);">log</span>.tag.ImageHeaderParser VERBOSE
adb shell setprop <span class="hljs-keyword" style="color: rgb(133, 153, 0);">log</span>.tag.ImageVideoDecoder VERBOSE
adb shell setprop <span class="hljs-keyword" style="color: rgb(133, 153, 0);">log</span>.tag.IVML VERBOSE
adb shell setprop <span class="hljs-keyword" style="color: rgb(133, 153, 0);">log</span>.tag.LocalUriFetcher VERBOSE
adb shell setprop <span class="hljs-keyword" style="color: rgb(133, 153, 0);">log</span>.tag.LruBitmapPool VERBOSE
adb shell setprop <span class="hljs-keyword" style="color: rgb(133, 153, 0);">log</span>.tag.MediaStoreThumbFetcher VERBOSE
adb shell setprop <span class="hljs-keyword" style="color: rgb(133, 153, 0);">log</span>.tag.MemorySizeCalculator VERBOSE
adb shell setprop <span class="hljs-keyword" style="color: rgb(133, 153, 0);">log</span>.tag.PreFillRunner VERBOSE
adb shell setprop <span class="hljs-keyword" style="color: rgb(133, 153, 0);">log</span>.tag.ResourceLoader VERBOSE
adb shell setprop <span class="hljs-keyword" style="color: rgb(133, 153, 0);">log</span>.tag.RMRetriever VERBOSE
adb shell setprop <span class="hljs-keyword" style="color: rgb(133, 153, 0);">log</span>.tag.StreamEncoder VERBOSE
adb shell setprop <span class="hljs-keyword" style="color: rgb(133, 153, 0);">log</span>.tag.TransformationUtils VERBOSE</code>
调试部分参考http://www.jianshu.com/p/9bd6efca8724。好了写到这里,很多方法可以直接去看github上面。
最后提供一个很牛逼的blog:Glide Series Overview


 2790
2790


 被折叠的 条评论
为什么被折叠?
被折叠的 条评论
为什么被折叠?
 到【灌水乐园】发言


