


如果知道hbase数据表的key的分布情况,就可以在建表的时候对hbase进行region的预分区。这样做的好处是防止大数据量插入的热点问题,提高数据插入的效率。
步骤:
1.规划hbase预分区
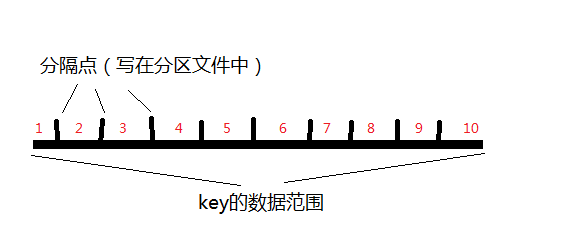
首先就是要想明白数据的key是如何分布的,然后规划一下要分成多少region,每个region的startkey和endkey是多少,然后将规划的key写到一个文件中。比如,key的前几位字符串都是从0001~0010的数字,这样可以分成10个region,划分key的文件如下:
0001|
0002|
0003|
0004|
0005|
0006|
0007|
0008|
0009|
为什么后面会跟着一个"|",是因为在ASCII码中,"|"的值是124,大于所有的数字和字母等符号,当然也可以用“~”(ASCII-126)。分隔文件的第一行为第一个region的stopkey,每行依次类推,最后一行不仅是倒数第二个region的stopkey,同时也是最后一个region的startkey。也就是说分区文件中填的都是key取值范围的分隔点,如下图所示:
2.hbase shell中建分区表,指定分区文件
在hbase shell中直接输入create,会看到如下的提示:
Examples:

Create a table with namespace=ns1 and table qualifier=t1
  hbase> create 'ns1:t1', {NAME => 'f1', VERSIONS => 5}

Create a table with namespace=default and table qualifier=t1
  hbase> create 't1', {NAME => 'f1'}, {NAME => 'f2'}, {NAME => 'f3'}
  hbase> # The above in shorthand would be the following:
  hbase> create 't1', 'f1', 'f2', 'f3'
  hbase> create 't1', {NAME => 'f1', VERSIONS => 1, TTL => 2592000, BLOCKCACHE => true}
  hbase> create 't1', {NAME => 'f1', CONFIGURATION => {'hbase.hstore.blockingStoreFiles' => '10'}}

Table configuration options can be put at the end.
Examples:

  hbase> create 'ns1:t1', 'f1', SPLITS => ['10', '20', '30', '40']
  hbase> create 't1', 'f1', SPLITS => ['10', '20', '30', '40']
  hbase> create 't1', 'f1', SPLITS_FILE => 'splits.txt', OWNER => 'johndoe'
  hbase> create 't1', {NAME => 'f1', VERSIONS => 5}, METADATA => { 'mykey' => 'myvalue' }
  hbase> # Optionally pre-split the table into NUMREGIONS, using
  hbase> # SPLITALGO ("HexStringSplit", "UniformSplit" or classname)
  hbase> create 't1', 'f1', {NUMREGIONS => 15, SPLITALGO => 'HexStringSplit'}
  hbase> create 't1', 'f1', {NUMREGIONS => 15, SPLITALGO => 'HexStringSplit', CONFIGURATION => {'hbase.hregion.scan.loadColumnFamiliesOnDemand' => 'true'}}
  hbase> create 't1', {NAME => 'f1'}, {NAME => 'if1', LOCAL_INDEX=>'COMBINE_INDEX|INDEXED=f1:q1:8|rowKey:rowKey:10,UPDATE=true'}
create 'split_table_test', 'cf', {SPLITS_FILE => 'region_split_info.txt'}
create 'split_table_test',{NAME =>'cf', COMPRESSION => 'SNAPPY'}, {SPLITS_FILE => 'region_split_info.txt'}
下面,我们登陆一下master的web页面<Hmaster:60010>,查看一下hbase的表信息,找到刚刚新建的预分区表,进入查看region信息:
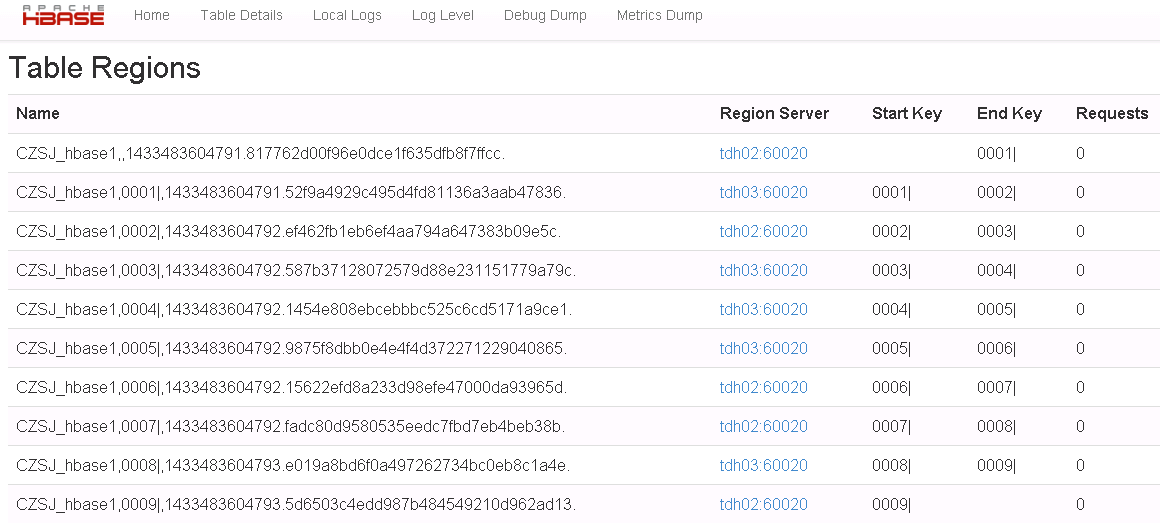
我们看到第一个region是没有startkey的,最后一个region是没有stopkey的。


 978
978


 被折叠的 条评论
为什么被折叠?
被折叠的 条评论
为什么被折叠?
 到【灌水乐园】发言


