这是我学习Immunity Debugger时在网上找到的一片文章,由于原作者是用英文编写的,为了方便我的学习及今后的查找,所以翻译过来,作为我的学习笔记。本文也希望给一起学习的人一个方便的译文。本着忠于原作者的态度,进行全文翻译。
原文网址如下:
[https://www.corelan.be/index.php/2010/01/26/starting-to-write-immunity-debugger-pycommands-my-cheatsheet/]
当我好多年前开始win32的漏洞开发时,我当时偏向的调试器是WinDbg(以及一些Olly)。虽然Windbg是一个很棒的快速的调试器,但我很快就发现需要一些额外的工具来提高我的漏洞开发体验。
尽管windbg中的命令行导向方法有很多好处,但是它也不是用来查找好的跳转地址,或者列出编译的non-safeseh或non-aslr模块等等的最好的工具。好吧,查找一个简单的“jmp esp”是微不足道的,但如果你是要在non-safeseh的编译模块中查找所有的pop ret组合呢。这不是一个简单的任务。
给windbg来构建插件式完全可行的,但是我找到的插件(MSEC,byakugan(Metasploit))并不是总能按照我想要的方式工作,而且它并不能够解决我写漏洞开发程序时遇到的问题。
OllyDbg和Immunity Debugeer与windbg完全不同。不仅仅是GUI有很大变化,这些debugger更是拥有更多的插件。在测评完这两款debugger(他们实际上有很相似的外观及操作感受),及这两款debugger的插件加入机制之后,我决定专注于Immunity Debugger。
这并不意味着OllyDbg不好或就写插件而言你所能做的有限制。我只是发现在构建漏洞程序时它比较不容易来“快速地微调一个插件”。OllyDbg插件会编译进dll文件中,所以改变一个插件将会须要我来重新编译和测试。而Immunity Debugger 则运用python脚本。我能进入这个脚本并作出一些改变来查看结果的变化。简单方便。
OllyDbg和Immunity Debugger都有很多插件(不论是社区贡献出来的来时当你安装时加载的)。当插件没有问题时,我很希望有一个单独的插件来帮我构建从A到Z的漏洞利用程序。将这个想法翻译进我的pvefindaddr PyCommand。
我的显而易见的选择是Immunity&Python。我完全不是一个出色的python开发者,但我足够来构建我的PyCommand在比较短的一段时间内。这证明了构建一个Immunity的PyCommands很容易,即使你不是一个专业的开发者。
我面临的唯一的问题就是寻找Immunity-specific API的方法和属性是如何工作的。老实来讲,Immunity Debugger中的API帮助并不是个好助手。它仅仅是基础地列出可得的方法和属性,而且仅此而已。没有对于这些方法和属性表现方式,应该做什么或者怎么用它们来解决问题的解释。
但一旦你开始了解它们是怎么运作的,它们仍然是一个好的参考,但是如果你是从scrath上学习的,一点坚持的信念是必须的。
幸运的是,自从Immunity有了很多PyCommand,他们能被用为参考。
不管怎样,用ImmDbg Python API 来帮助文本传输仍然是个好的想法。你能通过浏览“Help”,选择”Select API help file“,再选择 Documentation文件夹的IMMLIB.HLP文件来获取API帮助。(这里我试了一下,win8.1系统貌似无法打开)
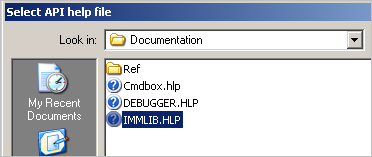
然后,你能通过”Help“-”Open API help file“来获取帮助。
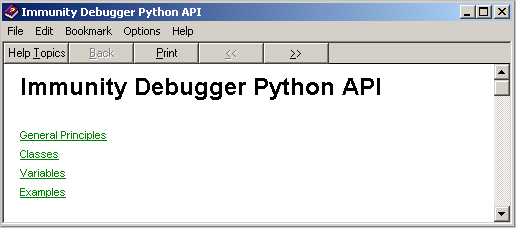
Immunity 也有一个API的在线的版本这里写链接内容
我今天的主要目的是给任何对写pycommands感兴趣的人总结一份参考/作弊条,然后你可以更快地开始构建你的插件。这不是一份完整的参考文献,但它能帮你开个头。
首先,你需要的Python语法是基于Python2.x的。(如果你不熟悉Python:v2.x和v3.x在某些地方是有很大不同的,所以如果你像给自己一些写python的参考或书,确定你找的是基于2.x版本的)
从scratch构建一个PyCommand
在Immunity Debugger PyCommand 文件夹中创建一个文件:<文件名>.py
这个文件名是很重要的,因为你将需要通过这个文件名来启动PyCommand。
启动一个PyCommand
启动一个PyCmmond很容易:只要在最下方的命令窗口打入文件名(不需要加.py的后缀,但开头要加一个感叹号)
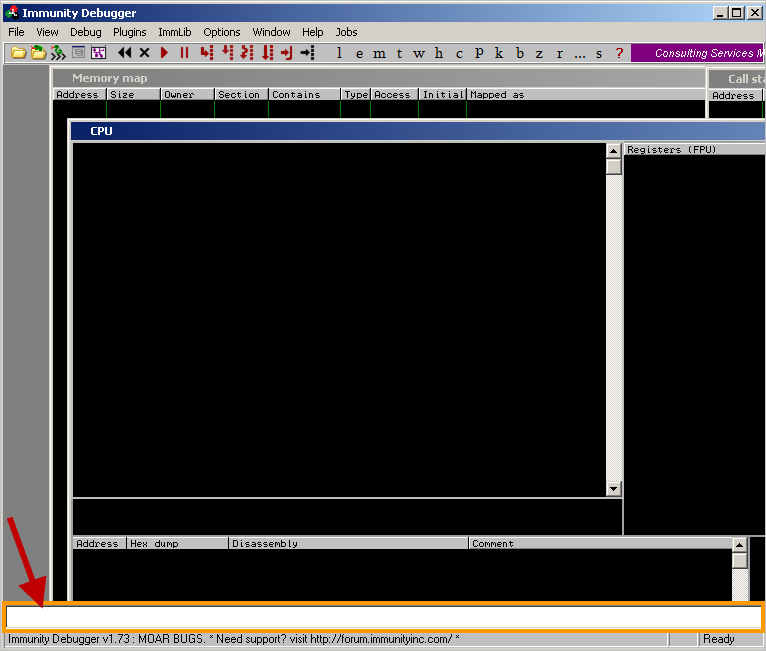
如果你的插件名为”plugin1.py“,你可以通过执行”!plugin1“来启动。
基本的结构
插件的基本结构如下:
-加载Immunity Libraries(或者其他的libraries,取决于你想做什么)
-写一个main()函数来读取命令行参数并调用你想让插件执行功能的函数
-写需要的函数来执行你的命令
#!/usr/bin/env python
"""
(c) Peter Van Eeckhoutte 2009
U{Peter Van Eeckhoutte - corelan.<http://www.corelan.be>}

peter.ve@corelan.be
corelanc0d3r

"""
__VERSION__ = '1.0'
import immlib
import getopt
import immutils
from immutils import *

""""""""""""
 Functions
""""""""""""


""""""""""""""""""
 Main application
""""""""""""""""""
def main(args):
接下来,你将需要提出你想用Immunity Debugger libraries和把他们用到你的脚本中。最好的方法是通过声明一个变量来链接到Immunity debugger类:
imm = immlib.Debugger()我通常把他设为全局变量,所以我把它设在main()函数的外面。(举例来说,你可以就把它放在”import“声明的下面)
可用类的列表如下:
处理参数
指定的参数是一个Python列表,在启动PyCommand时就被捕获。
你能获得参数使用的长度通过
len(args)在队列中使用参数本身同通过args[]列表反复调用来取得一种元素的内容一样简单:
def main(args):
    if not args:
        usage()
    else:
        print "Number of arguments : " + str(len(args))
        cnt=0
        while (cnt < len(args)):
            print " Argument " + str(cnt+1)+" : " + args[cnt]
            cnt=cnt+1
写Log,Table,File
你可能已经注意到了以上的脚本似乎没有输出任何东西。当语法正确时,没有任何可视的默认输出窗口,所以你需要告诉插件去哪里写输出的内容。
这里有几个选择:你可以写在Immunity Log window(这是最常用的),或是一个新的独立的table(只是一个可以在表格中列出信息的新窗口),或者是一个file中(如果输出会溢出Log window缓存区,这是一个好的想法)
在Log Window中输出
Log Window是debugger的一部分。所以我们需要用我们之前声明过的实例(imm)来输出。
方法很简单:imm.Log()
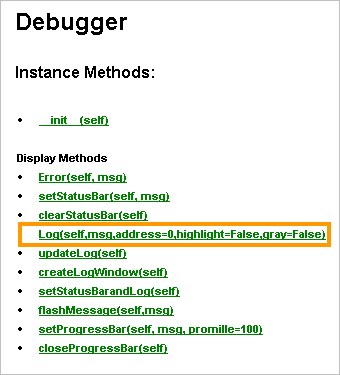
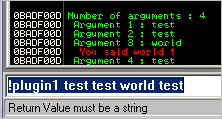
还有一些事你可以做到,让我们来看看这个例子:
def main(args):
    print "Number of arguments : " + str(len(args))
    imm.Log("Number of arguments : %d " % len(args))
    cnt=0
    while (cnt < len(args)):
        imm.Log(" Argument %d : %s" % (cnt+1,args[cnt]))
        if (args[cnt] == "world"):
            imm.Log("  You said %s !" % (args[cnt]),focus=1, highlight=1)
        cnt=cnt+1
你能在Log Window的左列指定一个通常的内存地址。(如果没有指定,地址将默认为 0BADF00D)你所要做的就是指定内存地址(整形数)来作为第二个参数传给Log()方法:
def main(args):
    print "Number of arguments : " + str(len(args))
    imm.Log("Number of arguments : %d " % len(args))
    cnt=0
    while (cnt < len(args)):
        imm.Log(" Argument %d : %s" % (cnt+1,args[cnt]),12345678)
        if (args[cnt] == "world"):
            imm.Log("  You said %s !" % (args[cnt]),focus=1, highlight=1)
        cnt=cnt+1
一个好的方法来开始你的插件,通过显示一个”Usage“文本来处理”no arguments“ 就像这样:
__VERSION__ = '1.0'
import immlib
import getopt
import immutils
from immutils import *
imm = immlib.Debugger()

"""
Functions
"""

def usage():
    imm.Log("  ** No arguments specified ** ")
    imm.Log("  Usage : ")
    imm.Log("       blah blah")


"""
Main application
"""
def main(args):
    if not args:
        usage()
    else:
        imm.Log("Number of arguments : %d " % len(args))
        cnt=0
        while (cnt < len(args)):
            imm.Log(" Argument %d : %s" % (cnt+1,args[cnt]))
            if (args[cnt] == "world"):
                imm.Log("  You said %s !" % (args[cnt]),focus=1, highlight=1)
            cnt=cnt+1
更新Log,Table
当你继续构建你的插件,你会发现当你在内存中搜索时(或者进行任何CPU密集型任务)Log Window可能不会及时更新。Immunity会停顿一会儿,然后当所有事情完成时,才会在log window中显示出来。
有一种方法来控制这个行为。在每个imm.Log()调用后,你能强制使Immunity Debugger更新log window。只要在你的程序中加入如下代码:
imm.updateLog()唯一的缺点(也是最大的)是它会减慢你运行的密集型CPU任务。所以你要在速度还是及时看到发生的事件之间做出选择。
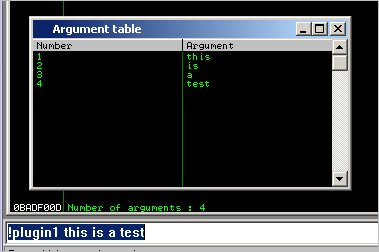
从table中输出
在Log中写入数据时,你能显示结构体和非结构体的数据。首先,你必须定义table(Table title + colum titles),然后你能用table对象中的.add()方法来往table中加入数据。
def main(args):
    if not args:
        usage()
    else:
        #create table
        table=imm.createTable('Argument table',['Number','Argument'])
        imm.Log("Number of arguments : %d " % len(args))
        cnt=0
        while (cnt < len(args)):
            table.add(0,["%d"%(cnt+1),"%s"%(args[cnt])])
            cnt=cnt+1
从file中输出
只要没有缓存区溢出,就能用Log或Table输出。如果溢出,你就应该考虑从file中输出数据。
这不是Immunity内置的–这只是python的代码。
当写files时,files将会默认保存在Immunity Debugger program文件夹。这个简单的技巧如下:
filename="myfile.txt"
FILE=open(filename,"a")  #this will append to the file
FILE.write("Blah blah" + "\n")
FILE.close()
我通常做的是:首先,我清空了文件的内容,然后我用一个函数(tofile())来往里加入数据。
清除文件内容如下:
def resetfile(file1):
    FILE=open(file1,"w")
    FILE.write("")
    FILE.close()
    return ""
在一个函数的开头,我重设了这个文件,用tofile()这个函数来往文件中写入数据
def tofile(info,filename):
    info=info.replace('\n',' - ')
    FILE=open(filename,"a")
    FILE.write(info+"\n")
    FILE.close()
    return ""
处理地址
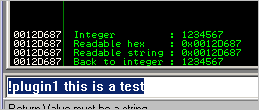
当你必须显示一个内存地址,或在函数中使用一个内存地址时,你必须核实地址所需的格式:是一个字符串(如果你只想显示这个地址)还是一个整形数(如果地址在Immunity方法中使用)。
当Immunity返回一个地址,或希望你提供一个地址时,应该使用整形数。如果你想在屏幕上显示这个地址,写入一个log,file等等,你应该使用一个格式行来把它转换成可读的格式:
def usage():
   imm.Log("  ** No arguments specified ** ")
   imm.Log("  Usage : ")
   imm.Log("       blah blah")

def tohex(intAddress):
   return "%08X" % intAddress

"""
Main application
"""
def main(args):
   if not args:
      usage()
   else:
      myAddress=1234567  #integer address
      imm.Log(" Integer         : %d " % myAddress,address=myAddress)
      imm.Log(" Readable hex    : 0x%08X" % myAddress,address=myAddress)
      hexAddress = tohex(myAddress)
      imm.Log(" Readable string : 0x%s" % hexAddress,address=myAddress)
      imm.Log(" Back to integer : %d" % int(hexAddress,16),address=int(hexAddress,16))
记住,任何时候Immunity API说一个方法需要用“地址”时,你应该指定一个整形值。
好了,这就是我们现在需要知道的。我们能开始写能实际做点有用的事情的代码并通过log,table,flie显示。
使用操作码,汇编 和 反汇编 并检查内存
你可能想要做的最平常的一件事是从内存中搜索,寻找特定类型的信息。举个例子:
-寻找跳转地址(jump,call,push+ret,pop pop ret,等等)
-把内存中的字节和文件中的字节作比较(单步调试内存位置,读取字节,并改变它)
-等等
一般来说,你可能也想要转换操作码到指令,反之亦然。
让我们一步步来。假设你想要寻找内存中所有的跳转指令。首先,在你寻找之前要有一个能链接Immunity的途径。没有途径==没有结果。
有两种方法来寻找。你能提供asm代码,用Immunity来把它转到操作码,并进行寻找;或者你能提供操作码来进行寻找。
例一:寻找“jmp esp”
def main(args):
   imm.Log("Started search for jmp esp...")
   imm.updateLog()
   searchFor="jmp esp"
   results=imm.Search( imm.Assemble (searchFor) )
   for result in results:
      imm.Log("Found %s at 0x%08x " % (searchFor, result), address = result)
这不坏,不是吗?
例二:如果你想要寻找一系列的指令(比如“push esp + ret”),那么指令一定要用\n分开:
def main(args):
   imm.Log("Started search for push esp / ret...")
   imm.updateLog()
   searchFor="push esp\nret"
   results=imm.Search( imm.Assemble (searchFor) )
   for result in results:
      imm.Log("Found %s at 0x%08x " % (searchFor.replace('\n',' - '), result), address = result)
例三:如果你想要直接用操作码(而不是指令),那么
-搜索会看起来有点不一样(不需要先用汇编)
-你能在被找到的地址上用Disasm()+getDisasm()函数反汇编指令
def main(args):
   imm.Log("Started search for mov ebp,esp ")
   imm.updateLog()
   searchFor="\x8b\xec" #mov ebp,esp / ret
   results=imm.Search( searchFor )
   for result in results:
      opc = imm.Disasm( result )
      opstring=opc.getDisasm()
      imm.Log("Found %s at 0x%08x " % (opstring, result), address = result)
笔记:当你在内存中寻找时,它将搜索所有的进程内存(被加载的模块和外部被加载的模块,但总是限制在在进程中运用的内存)。当更早启动时,从内存中搜索将会使你的CPU打到100%。
写你自己的汇编
只需这么做:
__VERSION__ = '1.0'
import immlib
import getopt
import immutils
from immutils import *
imm = immlib.Debugger()
import re


"""
Main application
"""
def main(args):
   if (args[0]=="assemble"):
      if (len(args) < 2):
         imm.Log("  Usage : !plugin1 compare instructions")
         imm.Log("           separate multiple instructions with #")
      else:
         cnt=1
         cmdInput=""
         while (cnt < len(args)):
            cmdInput=cmdInput+args[cnt]+" "
            cnt=cnt+1
         cmdInput=cmdInput.replace("'","")
         cmdInput=cmdInput.replace('"','')
         splitter=re.compile('#')
         instructions=splitter.split(cmdInput)
         for instruct in instructions:
            try:
               assembled=imm.Assemble( instruct )
               strAssembled=""
               for assemOpc in assembled:
                  strAssembled =  strAssembled+hex(ord(assemOpc)).replace('0x', '\\x')
               imm.Log(" %s = %s" % (instruct,strAssembled))
            except:
               imm.Log("   Could not assemble %s " % instruct)
               continue
(我在脚本开头加了“import”,然后我就能用分流器了(re.comile())
步进内存
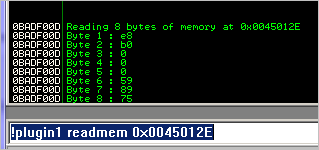
这有一个你想从一个特定的开头开始读取内存并得到内存中字节的案例。可以用以下技术来做:
if (args[0]=="readmem"):
   if (len(args) > 1):
      imm.Log("Reading 8 bytes of memory at %s " % args[1])
      cnt=0
      memloc=int(args[1],16)
      while (cnt < 8):
         memchar = imm.readMemory(memloc+cnt,1)
         memchar2 = hex(ord(memchar)).replace('0x','')
         imm.Log("Byte %d : %s" % (cnt+1,memchar2))
         cnt=cnt+1
readMemory()方法需要两个参数:你想要读取的地方和读取的字节的长度。
注册表
获取注册表也很直接:
regs = imm.getRegs()
for reg in regs:
   imm.Log("Register %s : 0x%08X " % (reg,regs[reg]))
SEH链
def main(args):
   if (args[0]=="sehchain"):
      thissehchain=imm.getSehChain()
      sehtable=imm.createTable('SEH Chain',['Address','Value'])
      for chainentry in thissehchain:
         sehtable.add(0,("0x%08x"%(chainentry[0]),("%08x"%(chainentry[1]))))
地址和模块的特性
当你的脚本在内存中搜索,并寻回一个地址时,有一些关于这个地址东西你可能想要知道:
-它是否属于一个模块?如果是,是哪个?
-模块的基址是什么,有多大
-模块是否用safeseh编译了
-模块是否使用了地址随机分配
-一个给定的内存位置的访问级是什么
非常好的问题,而且他们都能在你的脚本中解决
我们假装你实行了一次搜索,“结果”是在搜索结果队列的一个元素
查看一个地址是否属于一个模块
module = imm.findModule(result)
if not module:
   module="none"
else:
   module=module[0].lower()
模块基址和大小
modbase=module.getBaseAddress()
modsize=module.getSize()
modtop=modbase+modsize
模块是否被safeseh编译过
(这段代码需要你在开头“import struct”)
module = imm.findModule(result)
#
mod=imm.getModule(module[0])
mzbase=mod.getBaseAddress()
peoffset=struct.unpack('<L',imm.readMemory(mzbase+0x3c,4))[0]
pebase=mzbase+peoffset
flags=struct.unpack('<H',imm.readMemory(pebase+0x5e,2))[0]
numberofentries=struct.unpack('<L',imm.readMemory(pebase+0x74,4))[0]
if numberofentries>10:
   sectionaddress,sectionsize=struct.unpack('<LL',imm.readMemory(pebase+0x78+8*10,8))
   sectionaddress+=mzbase
   data=struct.unpack('<L',imm.readMemory(sectionaddress,4))[0]
   condition=(sectionsize!=0) and ((sectionsize==0x40) or (sectionsize==data))
   if condition==False:
      imm.Log("Module %s is not safeseh protected" % module[0])
      continue
这个模块是否用了地址随机分配
module = imm.findModule(result)
mod=imm.getModule(module[0])
mzbase=mod.getBaseAddress()
peoffset=struct.unpack('<L',imm.readMemory(mzbase+0x3c,4))[0]
pebase=mzbase+peoffset
flags=struct.unpack('<H',imm.readMemory(pebase+0x5e,2))[0]
if (flags&0x0040)==0:
    imm.Log("Module %s is not aslr aware" % module[0])
访问级
page = imm.getMemoryPagebyAddress( result )
access = page.getAccess( human = True )
imm.Log("Access : %s" % access)
组合进一个脚本
if (args[0]=="test"):
   imm.Log("Started search for mov ebp,esp ")
   imm.updateLog()
   searchFor="\x8b\xec" #mov ebp,esp / ret
   results=imm.Search( searchFor )
   for result in results:
      opc = imm.Disasm( result )
      opstring=opc.getDisasm()
      module = imm.findModule(result)
      if not module:
         module="none"
      else:
         page = imm.getMemoryPagebyAddress( result )
         access = page.getAccess( human = True )
         mod=imm.getModule(module[0])
         mzbase=mod.getBaseAddress()
         peoffset=struct.unpack('<L',imm.readMemory(mzbase+0x3c,4))[0]
         pebase=mzbase+peoffset
         flags=struct.unpack('<H',imm.readMemory(pebase+0x5e,2))[0]
         numberofentries=struct.unpack('<L',imm.readMemory(pebase+0x74,4))[0]
         if numberofentries>10:
            sectionaddress,sectionsize=struct.unpack('<LL',imm.readMemory(pebase+0x78+8*10,8))
            sectionaddress+=mzbase
            data=struct.unpack('<L',imm.readMemory(sectionaddress,4))[0]
            condition=(sectionsize!=0) and ((sectionsize==0x40) or (sectionsize==data))
            if condition==False:
              imm.Log("Module %s is not safeseh protected" % module[0],highlight=1)
              continue
         if (flags&0x0040)==0:
            extrastring="not ASLR aware"
         else:
            extrastring="ASLR protected"
         imm.Log("Found %s at 0x%08x - [module %s] - access %s - ASLR : %s " % (opstring, result,module[0],access,extrastring), address = result)
调试中的应用
如果你想要过滤(动态的)被加载执行的名字(路径也一样),你能用以下方法:
name=imm.getDebuggedName()
imm.Log("Name : %s" % name)
me=imm.getModule(name)
path=me.getPath()
imm.Log("Path : %s" % path)
Immunity Debugger v1.74及以上版本的对升级的影响
Immunity 计划修复一些在新版本的Immunity的方法或属性的矛盾(特别是大小写字符在函数方法的名字中以及Immunity libraries)。结果你可能需要修复你的PyCommand来让他和新版本的调试器工作。
这是一个关于你可能需要去修复的概观:
| current v1.73 | newer versions |
|---|---|
| ,Log | .log |
| .Assemble | .assemble |
| .Disassemble | .disassemble |
| .Search | .search |
| .getMemoryPagebyAddress | .getMemoryPageByAddress |
最后说几句
这篇参考离完成还很远,还有很多你能用Immunity API来做的。如果你像构建你自己的PyCommand,我只是希望能给你一个开头。
如果已经构建了你自己的新的PyCommand,把它与别人分享。我确定其他人能从你的作品中得益。
本人才疏学浅,文中如有任何问题可在评论区提交给我。或通过邮箱424448083@qq.com与我交流。


 本文是作者翻译的Immunity Debugger PyCommand使用教程,介绍了如何开始编写PyCommand,包括启动PyCommand、基本结构、处理参数、输出到Log、Table和File,以及操作内存、汇编和反汇编等。作者强调Immunity Debugger相比WinDbg在编写插件上的便利性,适合初学者快速上手。





 1714
1714

 被折叠的 条评论
为什么被折叠?


