


springMVC系列之注解版——03
摘要:实现使用注解版的springMVC来访问页面、测试GET、与POST类型方法的使用方法。
一:实现顺序
1、 为保留前面项目的内容、这里新建一个springMVC的配置文件:springAnnotation-servlet.xml、当然,要改变web.xml中的配置的加载文件的路径。
2、 在springAnnotation-servlet.xml中使用配置的方式开启annotation的使用、
3、 配置要被扫描的包、即哪些包下面的类是使用annotation来实现的。
4、 在指定的被annotation扫描的包下面建立一个具体的Controller、注意annotation的使用、暂时有类注解、方法的注解、具体意义代码中有说明。
二:具体步骤以及细节
1、实现springAnnotation-servlet.xml的配置、一个是开启、一个是扫描、代码中有注解
<?xml version="1.0" encoding="UTF-8"?>
<beans xmlns="http://www.springframework.org/schema/beans"
 xmlns:context="http://www.springframework.org/schema/context"
 xmlns:p="http://www.springframework.org/schema/p"
 xmlns:mvc="http://www.springframework.org/schema/mvc"
 xmlns:xsi="http://www.w3.org/2001/XMLSchema-instance"
 xsi:schemaLocation="http://www.springframework.org/schema/beans
      http://www.springframework.org/schema/beans/spring-beans-3.0.xsd
      http://www.springframework.org/schema/context
      http://www.springframework.org/schema/context/spring-context.xsd
      http://www.springframework.org/schema/mvc
      http://www.springframework.org/schema/mvc/spring-mvc-3.0.xsd">


    <!-- 注解扫描包 -->
	<context:component-scan base-package="com.chy.web.controller.annotation"></context:component-scan>

	<!-- 开启注解 第一个是处理注解类、第二个是处理方法 -->
	<bean class="org.springframework.web.servlet.mvc.annotation.DefaultAnnotationHandlerMapping"></bean>
	<bean class="org.springframework.web.servlet.mvc.annotation.AnnotationMethodHandlerAdapter"></bean>


	<bean id="viewResolver" class="org.springframework.web.servlet.view.InternalResourceViewResolver">
		<property name="prefix" value="/"></property>
		<property name="suffix" value=".jsp"></property>
	</bean>
 </beans>
2、具体的UserController:具体的代码中也有说明。
package com.chy.web.controller.annotation;

import org.springframework.stereotype.Controller;
import org.springframework.web.bind.annotation.RequestMapping;
import org.springframework.web.bind.annotation.RequestMethod;
import org.springframework.web.servlet.ModelAndView;

//类注解、表示这个类使用注解的形式、会被springMVC扫描到
@Controller
public class UserController {

	//方法的注解、有两个参数:value表示要使用这个方法的请求、method表示处理的请求的类型、不匹配的话会出错
	@RequestMapping(value="/user/toUser",method=RequestMethod.GET)
	public ModelAndView toUser(){
		return new ModelAndView("/annotation");
	}

	@RequestMapping(value="/user/addUser",method=RequestMethod.POST)
	public ModelAndView addUser(){
		String result="this is addUser-------";
		return new ModelAndView("/annotation","result",result);
	}

	@RequestMapping(value="/user/delUser",method=RequestMethod.GET)
	public ModelAndView delUser(){
		String result="this is delUser-------";
		return new ModelAndView("/annotation","result",result);
	}
}
3、对GET、POST方法的测试
a) 在地址栏中输入http://localhost:8080/springMVC4/user/toUser进入到annotation.jsp页面(此时url请求是get方式、同时UserController中对应”/user/toUser”方法也是按照get方式请求的、此时能正常访问)、因为没有任何参数传递到annotation.jsp、所以annotation.jsp中没有页面div中的reuslt的显示结果。
b) 点击annotation.jsp的form提交按钮、以post方式提交、通过action=”/springMVC/user/addUser”请求UserController的addUser方法、但是两者不一致、则访问失败、当将UserController的addUser方法的请求方式改为post时、则访问正常、
c) 自己尝试啊、不再贴图了、本来就水、图多了更水。。。
补充:
1、UserController中方法定义的请求路径是 /user/addUser、而form的action中请求是/springMVC/user/addUser。
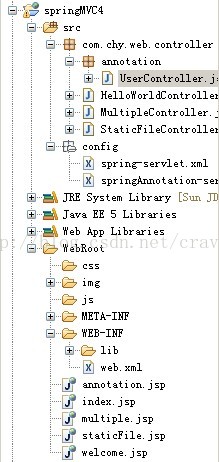
2、项目的整个结构图:
3、annotation.jsp:
<%@ page language="java" import="java.util.*" pageEncoding="UTF-8"%>
<%
String path = request.getContextPath();
String basePath = request.getScheme()+"://"+request.getServerName()+":"+request.getServerPort()+path+"/";
%>

<!DOCTYPE HTML PUBLIC "-//W3C//DTD HTML 4.01 Transitional//EN">
<html>
  <head>
    <base href="<%=basePath%>">

    <title>My JSP 'annotation.jsp' starting page</title>

	<meta http-equiv="pragma" content="no-cache">
	<meta http-equiv="cache-control" content="no-cache">
	<meta http-equiv="expires" content="0">
	<meta http-equiv="keywords" content="keyword1,keyword2,keyword3">
	<meta http-equiv="description" content="This is my page">
	<!--
	<link rel="stylesheet" type="text/css" href="styles.css">
	-->

  </head>

  <body>
  		<form action="/springMVC4/user/addUser" method="post">
  			this is annotaion page!
  			<br/>
  			<div>
  				${requestScope.result}
  			</div>
  			<input type="submit" value="post请求"/>
  			<input type="reset" value="取消"/>
  		</form>
  </body>
</html>
4、staticFile.jsp是看看springMVC是不是拦截了静态资源、如果图片显示就是没有拦截、否则就是拦截了。这个项目中好像没有配置、http://blog.csdn.net/crave_shy/article/details/19166555 中最后补充的配置文件中有。
<%@ page language="java" import="java.util.*" pageEncoding="UTF-8"%>
<%
String path = request.getContextPath();
String basePath = request.getScheme()+"://"+request.getServerName()+":"+request.getServerPort()+path+"/";
%>

<!DOCTYPE HTML PUBLIC "-//W3C//DTD HTML 4.01 Transitional//EN">
<html>
  <head>
    <base href="<%=basePath%>">

    <title>My JSP 'index.jsp' starting page</title>
	<meta http-equiv="pragma" content="no-cache">
	<meta http-equiv="cache-control" content="no-cache">
	<meta http-equiv="expires" content="0">
	<meta http-equiv="keywords" content="keyword1,keyword2,keyword3">
	<meta http-equiv="description" content="This is my page">
	<!--
	<link rel="stylesheet" type="text/css" href="styles.css">
	-->
  </head>

  <body>
  		<h1>图片访问</h1>
  		<div>
  			<img alt="img" src="img/1.jpg">
  		</div>
  </body>
</html>


 147
147


 被折叠的 条评论
为什么被折叠?
被折叠的 条评论
为什么被折叠?
 到【灌水乐园】发言


