


终于忙完手头上的工作了,难得有时间再唠叨一篇博客。在刚刚处理完的项目需求中,有一个小需求是客户要求查询出的所有数据一屏显示,如果显示不全,要做成可以左右滑动查看的形式(PS:原来的布局仅仅是一个ListView,然后显示几个重要数据,类似于数据表格)。既然客户要求了,那咱作为程序猿的就得赶紧实现啊(相信很多程序猿小伙伴都有这种经历,需求一遍一遍的提,一遍一遍的改,今天这个样,明天那个样,心里每天都有上百万匹什么马奔腾而过(最近老是能看到工作猝死的新闻,还好我心里承受能力还可以,要不然一天上百万匹马冲击我的小心脏,我还不得… ),但是没办法呀,谁让人家是客户涅……)好了,不说废话了,不就是需求吗,你提我改就是喽
首先先让我们看一下最终实现的效果图,用的模拟器演示,有点卡顿,真机不会这样。(样子有点丑,不过很好用哦)
好了,效果就是上面的那个样子,接下来让我们看看如何用代码实现,这里只贴主要代码,文章最后提供源码下载。
一、分析
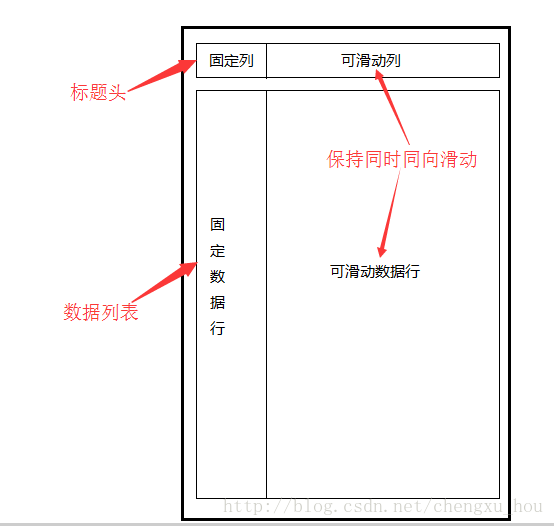
要实现上面的效果其实很简单,此表格分为两部分,最上面一行为标题头,下面为数据列表,看图,没有什么是一张图解决不了的问题,实在不行,再加一滴风油精
二、代码实现
1、首先列表的上下滚动还是使用ListView,这没什么好说的,代码就不贴了;
2、横向滚动 自定义CustomHScrollView类,继承HorizontalScrollView;
public class CustomHScrollView extends HorizontalScrollView {
ScrollViewObserver mScrollViewObserver = new ScrollViewObserver();
public CustomHScrollView(Context context) {
super(context);
}
public CustomHScrollView(Context context, AttributeSet attrs) {
super(context, attrs);
}
public CustomHScrollView(Context context, AttributeSet attrs, int defStyleAttr) {
super(context, attrs, defStyleAttr);
}
@Override
public boolean onTouchEvent(MotionEvent ev) {
return super.onTouchEvent(ev);
}
@Override
protected void onScrollChanged(int l, int t, int oldl, int oldt) {
//滚动时通知观察者
if (mScrollViewObserver != null) {
mScrollViewObserver.NotifyOnScrollChanged(l, t, oldl, oldt);
}
super.onScrollChanged(l, t, oldl, oldt);
}
/*
* 当发生了滚动事件时接口,供外部访问
*/
public static interface OnScrollChangedListener {
public void onScrollChanged(int l, int t, int oldl, int oldt);
}
/*
* 添加滚动事件监听
* */
public void AddOnScrollChangedListener(OnScrollChangedListener listener) {
mScrollViewObserver.AddOnScrollChangedListener(listener);
}
/*
* 移除滚动事件监听
* */
public void RemoveOnScrollChangedListener(OnScrollChangedListener listener) {
mScrollViewObserver.RemoveOnScrollChangedListener(listener);
}
/*
* 滚动观察者
*/
public static class ScrollViewObserver {
List<OnScrollChangedListener> mChangedListeners;
public ScrollViewObserver() {
super();
mChangedListeners = new ArrayList<OnScrollChangedListener>();
}
//添加滚动事件监听
public void AddOnScrollChangedListener(OnScrollChangedListener listener) {
mChangedListeners.add(listener);
}
//移除滚动事件监听
public void RemoveOnScrollChangedListener(OnScrollChangedListener listener) {
mChangedListeners.remove(listener);
}
//通知
public void NotifyOnScrollChanged(int l, int t, int oldl, int oldt) {
if (mChangedListeners == null || mChangedListeners.size() == 0) {
return;
}
for (int i = 0; i < mChangedListeners.size(); i++) {
if (mChangedListeners.get(i) != null) {
mChangedListeners.get(i).onScrollChanged(l, t, oldl, oldt);
}
}
}
}
}
实现图中的效果最重要的是如何让数据行与标题行保持同时同向滑动,由上面的代码可以看出,我定义了一个滚动观察者,用于监听滚动事件,每次滚动事件的触发(包括标题头和数据行每一行的滚动)都会通知给观察者,之后观察者再通知给它的订阅者,保持滚动的一致性。代码中都有注释,一目了然。
3、出此之外还要自定义一个拦截onTouch事件的布局
public class InterceptScrollLinearLayout extends LinearLayout {
public InterceptScrollLinearLayout(Context context) {
super(context);
}
public InterceptScrollLinearLayout(Context context, AttributeSet attrs, int defStyleAttr) {
super(context, attrs, defStyleAttr);
}
public InterceptScrollLinearLayout(Context context, AttributeSet attrs) {
super(context, attrs);
}
@Override
public boolean onInterceptTouchEvent(MotionEvent ev) {
return true;
}
}
关键代码就是上面这两个自定义类
来看MainActivity,只贴部分关键代码
public class MainActivity extends AppCompatActivity {
private RelativeLayout mHead;//标题头
private ListView mListView;
private List<TestData> mDataList;
private ListViewAdapter mAdapter;
CustomHScrollView mScrollView;
@Override
protected void onCreate(Bundle savedInstanceState) {
super.onCreate(savedInstanceState);
setContentView(R.layout.activity_main);
Toolbar toolbar = (Toolbar) findViewById(R.id.toolbar);
setSupportActionBar(toolbar);
initView();
initData();
}
private void initView(){
mListView = (ListView) findViewById(R.id.list_view);
mScrollView = (CustomHScrollView) findViewById(R.id.h_scrollView);
mHead = (RelativeLayout) findViewById(R.id.head_layout);
mHead.setBackgroundResource(R.color.colorAccent);
mHead.setFocusable(true);
mHead.setClickable(true);
mHead.setOnTouchListener(new MyTouchLinstener());
mListView.setOnTouchListener(new MyTouchLinstener());
}
/**
* 加载数据
*/
private void initData(){
mDataList = new ArrayList<>();
TestData data = null;
for (int i = 1; i <= 100; i++) {
data = new TestData();
data.setText1("第"+i+"行-1");
data.setText2("第"+i+"行-2");
data.setText3("第"+i+"行-3");
data.setText4("第"+i+"行-4");
data.setText5("第"+i+"行-5");
data.setText6("第"+i+"行-6");
data.setText7("第"+i+"行-7");
mDataList.add(data);
}
setData();
}
private void setData(){
mAdapter = new ListViewAdapter(this, mDataList, mHead);
mListView.setAdapter(mAdapter);
}
class MyTouchLinstener implements View.OnTouchListener {
@Override
public boolean onTouch(View arg0, MotionEvent arg1) {
//当在表头和listView控件上touch时,将事件分发给 ScrollView
HorizontalScrollView headSrcrollView = (HorizontalScrollView) mHead.findViewById(R.id.h_scrollView);
headSrcrollView.onTouchEvent(arg1);
return false;
}
}
//...............
}
再看适配器
public class ListViewAdapter extends BaseAdapter {
private Context mContext;
private List<TestData> mList;
private LayoutInflater mInflater;
private RelativeLayout mHead;
public ListViewAdapter(Context context, List<TestData> list, RelativeLayout head) {
this.mContext = context;
this.mList = list;
this.mHead = head;
this.mInflater = LayoutInflater.from(context);
}
@Override
public int getCount() {
return mList.size();
}
@Override
public Object getItem(int i) {
return mList.get(i);
}
@Override
public long getItemId(int i) {
return i;
}
@Override
public View getView(int i, View view, ViewGroup group) {
MyViewHolder holder = null;
if (view == null){
view = mInflater.inflate(R.layout.list_item, group, false);
holder = new MyViewHolder();
CustomHScrollView scrollView = (CustomHScrollView) view.findViewById(R.id.h_scrollView);
holder.scrollView = scrollView;
//..........
CustomHScrollView headSrcrollView = (CustomHScrollView) mHead.findViewById(R.id.h_scrollView);
//添加滚动监听事件
headSrcrollView.AddOnScrollChangedListener(new OnScrollChangedListenerImp(scrollView));
view.setTag(holder);
}else{
holder = (MyViewHolder) view.getTag();
}
//.........
return view;
}
class OnScrollChangedListenerImp implements CustomHScrollView.OnScrollChangedListener {
CustomHScrollView mScrollViewArg;
public OnScrollChangedListenerImp(CustomHScrollView scrollViewar) {
mScrollViewArg = scrollViewar;
}
@Override
public void onScrollChanged(int l, int t, int oldl, int oldt) {
mScrollViewArg.smoothScrollTo(l, t);
}
};
class MyViewHolder{
//........
}
}
对应的xml文件
<?xml version="1.0" encoding="utf-8"?>
<RelativeLayout
xmlns:android="http://schemas.android.com/apk/res/android"
xmlns:app="http://schemas.android.com/apk/res-auto"
xmlns:tools="http://schemas.android.com/tools"
android:id="@+id/content_main"
android:layout_width="match_parent"
android:layout_height="match_parent"
app:layout_behavior="@string/appbar_scrolling_view_behavior"
tools:context="com.hbh.cl.listviewhorizontalscrolldemo.MainActivity"
tools:showIn="@layout/activity_main">
<include
android:id="@+id/head_layout"
layout="@layout/list_item"
/>
<ListView
android:id="@+id/list_view"
android:layout_width="fill_parent"
android:layout_height="fill_parent"
android:layout_below="@+id/head_layout"
android:cacheColorHint="@android:color/transparent"
android:dividerHeight="1dp"
android:divider="@color/gray">
</ListView>
</RelativeLayout>
list_item.xml文件
<?xml version="1.0" encoding="utf-8"?>
<RelativeLayout xmlns:android="http://schemas.android.com/apk/res/android"
android:layout_width="match_parent"
android:layout_height="wrap_content"
android:background="@color/white"
android:descendantFocusability="blocksDescendants"
android:orientation="horizontal"
android:padding="5dp" >
<TextView
android:id="@+id/textView_1"
android:layout_width="80dp"
android:layout_height="40dp"
android:layout_alignParentLeft="true"
android:layout_marginLeft="2dp"
android:layout_marginRight="2dp"
android:gravity="center"
android:textAppearance="?android:attr/textAppearanceMedium"
android:maxLines="2"
android:ellipsize="end"
android:text="标题1"
android:textColor="@color/black"
android:textSize="14sp" />
<com.hbh.cl.listviewhorizontalscrolldemo.util.InterceptScrollLinearLayout
android:id="@+id/scroollContainter"
android:layout_width="fill_parent"
android:layout_height="40dp"
android:layout_alignParentRight="true"
android:layout_toRightOf="@id/textView_1"
android:focusable="false" >
<com.hbh.cl.listviewhorizontalscrolldemo.util.CustomHScrollView
android:id="@+id/h_scrollView"
android:layout_width="fill_parent"
android:layout_height="40dp"
android:focusable="false"
android:scrollbars="none" >
<LinearLayout
android:layout_width="match_parent"
android:layout_height="match_parent"
android:focusable="false"
android:orientation="horizontal" >
<LinearLayout
android:layout_width="80dp"
android:layout_height="match_parent"
android:gravity="center"
android:layout_gravity="center"
android:orientation="vertical" >
<TextView
android:id="@+id/textView_2"
android:layout_width="match_parent"
android:layout_height="wrap_content"
android:layout_marginLeft="2dp"
android:layout_marginRight="2dp"
android:text="标题2"
android:textColor="@color/black"
android:gravity="center"
android:textSize="14sp"
android:textAppearance="?android:attr/textAppearanceMedium" />
</LinearLayout>
<!-- ....省略...... -->
</LinearLayout>
</com.hbh.cl.listviewhorizontalscrolldemo.util.CustomHScrollView>
</com.hbh.cl.listviewhorizontalscrolldemo.util.InterceptScrollLinearLayout>
</RelativeLayout>
好了,代码基本上都贴出来了,至于其他的测试数据的类就不贴了,来,现在让我们跑一下我们的代码:

OK,非常完美,一切都显得那么和谐。但这都只是写死的数据,正常情况下是要通过网络请求获取数据,然后通过适配器展示数据的,咱们刚才的这种情况只能算是简单的模拟了网络请求展示数据,那么好了,我现在要刷新数据,刷新当前页面的数据,ok,咱们再增加一个刷新按钮,点击刷新,更新数据。
我们在MainActivity中增加一段代码:
@Override
public boolean onOptionsItemSelected(MenuItem item) {
int id = item.getItemId();
if (id == R.id.action_settings) {
initData();//刷新,重新加载数据
if (mAdapter != null){
mAdapter.notifyDataSetChanged();
}
return true;
}
return super.onOptionsItemSelected(item);
}
这里我们重新执行initData()方法,模拟网络请求进行刷新,然后调用
Adapter的notifyDataSetChanged()方法来刷新每个item的内容,好了,现在再来跑一下程序:

我擦,这是什么鬼,点击刷新之后,标题头与数据行内容完全错乱了,怎么回事呢???这是因为在我们点击刷新之后,
Adapter调用notifyDataSetChanged()方法将listview中的每个item都强制刷新,但标题头并不是listview的一部分,所以保持原来的状态,造成错乱的问题。
那怎么解决呢???很简单,就是在我们点击刷新的时候,让标题头(可滑动部分)回到初始状态。
什么意思呢??咱们看,当我们在不向左滑动的情况下,刷新是不会出现任何问题的,当我们向左滑动之后,再刷新,出现了数据错乱的问题,那么好了,能不能在我们刷新的时候让标题头回到初始位置呢??当然可以,看代码
找到我们的ListViewAdapter,其中有这么几行代码:
@Override
public void onScrollChanged(int l, int t, int oldl, int oldt) {
mScrollViewArg.smoothScrollTo(l, t);
if (n == 1) {//记录滚动的起始位置,避免因刷新数据引起错乱
new MainActivity().setPosData(oldl, oldt);
}
n++;
}
这个方法就是在我们左右滚动时所执行的,我们加了一个标记,记录下第一次滚动时的位置oldl和oldt
MainActivity中对应的改动:
@Override
public boolean onOptionsItemSelected(MenuItem item) {
int id = item.getItemId();
if (id == R.id.action_settings) {
initData();//刷新,重新加载数据
mScrollView.smoothScrollTo(leftPos, topPos);//每次刷新数据都让CustomHScrollView回到初始位置,避免错乱
if (mAdapter != null){
mAdapter.notifyDataSetChanged();
}
return true;
}
return super.onOptionsItemSelected(item);
}
/**
* 记录CustomHScrollView的初始位置
* @param l
* @param t
*/
public void setPosData(int l, int t){
this.leftPos = l;
this.topPos = t;
}
我们看到,在刷新的方法中我们增加了一行代码,让
CustomHScrollView回到初始位置,好了,我们现在再来运行一下程序:
OK,非常完美,一切又都是那么和谐,但是……已经没有问题了!!!
好了,啰啰嗦嗦那么多,可能让你也觉得不明不白,还不如直接看源码来的实在。那好,源码双手奉上
源码传送门
如果觉得还不错,顺手给个赞,star一下吧


 1512
1512


 被折叠的 条评论
为什么被折叠?
被折叠的 条评论
为什么被折叠?
 到【灌水乐园】发言


