


在上一篇我们介绍了JUnit3的简单应用,这里我们会再分析JUnit3框架介绍以及部分源代码分析。源码下载地址:http://download.csdn.net/download/wuhenhcp/3414175
一,组件类继承关系以及成员介绍
如上文所说我们用到JUnit3框架几个重要组件:TestCase,TestSuite,TestResult和TestRunner。类结构如下:
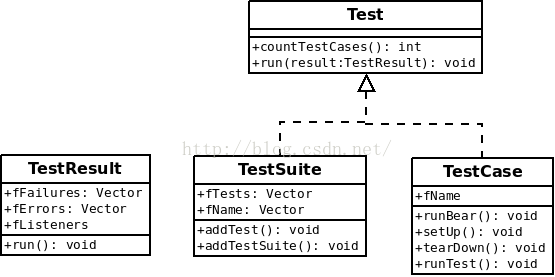
- TestResult:fFailures,fErrors,fListeners三个数组分别保存测试失败,测试错误和测试监听器列表,run方法用于运行测试用例
- TestCase:fName用于标记该用例中测试方法的名字,然后通过反射机制调用测试方法。比如测试getId这个方法,定义测试用例方法为testGetId,fName设置为testGetid,然后通过该成员调用测试方法。每个TestCase中可以定义多个测试方法,最终这些方法会分别创建新的TestCase示例,运行期每个TestCase实例只有一个测试方法。runBear和runTest方法用于调用测试方法,稍后会说。实现的接口run方法也是运行测试方法相关。
- TestSuite:fTests保存测试用例列表,是一个Test类型的数组,因此数据成员既可以是TestSuite也可以是TestCase(可以分别理解为树结构到额支干节点和叶节点)继承的run方法用于调用用例的测试方法。
组件间调用关系如下:
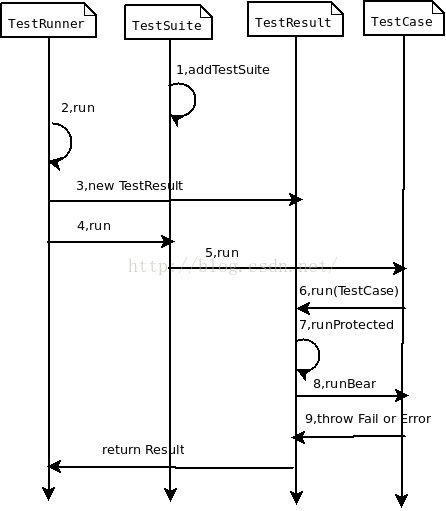
- 如上图TestSuite通过addTestSuite方法添加TestCase并将组合成的TestSuite传入TestRunner开始运行:
如上所示,众多TestCase被加入到TestSuite然后返回传入TestRunner的run方法开始执行public static void main(String[] args) { // TODO Auto-generated method stub TestRunner.run(suite()); } public static Test suite() { TestSuite suite = new TestSuite(); suite.addTestSuite(JunitTest.class); suite.addTestSuite(JunitTest2.class); return suite; } - 我们看看TestRunner的run方法如何工作: 首先调用自身duRun方法开始运行
然后在doRun方法中创建TestResult实例并且调用suite.run()方法开始运行测试套件,这里是通过树形遍历来运行每一个测试实例的。static public TestResult run(Test test) { TestRunner runner= new TestRunner(); return runner.doRun(test); }
这里我们会注意到doRun方法在创建TestResult的时候添加了默认监听器fPrinter,这个监听器可以打印测试结果到控制台,同时这里也可以作为我们的定制入口,通过重写createTestResult方法为TestResult添加自己的监听器。public TestResult doRun(Test suite, boolean wait) { TestResult result= createTestResult(); result.addListener(fPrinter); long startTime= System.currentTimeMillis(); suite.run(result); long endTime= System.currentTimeMillis(); long runTime= endTime-startTime; fPrinter.print(result, runTime); pause(wait); return result; } - 创建TestResult对象,略过不表。
- 调用TestSuite的run方法
public void run(TestResult result) {
		for (Enumeration e= tests(); e.hasMoreElements(); ) {
	  		if (result.shouldStop() )
	  			break;
			Test test= (Test)e.nextElement();
			runTest(test, result);
		}
	}
这里我们可以看到通过两个方法的互相调用实现了递归,也即深度优先的方式遍历测试树。最终调用到每一个测试用例的run方法。这里要注意的是run方法是Test接口定义的方法,TestSuite和TestCase的实现是不同的。TestCase会去调用实际的测试方法(下一步会讲到),TestSuite如上所示会继续遍历测试树。 在这一步有一个很关键的地方,通过TestSuite方法的tests方法得到测试列表。但是这个测试列表的由来呢?public void runTest(Test test, TestResult result) { test.run(result); }
这里我们想到了传入的TestSuite实例了。通过TestSuite.addTestSuite方法添加测试用例public Enumeration tests() { return fTests.elements(); }
然后就是TestSuite的构造方法:首先获得传入TestSuite类的全部方法然后通过addTestMethod添加到测试列表。最后通过getSuperclass方法获取该类型的父类,检查添加父类中的测试方法。/** * Adds a test to the suite. */ public void addTest(Test test) { fTests.addElement(test); } /** * Adds the tests from the given class to the suite */ public void addTestSuite(Class testClass) { addTest(new TestSuite(testClass)); }
addTestMethod逐个判定方法是否为测试方法,也即:参数数量为0,名称以test开始,返回类型为void,如果符合标准则调用addTest方法添加测试用例到测试列表中。public TestSuite(final Class theClass) { fName= theClass.getName(); /*-----------skip----------------*/ Class superClass= theClass; Vector names= new Vector(); while (Test.class.isAssignableFrom(superClass)) { Method[] methods= superClass.getDeclaredMethods(); for (int i= 0; i < methods.length; i++) { addTestMethod(methods[i], names, theClass); } superClass= superClass.getSuperclass(); } if (fTests.size() == 0) addTest(warning("No tests found in "+theClass.getName())); }private void addTestMethod(Method m, Vector names, Class theClass) { String name= m.getName(); if (names.contains(name)) return; if (! isPublicTestMethod(m)) { if (isTestMethod(m)) addTest(warning("Test method isn't public: "+m.getName())); return; } names.addElement(name); addTest(createTest(theClass, name)); }
addTest中调用createTest方法添加测试用例,传入TestClass和测试方法的名称。以此创建TestCase实例并将方法名称赋值给fName,将该TestCase实例添加到TestSuite的测试列表中。在这一步也完成了测试用例方法到单个用例的分拆。在TestSuite的测试列表中每一个TestCase实例都只含有一个测试用例private boolean isTestMethod(Method m) { String name= m.getName(); Class[] parameters= m.getParameterTypes(); Class returnType= m.getReturnType(); return parameters.length == 0 && name.startsWith("test") && returnType.equals(Void.TYPE); }static public Test createTest(Class theClass, String name) { Constructor constructor; try { constructor= getTestConstructor(theClass); } catch (NoSuchMethodException e) { return warning("Class "+theClass.getName()+" has no public constructor TestCase(String name) or TestCase()"); } Object test; try { if (constructor.getParameterTypes().length == 0) { test= constructor.newInstance(new Object[0]); if (test instanceof TestCase) ((TestCase) test).setName(name); } else { test= constructor.newInstance(new Object[]{name}); } } catch (InstantiationException e) { return(warning("Cannot instantiate test case: "+name+" ("+exceptionToString(e)+")")); } catch (InvocationTargetException e) { return(warning("Exception in constructor: "+name+" ("+exceptionToString(e.getTargetException())+")")); } catch (IllegalAccessException e) { return(warning("Cannot access test case: "+name+" ("+exceptionToString(e)+")")); } return (Test) test; }
- 遍历到叶子节点调用TestCase的run方法,在这一步会将TestCase实例传给TestResult,让TestResult运行测试实例收集测试结果
public void run(TestResult result) { result.run(this); } - TestResult运行run方法,首先通过startTest方法通知监听器开始测试,然后调用runProtected方法运行TestCase的runBear方法,最后通过endTest方法通知监听器测试结束。
protected void run(final TestCase test) {
		startTest(test);
		Protectable p= new Protectable() {
			public void protect() throws Throwable {
				test.runBare();
			}
		};
		runProtected(test, p);

		endTest(test);
	}
public void startTest(Test test) { final int count= test.countTestCases(); synchronized(this) { fRunTests+= count; } for (Enumeration e= cloneListeners().elements(); e.hasMoreElements(); ) { ((TestListener)e.nextElement()).startTest(test); } }public void endTest(Test test) { for (Enumeration e= cloneListeners().elements(); e.hasMoreElements(); ) { ((TestListener)e.nextElement()).endTest(test); } } - TestResult调用runProtected方法,这个名字很有意思,保护的运行??大概是因为这个方法会捕获测试结果的全部异常(最后的Throwable捕获所有类型异常)同时这也保证了运行测试套件的时候不会因为单个测试用例抛出异常而终止测试。所有的异常类型都会被加入到fFailures或者fErrors中作为结果输出,同时这里会通过p.protected方法调用testCase的runBear方法运行测试用例。
如代码所示,每一次addFailure或者addError都会忠实的通知监听器测试状况public void runProtected(final Test test, Protectable p) { try { p.protect(); } catch (AssertionFailedError e) { addFailure(test, e); } catch (ThreadDeath e) { // don't catch ThreadDeath by accident throw e; } catch (Throwable e) { addError(test, e); } }public synchronized void addFailure(Test test, AssertionFailedError t) { fFailures.addElement(new TestFailure(test, t)); for (Enumeration e= cloneListeners().elements(); e.hasMoreElements(); ) { ((TestListener)e.nextElement()).addFailure(test, t); } }
- TestCase的runBear方法,注意这里就是调用setUp和tearDown的地方。同时这也表明在每一个测试用例执行的时候都会调用setUp和tearDown
runTest方法则调用测试方法并通过抛出异常的形式同时TestResult收集测试结果。public void runBare() throws Throwable { setUp(); try { runTest(); } finally { tearDown(); } }
如下代码所示,assert方法最终都是通过调用fail方法抛出异常通知上层测试结果。protected void runTest() throws Throwable { assertNotNull(fName); Method runMethod= null; try { // use getMethod to get all public inherited // methods. getDeclaredMethods returns all // methods of this class but excludes the // inherited ones. runMethod= getClass().getMethod(fName, null); } catch (NoSuchMethodException e) { fail("Method \""+fName+"\" not found"); } if (!Modifier.isPublic(runMethod.getModifiers())) { fail("Method \""+fName+"\" should be public"); } try { runMethod.invoke(this, new Class[0]); } catch (InvocationTargetException e) { e.fillInStackTrace(); throw e.getTargetException(); } catch (IllegalAccessException e) { e.fillInStackTrace(); throw e; } }static public void fail(String message) { throw new AssertionFailedError(message); }
- 返回TestResult测试结果,因为很多监听器在测试过程中就实时掌控测试状态,这里返回的测试结果可用可不用。


 2611
2611


 被折叠的 条评论
为什么被折叠?
被折叠的 条评论
为什么被折叠?
 到【灌水乐园】发言


