


个人博客 迁移,欢迎光临
好久没来写技术博客了,惭愧惭愧,因为前段时间在忙其他一些事情,这段时间稍微时间松了点,赶快来补写下技术博客,可不能荒废了。
今天介绍的技术是一个很简单,但是确实有用的东西。众所周知,做android开发的应该都知道UI线程这个东西吧,UI线程顾名思义就是用来执行渲染UI相关操作的,为了良好的用户体验,在UI线程上的任何操作就是要快,不然操作5s就会anr哦。从代码级别来说,UI线程的快速响应可以简单理解成在UI线程环境下代码(系统代码+自己写的代码)执行的效率。
如果我们能够知道UI线程每次代码执行的起点以及终点不就可以知道每次代码执行时间了么,就有点像java的入口main函数一样。这里就需要一点额外知识体系了,了解过Android Message Looper以及Aidl(这部分知识就不在这里展开了,否则内容太多)的应该都知道,Android里面的Activity,Fragment之类的其实都是系统通过aidl方式最终把启动,暂停,销毁Activity之类的封装成一个Message发给UI线程的Looper里的MessageQueue去挨个取出来执行操作,如下图
public static void loop() {
    final Looper me = myLooper();
    if (me == null) {
        throw new RuntimeException("No Looper; Looper.prepare() wasn't called on this thread.");
    }
    final MessageQueue queue = me.mQueue;

    // Make sure the identity of this thread is that of the local process,
    // and keep track of what that identity token actually is.
    Binder.clearCallingIdentity();
    final long ident = Binder.clearCallingIdentity();

    for (;;) {
        Message msg = queue.next(); // might block
        if (msg == null) {
            // No message indicates that the message queue is quitting.
            return;
        }

        // This must be in a local variable, in case a UI event sets the logger
        Printer logging = me.mLogging;
        if (logging != null) {
            logging.println(">>>>> Dispatching to " + msg.target + " " +
                    msg.callback + ": " + msg.what);
        }

        msg.target.dispatchMessage(msg);

        if (logging != null) {
            logging.println("<<<<< Finished to " + msg.target + " " + msg.callback);
        }

        // Make sure that during the course of dispatching the
        // identity of the thread wasn't corrupted.
        final long newIdent = Binder.clearCallingIdentity();
        if (ident != newIdent) {
            Log.wtf(TAG, "Thread identity changed from 0x"
                    + Long.toHexString(ident) + " to 0x"
                    + Long.toHexString(newIdent) + " while dispatching to "
                    + msg.target.getClass().getName() + " "
                    + msg.callback + " what=" + msg.what);
        }

        msg.recycleUnchecked();
    }
}
上面代码27行前后是两句打印log,分别打印了发送Message前跟发送Message后的log记录,同时这个logging还开放了接口可以给开发者进行替换,我们就可以通过替换这个logging,并在每次打印消息时算出间隔时间即可知道每次系统回调到UI代码执行时的时间长度。
/**
 * Control logging of messages as they are processed by this Looper.  If
 * enabled, a log message will be written to <var>printer</var>
 * at the beginning and ending of each message dispatch, identifying the
 * target Handler and message contents.
 *
 * @param printer A Printer object that will receive log messages, or
 * null to disable message logging.
 */
public void setMessageLogging(Printer printer) {
    mLogging = printer;
}
所以获取每次UI线程执行时间的原理基本上在上面两段代码就可以体现出来,在每次发消息给UI线程操作前后分别做相关记录就可以得到相应的时间。
原理大概知道后我们来看下怎么编写代码来检测自己UI线程的执行效率如何。
首先定义一个类(我取名叫UiMonitor)继承Printer接口,并把它做成单例模式
public class UiMonitor implements Printer{
	private boolean mIsUiMonitoring = false; //是否在进行UI检测
    private int mMonitorTestTime = DEFAULT_MONITOR_TEST_TIME; //UI操作超时时间,默认200毫秒
    public final static int DEFAULT_MONITOR_TEST_TIME = 200;
    public final static int MAX_MONITOR_TEST_TIME = 1000; //最大检测时间

    private boolean isStartLogPrint = false;
    private String mUIDelayContent = null;

    private volatile Handler mMonitorHandler;
    private HandlerThread mMonitorHandlerThread;

    private static UiMonitor mInstance = null;
	 public static UiMonitor getInstance(){
        if(null == mInstance){
            synchronized (UiMonitor.class){
                if(null == mInstance){
                    mInstance = new UiMonitor();
                }
            }
        }
        return mInstance;
    }

    private UiMonitor(){
        if (mMonitorHandler == null) {
            mMonitorHandlerThread = new HandlerThread("uiMonitor");
            mMonitorHandlerThread.start();

            mMonitorHandler = new Handler(mMonitorHandlerThread.getLooper());
        }
    }
	 @Override
    public void println(String logLooper) {
        if (logLooper != null && isStartLogPrint) {
            mMonitorHandler.postDelayed(mUiMonitorRunnable, mMonitorTestTime);
        }
        else{
            mMonitorHandler.removeCallbacks(mUiMonitorRunnable);
        }
        isStartLogPrint = !isStartLogPrint;//每次只在logPrint的start发送消息
    }

}
上面的操作主要初始化一些变量,其中mMonitorHandlerThread 我们开启一个线程,待会专门用来操作提醒UI线程执行超时,而mMonitorHandler就是用来告诉mMonitorHandlerThread UI线程有超时操作的代码了。
所以我们重点来看下具体println里面做了啥
我们在ui线程代码执行前发起一个延时Runnable,结束的时候撤销这个Runnable,如果代码执行时间超过了我们的延时时间,导致我们来不及撤销这个Runnable,就会打印出具体超时的代码的堆栈信息,我们可以把这个信息写入日志(开启专门的线程做这事)也可以打印到logcat。
private Runnable mUiMonitorRunnable = new Runnable() {
        @Override
        public void run() {
            StackTraceElement[] arrTrace = Looper.getMainLooper().getThread().getStackTrace();
            StringBuffer sb = new StringBuffer();
            for (int i = 0;i < arrTrace.length; i++) {
                StackTraceElement ele = arrTrace[i];
                sb.append(ele.getClassName() + "." + ele.getMethodName() + "(" + ele.getLineNumber() + ")\n");
            }
            final String uiDelay = sb.toString();
            Runnable writeRunnable = new Runnable() {
                @Override
                public void run() {
                    writeUiDelayLog(uiDelay, getAvailMemory());
                }
            };
            Thread thread = new Thread(writeRunnable);
            thread.start();
            Toast.makeText(BaseApplication.getInstance(), "UI响应缓慢,请查看日志", Toast.LENGTH_SHORT).show();
        }
    };
核心的原理代码基本就是这样子,现在我拿demo代码来演示下,首先打卡ui卡顿检测,然后在UI线程里做了一个Thread.sleep(300);的操作看下会打印出什么什么堆栈信息
打印的堆栈信息如图
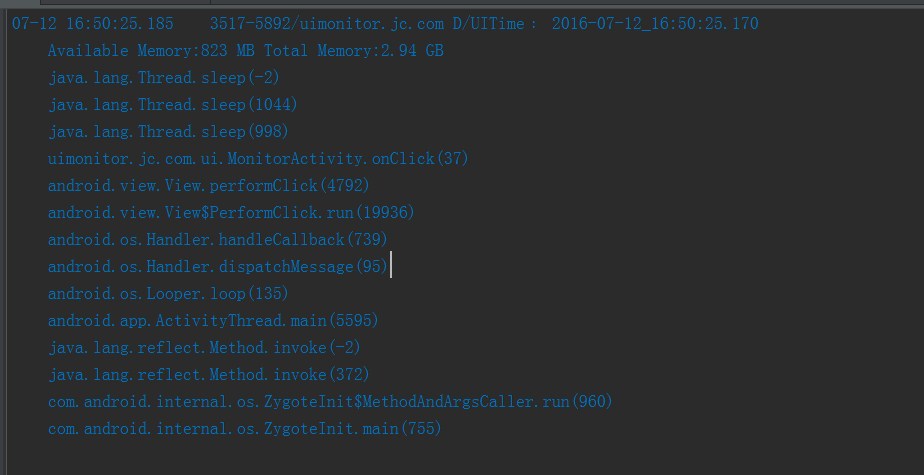
可以看到这个超时的UI堆栈信息清晰地展示了我们在UI线程sleep了300毫秒导致这段代码的执行时间过程,当然了,现实中大家肯定不会写这白痴的代码,但这里只是用这么一个简单的例子来解释下这种检测方法的原理跟效果,大家领会精神。
整个demo的完整代码在github上 Demo地址


 2万+
2万+


 被折叠的 条评论
为什么被折叠?
被折叠的 条评论
为什么被折叠?
 到【灌水乐园】发言


