


安装好CentOS6.5操作系统,选择带Desktop的。
安装前必读
1.caffe官网installation tutorial,http://caffe.berkeleyvision.org/installation.html
2.cuda官网installation tutorial,http://docs.nvidia.com/cuda/cuda-installation-guide-linux/#axzztXgfVMJ8
官网的教程是最应该的读的安装教程。
假如从https://github.com/BVLC/caffe上下载的是caffe-master.zip文件。
开始安装
1.安装gcc和g++。
版本要求是能支持c++11,如果装MATLAB,不能超过gcc-4.7。
安装gcc-4.7.0,参考:http://blog.csdn.net/chieryu/article/details/50218597
安装完后,确认版本:
#gcc --version
#g++ --version
2.安装cuda。
这步比较费时间,具体,参考:http://blog.csdn.net/chieryu/article/details/50218597
3.安装一些依赖库。
# yum install atlas-devel snappy-devel boost-devel leveldb leveldb-devel hdf5 hdf5-devel glog glog-devel gflags gflags-devel protobuf protobuf-devel opencv opencv-devel lmdb lmdb-devel采用yum从repository中安装这些依赖,是因为简单方便且版本大都符合要求。
确保boost的版本大于1.55,如果boost版本不满足要求,则可以单独编译自己的boost。我的CentOS6.5中默认安装的包如下:
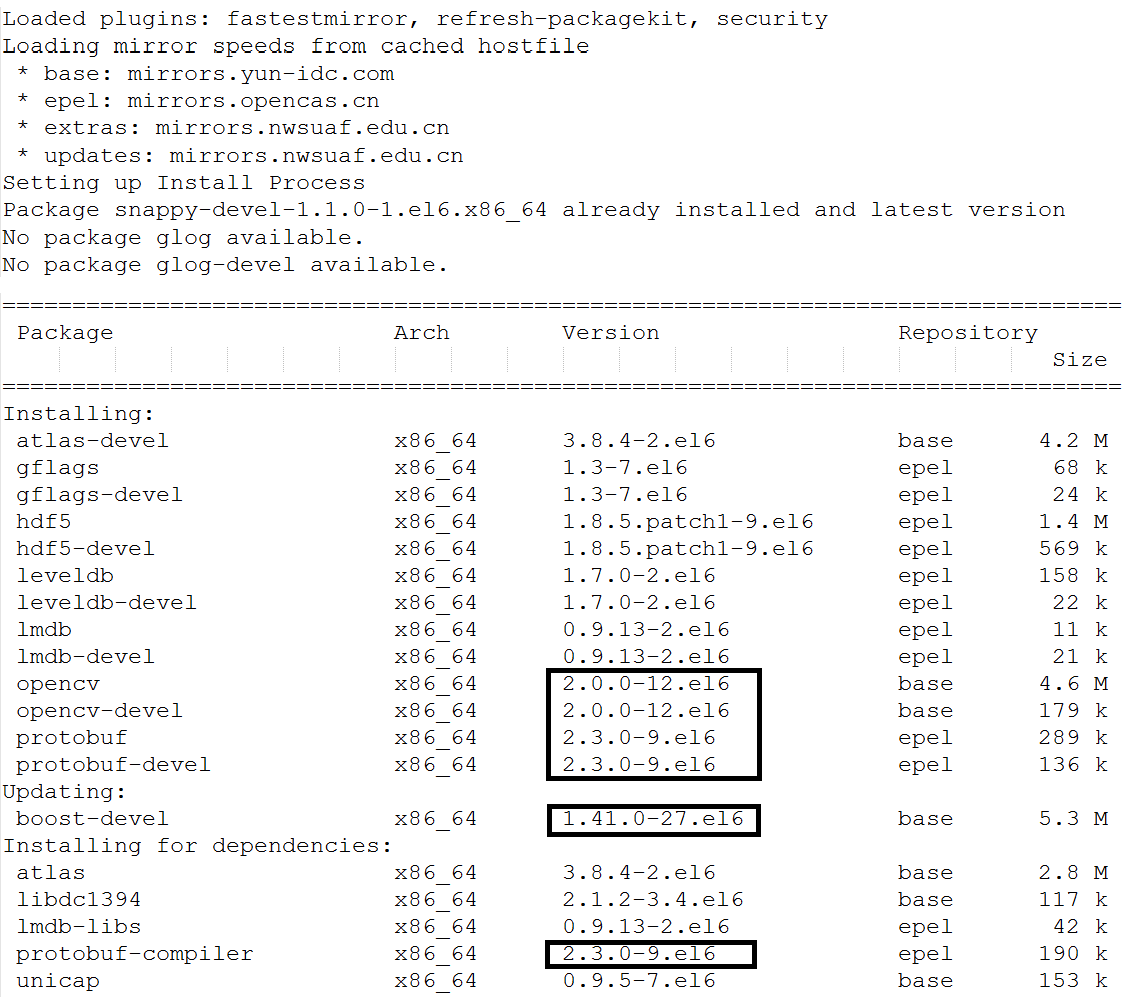
官网要求和经验得出,图中用黑框框出来的包都是不符合要求的。
4.安装boost。
下载boost_1_59_0.tar.gz文件,执行以下过程。
#yum remove boost boost-devel
#tar -xvf boost_1_59_0.tar.gz
#cd boost_1_59_0
#./bootstrap.sh --prefix=/usr/local
#./b2
#./b2 install
boost的编译要些时间。
5.安装cmake。
下载cmake,为下一步编译OpenCV做准备,gitHub有人写的自动编译OpenCV的脚本,但是在我的机器上执行出错了。因此,我需要自己编译OpenCV。
从网站https://cmake.org/download/下载:cmake-3.4.1-Linux-x86_64.sh
#sudo sh cmake-3.4.1-Linux-x86_64.sh这个会自动下载cmake-3.4.1的release文件到当前目录下的cmake-3.4.1-Linux-x86_64文件夹中。
6.安装opencv-2.4.9。
下载opencv-2.4.9。建议用浏览器下载,因为它比wget要快。下载地址:https://github.com/Itseez/opencv/tree/2.4.9
#yum remove opencv opencv-devel
#unzip opencv-2.4.9.zip
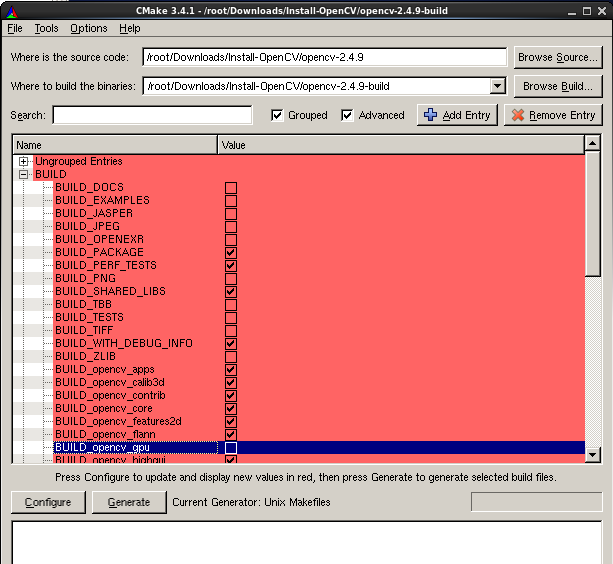
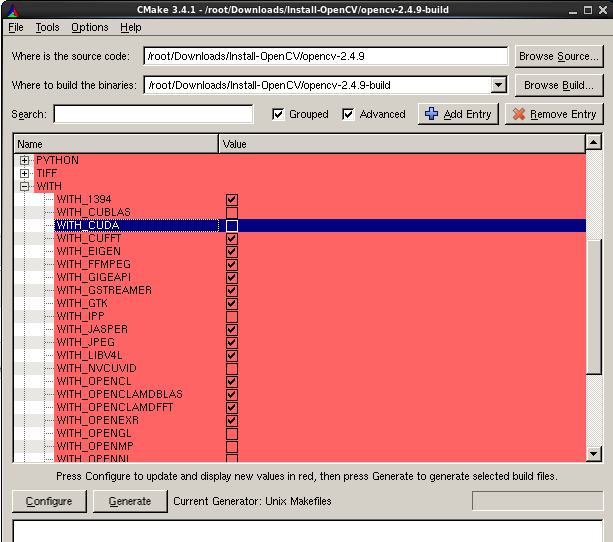
#./cmake-3.4.1-Linux-x86_64/bin/cmake-gui得到如下情况,设置好where is the source code和where is the binaries。
然后将gpu和cuda选项去掉。
configure 2次,并generate之后,在执行:
#cd opencv-2.4.9
#make -j16
#make install
经过10分钟左右就安装好了opencv了。
7.安装protobuf。
从gitHub https://github.com/google/protobuf/tree/v2.6.1下载protobuf-2.6.1或从其他地方下载protobuf-2.6.1.tar.gz。
认真阅读gitHub上给出的安装教程。
#yum remove protobuf protobuf-devel
#./autogen.sh
#./configure --prefix=/usr
#make -j16
#make check -j16
#make install
没有出现问题,那么protobuf-2.6.1就安装好了。
8.安装caffe了。
从gitHub https://github.com/BVLC/caffe 上下载caffe-master.zip文件。
#unzip caffe-master.zip
#mv caffe-master ../
#cd ../caffe-master
#make all -j16
#make test -j16
#make runtest -j16
如果没有出错,到目前为止,就算caffe暂时成功了。
问题和错误
我的安装过程中出现的问题和错误比较多,都是血的教训啊,记录如下:
- 安装完驱动后,开机不了。
原因是安装的驱动不适合我的显卡,而我又把nouveau驱动禁止了。我的解决办法就是重装系统后安装合适的驱动。由于之前备份过initramfs,此处应该可以修改grub.conf文件的,但是比较菜,觉得重装系统更快些。
- 执行./deviceQuery的时候,FATAL:MODULE nvidia not found.cudaGetDevicecount
returned 38.
驱动不适合,安装驱动失败。解决办法是安装NVIDIA-Linux-x86_64-358.16.run
4.出现如下错误,Failed to restart LSB:Bring up/down netwroking:
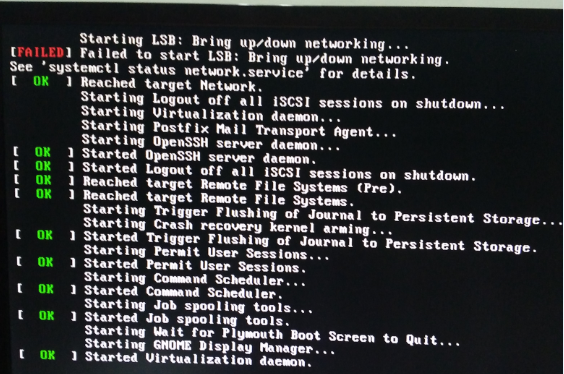
这是因为我的台式机使用的是我的本基本MAC地址,MAC地址不一致导致的。解决办法是在/etc/sysconfig/network-scripts/ifcfg-eth0文件中将ONBOOT=yes改成ONBOOT=no就可以了。
5.编译OpenCV时,出现
nvcc fatal : Unsupported gpu architecture ‘compute_11’
CMake Error at cuda_compile_generated_matrix_operations.cu.o.cmake:208 (message):
原因是驱动不合适,错在NVCC,重装驱动。
总之,安装驱动,我是笨笨地试了好几次。
5.编译OpenCV时,前面还比较快,可是到了79%的时候,开始出奇的慢,显示是在编译各种.cu文件,算了一下大概要15分钟才过1%。
解决办法是用cmake勾掉gpu和cuda,不让它编译cu文件。
6.编译caffe的时候,make all,make test,make runtest都提示:
make: warning: Clock skew detected. Your build may be incomplete.
make: Warning: File `/usr/local/cuda/include/cublas_v2.h’ has modification time 6.8e+03 s in the future
导致每次都要重新编译src下的一些.cpp文件,严重浪费了很多时间。
解决办法是:
#sudo date -s '13:49:00 2015-12-07'
#hwclock  (说明:写入BIOS,避免失效。)
7.在make runtest的时候出现下面的错误。
[----------] 9 tests from AdaGradSolverTest/3, where TypeParam = caffe::GPUDevice<double>
[ RUN ] AdaGradSolverTest/3.TestAdaGradLeastSquaresUpdate
libprotobuf ERROR google/protobuf/text_format.cc:169] Error parsing text-format caffe.SolverParameter: 1:23: Expected identifier.
F1207 19:34:53.711594 12333 test_gradient_based_solver.cpp:54] Check failed: google::protobuf::TextFormat::ParseFromString(proto, ¶m)
*** Check failure stack trace: ***
@ 0x7f7d952abe1d google::LogMessage::Fail()
@ 0x7f7d952adbd3 google::LogMessage::SendToLog()
@ 0x7f7d952aba38 google::LogMessage::Flush()
@ 0x7f7d952ae42e google::LogMessageFatal::~LogMessageFatal()
@ 0x7133a0 caffe::GradientBasedSolverTest<>::InitSolverFromProtoString()
@ 0x737603 caffe::GradientBasedSolverTest<>::RunLeastSquaresSolver()
@ 0x744da7 caffe::GradientBasedSolverTest<>::TestLeastSquaresUpdate()
@ 0x8dcada testing::internal::HandleExceptionsInMethodIfSupported<>()
@ 0x8d2679 testing::Test::Run()
@ 0x8d2757 testing::TestInfo::Run()
@ 0x8d2895 testing::TestCase::Run()
@ 0x8d2c05 testing::internal::UnitTestImpl::RunAllTests()
@ 0x8dc65a testing::internal::HandleExceptionsInMethodIfSupported<>()
@ 0x8d1ee1 testing::UnitTest::Run()
@ 0x4fd4f2 main
@ 0x36f8c1ed5d (unknown)
@ 0x503f29 (unknown)
make: *** [runtest] Aborted (core dumped)可知错误代码在InitSolverFromProtoString()这个函数里,进到函数里发现调用的是protobuf。
原因是caffe-master使用的protobuf版本是2.6.0及以上,而我yum install的protobuf是2.3.0,因此更新protobuf可以解决。
8.出现了下面的错误。
/opt/centos/devtoolset-1.0/root/usr/libexec/gcc/x86_64-redhat-linux/4.7.0/ld: cannot find -lcblas
/opt/centos/devtoolset-1.0/root/usr/libexec/gcc/x86_64-redhat-linux/4.7.0/ld: cannot find -latlas
collect2: error: ld returned 1 exit status
make: *** [.build_release/lib/libcaffe.so] Error 1
执行这个命令
#find / -name libcblas.so并将路径加到环境变量中,仍不起作用。
解决办法是:打开caffe-master/Makefile,在文件中添加路径ATLAS_DIRS,修改结果如下:
INCLUDE_DIRS += $(BLAS_INCLUDE)
ATLAS_DIRS = /usr/lib64/atlas
LIBRARY_DIRS += $(BLAS_LIB)
LIBRARY_DIRS +=$(ATLAS_DIRS)(转载请注明作者和出处:http://blog.csdn.net/CHIERYU 未经允许请勿用于商业用途)


 618
618

 被折叠的 条评论
为什么被折叠?
被折叠的 条评论
为什么被折叠?
 到【灌水乐园】发言


