


介绍和入口函数
为了测试chromium和webkit的兼容性,chromium project 中有一个content shell,相对整个项目来说,它简单了很多,如果运行的化,就是一个简单的windows窗口程序,有利于程序员测试webkit的最新特征,和掌握html5等相关的新功能。其入口点在content/shell目录下的shell_main.cc(对于windows系统是如此),打开该文件,可以看到如下代码:
#if defined(OS_WIN)

int APIENTRY wWinMain(HINSTANCE instance, HINSTANCE, wchar_t*, int) {
  sandbox::SandboxInterfaceInfo sandbox_info = {0};
  content::InitializeSandboxInfo(&sandbox_info);
  content::ShellMainDelegate delegate;
  return content::ContentMain(instance, &sandbox_info, &delegate);
}

#else

int main(int argc, const char** argv) {
#if defined(OS_MACOSX)
  // Do the delegate work in shell_content_main to avoid having to export the
  // delegate types.
  return ::ContentMain(argc, argv);
#else
  content::ShellMainDelegate delegate;
  return content::ContentMain(argc, argv, &delegate);
#endif  // OS_MACOSX
}

#endif  // OS_POSIX
和chrome工程的区别
可以看到它和chrome/app/chrome_exe_main_win.cc中的:
int APIENTRY wWinMain(HINSTANCE instance, HINSTANCE prev, wchar_t*, int) {
  // Initialize the commandline singleton from the environment.
  CommandLine::Init(0, NULL);
  // The exit manager is in charge of calling the dtors of singletons.
  base::AtExitManager exit_manager;


  MetroDriver metro_driver;
  if (metro_driver.in_metro_mode())
    return metro_driver.RunInMetro(instance, &RunChrome);
  // Not in metro mode, proceed as normal.
  return RunChrome(instance);
}
的不同之处:chrome中的main delegate是ChromeMainDelegate,content shell中的main delegate 是ShellMainDelegate,是content::ContentMainDelegate的不同子类实现版本,这样的设计就决定了上层界面有很大的不同,相对chrome来说,content shell的界面功能简单了很多,有利于大家理解浏览器的程序结构;
进入MainRunner
进入到Content_main.cc中的如下代码后:
namespace content {

#if defined(OS_WIN)
int ContentMain(HINSTANCE instance,
                sandbox::SandboxInterfaceInfo* sandbox_info,
                ContentMainDelegate* delegate) {
#else
int ContentMain(int argc,
                const char** argv,
                ContentMainDelegate* delegate) {
#endif  // OS_WIN

  scoped_ptr<ContentMainRunner> main_runner(ContentMainRunner::Create());

  int exit_code;

#if defined(OS_WIN)
  exit_code = main_runner->Initialize(instance, sandbox_info, delegate);
#else
  exit_code = main_runner->Initialize(argc, argv, delegate);
#endif  // OS_WIN

  if (exit_code >= 0)
    return exit_code;

  exit_code = main_runner->Run();

  main_runner->Shutdown();

  return exit_code;
}

}  // namespace content
在ContentMainRunnerImpl中的Run函数中,调用delegate_(ShellMainDelegate的实例)的RunProcess,就会进入到content/shell/Shell_browser_main.cc中的如下代码:
// Main routine for running as the Browser process.
int ShellBrowserMain(const content::MainFunctionParams& parameters) {
  scoped_ptr<content::BrowserMainRunner> main_runner_(
      content::BrowserMainRunner::Create());

  int exit_code = main_runner_->Initialize(parameters);

  if (exit_code >= 0)
    return exit_code;

  if (CommandLine::ForCurrentProcess()->HasSwitch(
        switches::kCheckLayoutTestSysDeps)) {
    MessageLoop::current()->PostTask(FROM_HERE, MessageLoop::QuitClosure());
    main_runner_->Run();
    main_runner_->Shutdown();
    return 0;
  }

  bool layout_test_mode =
      CommandLine::ForCurrentProcess()->HasSwitch(switches::kDumpRenderTree);

  if (layout_test_mode) {
    content::WebKitTestController test_controller;
    std::string test_string;
    CommandLine::StringVector args =
        CommandLine::ForCurrentProcess()->GetArgs();
    size_t command_line_position = 0;
    bool ran_at_least_once = false;

#if defined(OS_ANDROID)
    std::cout << "#READY\n";
    std::cout.flush();
#endif

    while (GetNextTest(args, &command_line_position, &test_string)) {
      if (test_string.empty())
        continue;
      if (test_string == "QUIT")
        break;

      bool enable_pixel_dumps;
      std::string pixel_hash;
      FilePath cwd;
      GURL test_url = GetURLForLayoutTest(
          test_string, &cwd, &enable_pixel_dumps, &pixel_hash);
      if (!content::WebKitTestController::Get()->PrepareForLayoutTest(
              test_url, cwd, enable_pixel_dumps, pixel_hash)) {
        break;
      }

      ran_at_least_once = true;
      main_runner_->Run();

      if (!content::WebKitTestController::Get()->ResetAfterLayoutTest())
        break;
    }
    if (!ran_at_least_once) {
      MessageLoop::current()->PostTask(FROM_HERE, MessageLoop::QuitClosure());
      main_runner_->Run();
    }
    exit_code = 0;
  } else {
    exit_code = main_runner_->Run();
  }

  main_runner_->Shutdown();

  return exit_code;
}
进入MainLoop
这样的话,还是会进入到Browser_main_runner.cc的BrowserMainRunnerImpl类中,并呼叫其实列的Initialize函数和Run函数;在BrowserMainRunnerImpl的Initialize中会看到如下代码:
base::StatisticsRecorder::Initialize();

    notification_service_.reset(new NotificationServiceImpl);

    main_loop_.reset(new BrowserMainLoop(parameters));

    main_loop_->Init();

    main_loop_->EarlyInitialization();

    // Must happen before we try to use a message loop or display any UI.
    main_loop_->InitializeToolkit();

    main_loop_->MainMessageLoopStart();
在BrowserMainLoop的Init函数中,可以看到如下代码:
void BrowserMainLoop::Init() {
  parts_.reset(
      GetContentClient()->browser()->CreateBrowserMainParts(parameters_));
}
parts_的定义如下:
scoped_ptr<BrowserMainParts> parts_;函数GetContentClient()在content/public/common/content_client.cc中定义如下:
void SetContentClient(ContentClient* client) {
  g_client = client;

  // Set the default user agent as provided by the client. We need to make
  // sure this is done before webkit_glue::GetUserAgent() is called (so that
  // the UA doesn't change).
  if (client) {
    webkit_glue::SetUserAgent(client->GetUserAgent(), false);
  }
}

ContentClient* GetContentClient() {
  return g_client;
}
和它对应的有个SetContentClient()函数;
让我们再回过头来看看前面的ContentMainRunnerImpl的Initialize函数中的部分代码:
if (!GetContentClient())
      SetContentClient(&empty_content_client_);
    ContentClientInitializer::Set(process_type, delegate_);
这段代码有点技巧在里面,好奇的人可以去阅读下这段代码中的相关函数就明白了,下面我们来看看ContentClientInitializer::Set函数:
 public:
  static void Set(const std::string& process_type,
                  ContentMainDelegate* delegate) {
    ContentClient* content_client = GetContentClient();
    if (process_type.empty()) {
      if (delegate)
        content_client->browser_ = delegate->CreateContentBrowserClient();
      if (!content_client->browser_)
        content_client->browser_ = &g_empty_content_browser_client.Get();
    }

#if !defined(OS_IOS)
    if (process_type == switches::kPluginProcess ||
        process_type == switches::kPpapiPluginProcess) {
      if (delegate)
        content_client->plugin_ = delegate->CreateContentPluginClient();
      if (!content_client->plugin_)
        content_client->plugin_ = &g_empty_content_plugin_client.Get();
    } else if (process_type == switches::kRendererProcess ||
               CommandLine::ForCurrentProcess()->HasSwitch(
                   switches::kSingleProcess)) {
      if (delegate)
        content_client->renderer_ = delegate->CreateContentRendererClient();
      if (!content_client->renderer_)
        content_client->renderer_ = &g_empty_content_renderer_client.Get();
    } else if (process_type == switches::kUtilityProcess) {
      if (delegate)
        content_client->utility_ = delegate->CreateContentUtilityClient();
      if (!content_client->utility_)
        content_client->utility_ = &g_empty_content_utility_client.Get();
    }
#endif  // !OS_IOS
  }
我们关注的地方在:
ContentClient* content_client = GetContentClient();
    if (process_type.empty()) {
      if (delegate)
        content_client->browser_ = delegate->CreateContentBrowserClient();
      if (!content_client->browser_)
        content_client->browser_ = &g_empty_content_browser_client.Get();
    }


      if (delegate)
        content_client->renderer_ = delegate->CreateContentRendererClient();
      if (!content_client->renderer_)
        content_client->renderer_ = &g_empty_content_renderer_client.Get();
这样就设置好了ShellContentClient的两个成员变量:
// The embedder API for participating in browser logic.
  ContentBrowserClient* browser_;
// The embedder API for participating in renderer logic.
  ContentRendererClient* renderer_;
分别为ShellMainDelegate的两个函数返回的结果:
ContentBrowserClient* ShellMainDelegate::CreateContentBrowserClient() {
  browser_client_.reset(new ShellContentBrowserClient);
  return browser_client_.get();
}
ContentRendererClient* ShellMainDelegate::CreateContentRendererClient() {
  renderer_client_.reset(new ShellContentRendererClient);
  return renderer_client_.get();
}
主要类图
理解了以上过程,对解释BrowserMainLoop的运行过程有帮助。
下面我把content_shell启动过程中涉及的几个主要类图贴上来,希望对理解有帮助
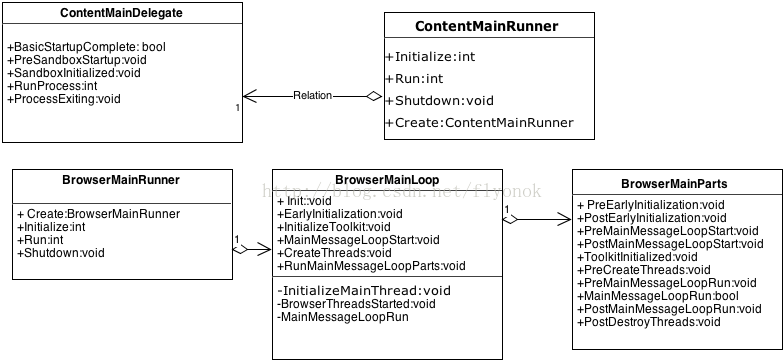
ContentMainDelegate类的子类有ChromeMainDelegate和ShellMainDelegate等,其实例一般通过Conten::Main()传入,我们一般关注BasicStartupComplete和RunProcess两个接口,负责浏览器的系统初始化和进入浏览器主循环的入口。
(完)


 3928
3928

 被折叠的 条评论
为什么被折叠?
被折叠的 条评论
为什么被折叠?
 到【灌水乐园】发言


