


MIT JOS lab4
写在前面的碎碎念~ :
经历了LAB 3的洗礼,死磕到了lab 4. 这里还是首先向各位为JOS 实验做过笔记,写过博客,把自己实验代码托管到JOS上面的先行者们致敬! 如果没有这么好的开源环境, 这么好的东西学不来. 珍惜, 不用嘴. Doing is better than saying!
--------------------------------------------------------------------------------------------------------------------------------
LAB 4 : Preemptive Multitasking
lab4的主题是多任务抢占.
对于多核CPU, JOS对其进行了抽象. 具体在./kern/cpu.h
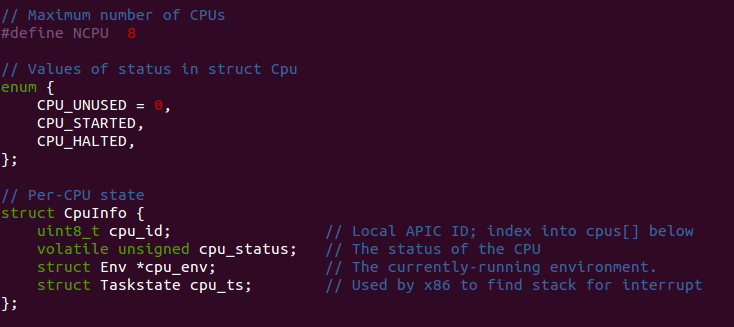
我们可以看到CPU最大数目是支持8个... 呵呵,就是一个宏定义
然后具体的,对CPU利用结构体进行抽象--struct CpuInfo.
而多核处理器我们用 struct mp来进行描述
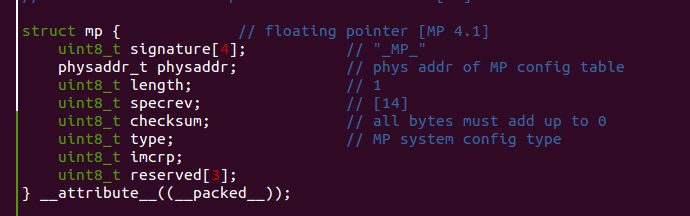
其中的成员 mp.physaddr指向结构体 struct mpconfig
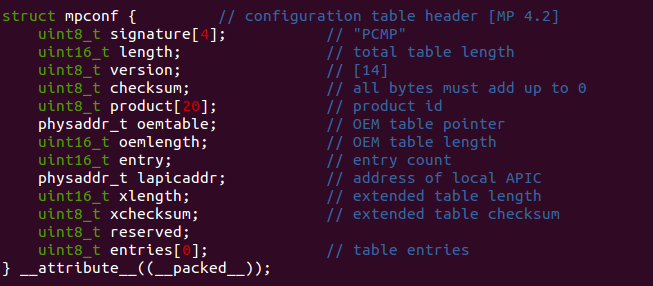
值得注意的是,这里最后一个成员是一个占位的0数组,下面的宏定义用于这个entries的索引

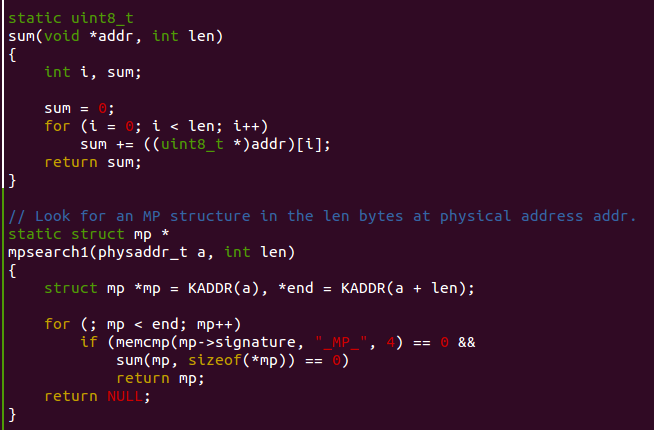
sum()函数把add处len字节长的数据全部加起来.
mpsearch1()函数在物理地址a起始处,长度为len的范围内查找MP结构体
他这里为什么sum(mp, sizeof(*mp))要等于0我不怎么理解
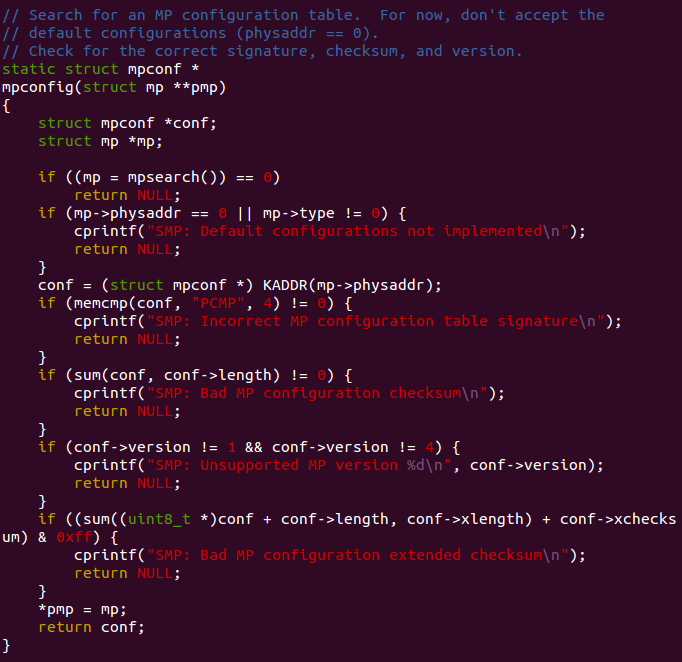
这里前面一堆的if判断条件就是为了最后 *pmp = mp 和 return conf做准备.
pmp是个二级指针,这里就是把mp赋值给函数串入参数的那个指针.
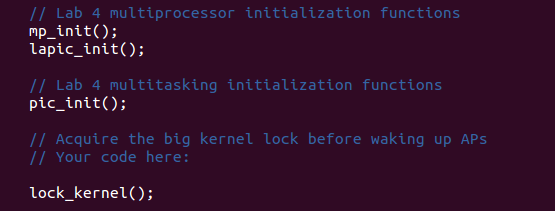
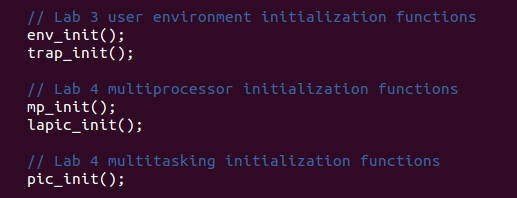
OK,铺垫都做好了,可以看mp_init()了 (如果看不懂就反复看看前面的mp_init()调用的函数)

先通过调用mpconfig()找到struct mpconf然后根据这个结构体内的entries信息对各个CPU结构体进行配置.
如果proc->flag是MPPROC_BOOT,说明这个入口对应的处理器是用于启动的处理器,我们把结构体数组cpus[ncpu]
地址赋值给bootcpu指针.注意这里ncpu是个全局变量,那么这里实质上就是把cpus数组的第一个元素的地址给了bootcpu.
那个ismp是个全局变量,默认的初始值为0, 但是我们进行mp_init()的时候,就把这个全局变量置为1了,如果出现任何entries匹配错误(switch找不到对应项,跳进default),这个时候我们多可处理器的初始化就失败了,不能用多核处理器进行机器的运行,于是ismp置为0
后面会对这个ismp进行检查.
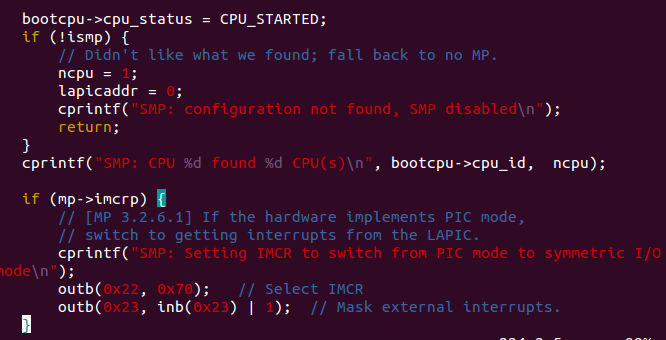
到这里mp_init()就搞定了
接下来就是lapic_init()做初始化工作.
Part A: Multiprocessor Support and Cooperative Multitasking
In the first part of this lab, you will first extend JOS to run on a multiprocessor system, and then implement some new JOS kernel system calls to allow userlevel environments to create additional new environments.
Multiprocessor Support
We are going to make JOS support "symmetric multiprocessing" (SMP), a multiprocessor model in which all CPUs have equivalent access to system resources such as memory and I/O buses. While all CPUs are functionally identical in SMP, during the boot process they can be classified into two types: the bootstrap processor (BSP) is responsible for initializing the system and for booting the operating system; and the application processors (APs) are activated by the BSP only after the operating system is up and running. Which processor is the BSP is determined by the hardware and the BIOS. Up to this point, all your existing JOS code has been running on the BSP.

//
// Reserve size bytes in the MMIO region and map [pa,pa+size) at this
// location.  Return the base of the reserved region.  size does *not*
// have to be multiple of PGSIZE.
//
void *
mmio_map_region(physaddr_t pa, size_t size)
{
    void * ret = (void *)base;
    size = ROUNDUP(size, PGSIZE);
    if (base + size > MMIOLIM || base + size < base)
    {
        panic("mmio_map_region : reservation overflow\n");
    }

    boot_map_region(kern_pgdir,
                    base,
                    size,
                    pa,
                    (PTE_P | PTE_PCD | PTE_PWT));
                    // never try to give a PTE_U
    base += size;

    return ret;
	//panic("mmio_map_region not implemented");
}
Application Processor Bootstrap
Before booting up APs, the BSP should first collect information about the multiprocessor system, such
as the total number of CPUs, their APIC IDs and the MMIO address of the LAPIC unit. The mp_init()
function in kern/mpconfig.c retrieves this information by reading the MP configuration table that resides
in the BIOS's region of memory.
对于SMP, 一开始系统是单核启动的(BSP), 而后完成启动后, 才会是APs. 就是启动APs的入口函数---- boot_aps()
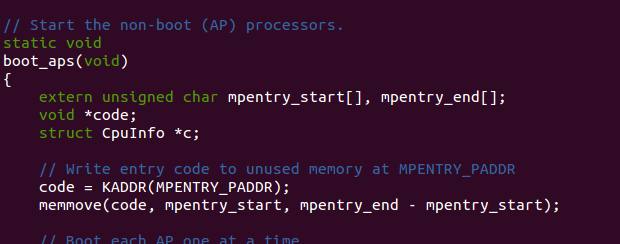
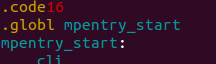
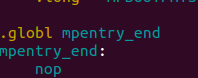
memmove会把几乎整个./kern/mpentry.S 文件从mpentry_start 到mpentry_end. 部分的汇编代码copy到指针code指向的地址处.
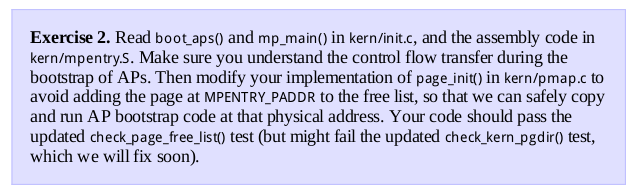
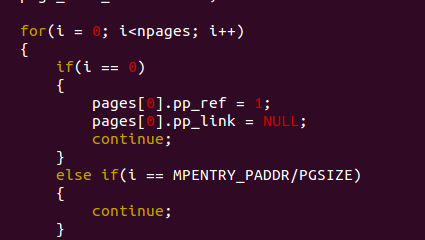
对于page_init()只要添加一个 else if (i == MPENTRY_PADDR/PGSIZE)判断条件
解答:
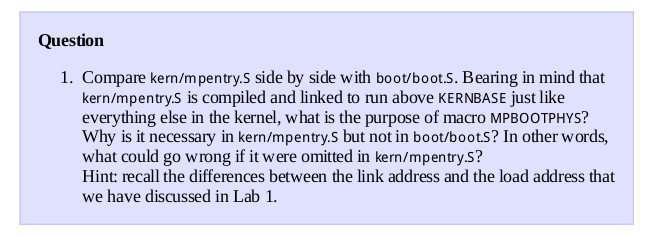
#define MPBOOTPHYS(s) ((s) - mpentry_start + MPENTRY_PADDR))))
MPBOOTPHYS is to calculate symobl address relative to MPENTRY_PADDR. The ASM is executed in the load address above KERNBASE, but JOS need to run mp_main at 0x7000 address! Of course 0x7000's page is reserved at pmap.c.
CSDNer SunnyBeiKe 的解答:
但是在AP的保护模式打开之前,是没有办法寻址到3G以上的空间的,因此用MPBOOTPHYS是用来计算相应的物理地址的。
但是在boot.S中,由于尚没有启用分页机制,所以我们能够指定程序开始执行的地方以及程序加载的地址;但是,在mpentry.S的时候,由于主CPU已经处于保护模式下了,因此是不能直接指定物理地址的,给定线性地址,映射到相应的物理地址是允许的。
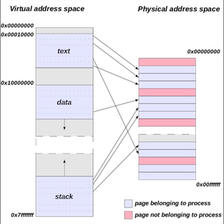
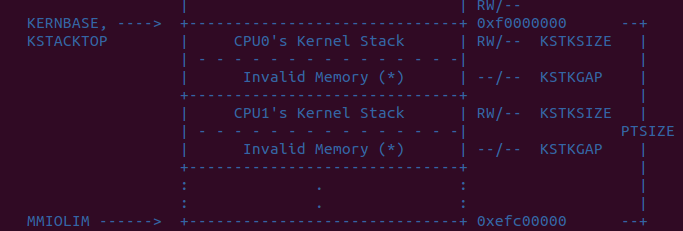
多核CPU的内存布局.
Per-CPU current environment pointer.
Since each CPU can run different user process simultaneously, we redefined the symbol curenv to refer to cpus[cpunum()].cpu_env (or thiscpu->cpu_env ), which points to the environment currently executing on the current CPU (the CPU on which the code is running).
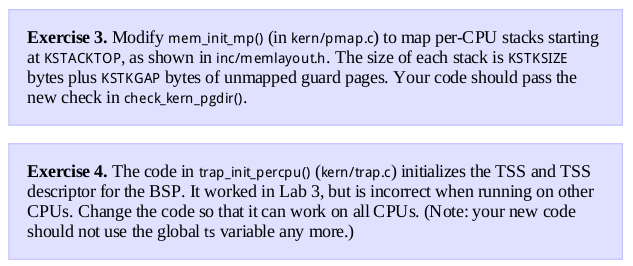
// Modify mappings in kern_pgdir to support SMP
//   - Map the per-CPU stacks in the region [KSTACKTOP-PTSIZE, KSTACKTOP)
//
static void
mem_init_mp(void)
{

    int i = 0;
    uintptr_t kstacktop_i;

    for (i = 0; i < NCPU; i++)
    {
        kstacktop_i = KSTACKTOP - i * (KSTKSIZE + KSTKGAP);
        boot_map_region(kern_pgdir,
                    kstacktop_i - KSTKSIZE,
                    ROUNDUP(KSTKSIZE, PGSIZE),
                    PADDR(&percpu_kstacks[i]),
                    (PTE_W) | (PTE_P));
    }

}

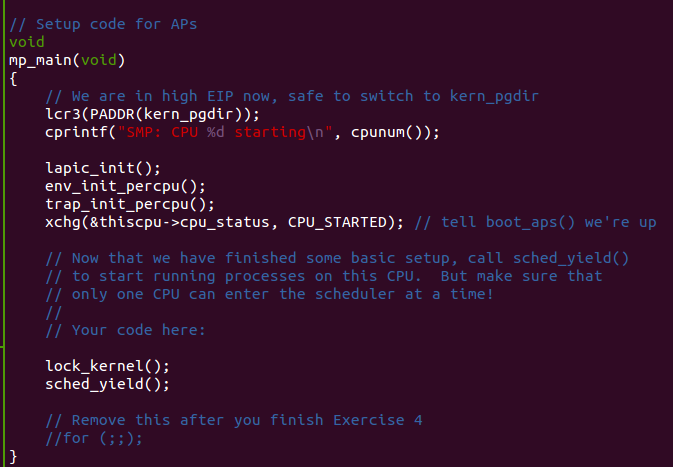
在 i386_init() , mp_main() , trap() , 这几个函数中添加lock_kernel(),在env_run() 中添加unlock_kernel();
关于spinlock的笔记:
http://blog.csdn.net/cinmyheart/article/details/43880517
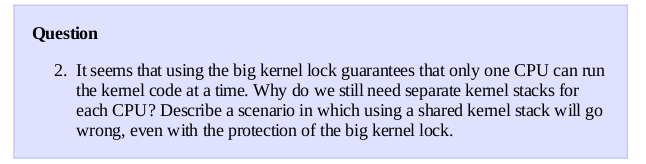
If it leaves future-needed data in the single kernel stack, It will have the re-entrant problem.
RoundRobin Scheduling

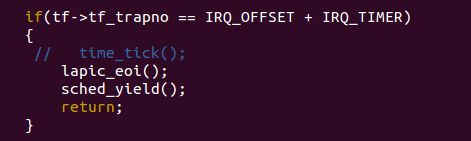
mp_main()函数:
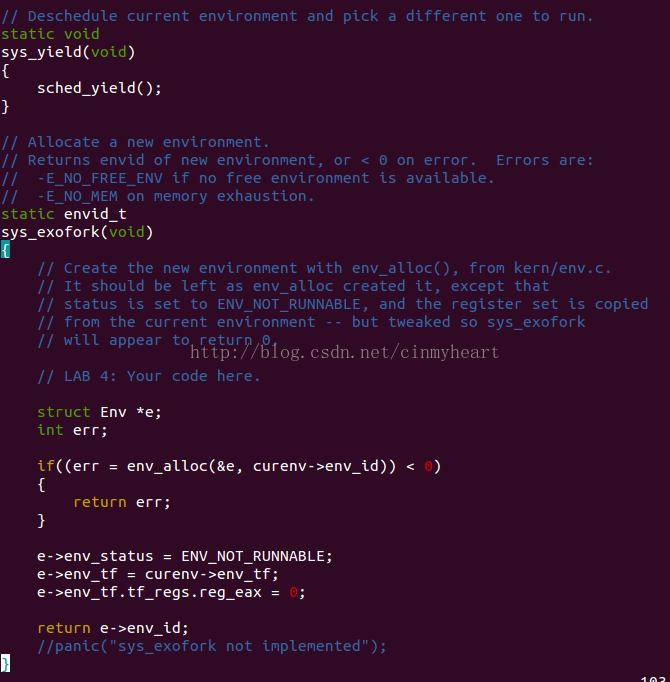
关于sched_yield()的实现:
// Choose a user environment to run and run it.
void
sched_yield(void)
{
	struct Env *idle;

	// Implement simple round-robin scheduling.
	//
	// Search through 'envs' for an ENV_RUNNABLE environment in
	// circular fashion starting just after the env this CPU was
	// last running.  Switch to the first such environment found.
	//
	// If no envs are runnable, but the environment previously
	// running on this CPU is still ENV_RUNNING, it's okay to
	// choose that environment.
	//
	// Never choose an environment that's currently running on
	// another CPU (env_status == ENV_RUNNING). If there are
	// no runnable environments, simply drop through to the code
	// below to halt the cpu.

	// LAB 4: Your code here.

    idle = thiscpu->cpu_env;
    uint32_t start = (idle != NULL) ? ENVX( idle->env_id) : 0;
    uint32_t i = start;
    bool first = true;
    for (; i != start || first; i = (i+1) % NENV, first = false)
    {
        if(envs[i].env_status == ENV_RUNNABLE)
        {
            env_run(&envs[i]);
            return ;
        }
    }

    if (idle && idle->env_status == ENV_RUNNING)
    {
        env_run(idle);
        return ;
    }

	// sched_halt never returns
	sched_halt();
}
还可以去这里看看关于JOS 里的Round robin:
http://blog.csdn.net/cinmyheart/article/details/45192013
记得把kern/init.c里面的 ENV_CREAT()
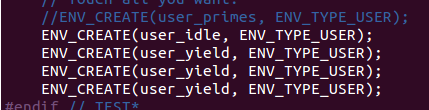
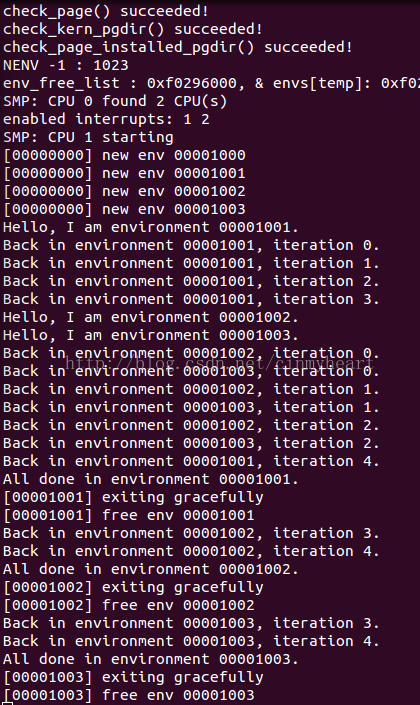
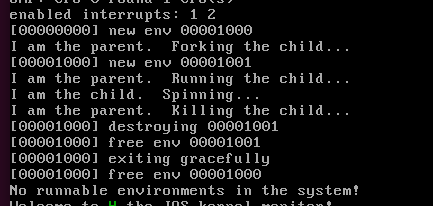
当CPUS=2时候,系统运行的IO信息
你会看到如下信息:
System Calls for Environment Creation
Although your kernel is now capable of running and switching between multiple user level environments, it is still limited to running environments that the kernel initially set up. You will now implement the necessary JOS system calls to allow user environments to create and start other new user environments.
刚才我们看到的多核CPU的进程并发还有进程切换,这些进程都是内核态的,我们现在要把并发的能力提供给用户,于是这个时候,我们就需要扩展之前还很简陋的系统调用功能.
Unix provides the fork() system call as its process creation primitive. Unix fork() copies the entire address
space of calling process (the parent) to create a new process (the child). The only differences between the two observable from user space are their process IDs and parent process IDs (as returned by getpid and getppid). In the parent, fork() returns the child's process ID, while in the child, fork() returns 0. By default, each process gets its own private address space, and neither process's modifications to memory are visible to the other.
You will provide a different, more primitive set of JOS system calls for creating new usermode environments. With these system calls you will be able to implement a Unixlike fork() entirely in user space, in addition to other styles of environment creation. The new system calls you will write for JOS are as follows
自己要搞出一个类似于Unix里面的fork()函数出来
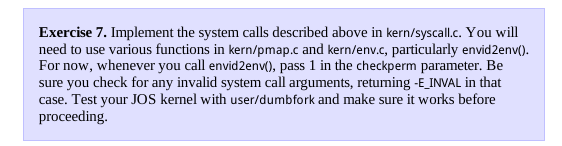
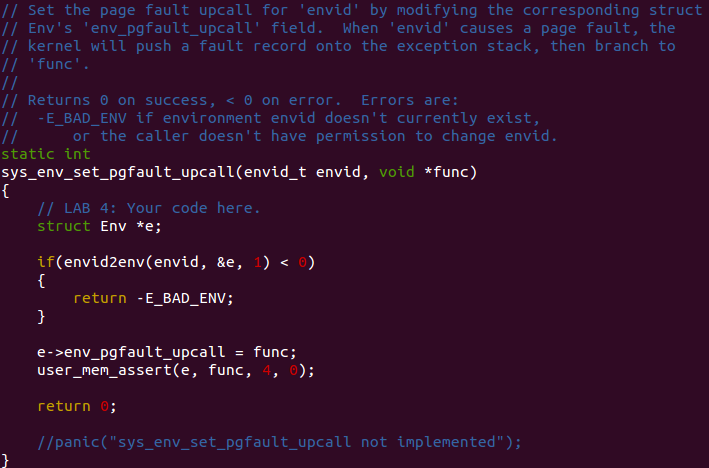
补全kern/syscall.c里面的函数
后面还有
sys_env_set_status:
sys_page_alloc:
sys_page_map:
sys_page_unmap:
四个函数需要实现,这里不再贴出来了,太冗长,去我github看吧.
然后接着要我们利用一个用户程序去测试这个我们新做出来的fork()函数,即sys_exofork()
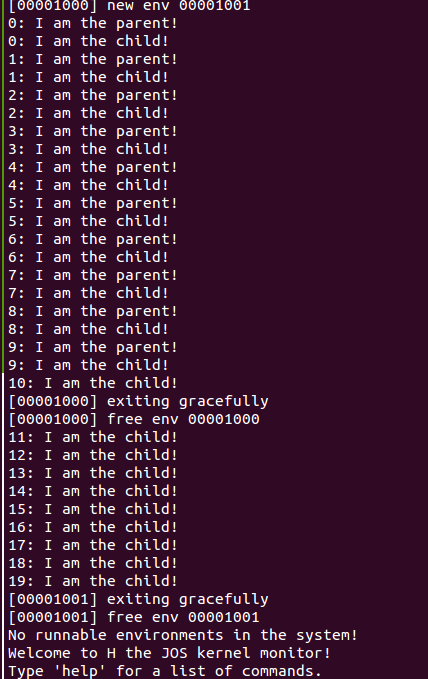
We have provided a very primitive implementation of a Unixlike fork() in the test program user/dumbfork.c. This test program uses the above system calls to create and run a child environment with a copy of its own address space. The two environments then switch back and forth using sys_yield as in the previous exercise. The parent exits after 10 iterations, whereas the child exits after 20.
从十二点到现在是凌晨两点半,(⊙v⊙)嗯,期间一直在panic....
终于搞定了...
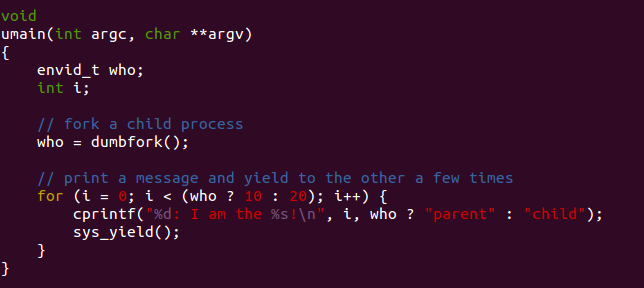
会调用dumbfork这个函数,然后不停的fork
这里这个who接受dumbfork的返回值,相当于我们unix系里fork父进程返回pid,子进程返回0一样.
如果这里who是0,那么就迭代输出20次,如果who是非0的,那么迭代10次
两个进程通过sys_yield实现进程的切换.以至于不会一直抢占着CPU
下面是部分输出结果
传说中的COW技术
Part B: Copy on Write Fork
为什么需要这种技术?
xv6 Unix implements fork() by copying all data from the parent's pages into new pages allocated for the
child. This is essentially the same approach that dumbfork() takes. The copying of the parent's address space into the child is the most expensive part of the fork() operation.
However, a call to fork() is frequently followed almost immediately by a call to exec() in the child process, which replaces the child's memory with a new program. This is what the the shell typically does, for example. In this case,the time spent copying the parent's address space is largely wasted, because the child process will use very little of its memory before calling exec() .

之前见过struct Trapframe,这个结构体是用于用户态切换到内核态保存进程状态的结构体.
而如果这里通过fork()去触发一个page fault 这时候就需要用户态去处理这个异常
During normal execution, a user environment in JOS will run on the normal user stack: its ESP register
starts out pointing at USTACKTOP , and the stack data it pushes resides on the page between USTACKTOP-
PGSIZE and USTACKTOP-1 inclusive. When a page fault occurs in user mode, however, the kernel will
restart the user environment running a designated userlevel page fault handler on a different stack,
namely the user exception stack.
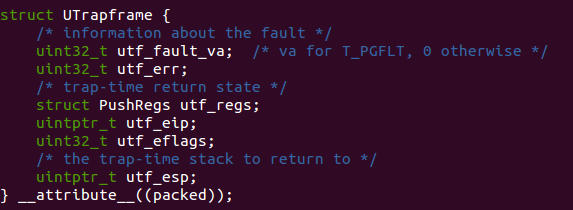
下面是User exception stack的栈帧描述

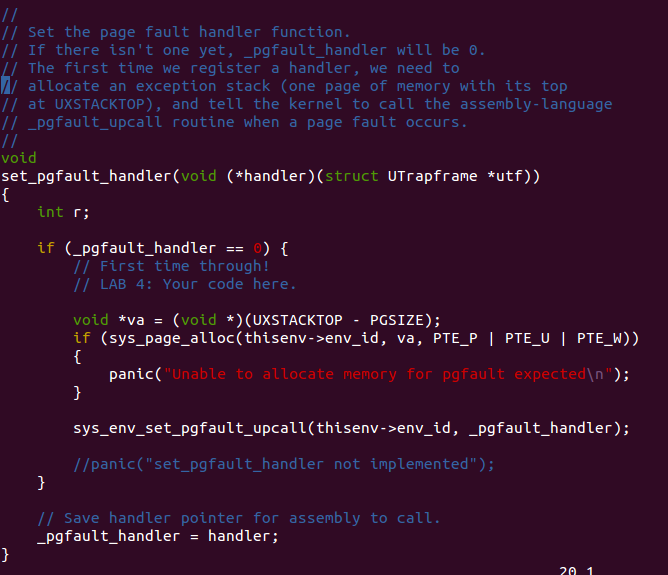
Exercise 11. Finish set_pgfault_handler() in lib/pgfault.c
这里要在用户态的程序设置好page fault的handler,调用下面这个函数.如果没有设置好,会进而调用内核的page fault handler!! 虽然一直panic,但是搞明白了真的很好玩!少年,因为这就是我们常见的core dump的实现机制啊!
能不兴奋么
这里有一个已经写好的用户程序在 user/faultdie.c
// test user-level fault handler -- just exit when we fault
#include <inc/lib.h>
void
handler(struct UTrapframe *utf)
{
void *addr = (void*)utf->utf_fault_va;
uint32_t err = utf->utf_err;
cprintf("i faulted at va %x, err %x\n", addr, err & 7);
sys_env_destroy(sys_getenvid());
}
void
umain(int argc, char **argv)
{
set_pgfault_handler(handler);
*(int*)0xDeadBeef = 0;
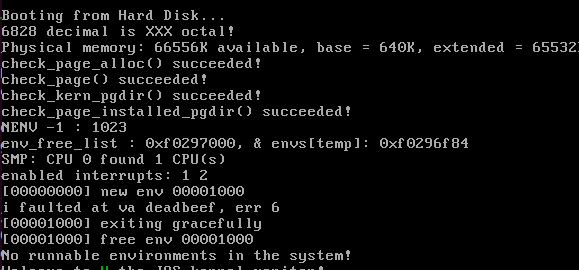
}我们调用这个程序就可以了 make run-faultdie
我们还可以更细致的去分析一下究竟是怎么触发中断的
gdb调试的时候内核态好像不能检测到用户态的调试信息,我们只能手动的去设置断点了(就是不能用gdb的tab自动补全)
这里我们看到,在obj/user/faultdie.sym里我们能看到linker需要的符号信息,还有对应的地址.
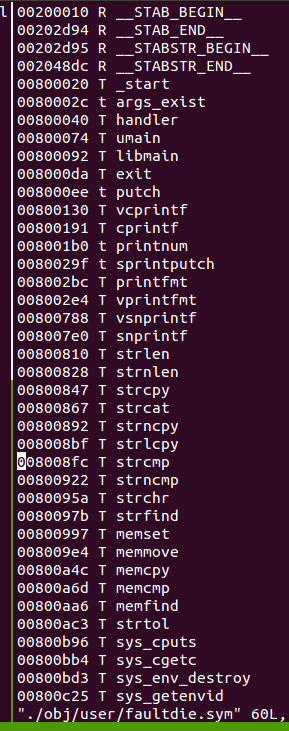
我们在 umain处设置断点,即 0x800033
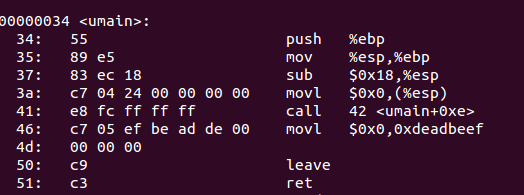
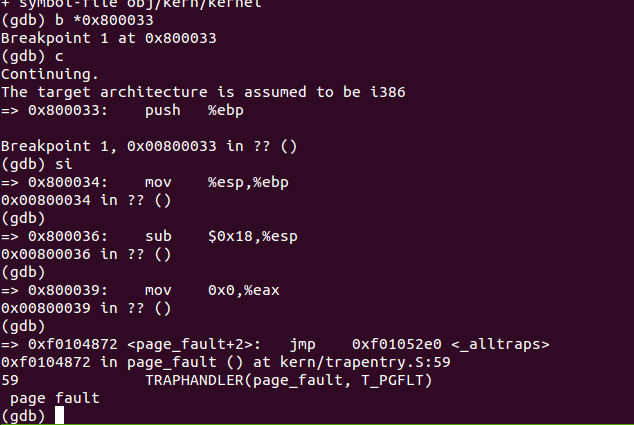
左边是直接反汇编faultdie.o的结果.右边是gdb调试的时候,我们看到的单个指令运行的调试信息.
(gdb调试的时候可能寄存器会有点不一样) 但是我们还是会发现执行movl指令之后会触发page fault
这里引用了这个非法地址,尝试写入0,触发page fault.
*(int*)0xDeadBeef = 0;
这个时候我们会先进入 TRAPTHANDLER(page_fault, T_PGFLT)处理程序.
后续会调用trap()函数,并进一步调用trap_dispatch() ,再调用page_fault_handler()
重头戏就来了.这个时候由于我们是设置了env_page_fault_upcall,那么就会调用这个用户态的处理程序.
在就会进入
handler(struct UTrapframe *utf)
{
	void *addr = (void*)utf->utf_fault_va;
	uint32_t err = utf->utf_err;
	cprintf("i faulted at va %x, err %x\n", addr, err & 7);
	sys_env_destroy(sys_getenvid());
}
所以你才能看到 i faulted at va deadbeef err 6这个在屏幕上通过cprintf的输出信息
这种机制非常棒!你会发现,它保护了系统!!!用户是可以触发page fault但是用户的page fault不会导致系统挂掉.不会panic,只是返回给用户信息就好.这和我们常常写的普通C 程序防止页面非法读写的原理是一样的,
我们常常遇到的"core dump""段错误" (给非法的地址写入值),就是这种防范机制.
你还是不至于写个用户C程序就吧系统给玩挂了吧...禁不住感叹,真的很精彩啊!哈哈
比较左右两个用户程序,不同的就是左边调用的cprintf而右边调用的是 sys_cputs
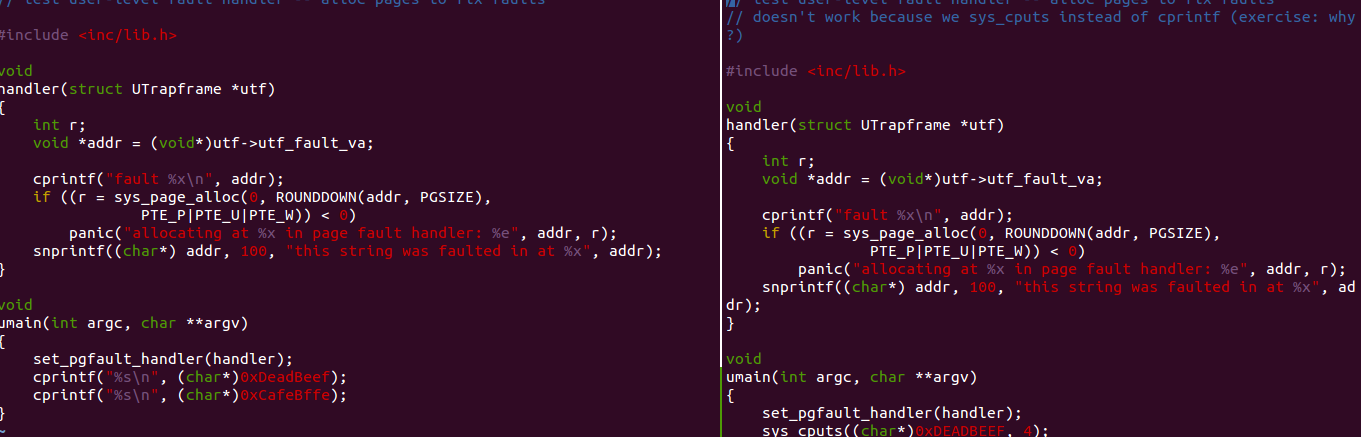
结果是左边正常触发用户态的page fault handler,而右边的会被断言挂掉
问题的本质就在于sys_cputs本身就是个系统调用哇...压根就跳过了trap_dispatch那一步...没别的
Implementing CopyonWrite Fork
You now have the kernel facilities to implement copyonwrite fork() entirely in user space.
直接贴结果了.代码去这里看吧,有点长.
https://github.com/jasonleaster/MIT_JOS_2014/tree/lab4
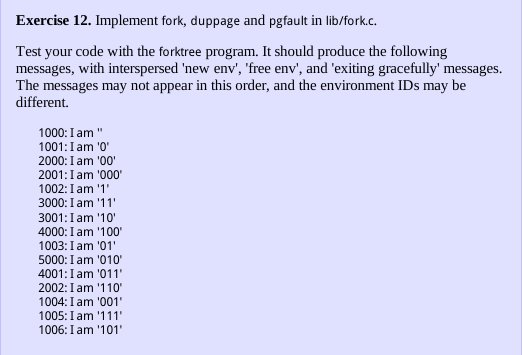
用户程序是这样的:
// Fork a binary tree of processes and display their structure.

#include <inc/lib.h>

#define DEPTH 3

void forktree(const char *cur);

void
forkchild(const char *cur, char branch)
{
	char nxt[DEPTH+1];

	if (strlen(cur) >= DEPTH)
		return;

	snprintf(nxt, DEPTH+1, "%s%c", cur, branch);
	if (fork() == 0) {
		forktree(nxt);
		exit();
	}
}

void
forktree(const char *cur)
{
	cprintf("%04x: I am '%s'\n", sys_getenvid(), cur);

	forkchild(cur, '0');
	forkchild(cur, '1');
}

void
umain(int argc, char **argv)
{
	forktree("");
}
forktree()输入一个初始的空字符这个函数又会调用forkchild.
forkchild()是个递归函数,父进程会返回,而子进程又会调用forktree(),知道递归的深度达到3之后就会返回,因此我们最多能看到的是子进程"111"
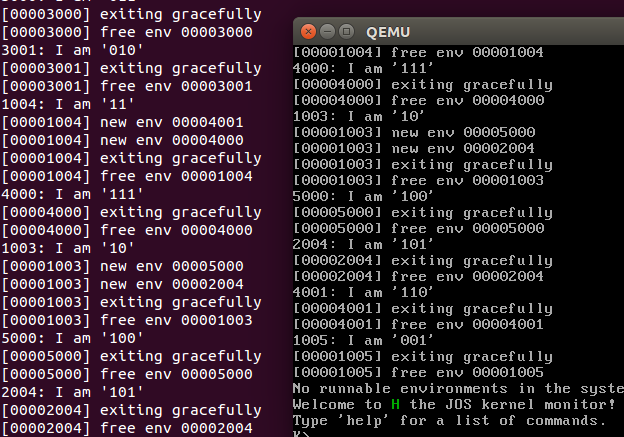
copy on write技术的核心思想就是先不要拷贝进程的进程空间到子进程中,如果一旦子进程尝试写入操作,那么再触发用户态的page fault,进而调用trap_dispatch(),会有配置好的用户态page fault handler去处理这个错误,这个handler实质上就是lib/fork.c里面的pgfault()函数.这个函数会把父进程的东东拷贝到子进程
Part C: Preemptive Multitasking and InterProcess communication (IPC)

去kern/trap.c里面的trap_dispatch()补好下面这部分.具体的还是去我github看比较保险
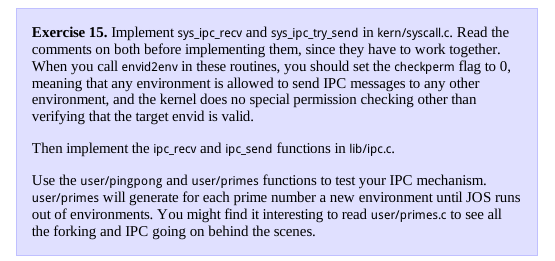
InterProcess communication (IPC)
我都不想写下去了...啰嗦的shi...
心情好的时候再更吧
我希望以后的笔记贴更倾向于理论的分析,不过多的贴代码解答.代码直接去github自己看就好.对应的lab分支里都能找到.有心人自会去看.希望有机会一起交流讨论.
linus不是说过么"RTFSC"
: )
我的个神啊...lab4略微震撼..真的很爽
也终于算是告一段落.后续会持续更新,把笔记贴写的更清楚,详细.


 1万+
1万+


 被折叠的 条评论
为什么被折叠?
被折叠的 条评论
为什么被折叠?
 到【灌水乐园】发言


