


微信小程序连接蓝牙打印机示例
小程序连接蓝牙打印机打印文本与二维码等示例在 github 上都能找到一些,唯独打印图片这个案例几乎没有。希望能帮助到有打印图片需求的小伙伴。
- 测试打印机:凯盛诺 PTP-II-UBC 58mm 便携热敏打印机
- 测试环境有:Android微信 , IOS微信;其中 Android 和 IOS 在打印文本与二维码速率相对一致,但 IOS 打印图片几乎慢到无法打印的情况(听说蓝牙打印机在 IOS 中受限制,需要与 IOS 合作授权,在斑马品牌的一款打印机用 IOS 就能打印出来。即使是 Android ,小程序打印图片比打印文本会慢许多,并不是打印机的问题,而是小程序只能使用低功率蓝牙,受限在一次发送 20 个字节的数据,需要分段递归发送,图片数据可以达到几万、几十万个字节。)
- 打印机指令类型:ESC/POS 指令集 (打印机产家都会提供对应的指令文档,此 demo 中使用十进制的数据格式的指令,十六进制的指令或者更多指令的使用方式可以参考另一个示例小程序蓝牙打印 miniprogram-bluetoothprinter)
示例功能
- 连接蓝牙打印机
- 打印文本 (打印中文出现乱码,因为打印机默认的编码是 GB2312,需要将 UTF-8 转 GB2312,这里用的轻小的GBK 库,也可以使用text-encoding)
- 打印二维码(使用指令打印内置二维码样式,或者用图片方式打印定制二维码)
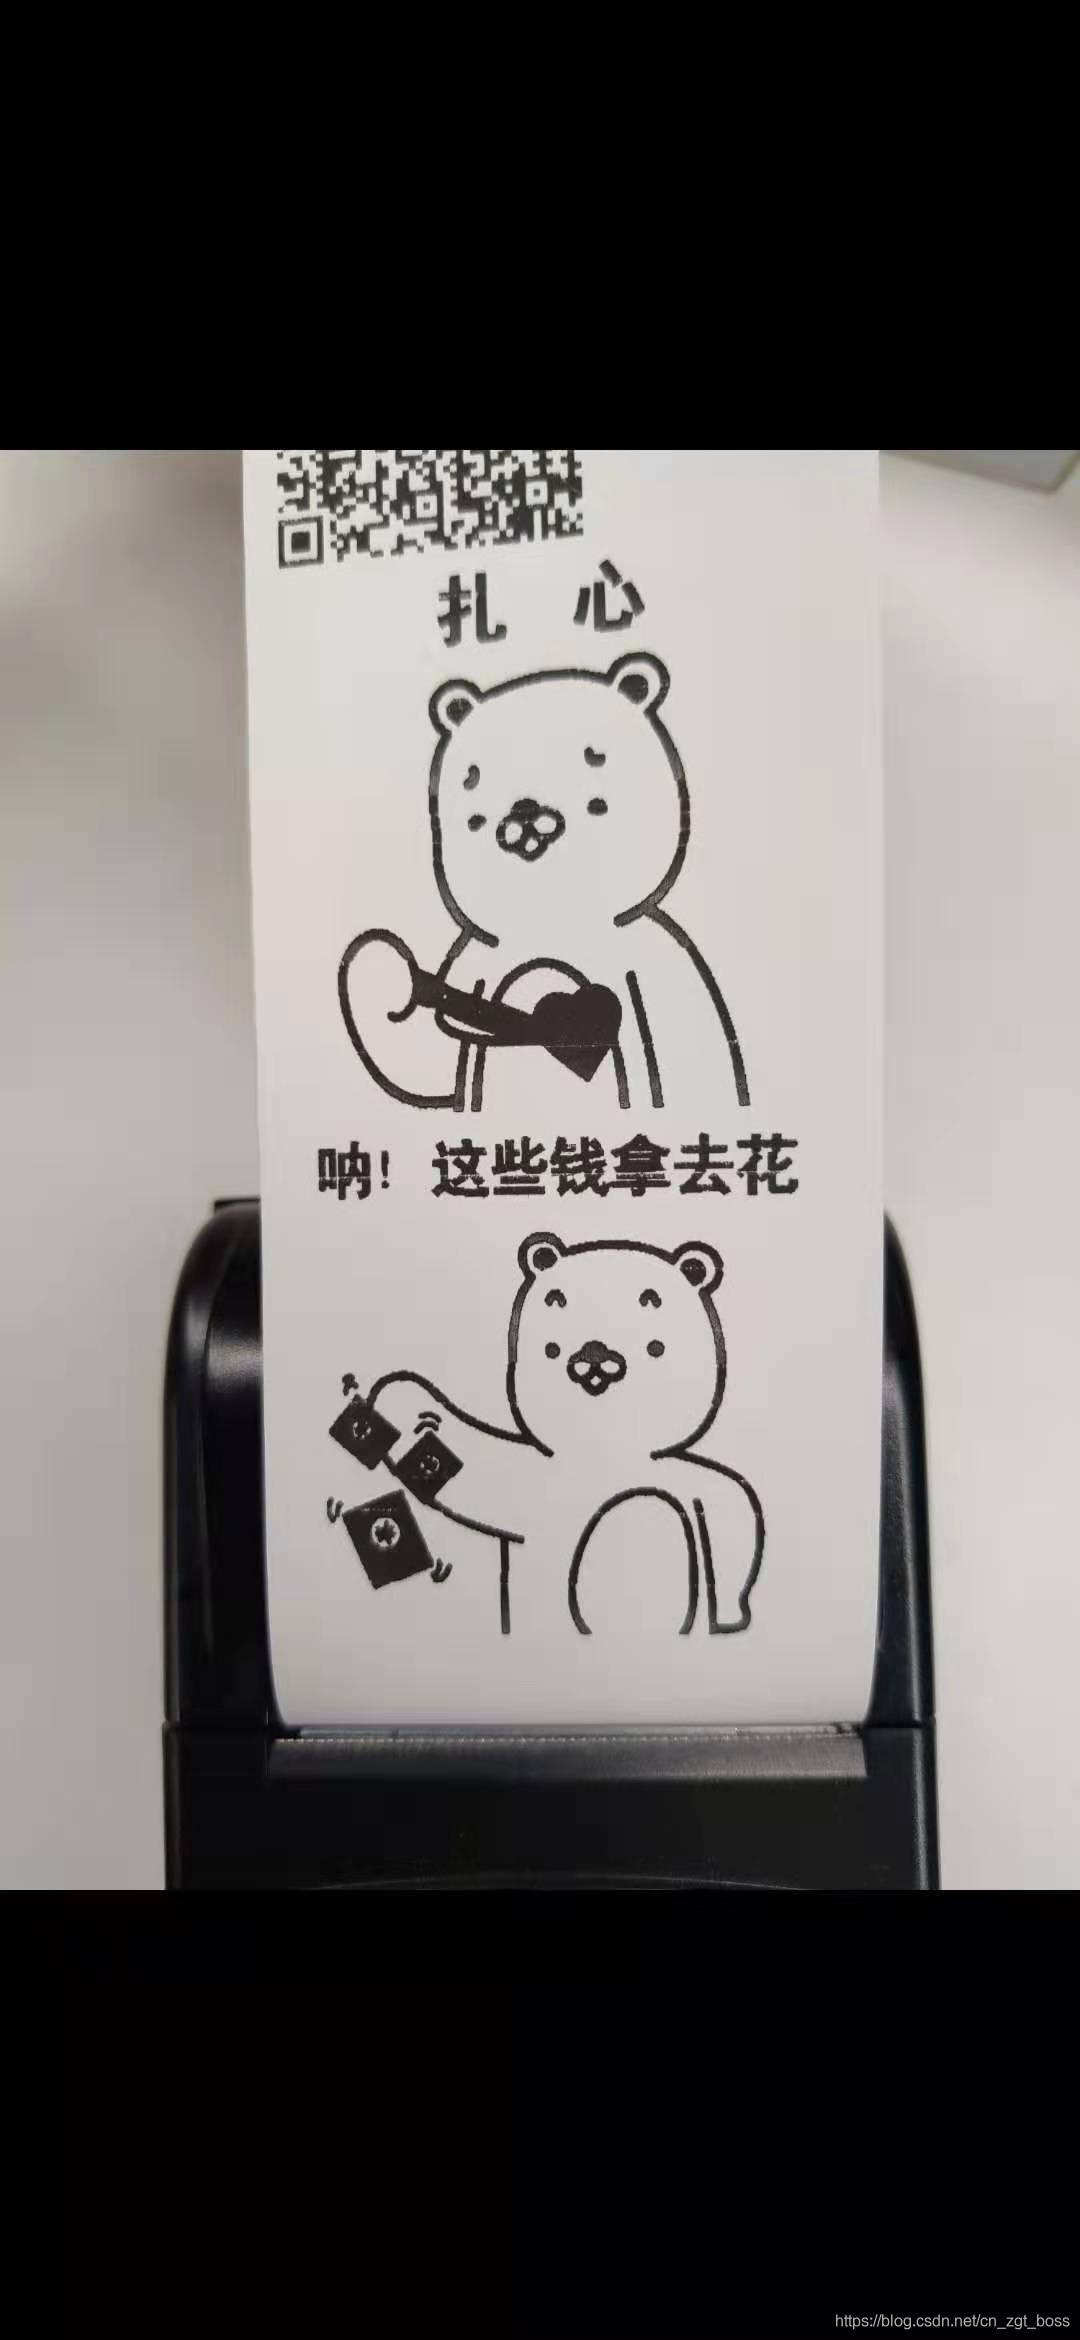
- 打印任意图片(此示例的重点, canvas 绘制图片,wx.canvasGetImageData()取得 Uint8ClampedArray后再转成位图数据,使用
图片水平取模数据打印指令打印位图数据)
效果图
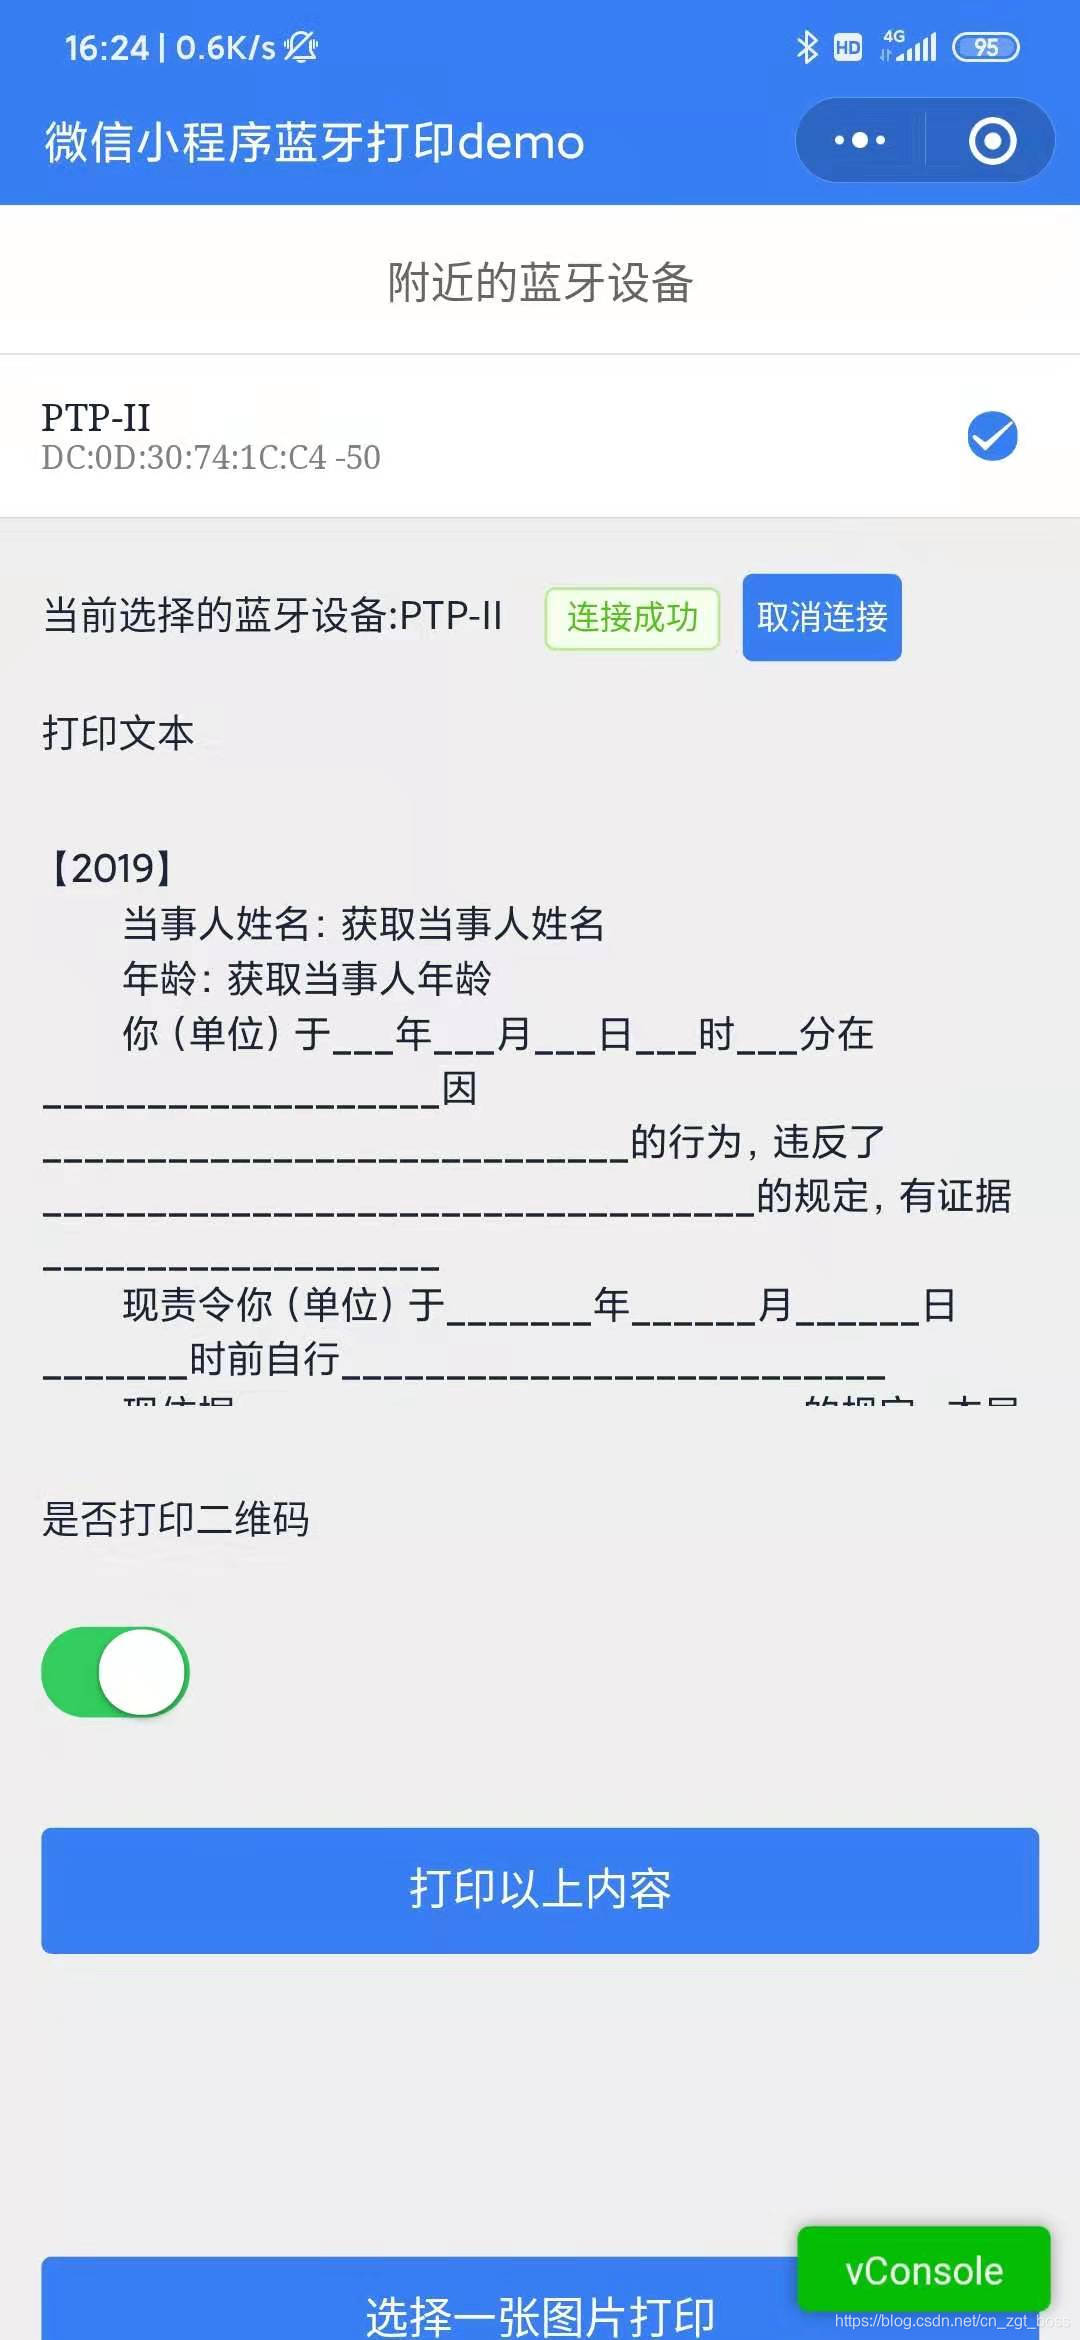


Demo 中连接打印机的流程
- 初始化蓝牙模块 wx.openBluetoothAdapter()
- 初始化完成后搜寻附近的蓝牙设备 wx.startBluetoothDevicesDiscovery()
- 监听寻找到新设备的事件 wx.onBluetoothDeviceFound()
- 在监听寻找到新设备的事件回调中获取所有蓝牙设备列表 wx.getBluetoothDevices()
- 连接低功耗蓝牙设备 wx.createBLEConnection()
- 连接成功后获取蓝牙设备服务 wx.getBLEDeviceServices()
- 在服务中取(notify=true || indicate=true) && write=true 的特征值的 uuid: wx.getBLEDeviceCharacteristics()
- 完成后停止搜寻 wx.stopBluetoothDevicesDiscovery()
- 向低功耗蓝牙设备特征值中写入二进制数据 wx.writeBLECharacteristicValue()
- 离开页面时取消蓝牙连接 wx.closeBLEConnection()
- 关闭蓝牙模块 wx.closeBluetoothAdapter()
关于找蓝牙设备中能用的 Characteristic,这里贴出对应的代码,关注注释部分
/**
 * 以Promise方式调用 微信api
 * @param {string} name 微信api的名称 ,如 wxAsyncPromise("getSystemInfo",options)
 * @param {object} options 除了success 和 fail 的其他参数
 * @returns
 */
export function wxAsyncPromise(name, options) {
    return new Promise((resolve, reject) => {
        wx[name]({
            ...(options || {}),
            success: function (res) {
                resolve(res);
            },
            fail: function (res) {
                reject(res);
            },
        });
    });
}
//在多个服务services中递归查找能用的特征值
//deviceId : 已连接的蓝牙设备id
//services : wx.getBLEDeviceServices()取得的服务
export function getDeviceCharacteristics(deviceId, services = [], success, fail) {
    services = services.slice(0);
    if (services.length) {
        const serviceId = services.shift().uuid;
        wxAsyncPromise('getBLEDeviceCharacteristics', {
            deviceId,
            serviceId,
        })
            .then((res) => {
                console.log('getBLEDeviceCharacteristics', deviceId, serviceId, res);
                let finished = false;
                let write = false;
                let notify = false;
                let indicate = false;
                //有斑马品牌的一款打印机中res.characteristics的所有uuid都是相同的,
                //找所有的properties存在(notify || indicate) && write(如果只写入数据只要write=true也可以)这种情况就说明这个uuid是可用的
                //(不确保所有的打印机都能用这种方式取得uuid,
                //在凯盛诺打印机的res.characteristic只有一个uuid,所以也能用这个方式)
                for (var i = 0; i < res.characteristics.length; i++) {
                    if (!notify) {
                        notify = res.characteristics[i].properties.notify;
                    }
                    if (!indicate) {
                        indicate = res.characteristics[i].properties.indicate;
                    }
                    if (!write) {
                        write = res.characteristics[i].properties.write;
                    }
                    if ((notify || indicate) && write) {
                        /* 获取蓝牙特征值uuid */
                        success &&
                            success({
                                serviceId,
                                characteristicId: res.characteristics[i].uuid,
                            });
                        finished = true;
                        break;
                    }
                }

                if (!finished) {
                    getDeviceCharacteristics(deviceId, services, success, fail);
                }
            })
            .catch((res) => {
                getDeviceCharacteristics(deviceId, services, success, fail);
            });
    } else {
        fail && fail();
    }
}
打印图片
图片来源
在 Demo 中手机选任意一张图片用 canvas 绘制,wx.canvasGetImageData()取得 Uint8ClampedArray 类型的图像像素点数据。
位图数据
需要把 Uint8ClampedArray 类型的数据转成打印机识别的点阵位图数据(也可以让后台实现图片转位图数据,参考热敏打印机编程 ESC/POS 指令)。
不同打印机厂家的指令集可能不同,但打印图片的位图数据是一样的。
贴出 Uint8ClampedArray 转位图数据的代码
function grayPixle(pix) {
    return pix[0] * 0.299 + pix[1] * 0.587 + pix[2] * 0.114;
}
/**
 * overwriteImageData
 * @param {object} data
 * {
            width,//图片宽度
            height,//图片高度
            imageData,//Uint8ClampedArray
            threshold,//阈值
    }
 */
export function overwriteImageData(data) {
    let sendWidth = data.width,
        sendHeight = data.height;
    const threshold = data.threshold || 180;
    let sendImageData = new ArrayBuffer((sendWidth * sendHeight) / 8);
    sendImageData = new Uint8Array(sendImageData);
    let pix = data.imageData;
    const part = [];
    let index = 0;
    for (let i = 0; i < pix.length; i += 32) {
        //横向每8个像素点组成一个字节(8位二进制数)。
        for (let k = 0; k < 8; k++) {
            const grayPixle1 = grayPixle(pix.slice(i + k * 4, i + k * 4 + (4 - 1)));
            //阈值调整
            if (grayPixle1 > threshold) {
                //灰度值大于threshold位   白色 为第k位0不打印
                part[k] = 0;
            } else {
                part[k] = 1;
            }
        }
        let temp = 0;
        for (let a = 0; a < part.length; a++) {
            temp += part[a] * Math.pow(2, part.length - 1 - a);
        }
        //开始不明白以下算法什么意思,了解了字节才知道,一个字节是8位的二进制数,part这个数组存的0和1就是二进制的0和1,传输到打印的位图数据的一个字节是0-255之间的十进制数,以下是用权相加法转十进制数,理解了这个就用上面的for循环替代了
        // const temp =
        //     part[0] * 128 +
        //     part[1] * 64 +
        //     part[2] * 32 +
        //     part[3] * 16 +
        //     part[4] * 8 +
        //     part[5] * 4 +
        //     part[6] * 2 +
        //     part[7] * 1;
        sendImageData[index++] = temp;
    }
    return {
        array: Array.from(sendImageData),
        width: sendWidth / 8,
        height: sendHeight,
    };
}
贴出递归发送二进制数据到蓝牙的代码
/**
 * sendDataToDevice
 * @param {object} options
 * {
            deviceId,
            serviceId,
            characteristicId,
            value [ArrayBuffer],
            lasterSuccess,
    }
 */
export function sendDataToDevice(options) {
    let byteLength = options.value.byteLength;
    //这里默认一次20个字节发送
    const speed = options.onceByleLength || 20;
    if (byteLength > 0) {
        wxAsyncPromise('writeBLECharacteristicValue', {
            ...options,
            value: options.value.slice(0, byteLength > speed ? speed : byteLength),
        })
            .then((res) => {
                if (byteLength > speed) {
                    sendDataToDevice({
                        ...options,
                        value: options.value.slice(speed, byteLength),
                    });
                } else {
                    options.lasterSuccess && options.lasterSuccess();
                }
            })
            .catch((res) => {
                console.log(res);
            });
    }
}
贴出发送逐行图片数据的代码
// 使用的 ESC/POS指令, 十进制方式
// 更多指令请查看 ./PrintCommandDocs/ESC-POS指令文档(凯盛诺打印机代表).pdf

export const printCommand = {
    left: [27, 97, 0], //居左
    center: [27, 97, 1], //居中
    right: [27, 97, 2], //居右
    clear: [27, 64], //初始化
    enter: [10],
};
/**
 * printImage
 * @param {object} opt
 * {
            deviceId,//蓝牙设备id
            serviceId,//服务id
            characteristicId,//可用特征值uuid
            lasterSuccess , //最后完成的回调
            onProgress, //每段发送完成的回调
	}
 * @param {object} imageInfo // 由overwriteImageData返回的对象
 */
/**2022-04-19对printImage做了修复处理,请往下看,这里只是留个记录*/
export function printImage(opt = {}, imageInfo = {}) {
    const { printAlign = 'left' } = opt;
    let arr = imageInfo.array,
        width = imageInfo.width;
    const writeArray = [];
    const xl = width % 256;
    const xh = width / 256;
    //分行发送图片数据
    const command = []
        .concat(printCommand.clear)
        .concat(printCommand[printAlign])
        .concat([29, 118, 48, 0, xl, xh, 1, 0]);
    for (let i = 0; i < arr.length / width; i++) {
        const subArr = arr.slice(i * width, i * width + width);
        const tempArr = command.concat(subArr);
        writeArray.push(new Uint8Array(tempArr));
    }
    const len = writeArray.length;
    const print = (options, writeArray) => {
        if (writeArray.length) {
            sendDataToDevice({
                ...options,
                value: writeArray.shift().buffer,
                lasterSuccess: () => {
                    options.onProgress && options.onProgress(Math.floor(((len - writeArray.length) / len) * 100));
                    if (writeArray.length) {
                        print(options, writeArray);
                    } else {
                        options.lasterSuccess && options.lasterSuccess();
                    }
                },
            });
        }
    };
    print(opt, writeArray);
}
2022-04-19更新
打印图片某些情况会出现乱码,这个问题之前不知道如何复现出来,有道友反馈修改图片打印宽度时会变形甚至乱码,是什么原因也没有头绪,最近又看了一些内容,发现图片打印时的宽度应该是8的整数倍才行,我测试的打印机最大宽度时384,也是8的整数倍,所以打印很正常。在github的demo中处理了这个问题,也可以随意的修改打印宽度。主要处理如下:
pages/blueList/index.js
{
  chooseImage() {
        const ctx = wx.createCanvasContext('secondCanvas');
        //选择一张图片
        wx.chooseImage({
            success: (res) => {
                const tempFilePath = res.tempFilePaths[0];
                wx.getImageInfo({
                    src: tempFilePath,
                    success: (res) => {
                        // 打印宽度须是8的整数倍,这里处理掉多余的,使得宽度合适,不然有可能乱码
                        const mw = this.data.paperWidth % 8;
                        const w = mw === 0 ? this.data.paperWidth : this.data.paperWidth - mw;
                        // 等比算出图片的高度
                        const h = Math.floor((res.height * w) / res.width);
                        // 设置canvas宽高
                        this.setData({
                            img: tempFilePath,
                            canvasHeight: h,
                            canvasWidth: w,
                        });
                        // 在canvas 画一张图片
                        ctx.fillStyle = 'rgba(255,255,255,1)';
                        ctx.clearRect(0, 0, w, h);
                        ctx.fillRect(0, 0, w, h);
                        ctx.drawImage(tempFilePath, 0, 0, w, h);
                        ctx.draw(false, () => {
                            wx.hideLoading();
                        });
                    },
                    fail: (res) => {
                        console.log('get info fail', res);
                        wx.hideLoading();
                    },
                });
            },
        });
    }
}
还有printImage方法的改动,wx-weapp-tool/bluetoolth.js
/**
 *
 * @export
 * @param {object} options
 * {
            deviceId,
            serviceId,
            characteristicId,
			lasterSuccess,
            onProgress,
    }
 *  * @param {array} allUint8Array  所有的Uint8Array
 */
export function sendDataToPrint(options, allUint8Array) {
    const allLenth = allUint8Array.length;
    const writeArrayCopyer = allUint8Array.slice(0);
    const print = (options, writeArray) => {
        if (writeArray.length) {
            sendDataToDevice({
                ...options,
                value: writeArray.shift().buffer,
                lasterSuccess: () => {
                    options.onProgress &&
                        options.onProgress(Math.floor(((allLenth - writeArray.length) / allLenth) * 100));
                    if (writeArray.length) {
                        print(options, writeArray);
                    } else {
                        options.lasterSuccess && options.lasterSuccess();
                    }
                },
            });
        }
    };
    print(options, writeArrayCopyer);
}
/**
 * 获取打印图片的指令
 *
 * @export
 * @param {object} options
 * {
           lineByLine, // 是否逐行打印,默认true
    }
  * @param {object} imageInfo overwriteImageData 得到的位图数据数组和宽高信息
    {
        array,
        width,
        height
    }
 */
export function getImageCommandArray(opt = {}, imageInfo = {}) {
    const lineByLine = typeof opt.lineByLine !== 'boolean' ? true : opt.lineByLine;
    const width = imageInfo.width;
    const h = imageInfo.height;
    const xl = width % 256;
    const xh = (width - xl) / 256;
    const yl = h % 256;
    const yh = (h - yl) / 256;
    //打印图片的十进制指令数组
    let command = [];

    if (lineByLine) {
        // 分段逐行的指令
        command = command.concat([29, 118, 48, 0, xl, xh, 1, 0]);
    } else {
        // 非分段逐行的指令
        command = command.concat([29, 118, 48, 0, xl, xh, yl, yh]);
    }

    return command;
}
/**
 * 获取一张图片数据与指令整合的writeArray,结合 sendDataToPrint 发送二进制数据到蓝牙打印机
 * @param {object} options
 * {
           lineByLine, // 是否逐行打印,默认true
           printAlign, // 打印的位置
    }
  * @param {object} imageInfo overwriteImageData 得到的位图数据数组和宽高信息
    {
        array,
        width,
        height
    }
 */
export function getPrintImageWriteArray(opt = {}, imageInfo = {}) {
    const lineByLine = typeof opt.lineByLine !== 'boolean' ? true : opt.lineByLine;
    const width = imageInfo.width;
    let arr = imageInfo.array;
    let writeArray = [];
    const iniTcommand = [].concat(printCommand.clear).concat(printCommand[opt.printAlign || 'left']);
    const command = getImageCommandArray(opt, imageInfo);
    writeArray.push(new Uint8Array(iniTcommand));
    // 分段逐行打印的数据
    if (lineByLine) {
        for (let i = 0; i < arr.length / width; i++) {
            const subArr = arr.slice(i * width, i * width + width);
            const tempArr = command.concat(subArr);
            writeArray.push(new Uint8Array(tempArr));
        }
    } else {
        // 非逐行打印
        writeArray.push(new Uint8Array(command.concat(arr)));
    }
    // writeArray.push(new Uint8Array([27, 74, 3]));
    return writeArray;
}
/**
 * 只打印一张图片数据的方法
 * @param {object} options
 * {
            deviceId,
            serviceId,
            characteristicId,
			lasterSuccess,
            onProgress,
            printAlign, "left"|"right"|"center"
    }
 * @param {object} imageInfo overwriteImageData 得到的位图数据数组和宽高信息
    {
        array,
        width,
        height
    }
 */

export function printImage(opt, imageInfo) {
    sendDataToPrint(
        opt,
        getPrintImageWriteArray(
            {
                printAlign: opt.printAlign,
                lineByLine: opt.lineByLine,
            },
            imageInfo,
        ),
    );
}
打印机指令文档
在demo源码中的 PrintCommandDocs目录有 ESC-POS和CPCL两种类型的pdf指令文档


 2150
2150


 被折叠的 条评论
为什么被折叠?
被折叠的 条评论
为什么被折叠?
 到【灌水乐园】发言


