


今天就开始投入到RN项目了,做后端出生,写Android和iOS确实有点勉强,不过还是要把这段经历记录下来。
要实现的功能界面如下:
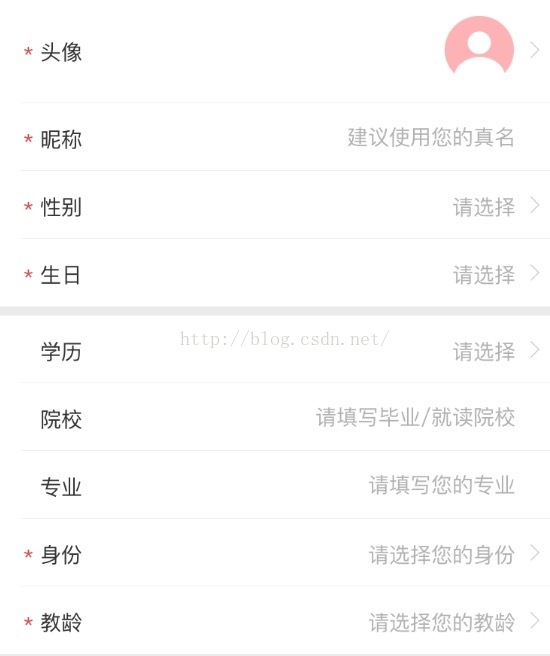
这个是最简单的Form表单,第一步实现界面吧,不管点击效果,不管筛选控件...
思路:
我把这几类控件分为了3类:
1、带头像的一行抽取成一个组件
2、带输入框 TextInput的抽象成一个组件
3、带选择项的抽取成一个组件
首页直接引用这3个组件
首页代码:
/**
 * Sample React Native App
 * https://github.com/facebook/react-native
 * @flow
 */

import React, { Component } from 'react';
import {
  AppRegistry,
  StyleSheet,
  Text,
  View,
  TextInput
} from 'react-native';

import TextInputWidget from './TextInputWidget.js';
import TextTipsWidget from './TextTipsWidget';
import TextImageWidget from './TextImageWidget.js';


class Demo extends Component {

  constructor(props){
    super(props);
  }

  render() {
    return (
      <View style={styles.container}>
        <TextImageWidget
          title='* 头像' />

        <TextInputWidget
          title='* 昵称'
          placeholder='请输使用您的真实姓名' />

        <TextTipsWidget
          title='* 性别' tips='请选择' onPress={this.showSex.bind(this)}/>

        <TextTipsWidget
            title='* 生日' tips='请选择'/>

        <View style={{height:3}}/>

        <TextTipsWidget
            title='  学历' tips='请选择'/>

        <TextInputWidget
          title='  院校'
          placeholder='请填写毕业/就读院校' />

        <TextInputWidget
          title='  专业'
          placeholder='请填写您的专业' />

        <TextTipsWidget
            title='* 身份' tips='请选择您的身份'/>

        <TextTipsWidget
            title='* 教龄' tips='请选择您的教龄'/>
      </View>
    );
  }

  //todo  弹出选择 性别控件
  showSex(){

    alert('1');
  }
}

const styles = StyleSheet.create({
  container: {
    flex: 1,
    marginTop:20, //去除状态栏图标
    backgroundColor: 'gray',
  },
});

AppRegistry.registerComponent('Demo', () => Demo);
带头像的组件:TextTipsWidget
import React, { Component } from 'react';
var {
  StyleSheet,
  View,
  Text,
  Image,
  TextInput,
  PixelRatio,
  Dimensions
} = require('react-native')


var screenWidth = Dimensions.get('window').width;


export default class TextImageWidget extends Component{

    constructor(props) {
      super(props);
    }

  _renderRow() {
    return (
      <View style={styles.rowContainer}  >
        <View style={styles.row}>
          <Text
            numberOfLines={1}
            style={styles.textInputTitle} >
            {this.props.title}
          </Text>
          <View style={styles.textImage}>
            <Image source={require('./img/defailHead.png')} style={styles.image} />
          </View>
          <View style={styles.rightArrow}>
            <Image source={require('./img/rightArrow.png')}  />
          </View>
        </View>
      </View>
    );

  }

  render() {
    return this._renderRow();
  }
}

const styles = StyleSheet.create({
    rowContainer: {
      backgroundColor: '#FFF',
      width:screenWidth,
    },
    row: {
      flexDirection: 'row',
      height: 44,
      alignItems: 'center',
      marginRight: 15,
      marginLeft: 15,
      //paddingTop:15,
      borderBottomWidth: 0.5 / PixelRatio.get(),
      borderColor:'gray',//需要标色

    },
    textInputTitle: {
      width: 80,
      fontSize: 13,
      //color: '#333',
      //backgroundColor: 'red',
    },
    textImage: {
      flex: 1,
      height: 44,// @todo should be changed if underlined
      justifyContent:'flex-end',
      flexDirection: 'row',

    },
    image:{
      width:38,
      height:38,
      backgroundColor:'gray',
      borderRadius: 19,
    },
    rightArrow:{
      paddingLeft:10,
      //backgroundColor:'red',

    }

  });
由于另外两个组件和TextImageWidget类似,所以就不贴源码了。
这个Demo界面写的很粗糙,只是实现了功能,还有需要优化的地方:
1、* 号的处理
2、组件封装的不彻底,通用性不够
大家有什么好建议,可以留言。


 1703
1703


 被折叠的 条评论
为什么被折叠?
被折叠的 条评论
为什么被折叠?
 到【灌水乐园】发言


