


WebService体系之——与spring的整合
摘要:好处意义什么的不再赘述、前面讲的东西也都是对webservice的认识、知道它基本的实现步骤、学习最终的目的就是应用、而spring在项目中的出镜率已经爆表、本篇笔记就是两者的整合的过程。
一:简介
spring与webservice的整合很简单、如过对spring有所了解的话、不难猜想两者是如何结合的、我们使用spring的目的就是看重他的依赖注入功能、可以为我们通过配置文件自动生成bean、同时可以将我们指定的属性设置好、那么两者的整合肯定是通过配置spring的配置文件、让spring为我们生成项目运行中需要使用的关于webservice的bean、并且有我们想要的一切!
1、新建web项目。
2、引入jar包。
3、修改web.xml。
4、创建服务端webservice接口。
5、实现服务端webservice接口实现类。
6、新建spring的配置文件
7、将项目发布到Tomcat服务器中、并启动。
8、访问地址:有结果则说明webservice发布成功。
9、新建测试类测试webservice发布的接口。
二:同一项目下具体的实现步骤
1、创建web项目。右键。。新建。。。
2、jar包的引入:前面提到过、下载下来的jar包中有一部分是spring的jar、当时没有过多提及、在这里就自然而然的想到是两者整合需要的jar包、我们直接将lib文件夹拷贝到项目的WEB-INFO下面即可。
3、web.xml的配置:主要配置spring监听和配置文件加载位置以及CXF的配置。具体代码:
<?xml version="1.0" encoding="UTF-8"?>
<web-app version="2.5" xmlns="http://java.sun.com/xml/ns/javaee"
	xmlns:xsi="http://www.w3.org/2001/XMLSchema-instance"
	xsi:schemaLocation="http://java.sun.com/xml/ns/javaee
	http://java.sun.com/xml/ns/javaee/web-app_2_5.xsd">
	<welcome-file-list>
		<welcome-file>index.jsp</welcome-file>
	</welcome-file-list>

	<context-param>
		<param-name>contextConfigLocation</param-name>
		<param-value>classpath*:applicationContext-server.xml</param-value>
	</context-param>

	<!-- Spring 配置 -->
	<listener>
		<listener-class>org.springframework.web.context.ContextLoaderListener</listener-class>
	</listener>
	<listener>
		<listener-class>org.springframework.web.util.IntrospectorCleanupListener</listener-class>
	</listener>

	<!-- WebServices设置 -->
    <servlet>
        <servlet-name>CXFServices</servlet-name>
        <servlet-class>org.apache.cxf.transport.servlet.CXFServlet</servlet-class>
        <load-on-startup>0</load-on-startup>
    </servlet>
    <servlet-mapping>
        <servlet-name>CXFServices</servlet-name>
        <url-pattern>/services/*</url-pattern>
    </servlet-mapping>
</web-app>
4、创建服务端webservice接口——HelloService:
package com.chy.ws.service;

import javax.jws.WebService;

@WebService
public interface HelloService {
	public String sayHello(String name);
}
5、实现服务端webservice接口实现类——HelloServiceImpl:
package com.chy.ws.service;

import javax.jws.WebService;

@WebService(endpointInterface="com.chy.ws.service.HelloServiceImpl")
public class HelloServiceImpl implements HelloService {

	public String sayHello(String name) {
		return "hello " + name;
	}
}
6、在web.xml中指定的spring配置文件的加载位置:src下新建applicationContext-server.xml:
<?xml version="1.0" encoding="UTF-8"?>
<beans  xmlns="http://www.springframework.org/schema/beans"
        xmlns:xsi="http://www.w3.org/2001/XMLSchema-instance"
        xmlns:jaxws="http://cxf.apache.org/jaxws"
        xsi:schemaLocation="
            http://www.springframework.org/schema/beans
            http://www.springframework.org/schema/beans/spring-beans-3.0.xsd
            http://cxf.apache.org/jaxws
            http://cxf.apache.org/schemas/jaxws.xsd">

    <!-- Import apache CXF bean definition 固定-->
    <import resource="classpath:META-INF/cxf/cxf.xml" />
    <import resource="classpath:META-INF/cxf/cxf-extension-soap.xml" />
    <import resource="classpath:META-INF/cxf/cxf-servlet.xml" />

    <!-- services接口配置 -->
    <bean id="helloServicesBean" class="com.chy.ws.service.HelloServiceImpl" />

    <!-- CXF 配置WebServices的服务名及访问地址 -->
    <jaxws:server id="helloService" address="/HelloService" serviceClass="com.chy.ws.service.HelloService">
            <jaxws:serviceBean>
                <ref bean="helloServicesBean"/>
            </jaxws:serviceBean>
    </jaxws:server>
</beans>
7、将项目发布到Tomcat服务器中、并启动。
8、访问地址:http://localhost:8080/services 若有结果则服务发布成功。
9、新建测试类——HelloServiceClient代码:
package com.chy.ws.service.client;

import org.apache.cxf.jaxws.JaxWsProxyFactoryBean;

import com.chy.ws.service.HelloService;

public class HelloServiceClient {
	public static void main(String[] args) {
		invokByJava();
	}

	public static void invokByJava(){
		JaxWsProxyFactoryBean factory = new JaxWsProxyFactoryBean();
		factory.setServiceClass(HelloService.class);
		factory.setAddress("http://localhost:8080/webservice_spring_server/services/HelloService");
		HelloService helloService = (HelloService)factory.create();
		System.out.println(helloService.sayHello("andyChen"));
	}
}
三:不同项目下客户端具体的实现步骤
1、实现服务端。
2、创建web项目、引入jar包、和前面一样。
3、配置web.xml——主要配置spring监听、配置文件的加载路径。
4、创建与服务器端一样的接口(注意名称、包名也要一样、可以直接拷贝)——HelloService代码与服务端相同。
5、spring配置文件applicationContext-client.xml:
<?xml version="1.0" encoding="UTF-8"?>
<beans  xmlns="http://www.springframework.org/schema/beans"
        xmlns:xsi="http://www.w3.org/2001/XMLSchema-instance"
        xmlns:jaxws="http://cxf.apache.org/jaxws"
        xsi:schemaLocation="
            http://www.springframework.org/schema/beans
            http://www.springframework.org/schema/beans/spring-beans-3.0.xsd
            http://cxf.apache.org/jaxws
            http://cxf.apache.org/schemas/jaxws.xsd">
    <!-- Import apache CXF bean definition -->
    <import resource="classpath:META-INF/cxf/cxf.xml" />
    <import resource="classpath:META-INF/cxf/cxf-extension-soap.xml" />
    <import resource="classpath:META-INF/cxf/cxf-servlet.xml" />

    <!-- CXF webservices 客户端配置 -->
    <jaxws:client id="helloClient" serviceClass="com.chy.ws.service.HelloService"
            address="http://localhost:8080/webservice_spring_server/services/HelloService">
    </jaxws:client>
</beans>
6、发布、启动。
7、新建测试类:此时我们可以有两种选择:一种是使用原始的方式获取服务端、另一种是使用spring获取服务端——HelloServiceClient:
package com.chy.ws.service.test;
import org.apache.cxf.jaxws.JaxWsProxyFactoryBean;
import org.springframework.context.ApplicationContext;
import org.springframework.context.support.ClassPathXmlApplicationContext;
import com.chy.ws.service.HelloService;
public class HelloServiceClient {
public static void main(String[] args) {
invokByJava();
}
/**
* use spring's application context method to obtain web service.
*/
public static void invokBySpring(){
ApplicationContext context = new ClassPathXmlApplicationContext("applicationContext-client.xml");
HelloService helloService = context.getBean("helloClient", HelloService.class);
System.out.println(helloService.sayHello("andyChen"));
}
/**
* use original method to obtain web service.
*/
public static void invokByJava(){
JaxWsProxyFactoryBean factory = new JaxWsProxyFactoryBean();
factory.setServiceClass(HelloService.class);
factory.setAddress("http://localhost:8080/webservice_spring_server/services/HelloService");
HelloService helloService = (HelloService)factory.create();
System.out.println(helloService.sayHello("andyChen"));
}
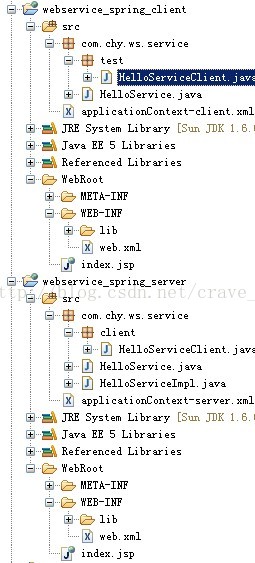
}四:补充
完整项目图:


 被折叠的 条评论
为什么被折叠?
被折叠的 条评论
为什么被折叠?
 到【灌水乐园】发言


