


Mybatis使用之查询详解
一:简介
此篇主要知识点:
1、sql语句块
2、select标签属性
3、ResultMap 标签配置
4、一对一关联
5、一对多关联
6、多对多关联
7、嵌套查询
二:SQL语句块
2.1 作用
SQL元素可以被用来定义可重用的SQL 代码段,可以包含在其他语句中。比如在项目中常常做的分页查询、分别需要两条SQL语句、一条是查询所有具体记录信息、另一条需要查询记录数、而两条语句的where条件是一样的。这种类似情况就可以使用SQL语句块来简化配置信息。
2.2 实例
2.2.1 SQL语句定义:
<sql id="queryColumns"> id, username, password </sql>2.2.2 使用:
    <select id="queryAuthor" parameterType="int" resultType="author">
        SELECT
        <include refid="queryColumns"/>
        FROM author
        WHERE id = #{id}
    </select>
三:select标签属性
3.1 标签属性集合:
<select

 id="selectPerson"

 parameterType="int"

 parameterMap="deprecated"

 resultType="hashmap"

 resultMap="personResultMap"

 flushCache="false"

 useCache="true"

 timeout="10000"

 fetchSize="256"

 statementType="PREPARED"

 resultSetType="FORWARD_ONLY">
3.2具体意义:
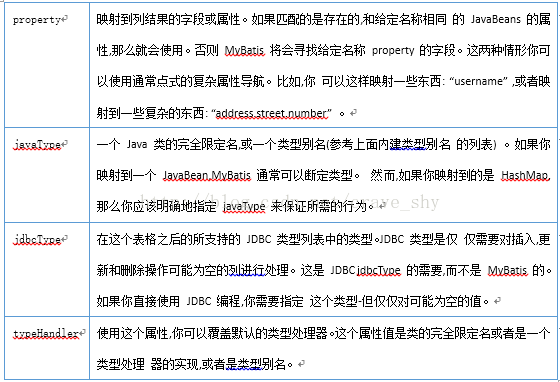
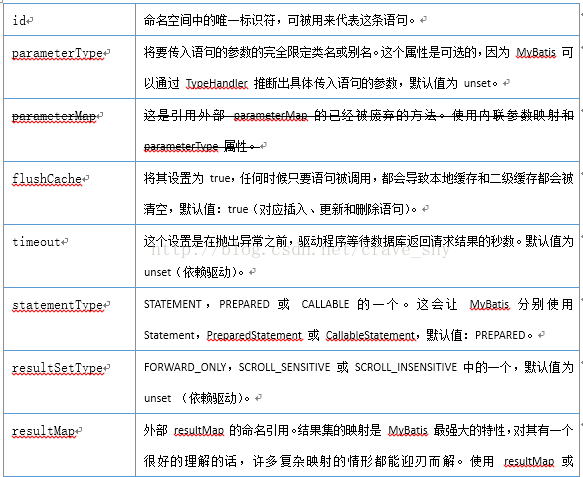
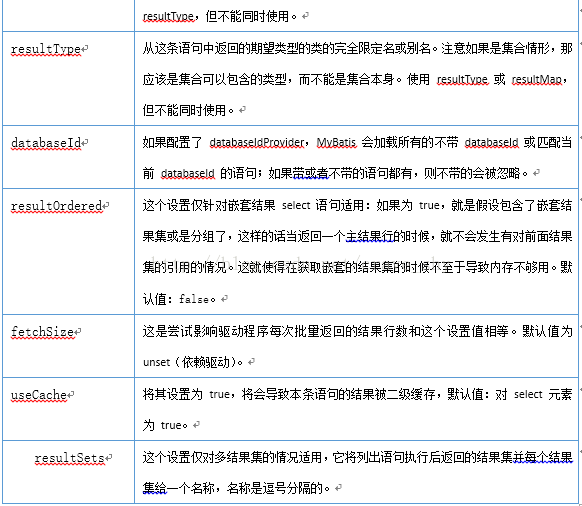
参见补充部分。
四:ResultMap 标签配置
4.1 介绍
resultMap 元素是MyBatis 中最重要最强大的元素。它就是让你远离90%的需要从结果集中取出数据的 JDBC 代码的那个东西, 而且在一些情形下允许你做一些 JDBC 不支持的事情。事实上, 编写相似于对复杂语句联合映射这些等同的代码, 也许可以跨过上千行的代码。 ResultMap 的设计就是简单语句不需要明确的结果映射,而很多复杂语句确实需要描述它们的关系。
4.2 ResultMap 与ResultType的区别
MyBatis中在查询进行select映射的时候,返回类型可以用resultType,也可以用resultMap。resultType是直接表示返回类型的,而resultMap则是对外部ResultMap的引用但是resultType跟resultMap不能同时存在。
在MyBatis进行查询映射的时候,其实查询出来的每一个属性都是放在一个对应的Map里面的,其中键是属性名,值则是其对应的值。当提供的返回类型属性是resultType的时候,MyBatis会将Map里面的键值对取出赋给resultType所指定的对象对应的属性。
所以其实MyBatis的每一个查询映射的返回类型都是ResultMap,只是当我们提供的返回类型属性是resultType的时候,MyBatis对自动的给我们把对应的值赋给resultType所指定对象的属性,而当我们提供的返回类型是resultMap的时候,Mybatis就会根据我们配置的信息做映射
4.3 标签属性
   <resultMap id="resultMapId"

               type="JavaBean"

               autoMapping="false"

               extends=""/>
4.4 标签体
ResultMap的主要组成部分、并且标签体之间可以相互嵌套、来表示更复杂的JavaBean。具体的使用到对应的标签体再说明其作用与标签属性的配置及意义。
下面是其标签体签名:
        <constructor>
            <idArg/>
            <arg/>
        </constructor>
        <id property="" column="" javaType="" jdbcType="" typeHandler=""/>
        <result typeHandler="" jdbcType="" javaType="" column="" property=""/>
        <association property=""/>
        <collection property=""/>
        <discriminator javaType="">
            <case value=""/>
        </discriminator>
五:简单对象select映射
5.1 ResultType类型返回值的表示方式:
因为在前面提到过、加载Mybatis总配置文件的时候会自动扫描指定包下面的类、并且用类名首字母小写作为名称作为其别名(TypeAliases)、这样我们就不必在select的resultType指定JavaBean的全限定名称了。select语句如下即可:
    <select id="getAllAuthors" resultType="author">
        SELECT
            t.id,
            t.username,
            t.password,
            t.email,
            t.bio,
            t.favourite_section favouriteSection
        FROM author t
    </select>
5.2 ResultMap类型返回值的表示方式:
5.2.1 配置ResultMap
    <resultMap id="author" type="author">
        <id property="id" column="author_id"/>
        <result property="username" column="username"/>
        <result property="password" column="password"/>
        <result property="email" column="email"/>
        <result property="bio" column="bio"/>
        <result property="favouriteSection" column="favouriteSection"/>
    </resultMap>
5.2.2 将select标签的ResultMap属性值设置为上面ResultMap标签的id、达到映射效果
    <select id="getAllAuthors" resultMap="author">
        SELECT
            t.id,
            t.username,
            t.password,
            t.email,
            t.bio,
            t.favourite_section favouriteSection
        FROM author t
    </select>
5.2.3 当前ResultMap中 id result子表签作用及属性意义

六:一对一关联
6.1 一对一场景
以Blog为例、从《Mybatis使用之环境搭建》中知道Blog与Author是一对一关系、这里是在Blog中关联了Author信息。其他的先不管。如何查询Blog信息、要求是除基本信息外还包含作者完整信息
6.1.1 ResultMap配置一:
    <resultMap id="oneToOneBlog" type="blog">
        <id property="id" column="blog_id"/>
        <result property="title" column="title"/>
        <!-- 可以使用resultMap属性指向其他映射文件已经定义好的resultMap -->
        <association property="author" resultMap="org.alien.mybatis.samples.mapper.AuthorMapper.author"/>
    </resultMap>
6.1.2 ResultMap配置二:
    <resultMap id="oneToOneBlog" type="blog">
        <id property="id" column="blog_id"/>
        <result property="title" column="title"/>
        <!-- 也可以在此内部定义指向Author类的映射、此种定义不能重用 -->
        <association property="author" javaType="author">
            <id property="id" column="author_id"/>
            <result property="username" column="username"/>
            <result property="password" column="password"/>
            <result property="email" column="email"/>
            <result property="bio" column="bio"/>
            <result property="favouriteSection" column="favouriteSection"/>
        </association>
    </resultMap>
6.1.3查询语句:
    <select id="getBlogOneToOne" resultMap="oneToOneBlog">
        SELECT
            t1.id                blog_id,
            t1.title,
            t2.id                author_id,
            t2.username,
            t2.password,
            t2.email,
            t2.bio,
            t2.favourite_section favouriteSection
        FROM blog t1, author t2
        WHERE t1.author_id = t2.id
    </select>
6.1.4 association标签属性以及标签体
属性:
七:一对多关联
7.1 一对多场景
以Blog为例、从《Mybatis使用之环境搭建》中知道Blog与Post是一对多关系、这里是在Blog中有一个集合存放类型为Post的List。
7.1.1 ResultMap配置一:
    <resultMap id="oneToMany" type="blog">
        <id property="id" column="blog_id" javaType="int"/>
        <result property="title" column="title" javaType="string"/>
        <collection property="posts" ofType="post">
            <id property="id" column="post_id"/>
            <result property="section" column="section"/>
        </collection>
    </resultMap>
7.1.2 ResultMap配置二:
    <resultMap id="oneToManyResultMap" type="blog">
        <id property="id" column="blog_id" javaType="int"/>
        <result property="title" column="title" javaType="string"/>
        <collection property="posts" ofType="post" resultMap="org.alien.mybatis.samples.mapper.PostMapper.post"/>
    </resultMap>
7.1.3查询语句:
    <!--<select id="getBlogWithPosts" resultMap="oneToMany">-->
    <select id="getBlogWithPosts" resultMap="oneToManyResultMap">
        SELECT
            t1.id blog_id,
            t1.title,
            t2.id post_id,
            t2.section
        FROM blog t1 LEFT OUTER JOIN post t2 ON t1.id = t2.blog_id WHERE t1.id = 1
    </select>
7.1.4 collection标签属性:
“ofType”属性。这个属性用来区分JavaBean(或字段)属性类型和集合包含的类型(类型明确下也可以省略)。比如:
<collection property="posts" javaType="ArrayList" column="id" ofType="Post" select="selectPostsForBlog"/>

读作: “在 Post 类型的 ArrayList 中的 posts 的集合。”

javaType 属性是不需要的,因为 MyBatis 在很多情况下会为你算出来。所以你可以缩短 写法:

<collection property="posts" column="id" ofType="Post" select="selectPostsForBlog"/>
八:多对多关联
多对多关联可以简化为单方面一对多关联。可以参见一对多关联的方式实现。
九:嵌套关联
9.1 一对多场景
以Blog为例、从《Mybatis使用之环境搭建》中知道Blog与Post是一对多关系、Post与PostComment(文章评论)Tag(文章标签)是一对多、当在查询Blog属性时、关联的Post属性一并查出来、同时PostComment和Tag属性关联出来。
9.1.1 ResultMap配置:
    <resultMap id="oneToManyNested" type="blog">
        <id property="id" column="blog_id" javaType="int"/>
        <result property="title" column="title" javaType="string"/>
        <collection property="posts" ofType="post">
            <id property="id" column="post_id"/>
            <result property="section" column="section"/>
            <collection property="comments" resultMap="org.alien.mybatis.samples.mapper.PostCommentMapper.postComment"/>
            <collection property="tags" ofType="tag">
                <id property="id" column="tag_id"/>
                <result property="name" column="tag_name"/>
            </collection>
        </collection>
    </resultMap>
9.1.2 查询语句:
    <select id="getBlogWithPostsNested" resultMap="oneToManyNested">
        SELECT
            t1.id           blog_id,
            t1.title,
            t2.id           post_id,
            t2.section,
            t3.id           post_comment_id,
            t3.name         post_comment_name,
            t3.comment_text post_comment_text,
            t5.id           tag_id,
            t5.name         tag_name
        FROM blog t1 LEFT OUTER JOIN post t2 ON t1.id = t2.blog_id
            LEFT OUTER JOIN post_comment t3 ON t2.id = t3.post_id
            LEFT OUTER JOIN post_tag t4 ON t2.id = t4.post_id
            LEFT OUTER JOIN tag t5 ON t4.tag_id = t5.id WHERE t1.id = 1
    </select>
十:缓存
MyBatis 包含一个非常强大的查询缓存特性,它可以非常方便地配置和定制。MyBatis 3中的缓存实现的很多改进都已经实现了,使得它更加强大而且易于配置。
默认情况下是没有开启缓存的,除了局部的 session 缓存,可以增强变现而且处理循环依赖也是必须的。要开启二级缓存,你需要在你的 SQL 映射文件中添加一行:
<cache/>字面上看就是这样。这个简单语句的效果如下:
- 映射语句文件中的所有 select 语句将会被缓存。
- 映射语句文件中的所有 insert,update 和 delete 语句会刷新缓存。
- 缓存会使用 Least Recently Used(LRU,最近最少使用的)算法来收回。
- 根据时间表(比如 no Flush Interval,没有刷新间隔), 缓存不会以任何时间顺序 来刷新。
- 缓存会存储列表集合或对象(无论查询方法返回什么)的 1024 个引用。
- 缓存会被视为是 read/write(可读/可写)的缓存,意味着对象检索不是共享的,而且可以安全地被调用者修改,而不干扰其他调用者或线程所做的潜在修改。
所有的这些属性都可以通过缓存元素的属性来修改。比如:
<cache
  eviction="FIFO"
  flushInterval="60000"
  size="512"
  readOnly="true"/>
这个更高级的配置创建了一个 FIFO 缓存,并每隔 60 秒刷新,存数结果对象或列表的512 个引用,而且返回的对象被认为是只读的,因此在不同线程中的调用者之间修改它们会导致冲突。
可用的收回策略有:
- LRU – 最近最少使用的:移除最长时间不被使用的对象。
- FIFO – 先进先出:按对象进入缓存的顺序来移除它们。
- SOFT – 软引用:移除基于垃圾回收器状态和软引用规则的对象。
- WEAK – 弱引用:更积极地移除基于垃圾收集器状态和弱引用规则的对象。
默认的是 LRU。
flushInterval(刷新间隔)可以被设置为任意的正整数,而且它们代表一个合理的毫秒形式的时间段。默认情况是不设置,也就是没有刷新间隔,缓存仅仅调用语句时刷新。
size(引用数目)可以被设置为任意正整数,要记住你缓存的对象数目和你运行环境的可用内存资源数目。默认值是 1024。
readOnly(只读)属性可以被设置为 true 或 false。只读的缓存会给所有调用者返回缓存对象的相同实例。因此这些对象不能被修改。这提供了很重要的性能优势。可读写的缓存会返回缓存对象的拷贝(通过序列化)。这会慢一些,但是安全,因此默认是 false。
这里暂时没有自定义缓存、后面会有专门关于缓存的记录。
补充:
更多内容:Mybatis 目录
github地址:https://github.com/andyChenHuaYing/scattered-items/tree/master/items-mybatis
源码下载地址:http://download.csdn.net/detail/chenghuaying/8713311
select标签属性对应意义:


 496
496


 被折叠的 条评论
为什么被折叠?
被折叠的 条评论
为什么被折叠?
 到【灌水乐园】发言


