


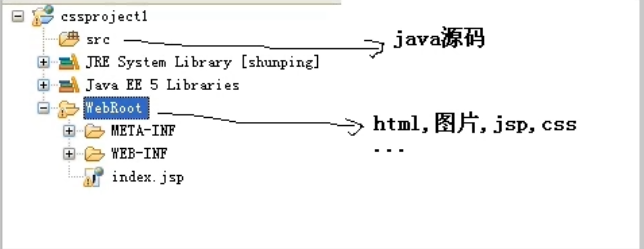
div+css 的讲解
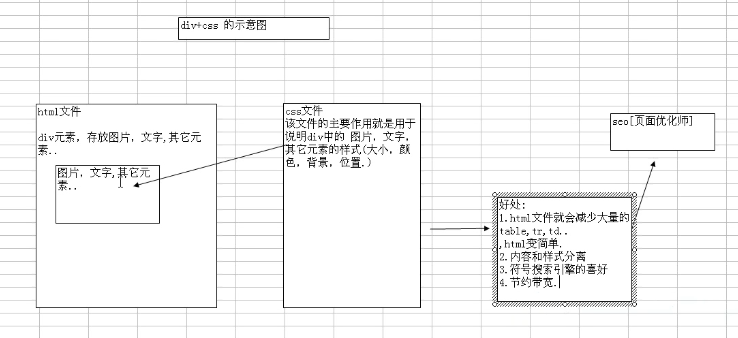
◆div+css的介绍
div是用于存放html 元素,文字,图片,视频等的元素。
css是层叠样式表,用于去指定div中的内容的样式

◆div+css的快速体验案例
test1.html
<html>
<!----引入my.css文件----->
<head>
<link href="my.css" type="text/css" rel="stylesheet"/>
</head>
<body>
<div class="style1">
<table>
<tr><td>1</td><td>2</td><td>3</td><td>5</td></tr>
<tr><td>1</td><td>2</td><td>3</td><td>5</td></tr>
<tr><td>1</td><td>2</td><td>3</td><td>5</td></tr>
<tr><td>1</td><td>2</td><td>3</td><td>5</td></tr>
</table>
</div>
</body>
</html>
my.css中指定:
.style1{
width:300px;
height:200px;
border: 1px solid red;
margin: 400px;400px;700px;
/*margin的三个值分别是?目前似乎只有第一个起作用了*/
}
/*父子选择器*/
.style1 table{
width:298px;
height:180px;
border: 1px solid blue;
}
.style1 table td{
border: 1px solid blue;
text-align:center;
}
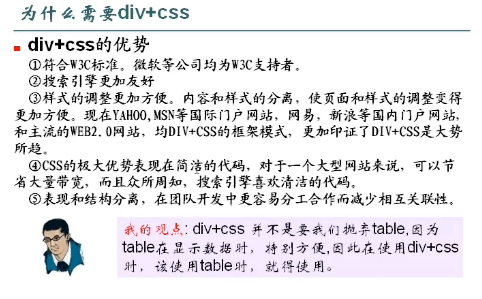
◆div+css的优势
width:300px;
height:200px;
border: 1px solid red;
margin: 400px;400px;700px;
/*margin的三个值分别是?目前似乎只有第一个起作用了*/
}
/*父子选择器*/
.style1 table{
width:298px;
height:180px;
border: 1px solid blue;
}
.style1 table td{
border: 1px solid blue;
text-align:center;
}
◆div+css的优势

css的必要性
先看一个案例:
使用<span>元素来编写:
使用ide开发css(myeclipe),因为myeclipe可以给我们提示功能
<span style="font-size: 50px;color: blue;">栏目一</span></br>
从使用span元素我们可以看到,css的基本语法:
<元素名 style="属性名:属性值;属性名:属性值">
元素可以是html里的任意元素;
属性名:属性值 要参考文档 w3c组织给出的文档
◆使用css可以同意网站的风格
css分类:内部css(写在html里边);外部css(单独写一个css文件)
<!-- Docytype:文档类型,用于指定使用哪个dtd(说明当前这个HTML文件是什么版本) -->
<!DOCTYPE html>
<html>
<head>
<title>css1l.html</title>
<!-- 页面关键字,搜索引擎会参考这些关键字,只看前边几个。这个主要是给搜索引擎看的 -->
<meta http-equiv="keywords" content="dell笔记本,馋嘴鸭,么么哒">
<meta http-equiv="description" content="this is my page">
<!-- 告诉浏览器,文件是什么编码,这里用UTF-8 -->
<meta http-equiv="content-type" content="text/html; charset=UTF-8">
<!-- 引入css文件 -->
<!--<link rel="stylesheet" type="text/css" href="./styles.css">-->
<style type="text/css">
.style1{
font-size:20px;
color:red;
font-weight:bold;
font-style:italic;
text-decoration: underline;
}
</style>
</head>
<body>
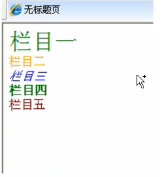
<span class="style1">栏目一</span></br>
<span class="style1">栏目二</span></br>
<span class="style1">栏目三</span></br>
<span class="style1">栏目四</span></br>
<span class="style1">栏目五</span></br>
</body>
</html>
<!DOCTYPE html>
<html>
<head>
<title>css1l.html</title>
<!-- 页面关键字,搜索引擎会参考这些关键字,只看前边几个。这个主要是给搜索引擎看的 -->
<meta http-equiv="keywords" content="dell笔记本,馋嘴鸭,么么哒">
<meta http-equiv="description" content="this is my page">
<!-- 告诉浏览器,文件是什么编码,这里用UTF-8 -->
<meta http-equiv="content-type" content="text/html; charset=UTF-8">
<!-- 引入css文件 -->
<!--<link rel="stylesheet" type="text/css" href="./styles.css">-->
<style type="text/css">
.style1{
font-size:20px;
color:red;
font-weight:bold;
font-style:italic;
text-decoration: underline;
}
</style>
</head>
<body>
<span class="style1">栏目一</span></br>
<span class="style1">栏目二</span></br>
<span class="style1">栏目三</span></br>
<span class="style1">栏目四</span></br>
<span class="style1">栏目五</span></br>
</body>
</html>
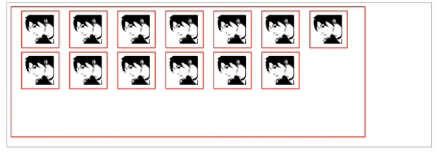
◆css的滤镜体验(将彩色的图片变成黑白的)
<!DOCTYPE html>
<html>
<head>
<title>test1.html</title>
<meta http-equiv="keywords" content="keyword1,keyword2,keyword3">
<meta http-equiv="description" content="this is my page">
<meta http-equiv="content-type" content="text/html; charset=UTF-8">
<!--<link rel="stylesheet" type="text/css" href="./styles.css">-->
<style type="text/css">
/*使用滤镜,无法成功,似乎是高版本IE不支持了?*/
a:link img{
filter:gray;
}
a:hover img{
filter:"";
}
</style>
</head>
<body>
<a href="#"> <img src="images/title.png"> </a><br>
<a href="#"> <img src="images/爱我别走1.gif"> </a> <br>
<a href="#"> <img src="images/桃子.png"> </a><br>
<a href="#"> <img src="images/邮箱登陆.png"> </a> <br>
</body>
</html>
css的选择器
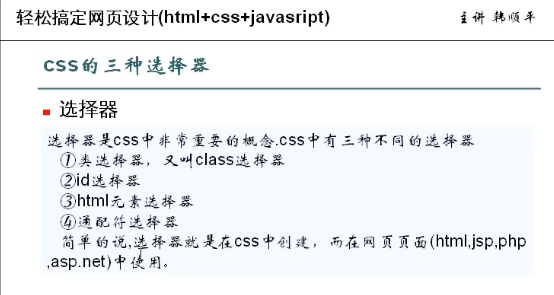
◆类选择器的基本语法:
.类选择器名{
属性名:属性值;
……
}
/*.style 就是类选择器*/
my.css程序
/*.style 就是类选择器*/my.css程序
.style1{
font-weight: bold;
font-size: 20px;
background-color: pink;
color: black;
}
/* #style2 就是一个id选择器*/
#style2{
font-size: 50px;
background-color: silver;
color: red;
}
/*html 的选择器*/
body{
color: orange;
}
a:link{
color: black;
text-decoration: none;
}
a:HOVER {
text-decoration: underline;
}
a:VISITED {
color: red;
}
HtmlPagel.html程序
<!DOCTYPE html>
<html>
<head>
<title>HtmlPagel.html</title>
<meta http-equiv="keywords" content="keyword1,keyword2,keyword3">
<meta http-equiv="description" content="this is my page">
<meta http-equiv="content-type" content="text/html; charset=UTF-8">
<!--<link rel="stylesheet" type="text/css" href="./styles.css">-->
<link rel="stylesheet" href="my.css" type="text/css"></link></head>
<body>
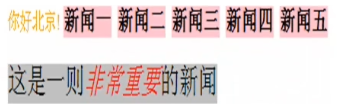
你好北京!
<span class="style1">新闻一</span>
<span class="style1">新闻二</span>
<span class="style1">新闻三</span>
<span class="style1">新闻四</span>
<span class="style1">新闻五</span><br/>
<span class="style1" id="style2">这是一则非常重要的新闻</span><br/>
<a href="#">go to sohu</a><br/>
<a href="#">go to sina</a><br/>
</body>
</html>
<html>
<head>
<title>HtmlPagel.html</title>
<meta http-equiv="keywords" content="keyword1,keyword2,keyword3">
<meta http-equiv="description" content="this is my page">
<meta http-equiv="content-type" content="text/html; charset=UTF-8">
<!--<link rel="stylesheet" type="text/css" href="./styles.css">-->
<link rel="stylesheet" href="my.css" type="text/css"></link></head>
<body>
你好北京!
<span class="style1">新闻一</span>
<span class="style1">新闻二</span>
<span class="style1">新闻三</span>
<span class="style1">新闻四</span>
<span class="style1">新闻五</span><br/>
<span class="style1" id="style2">这是一则非常重要的新闻</span><br/>
<a href="#">go to sohu</a><br/>
<a href="#">go to sina</a><br/>
</body>
</html>
◆id选择器基本语法:
#id选择器名{
属性名:属性值;
……
}
案例:
/* #style2 就是一个id选择器*/
#style2{
font-size: 50px;
background-color: silver;
}
#style2{
font-size: 50px;
background-color: silver;
}
在html文件中如果要引用id选择器,则
<元素 id="id选择器的名称"></元素>
<元素 id="id选择器的名称"></元素>
◆html元素选择器
html元素名称{
属性名:属性值;
……
}
结论:当一个元素同时被id选择器、类选择器、html选择器修饰,则优先级是:
id选择器>类选择器>html选择器
案例:
/*html 的选择器*/
body{
color: orange;
}
body{
color: orange;
}
◆通配符选择器
希望所有的元素都符合某一种样式,可以使用通配符选择器来完成。
案例:
/*使用通配符选择器,对外边距和内边距清零*/
*{
/*margin: 0px; 这个是边距都清零*/
/*margin-top:10px;
margin-left:50px;
margin-right:50px;
margin-bottom:10px; 一上是第一种定义边距的方法,比较麻烦*/
/*margin:10px 50px 10px 50px 若给出4个值,则分别是,上、右、下、左(即从上顺时针旋转),直接定义边距*/
margin:10px 50px 50px /*若给出3个值,则分别是:上边距、左右边距、下边距*/
/*margin:10px 50px 若给出2个值,则分别是:上下边距、左右边距*/
/*margin:10px 若给出1个值,则是上下左右边距均为此值*/
padding: 0px;/*padding 规范和margin 一样*/
}
◆父子选择器
需求
针对:
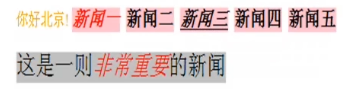
<span id="style2">这是一则<span >非常重要</span>的新闻</span><br/>
my.css添加了一个父子选择器:
/*父子选择器*/
#style2 span{
font-style: italic;
color: red;
}
#style2 span{
font-style: italic;
color: red;
}
*注意:子选择器的标签不能瞎写
*注意:父子选择器是可以层层嵌套的,但是一般不会嵌套太多层,下例2层:
在上例的基础上,再嵌套一个:
<span id="style2">这是一则<span >非常<span>重</span>要</span>的新闻</span><br/>
/*父子选择器*/
#style2 span{
font-style: italic;
color: red;
}
#style2 span span{
font-size: 80px;
}
#style2 span{
font-style: italic;
color: red;
}
#style2 span span{
font-size: 80px;
}
*父子选择器适用于 id选择器 和 class类选择器
◆结论:一个元素被id 和 class 同时修饰的时候,id选择器的优先级较高。
*注意:一个元素最多有一个id选择器,但是可以有多个类选择器。
看一个需求:
希望新闻三 下划线,同时斜体
思路:1.可以给新闻三配置一个id选择器
2.再制定一个class类选择器
my.css中添加:
/*.style 就是类选择器*/
.style1{
font-weight: bold;
font-size: 20px;
background-color: pink;
color: black;
}
.style4{
font-style: italic;
text-decoration: underline;
color: green;
}
.style1{
font-weight: bold;
font-size: 20px;
background-color: pink;
color: black;
}
.style4{
font-style: italic;
text-decoration: underline;
color: green;
}
html文件中如何使用多个class选择器:
<span class="style1 style4" >新闻三</span>
*注意:1.在引用多个class选择器的时候,用空格隔开写即可;
2.当两个类选择器修饰同一个元素冲突的时候,以在css文件中最后出现的那个class选择器样式为准。
结论:各个选择器的优先级:id选择器>class类选择器>html选择器>通配符选择器
注意:所以开发的时候,先用类选择器,如果开发过程中需要修改,再用id选择器,此时id选择器优先级高,更易于修改,且id选择器只能用一个,所以先留着。
◆在css文件中,如果有多个类/id选择器它们都有相同的部分,我们可以把相同的css样式放在一起,见案例
案例说明:
案例:my.css
/*招生广告*
/
.ad_atu{
width:136px;
height:196px;
background-color:#FC7E8C;
margin:5px 0 0 5px;
float: left;
}
/*广告2*
/
.ad_2{
background-color:#7CF574;
height:196px;
width:457px;
float: left;
margin:5px 0 0 5px;
}
/*房地产广告*/
.ad_house{
background-color:#7CF574;
height:196px;
width:152px;
float: left;
margin:5px 0 0 6px;
}
在有些css中,我们可以多个class选择器、id选择器、html选择器共同的部分,提取出来,写在一起,这样可以简化css文件。
上边的my.css文件可以写成:
案例:my.css
/*招生广告*
/
.ad_atu{
width:136px;
background-color:#FC7E8C;
margin:5px 0 0 5px;
}
/*广告2*/
.ad_2{
background-color:#7CF574;
width:457px;
margin:5px 0 0 5px;
}
/*房地产广告*/
.ad_house{
background-color:#7CF574;
width:152px;
margin:5px 0 0 6px;
}
.ad_atu,.ad_2,ad_house{
height:196px;
float:left;
}
*第11讲末尾的小练习 (exam1.html exam1.css)
exam1.html文件:
<!DOCTYPE html>
<html>
<head>
<title>exam1.html</title>
<meta http-equiv="keywords" content="keyword1,keyword2,keyword3">
<meta http-equiv="description" content="this is my page">
<meta http-equiv="content-type" content="text/html; charset=UTF-8">
<!--<link rel="stylesheet" type="text/css" href="./styles.css">-->
<link rel="stylesheet" href="exam1.css" type="text/css"></link></head>
<body>
<font class="s1">梁山排行榜</font><br/><br/>
<span class="s2">宋江</span><br/><br/>
<span class="s3">卢员外</span><br/><br/>
<span class="s4">吴用</span><br/><br/>
<span class="s3">豹子头</span><br/><br/>
<span class="s3">大刀关胜</span><br/><br/>
<a href="#">goto 搜狐1</a><br/>
<a href="#">goto 搜狐2</a><br/>
<a href="#">goto 搜狐3</a><br/>
<a href="#">goto 搜狐4</a><br/>
<a href="#">goto 搜狐5</a><br/>
</body>
</html>
exam1.css文件:
.s1{
font-weight: bold;
font-size: 30px;
color: yellow;
}
.s2{
font-style: italic;
color: red;
}
.s3,.s2,.s4{
background-color: gray;
font-weight: bold;
}
.s4{
font-style: italic;
text-decoration: underline;
}
/*使用html元素选择器*/
a:link{
color: red;
font-size: 24px;
font-family: “华文新魏”;
text-decoration: none;
}
a:HOVER {
color: green;
font-size: 40px;
font-family: "宋体";
text-decoration: underline;
}
a:VISITED {
color: gray;
}
font-weight: bold;
font-size: 30px;
color: yellow;
}
.s2{
font-style: italic;
color: red;
}
.s3,.s2,.s4{
background-color: gray;
font-weight: bold;
}
.s4{
font-style: italic;
text-decoration: underline;
}
/*使用html元素选择器*/
a:link{
color: red;
font-size: 24px;
font-family: “华文新魏”;
text-decoration: none;
}
a:HOVER {
color: green;
font-size: 40px;
font-family: "宋体";
text-decoration: underline;
}
a:VISITED {
color: gray;
}
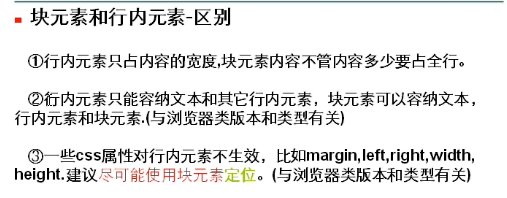
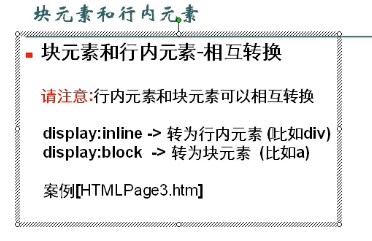
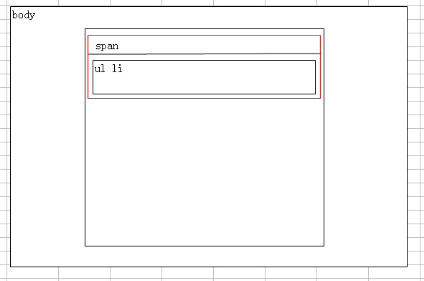
◆块元素和行内元素

行内元素:(inline element),特点是只占用内容的宽度,默认不换行,行内元素一般放文本或者其他的行内元素。
块元素:(bolck element),特点是不管内容有多少,他要换行,同时就算没东西也会占满整行,块元素可以放文本,行内元素,或者块元素
案例:
<span class="s1">span1</span>
<span class="s1">span1</span>
<span class="s1">span1</span>
<div class="s2">div1</div>
<div class="s2">div1</div>
<span class="s1">span1</span>
<span class="s1">span1</span>
<div class="s2">div1</div>
<div class="s2">div1</div>
案例:
<span style="display:block" class="s1">span1<div class="s2">yyy</div></span>
<p style="display: inline" class="s3">p1</p>
注意:style="display:block" 和style="display: inline" 也可以写在css文件里
◆ css的标准流/非标准流
标准流:在网页布局中,写在前边的元素先显示,写在后边的元素后显示,这是默认的布局方式,也称之为标准流
非标准流:在实际网页布局中,我们可能需要使用非标准流的方式来布局(让某个元素脱离它本身的位置)
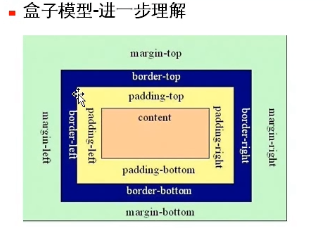
◆css的盒子模型
盒子模型的原理分析图
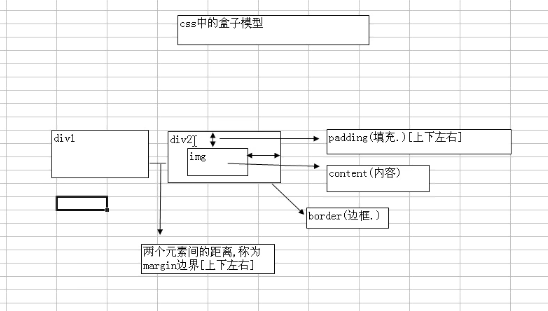
细节说明:
1.html元素都可以看作一个盒子
2.盒子模型的参照物不一样,则使用的css属性也就不一样,比如从div1的角度看,可能是margin-right,从div2的角度看,则是margin-left
3.如果你不希望破坏外观,则尽量使用margin来进行布局,因为padding可能会改变盒子的大小(相当于这个盒子有弹性)。margin如果过大,会将盒子里边的内容挤到盒子外边去,盒子本身没有变化;而如果padding过大,可能会将盒子撑大。
详细图:
请大家做一个小练习:
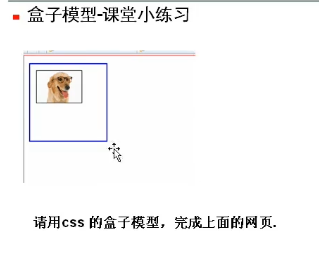
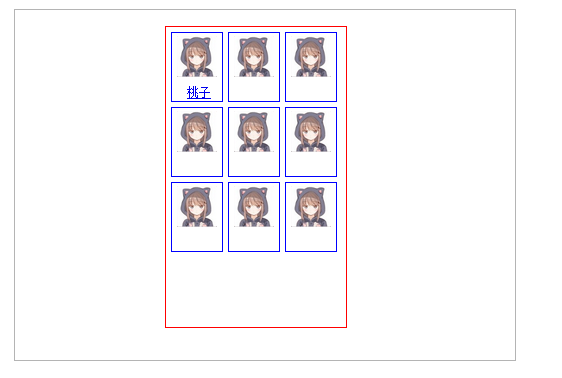
盒子模型的综合案例(可以当作一个模板使用):
最后做成了这样
代码:
box2.html:
<!DOCTYPE html>
<html>
<head>
<title>box2.html</title>
<meta http-equiv="keywords" content="keyword1,keyword2,keyword3">
<meta http-equiv="description" content="this is my page">
<meta http-equiv="content-type" content="text/html; charset=UTF-8">
<!--<link rel="stylesheet" type="text/css" href="./styles.css">-->
<link rel="stylesheet" href="box2.css" type="text/css"></link></head>
<body>
<div class="div1">
<ul class="faceul">
<li><img src="images/桃子.png"></img><a href="#">桃子</a></li>
<li><img src="images/桃子.png"></img></li>
<li><img src="images/桃子.png"></img></li>
<li><img src="images/桃子.png"></img></li>
<li><img src="images/桃子.png"></img></li>
<li><img src="images/桃子.png"></img></li>
<li><img src="images/桃子.png"></img></li>
<li><img src="images/桃子.png"></img></li>
<li><img src="images/桃子.png"></img></li>
</ul>
</div>
</body>
</html>
box2.css:
/*body*/
body{
margin:100px;
padding:100px;
}
/*div1用来控制图片显示的位置*/
.div1{
width: 500px;
height: 350px;
border: 1px solid #b4b4b4;
margin-left: 50px;
margin-top: 50px;
}
/*faceul用于控制显示图片区域的宽度和高度*/
.faceul{
width:180px;
height:300px;
border: 1px solid red;
list-style-type: none;/*列表项标志,none为不显示任何东西*/
padding:0px;
margin-left: 150px;
}
/*这个用于控制单个图片区域的大小*/
.faceul li{
width: 50px;
height: 68px;
border: 1px solid blue;
float: left;/*左浮动*/
margin-left: 5px;
margin-top: 5px;
}
.faceul a{
font-size: 12px;
margin-left: 15px;
}
a:link{
text-decoration: none;
color: black;
}
a:hover{
text-decoration:underline;
color: blue;
}
.faceul img{
width: 40px;
margin-left: 5px;
margin-top: 3px;
margin-bottom: 1px;
}
课堂练习:
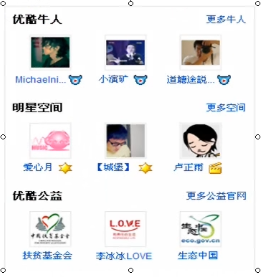
程序:
youku.html文件:
<!DOCTYPE html>
<html>
<head>
<title>youku.html</title>
<meta http-equiv="keywords" content="keyword1,keyword2,keyword3">
<meta http-equiv="description" content="this is my page">
<meta http-equiv="content-type" content="text/html; charset=UTF-8">
<!--<link rel="stylesheet" type="text/css" href="./styles.css">-->
<link rel="stylesheet" href="youku.css" type="text/css"></link></head>
<body>
<div class="div1">
<div>
<span class="span1"><font class="font1">优酷牛人</font><a href="#">更多牛人</a></span>
<ul class="faceul">
<li><img src="images/桃子.png"></img></br><a href="#">桃子</a></li>
<li><img src="images/桃子.png"></img></br><a href="#">桃子</a></li>
<li><img src="images/桃子.png"></img></br><a href="#">桃子</a></li>
</ul>
</div>
</div>
</body>
</html>
youku.css文件:
body{
margin:0 auto;
width: 1000px;
height: 1000px;
border: 1px solid blue;
font-size: 12px;
}
.div1{
width: 350px;
height: 370px;
border: 1px solid silver;
}
/*定义几个常用的字体样式*/
.font1{
font-weight: bold;
font-size: 20px;
margin: 2px 0 0 2px;
}
.span1{
display: block;
/*background-color: blue;*/
}
.span1 a{
margin-left: 200px;
}
.faceul{
width: 350px;
height: 65px;
/*background-color: green;*/
list-style-type: none;
padding: 0px;
}
.faceul li{
float: left;
width: 107px;
height: 78px;
/*background-color: red;*/
margin-left: 6px;
text-align: center;/*text-align 表示放在该元素的其他元素会左右居中显示*/
margin-top: 2px;
}
.faceul img{
margin-top: 2px;
width: 40px;
height: 40px;
padding-bottom: 2px;
}
/*定义几种超链接的样式*/
a:link{
text-decoration: none;
}
◆浮动
margin:0 auto;
width: 1000px;
height: 1000px;
border: 1px solid blue;
font-size: 12px;
}
.div1{
width: 350px;
height: 370px;
border: 1px solid silver;
}
/*定义几个常用的字体样式*/
.font1{
font-weight: bold;
font-size: 20px;
margin: 2px 0 0 2px;
}
.span1{
display: block;
/*background-color: blue;*/
}
.span1 a{
margin-left: 200px;
}
.faceul{
width: 350px;
height: 65px;
/*background-color: green;*/
list-style-type: none;
padding: 0px;
}
.faceul li{
float: left;
width: 107px;
height: 78px;
/*background-color: red;*/
margin-left: 6px;
text-align: center;/*text-align 表示放在该元素的其他元素会左右居中显示*/
margin-top: 2px;
}
.faceul img{
margin-top: 2px;
width: 40px;
height: 40px;
padding-bottom: 2px;
}
/*定义几种超链接的样式*/
a:link{
text-decoration: none;
}
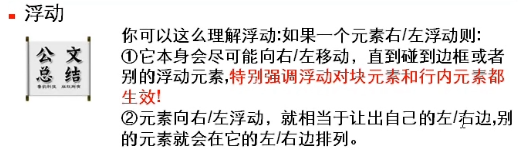
◆浮动
浮动是一个重要的概念:分为左浮动,右浮动,清除浮动。
浮动必要性:
因为默认情况下,div是纵向排列的,比如:
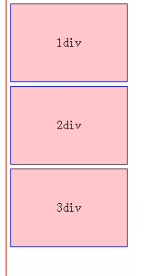
如果希望1div向右移动,这时我们使用右浮动:
float: right;
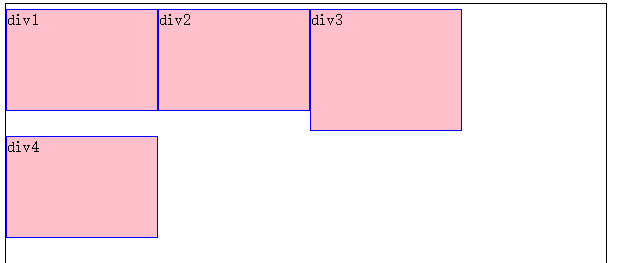
如果我们希望所有的元素横向排列,则使用到左浮动:
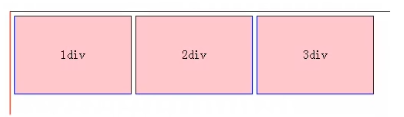
这时,对div的css添加:
float:left;
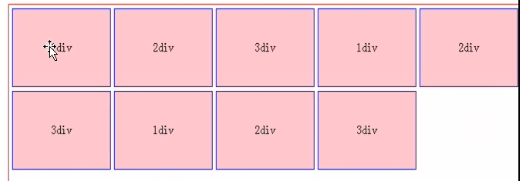
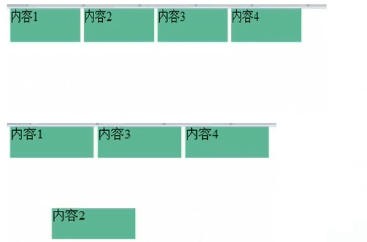
特别注意:如果一行宽度不够排列所有的div元素,则会自动换行,如:
当然,如果有某个div过大,则会卡住别的div,如:
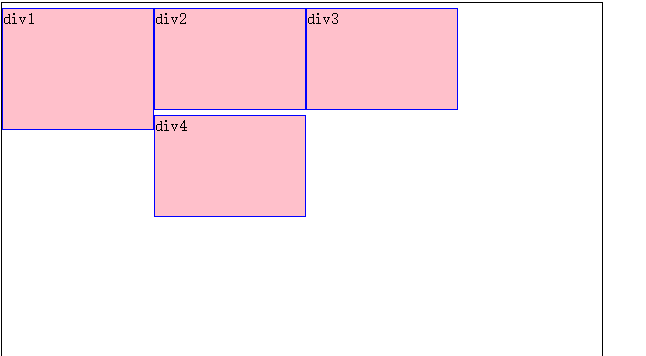
还有:
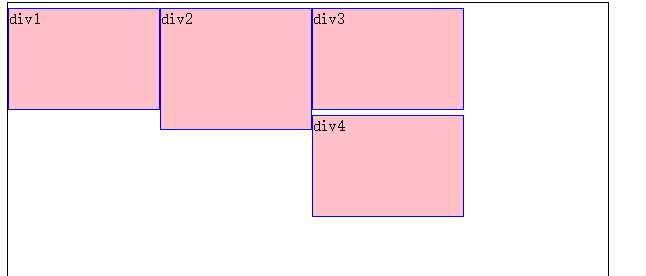
上图右边不够放div4了,所以自动换行,但是div3大了,所以卡住。
案例:文字包图 在Myfloat2.html/Myfloat2.css
◆定位
css的定位有以下几种:
1.static定位(默认)
默认的方式,以标准流的先后顺序摆放。
对static而言,用left,right等,不识别,无效。
2.relative定位(相对定位)
在原位置的基础上形状大小不变,进行移动(left和top),原来的位置仍然给他留着。从这一角度看,好像该元素仍然在文档的标准流中一样。
特别说明:1.relative的参照点是他原来的位置(即在原来位置的基础上进行移动)。
案例:
代码:
<body>
<div class="s1">内容1</div>
<div id="special" class="s1">内容2</div>
<div class="s1">内容3</div>
<div class="s1">内容4</div>
</body>
<div class="s1">内容1</div>
<div id="special" class="s1">内容2</div>
<div class="s1">内容3</div>
<div class="s1">内容4</div>
</body>
在css中,对内容2的指定:
#special{
position: relative;/*这里我们使用的相对定位*/
left: 40px;/*在原来的位置的基础上向右移动。(若想向左移动,则值为负)*/
top: 100px;/*在原来的位置的基础上向下移动。(若想向上移动,则值为负)*/
}
position: relative;/*这里我们使用的相对定位*/
left: 40px;/*在原来的位置的基础上向右移动。(若想向左移动,则值为负)*/
top: 100px;/*在原来的位置的基础上向下移动。(若想向上移动,则值为负)*/
}
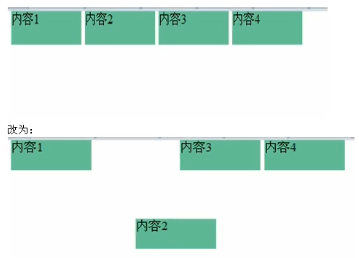
3.绝对定位:absolute
元素从原来的位置脱离,之前的位置让给其他元素,后续远的元素会补上,占用他让出的空间。
案例:
css代码:
#special{
position:absolute;/*这就是绝对定位*/
left: 40px;/*在原来的位置的基础上向右移动。(若想向左移动,则值为负)*/
top: 100px;/*在原来的位置的基础上向下移动。(若想向上移动,则值为负)*/
}
position:absolute;/*这就是绝对定位*/
left: 40px;/*在原来的位置的基础上向右移动。(若想向左移动,则值为负)*/
top: 100px;/*在原来的位置的基础上向下移动。(若想向上移动,则值为负)*/
}
特别强调一点,absolut定位是对离自己最近的那个非标准流盒子而言的,不一定每次都是body。如下:
4.fixed定位:
跟绝对定位差不多,但是他只以body作为参照物。也可以说他是只以body为参照物的绝对定位。
5.interit继承父元素的定位情况。
css综合案例:
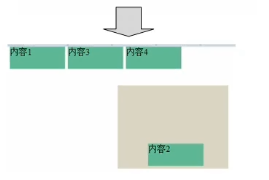
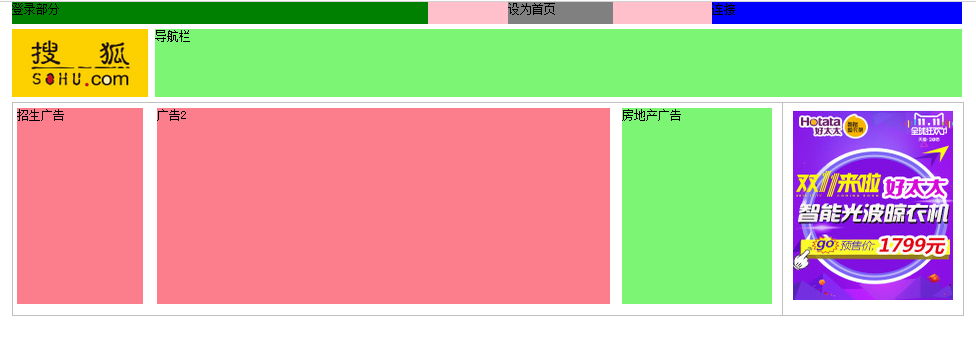
◆仿sohu网站首页布局
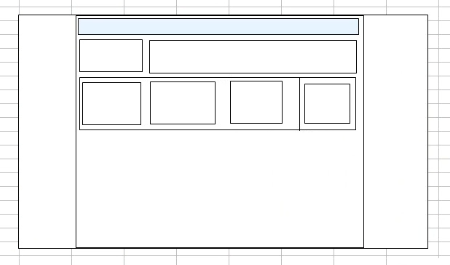
完成效果图:
sohu.html代码:
<!DOCTYPE html>
<html>
<head>
<title>sohu.html</title>
<meta http-equiv="keywords" content="keyword1,keyword2,keyword3">
<meta http-equiv="description" content="this is my page">
<meta http-equiv="content-type" content="text/html; charset=UTF-8">
<!--<link rel="stylesheet" type="text/css" href="./styles.css">-->
<link rel="stylesheet" href="sohu.css" type="text/css"></link></head>
<body>
<!--最top的div -->
<div class="top">
<div class="login">登录部分</div>
<div class="indexpage">设为首页</div>
<div class="myhref">连接</div>
</div>
<!-- logo div -->
<div class="logo"><img src="images/搜狐.png"></img></div>
<div class="navi">导航栏</div>
<!-- 广告部分 -->
<div class="ad">
<div class="stuad">招生广告</div>
<div class="ad2">广告2</div>
<div class="housead">房地产广告</div>
<div class="picturead"><img src="images/广告图片.png"></img></div>
</div>
</body>
</html>
sohu.css代码:
body{
width: 950px;
/*高度定不下来,就暂时随便写一个*/
height:800px;
margin: 0 auto;
/*border: 1px solid red;*/
font-size: 12px;
}
.top{
width: 950px;
height: 22px;
background-color: pink;
}
/*登录部分*/
.login{
width: 416px;
height: 22px;
background-color: green;
float: left;
}
/*设为首页*/
.indexpage{
width: 105px;
height: 22px;
background-color: gray;
float: left;
margin-left: 80px;
}
/*超链接*/
.myhref{
width: 250px;
height: 22px;
float: right;
background-color: blue;
}
/*logo*/
.logo{
width: 137px;
height: 68px;
background-color: black;
float: left;
margin-top: 5px;
}
.logo img{
width: 137px;
height: 68px;
}
/*导航*/
.navi{
width: 807px;
height: 68px;
float: left;
margin-left: 6px;
background-color: #7Cf574;
margin-top: 5PX;
}
/*广告*/
.ad{
width: 950px;
height: 212px;
/*background-color: pink;*/
margin-top: 5px;
float: left;
border: 1px solid silver;
}
/*学生广告*/
.stuad{
width: 126px;
height: 196px;
background-color: #FC7E8C;
margin: 5px 0 0 4px;
float: left;
}
/*广告2*/
.ad2{
width: 453px;
height: 196px;
margin: 5px 0 0 14px;
background-color: #FC7E8C;
float: left;
}
/*房地产广告*/
.housead{
height: 196px;
width: 150px;
background-color: #7CF574;
margin: 5px 0 0 12px;
float: left;
}
/*图片广告*/
.picturead{
height: 212px;
width: 180px;
float: right;
/*background-color: #7CF574;*/
border-left: 1px solid silver;
text-align: center;/*设置水平居中*/
}
.picturead img{
margin-top: 7px;
height: 190px;
width: 160px;
}
width: 950px;
/*高度定不下来,就暂时随便写一个*/
height:800px;
margin: 0 auto;
/*border: 1px solid red;*/
font-size: 12px;
}
.top{
width: 950px;
height: 22px;
background-color: pink;
}
/*登录部分*/
.login{
width: 416px;
height: 22px;
background-color: green;
float: left;
}
/*设为首页*/
.indexpage{
width: 105px;
height: 22px;
background-color: gray;
float: left;
margin-left: 80px;
}
/*超链接*/
.myhref{
width: 250px;
height: 22px;
float: right;
background-color: blue;
}
/*logo*/
.logo{
width: 137px;
height: 68px;
background-color: black;
float: left;
margin-top: 5px;
}
.logo img{
width: 137px;
height: 68px;
}
/*导航*/
.navi{
width: 807px;
height: 68px;
float: left;
margin-left: 6px;
background-color: #7Cf574;
margin-top: 5PX;
}
/*广告*/
.ad{
width: 950px;
height: 212px;
/*background-color: pink;*/
margin-top: 5px;
float: left;
border: 1px solid silver;
}
/*学生广告*/
.stuad{
width: 126px;
height: 196px;
background-color: #FC7E8C;
margin: 5px 0 0 4px;
float: left;
}
/*广告2*/
.ad2{
width: 453px;
height: 196px;
margin: 5px 0 0 14px;
background-color: #FC7E8C;
float: left;
}
/*房地产广告*/
.housead{
height: 196px;
width: 150px;
background-color: #7CF574;
margin: 5px 0 0 12px;
float: left;
}
/*图片广告*/
.picturead{
height: 212px;
width: 180px;
float: right;
/*background-color: #7CF574;*/
border-left: 1px solid silver;
text-align: center;/*设置水平居中*/
}
.picturead img{
margin-top: 7px;
height: 190px;
width: 160px;
}


 被折叠的 条评论
为什么被折叠?
被折叠的 条评论
为什么被折叠?
 到【灌水乐园】发言


