


对于AMS来讲,Activity管理是它的核心工作,前面两篇文章都是讲AMS的启动流程和进程的管理,这两篇文章其实是为本文做铺垫的,只有理解了前面两篇文章才能更好地理解AMS的activity管理。在谈到Activity的管理的时候,就不得不说一下Activity的启动流程,说道activity的启动流程就要说一下进程启动的问题了,前面一片文章中我们已经分析了AMS的进程管理,这里需要补充的一点就是在android中并没有针对app开放进程的启动接口,只是在启动activity或者service等组件的时候,我们的AMS会根据需要来启动相应的进程。
好了,下面我们开始分析AMS的activity的启动流程吧。
AMS的activity的启动流程
Activity的启动是从app端开始的,在AMS实际启动完成后结束的,这里就涉及到了Binder的C/S通讯,因此这里我们分为两个部分分析:客户端和服务端的实现。
activity启动之客户端
这里我们以在app中通过调用activity的startActivity方法启动目标activity来分析一个典型的activity启动流程。首先我们需要看一下Activity的startActivity方法的实现,Activity的startActivity实现了多态,一共两个实现:一个参数(intent)的,两个参数的(一个intent和一个bundle)的,不过通常我们都是调用一个参数的,下面是一个参数的实现:
[email protected]
@Override
public void startActivity(Intent intent) {
    this.startActivity(intent, null);
}
可以看到这里还是调用了两个参数的:
@Override
public void startActivity(Intent intent, @Nullable Bundle options) {
    if (options != null) {
        startActivityForResult(intent, -1, options);
    } else {
        // Note we want to go through this call for compatibility with
        // applications that may have overridden the method.
        startActivityForResult(intent, -1);
    }
}
我们发现这里调用了startActivityForResult方法,这个方法根据option的不同调用startActivityForResult方法时参数不一样,我们前面给的option参数是null因此这里走第一个分支:
[email protected]
public void startActivityForResult(Intent intent, int requestCode, @Nullable Bundle options) {
    if (mParent == null) {
        // 通过mInstrumentation的execStartActivity实际启动activity
        Instrumentation.ActivityResult ar =
            mInstrumentation.execStartActivity(
                this, mMainThread.getApplicationThread(), mToken, this,
                intent, requestCode, options);
        // ar表示activity启动结果,如果结果就调用ActivityThread的sendActivityResult通知启动结果,这里会回调到请求activity的onActivityResult方法
        if (ar != null) {
            mMainThread.sendActivityResult(
                mToken, mEmbeddedID, requestCode, ar.getResultCode(),
                ar.getResultData());
        }
        if (requestCode >= 0) {
            // If this start is requesting a result, we can avoid making
            // the activity visible until the result is received.  Setting
            // this code during onCreate(Bundle savedInstanceState) or onResume() will keep the
            // activity hidden during this time, to avoid flickering.
            // This can only be done when a result is requested because
            // that guarantees we will get information back when the
            // activity is finished, no matter what happens to it.
            mStartedActivity = true;
        }

        cancelInputsAndStartExitTransition(options);
        // TODO Consider clearing/flushing other event sources and events for child windows.
    } else {
        if (options != null) {
            mParent.startActivityFromChild(this, intent, requestCode, options);
        } else {
            // Note we want to go through this method for compatibility with
            // existing applications that may have overridden it.
            mParent.startActivityFromChild(this, intent, requestCode);
        }
    }
}
这里的关键就是通过mInstrumentation的execStartActivity实际启动activity部分了,我们看下Instrumentation的execStartActivity实现:
[email protected]
public ActivityResult execStartActivity(
        Context who, IBinder contextThread, IBinder token, Activity target,
        Intent intent, int requestCode, Bundle options) {
    IApplicationThread whoThread = (IApplicationThread) contextThread;
    Uri referrer = target != null ? target.onProvideReferrer() : null;
    if (referrer != null) {
        intent.putExtra(Intent.EXTRA_REFERRER, referrer);
    }
    if (mActivityMonitors != null) {
        synchronized (mSync) {
            final int N = mActivityMonitors.size();
            for (int i=0; i<N; i++) {
                final ActivityMonitor am = mActivityMonitors.get(i);
                if (am.match(who, null, intent)) {
                    am.mHits++;
                    if (am.isBlocking()) {
                        return requestCode >= 0 ? am.getResult() : null;
                    }
                    break;
                }
            }
        }
    }
    try {
        intent.migrateExtraStreamToClipData();
        intent.prepareToLeaveProcess();
        // 通过调用ActivityManagerNative的startActivity来实际启动activity
        int result = ActivityManagerNative.getDefault()
            .startActivity(whoThread, who.getBasePackageName(), intent,
                    intent.resolveTypeIfNeeded(who.getContentResolver()),
                    token, target != null ? target.mEmbeddedID : null,
                    requestCode, 0, null, options);
        checkStartActivityResult(result, intent);
    } catch (RemoteException e) {
        throw new RuntimeException("Failure from system", e);
    }
    return null;
}
这里我们看到execStartActivity方法最终也是通过调用ActivityManagerNative的startActivity来实际启动activity,ActivityManagerNative这个是一个Binder类,这个类提供了Binder通讯的实现用于和AMS通讯的,我们先看一下这个类的定义:
public abstract class ActivityManagerNative extends Binder implements IActivityManager果不其然,这里继承自Binder类,并且实现了IActivityManager接口,下面我们来看下上面调用的getDefault方法的实现,看名字应该是一个单例实现:
static public IActivityManager getDefault() {
   return gDefault.get();
}
我们在看下gDefault:
private static final Singleton<IActivityManager> gDefault = new Singleton<IActivityManager>() {
    protected IActivityManager create() {
        IBinder b = ServiceManager.getService("activity");
        if (false) {
            Log.v("ActivityManager", "default service binder = " + b);
        }
        IActivityManager am = asInterface(b);
        if (false) {
            Log.v("ActivityManager", "default service = " + am);
        }
        return am;
    }
};
看到这里,想必大家都明白了,这的确是一个单例实现,其中g的意思应该是global的意思。Singleton泛型类的get方法会调用create方法来创建一个实例,我们一下这里的create的实现,首先通过SM获得AMS的IBinder对象(这个对象是用来和Binder发起通讯的对象),下面我们调用了asInterface方法将IBinder对象转换成IActivityManager,以方便客户端调用IActivityManager的接口。下面是asInterface的实现:
static public IActivityManager asInterface(IBinder obj) {
    if (obj == null) {
        return null;
    }
    IActivityManager in =
        (IActivityManager)obj.queryLocalInterface(descriptor);
    if (in != null) {
        return in;
    }

    return new ActivityManagerProxy(obj);
}
如果你熟悉Binder的话,那么asInterface方法你应该很熟悉了,这个方法就是用来将IBinder对象转换成实际的Interface对象的,我们看到这里的原理很简单,首先查询本地有没有实现接口的服务,如果有就返回这个对象,这个时候表示操作和AMS是在同一个进程中的,显然很多情况下不是这样的,我们应该就是直接new一个ActivityManagerProxy对象,然后返回。ActivityManagerProxy类是ActivityManagerNative的一个内部类,是一个用来和AMS交互的proxy类。
现在我们明白了,我们上面的startActivity实际最后会调用到ActivityManagerProxy的startActivity中去:
startActivity@ActivityManagerProxy
public int startActivity(IApplicationThread caller, String callingPackage, Intent intent,
String resolvedType, IBinder resultTo, String resultWho, int requestCode,
int startFlags, ProfilerInfo profilerInfo, Bundle options) throws RemoteException {
Parcel data = Parcel.obtain();
Parcel reply = Parcel.obtain();
data.writeInterfaceToken(IActivityManager.descriptor);
data.writeStrongBinder(caller != null ? caller.asBinder() : null);
data.writeString(callingPackage);
intent.writeToParcel(data, 0);
data.writeString(resolvedType);
data.writeStrongBinder(resultTo);
data.writeString(resultWho);
data.writeInt(requestCode);
data.writeInt(startFlags);
if (profilerInfo != null) {
data.writeInt(1);
profilerInfo.writeToParcel(data, Parcelable.PARCELABLE_WRITE_RETURN_VALUE);
} else {
data.writeInt(0);
}
if (options != null) {
data.writeInt(1);
options.writeToParcel(data, 0);
} else {
data.writeInt(0);
}
// 通过Binder的transact方法开始和AMS通讯。
mRemote.transact(START_ACTIVITY_TRANSACTION, data, reply, 0);
reply.readException();
int result = reply.readInt();
reply.recycle();
data.recycle();
return result;
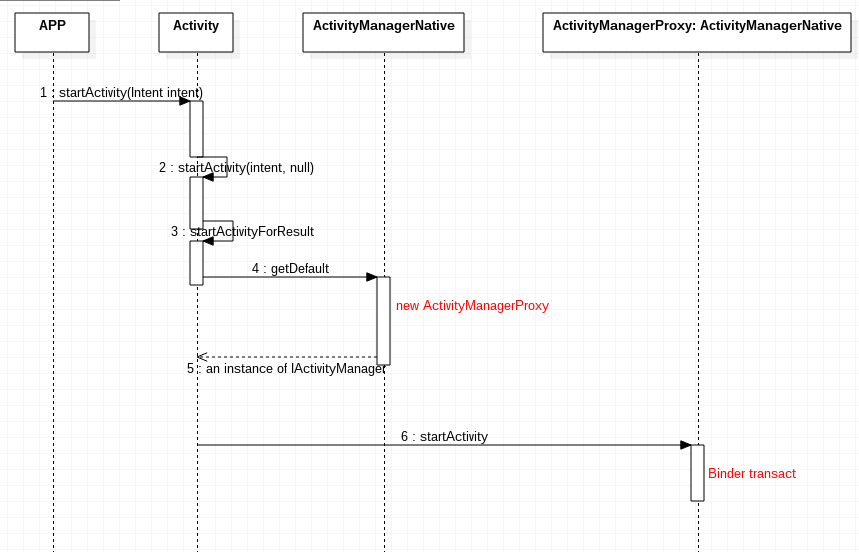
}我们的ActivityManagerNative是一个强大的Binder实现类,这个类是一个既面向客户有面向服务端的类,它封装了Binder的通讯实现,减少客户端和服务端通讯的困难度。刚才我们说的ActivityManagerProxy内部类是运行在客户端的一个代理,他只是提供接口,真正的实现还是在服务端的,那么ActivityManagerNative就是运行在服务端的,他就是负责从Binder监听来自proxy代理的通讯请求,使用transaction code区别不同的信息,上面我们的transaction code就是START_ACTIVITY_TRANSACTION。在继续分析server端的实现之前,我们先来梳理一下client这边的操作,整体上如下面这个时序图:
同时我们还要弄清楚ActivityManagerNative,ActivityManagerProxy,AMS,IActivityManager以及我们后面要说道面向app的管理类:ActivityManager之间是什么关系,下面我们给出它的类图关系:
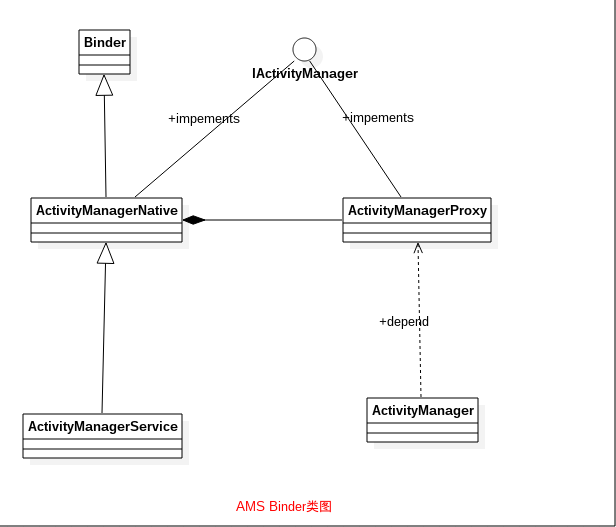
这张图描述了上面说到的一堆类和Binder之间的关系,看代码的话感觉关系比较乱,但是看这个图的话就基本明白了。下面我们就可以分析服务端的实现了。
activity启动之服务端
上面我们分析完了activity客户端的启动流程,下面我们继续看看服务端收到客户端的启动请求后是怎么处理的。上面我们说道ActivityManagerNative是运行在服务端的,专门用来处理客户端的通讯请求的,我们知道Binder驱动在收到数据后会返回给上层,上层的Binder会回调具体接受者的onTransact方法(如果你对Binder不熟悉的话,可以先学习一下Binder的知识,这在android世界里是很核心的一个东西,如果这个东西你不懂的话,那么android的大门永远你都进不了),下面我们看下ActivityManagerNative的onTransact实现:
[email protected]
@Override
public boolean onTransact(int code, Parcel data, Parcel reply, int flags)
        throws RemoteException {
    switch (code) {
    case START_ACTIVITY_TRANSACTION:
    {
        // 读取客户端的数据
        data.enforceInterface(IActivityManager.descriptor);
        IBinder b = data.readStrongBinder();
        IApplicationThread app = ApplicationThreadNative.asInterface(b);
        String callingPackage = data.readString();
        Intent intent = Intent.CREATOR.createFromParcel(data);
        String resolvedType = data.readString();
        IBinder resultTo = data.readStrongBinder();
        String resultWho = data.readString();
        int requestCode = data.readInt();
        int startFlags = data.readInt();
        ProfilerInfo profilerInfo = data.readInt() != 0
                ? ProfilerInfo.CREATOR.createFromParcel(data) : null;
        Bundle options = data.readInt() != 0
                ? Bundle.CREATOR.createFromParcel(data) : null;
        // 现在,数据读取完毕了,需要启动activity,调用startActivity实现
        int result = startActivity(app, callingPackage, intent, resolvedType,
                resultTo, resultWho, requestCode, startFlags, profilerInfo, options);
        // 回写执行结果,通知客户端
        reply.writeNoException();
        reply.writeInt(result);
        return true;
    }
    ......(省略其他code的处理,我们现在只关心activity启动的code)
这里我们调用了startActivity方法来启动activity,这个方法在AMS中实现的,因为ActivityManagerNative是一个抽象类没有实现,而AMS继承自ActivityManagerNative。我们看一下AMS中的startActivity:
[email protected]
@Override
public final int startActivity(IApplicationThread caller, String callingPackage,
        Intent intent, String resolvedType, IBinder resultTo, String resultWho, int requestCode,
        int startFlags, ProfilerInfo profilerInfo, Bundle options) {
    return startActivityAsUser(caller, callingPackage, intent, resolvedType, resultTo,
        resultWho, requestCode, startFlags, profilerInfo, options,
        UserHandle.getCallingUserId());
}
这里的startActivity是一个包装方法,它实际调用了startActivityAsUser方法,添加了一个参数UserHandle.getCallingUserId(),这个参数是通过Binder获取调用者的UID获得到的。
[email protected]
@Override
public final int startActivityAsUser(IApplicationThread caller, String callingPackage,
        Intent intent, String resolvedType, IBinder resultTo, String resultWho, int requestCode,
        int startFlags, ProfilerInfo profilerInfo, Bundle options, int userId) {
    // 判断是不是一个独立的进程,独立进程是不允许调用startActivity方法的
    enforceNotIsolatedCaller("startActivity");
    // 判断当前UID是否允许启动activity
    userId = handleIncomingUser(Binder.getCallingPid(), Binder.getCallingUid(), userId,
            false, ALLOW_FULL_ONLY, "startActivity", null);
    // TODO: Switch to user app stacks here.
    // 调用ActivityStackSupervisor的startActivityMayWait方法启动activity
    return mStackSupervisor.startActivityMayWait(caller, -1, callingPackage, intent,
            resolvedType, null, null, resultTo, resultWho, requestCode, startFlags,
            profilerInfo, null, null, options, false, userId, null, null);
}
上面的代码首先进行安全检查,如果是独立进程就不允许启动activity,所谓的独立进程就是使用android:isolatedProcess标记的进程,该进程与系统其他部分隔离,且没有自己的权限。 与其通讯的唯一手段就是通过 Service API (绑定和启动)。接下来就是判断当前的UID是否有权限,如果安全检查通过的话,那么会调用ActivityStackSupervisor的startActivityMayWait方法启动activity,这个方法比较长,我们分段来分析:
[email protected]
final int startActivityMayWait(IApplicationThread caller, int callingUid,
        String callingPackage, Intent intent, String resolvedType,
        IVoiceInteractionSession voiceSession, IVoiceInteractor voiceInteractor,
        IBinder resultTo, String resultWho, int requestCode, int startFlags,
        ProfilerInfo profilerInfo, WaitResult outResult, Configuration config,
        Bundle options, boolean ignoreTargetSecurity, int userId,
        IActivityContainer iContainer, TaskRecord inTask) {
    // Refuse possible leaked file descriptors
    if (intent != null && intent.hasFileDescriptors()) {
        throw new IllegalArgumentException("File descriptors passed in Intent");
    }

    // 获得处理该intent的组件,
    boolean componentSpecified = intent.getComponent() != null;

    // Don't modify the client's object!
    intent = new Intent(intent);

    // Collect information about the target of the Intent.
    // 解析intent中的目标信息
    ActivityInfo aInfo =
            resolveActivity(intent, resolvedType, startFlags, profilerInfo, userId);
这里主要是通过resolveActivity来解析intent中包含的目标信息,存储在ActivityInfo对象当中,resolveActivity方法会会通过packageManagerService来解析当前intent包含的目标信息。
接下来的操作全部都是原子操作,我们继续看这个原子操作内部的代码:
if (container != null && container.mParentActivity != null &&
                    container.mParentActivity.state != RESUMED) {
    // Cannot start a child activity if the parent is not resumed.
    return ActivityManager.START_CANCELED;
}
这里是一个判断,意思是如果启动目标activity的请求activity还没有resume的话,那么它是不能启动一个新的activity的,也就是说如果一个activity还没有启动完成,那么它是不能启动一个新的activity的。
final int realCallingPid = Binder.getCallingPid();
final int realCallingUid = Binder.getCallingUid();
int callingPid;
if (callingUid >= 0) {
    callingPid = -1;
} else if (caller == null) {
    callingPid = realCallingPid;
    callingUid = realCallingUid;
} else {
    callingPid = callingUid = -1;
}
这里的操作比较简单,通过Binder获得caller的pid和uid,然后给callingPid和callingUid赋值,我们前面你传递进来的callingUid是-1,并且caller不为空,因此我们走最后一个分支,也就是callingPid和callingUid都是-1。
if (aInfo != null &&
                    (aInfo.applicationInfo.privateFlags
                            &ApplicationInfo.PRIVATE_FLAG_CANT_SAVE_STATE) != 0) {
   // This may be a heavy-weight process!  Check to see if we already
   // have another, different heavy-weight process running.
   if (aInfo.processName.equals(aInfo.applicationInfo.packageName)) {
       if (mService.mHeavyWeightProcess != null &&
               (mService.mHeavyWeightProcess.info.uid != aInfo.applicationInfo.uid ||
               !mService.mHeavyWeightProcess.processName.equals(aInfo.processName))) {
           int appCallingUid = callingUid;
           if (caller != null) {
               ProcessRecord callerApp = mService.getRecordForAppLocked(caller);
               if (callerApp != null) {
                   appCallingUid = callerApp.info.uid;
               } else {
                   Slog.w(TAG, "Unable to find app for caller " + caller
                         + " (pid=" + callingPid + ") when starting: "
                         + intent.toString());
                   ActivityOptions.abort(options);
                   return ActivityManager.START_PERMISSION_DENIED;
               }
           }
上面的代码就是判断目标activity进程是不是重量级进程,如果当前系统中已经存在的重量级进程不是将要启动的这个,那么就要给intent重新赋值。
接下来的工作就是通过调用startActivityLocked方法来进一步完成启动工作,后面的outResult因为我们给的是null,因此不会执行。
现在我们来详细分析一下startActivityLocked的实现,由于这个函数比较长,我们就只关注重点部分的操作,同样的我们分步分析:
[email protected]
ProcessRecord callerApp = null;
if (caller != null) {
    callerApp = mService.getRecordForAppLocked(caller);
    if (callerApp != null) {
        callingPid = callerApp.pid;
        callingUid = callerApp.info.uid;
    } else {
        Slog.w(TAG, "Unable to find app for caller " + caller
              + " (pid=" + callingPid + &
最低0.47元/天 解锁文章


 1万+
1万+


 被折叠的 条评论
为什么被折叠?
被折叠的 条评论
为什么被折叠?
 到【灌水乐园】发言


