


转载自:http://www.ibm.com/developerworks/cn/xml/x-androidstorage/
前提条件
要跟随本文,需要具备以下技能和工具:
- 基本了解 Java™ 技术和如何使用 Eclipse(或者您喜欢的 IDE)
- Java Development Kit(需要版本 5 或 6)
- Eclipse(版本 3.4 或 3.5)
- Android SDK 和 ADT 插件
- 关于下载和设置信息,请参见本文末尾的 参考资料。
样例应用程序
为了突出 Android 应用程序开发的本地存储方面,我这里介绍一个样例应用程序,它允许您测试各种类型 API 的执行。有 源代码 可供下载。该应用程序支持 图 1 中的操作。
图 1 列出了以下用例:
- 列表内容
- 管理和存储首选项
- 从应用程序资产加载信息
- 将信息导出到内部内存、外部内存和本地数据库
- 从内部内存和本地数据库读取数据
- 清除已存储的信息
- 在屏幕上查看信息
通篇文章中,详细介绍了在应用程序中使用本地存储,如下: - 从用户捕获首选项,本地存储起来,并在整个应用程序中加以使用。
- 从内部应用程序资产检索一个用户图片,存储在本地内部内存和外部内存中,并呈现在屏幕上。
- 从应用程序的资产检索一个 JSON 格式的好友列表。解析并存储在本地内部内存、外部内存和关系数据库中,再呈现在屏幕上。
表 1. 样例应用程序中的类
| 类 | 说明 |
|---|---|
| MainActivity | Main Activity;大多数样例代码都驻留在这里 |
| Friend | 描绘一个 Friend |
| AppPreferenceActivity | Preferences Activity 和屏幕 |
| DBHelper | 一个用于 SQLite 数据库管理的帮助器类 |
示例应用程序使用了两种类型的数据。第一种是应用程序首选项,存储为名-值对。对于首选项,定义了以下信息:
- 一个 filename,用于加载和存储好友姓名列表
- 一个 filename,用于加载和存储用户的一幅图片
- 一个 flag,如果设置了,那么表示在应用程序启动时自动删除所有已存储的数据
第二种类型的数据是好友列表。好友列表最初表示为 Facebook Graph API JSON 格式,包含一组姓名和好友对象(参见 清单 1)。
清单 1. 好友列表(Facebook Graph API JSON 格式)
{
   "data": [
      {
         "name": "Edmund Troche",
         "id": "500067699"
      }
   ]
}
上面的简单格式使得 Friend 对象和数据库模式也简单。清单 2 展示了 Friend 类。
清单 2. Friend 类
package com.cenriqueortiz.tutorials.datastore;

import android.graphics.Bitmap;

/**
 * Represents a Friend
 */
public class Friend {
    public String id;
    public String name;
    public byte[] picture;
    public Bitmap pictureBitmap;;
}
除了 ID 和姓名之外,样例应用程序也保留了对好友图片的引用。尽管样例应用程序没有使用这些引用,但是您很容易扩展样例应用程序,以从 Facebook 检索图片并显示在主屏幕中。
数据库模式包含单个表,用于存储 Friend 的信息。表有三列:
- 惟一的 ID 或键
- Facebook ID
- Friend 的姓名
清单 3 展示了相应关系表声明的 SQL 语句。
db.execSQL("create table " + TABLE_NAME + " (_id integer primary key autoincrement, "
+ " fid text not null, name text not null) ");
根据此信息,您可以在主屏幕上显示姓名;使用 ID,您可以检索所选用户的额外详细信息。在样例应用程序中,只显示了姓名。检索额外信息留给您去试验。注意,您很容易更改代码,以直接转向 Facebook。
存储应用程序首选项
本节介绍 Preferences API 和屏幕。Android API 提供很多方式处理首选项。其中一种方式是直接使用 SharedPreferences,并使用您自己的屏幕设计和首选项管理。第二种方法是使用 PreferenceActivity。PreferenceActivity 自动负责首选项如何呈现在屏幕上(默认情况下,看起来跟系统首选项一样),并通过使用 SharedPreferences 在用户与每个首选项交互时自动存储或保存首选项。
为了简化样例应用程序,使用一个 PreferenceActivity 来管理首选项和首选项屏幕(参见 图 2)。首选项屏幕显示两个部分:Assets 和 Auto Settings。在 Assets 下,您可以为 Friends List 和 Picture 选项输入文件名。在 Auto Settings 下,您可以选中一个复选框,以便在启动时删除信息。
图 2. 实现的 Preferences 屏幕
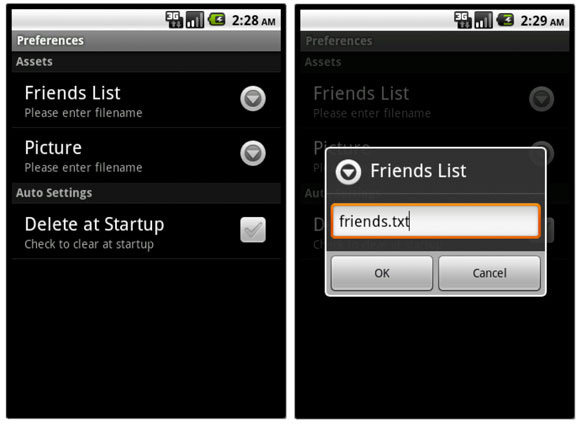
在 图 2 中,布局是用 XML 以声明式方法定义的(不是以编程方式);声明式 XML 是首选方法,因为它保持了源代码的清晰可读。清单 4 展示了 Preferences UI 的 XML 声明。
清单 4. Preferences 屏幕的 XML 声明
<?xml version="1.0" encoding="utf-8"?>
<PreferenceScreen
        xmlns:android="http://schemas.android.com/apk/res/android"
        android:id="@+id/prefs_screen"
        android:key="preferencescreen"
    >
    <PreferenceCategory android:title="Assets">
        <EditTextPreference
            android:key="@string/prefs_assetname_friendslist_key"
            android:title="Friends List"
            android:summary="Please enter filename"
            android:defaultValue="friends.txt"
        />
        <EditTextPreference
            android:key="@string/prefs_assetname_picture_key"
            android:title="Picture"
            android:summary="Please enter filename"
            android:defaultValue="pict2.jpg"
        />
    </PreferenceCategory>

    <PreferenceCategory android:title="Auto Settings">
        <CheckBoxPreference
            android:key="@string/prefs_autodelete_key"
            android:title="Delete at Startup"
            android:summary="Check to clear at startup"
            android:defaultValue="false"
        />
    </PreferenceCategory>
</PreferenceScreen>
PreferenceScreen 包含 EditTextPreference 的两个实例、一个 CheckBoxPreference 和两个由 PreferenceCategory 定义的类别组(一个用于 Asset,另一个用于 Auto Settings)。
在样例应用程序中,设计要求 Preference 屏幕使用菜单项进行调用。为此,使用一条 Intent 消息来调用叫做 AppPreferenceActivity 的 Preference Screen Activity(参见 清单 5)。注意,我没有详细介绍 Intent 如何工作。关于 Intent 的更多信息,请参见 参考资料。
清单 5. AppPreferenceActivity
/*
 * AppPreferenceActivity is a basic PreferenceActivity
 * C. Enrique Ortiz | http://CEnriqueOrtiz.com
 */
package com.cenriqueortiz.tutorials.datastore;

import android.os.Bundle;
import android.preference.PreferenceActivity;

public class AppPreferenceActivity extends PreferenceActivity {

    /**
     * Default Constructor
     */
    public AppPreferenceActivity() {}

   /**
    * Called when the activity is first created.
    *   Inflate the Preferences Screen XML declaration.
    */
    @Override
    public void onCreate(Bundle savedInstanceState) {
        super.onCreate(savedInstanceState);
        addPreferencesFromResource(R.xml.prefs); // Inflate the XML declaration
    }

}
在样例应用程序中,像 清单 6 中一样,从菜单项处理程序中调用 Intent。
清单 6. 使用 Intent 调用 Preference Activity
/**
 * Invoked when a menu item has been selected
 */
@Override
public boolean onOptionsItemSelected(MenuItem item) {
    switch (item.getItemId()) {

        // Case: Bring up the Preferences Screen
        case R.id.menu_prefs: // Preferences
            // Launch the Preference Activity
            Intent i = new Intent(this, AppPreferenceActivity.class);
            startActivity(i);
            break;

        case R.id.menu...:
            :
            break;

    }
    return true;
}
此外,您必须在 AndroidManifest XML 文件中定义所有的 Intent,如 清单 7 所示。
清单 7. 在 AndroidManifest.xml 中定义 Intent
:

<application android:icon="@drawable/icon" android:label="@string/app_name">

    :
    :

    <activity
        android:name="AppPreferenceActivity"
        android:label="Preferences">
    </activity>

     :

</application>
回想一下,PreferenceActivity 使用 SharedPreferences 在用户与首选项屏幕交互时自动存储首选项。然后应用程序在执行各种任务时使用这些首选项。清单 8 展示了如何直接使用 SharedPreferences 来加载存储的首选项;关于加载的首选项在整个样例代码中是如何被使用的,您可以参考相应的样例代码。此外,清单 8 也展示了如何利用 SharedPreferences 直接存储首选项,以防您喜欢自己管理首选项(不是通过 PrefenceActivity),使用了一个 Editor。
清单 8 展示了如何使用 SharedPreferences 加载已存储的首选项,以及如何使用 Editor 更改已存储的首选项。
清单 8. 使用 SharedPreferences
/
// The following methods show how to use the SharedPreferences
/

/**
 * Retrieves the Auto delete preference
 * @return the value of auto delete
 */
public boolean prefsGetAutoDelete() {
    boolean v = false;
    SharedPreferences sprefs =
       PreferenceManager.getDefaultSharedPreferences(appContext);
    String key = appContext.getString(R.string.prefs_autodelete_key);
    try {
        v = sprefs.getBoolean(key, false);
    } catch (ClassCastException e) {
    }
    return v;
}

/**
 * Sets the auto delete preference
 * @param v the value to set
 */
public void  prefsSetAutoDelete(boolean v) {
    SharedPreferences sprefs =
    PreferenceManager.getDefaultSharedPreferences(appContext);
    Editor e = sprefs.edit();
    String key = appContext.getString(R.string.prefs_autodelete_key);
    e.putBoolean(key, v);
    e.commit();
}
接下来,将介绍如何使用数据库来存储数据。
使用 SQLite 数据库
Android 通过 SQLite 提供对本地关系数据库的支持。表中(定义在以下代码清单中)汇总了样例应用程序中使用的重要数据库类。
样例应用程序使用了一个 DBHelper 类来封装一些数据库操作(参见 清单 9)。
清单 9. DBHelper
package com.cenriqueortiz.tutorials.datastore;

import java.util.ArrayList;

import android.content.Context;
import android.database.Cursor;
import android.database.sqlite.SQLiteDatabase;
import android.database.sqlite.SQLiteOpenHelper;

public class DBHelper extends SQLiteOpenHelper {
为数据库版本、数据库名称和表名称定义了很多常量(参见 清单 10)。
清单 10. 初始化 DBHelper
    private SQLiteDatabase db;
    private static final int DATABASE_VERSION = 1;
    private static final String DB_NAME = "sample.db";
    private static final String TABLE_NAME = "friends";

    /**
     * Constructor
     * @param context the application context
     */
    public DBHelper(Context context) {
        super(context, DB_NAME, null, DATABASE_VERSION);
        db = getWritableDatabase();
    }
在准备好创建数据库时,会调用 onCreate() 方法。在该方法中,创建表(参见 清单 11)。
清单 11. 创建数据库表
    /**
     * Called at the time to create the DB.
     * The create DB statement
     * @param the SQLite DB
     */
    @Override
    public void onCreate(SQLiteDatabase db) {
        db.execSQL(
                "create table " + TABLE_NAME + " (_id integer primary key autoincrement,
" + " fid text not null, name text not null) ");
    }
insert() 方法在信息导出到数据库时由 MainActivity 调用(参见 清单 12)。
清单 12. 插入一行
    /**
     * The Insert DB statement
     * @param id the friends id to insert
     * @param name the friend's name to insert
     */
    public void insert(String id, String name) {
        db.execSQL("INSERT INTO friends('fid', 'name') values ('"
                + id + "', '"
                + name + "')");
    }
deleteAll() 方法在清理数据库时由 MainActivity 调用。它删除表(参见 清单 13)。
清单 13. 删除数据库表
    /**
     * Wipe out the DB
     */
    public void clearAll() {
        db.delete(TABLE_NAME, null, null);
    }
提供了两个 SELECT ALL 方法:cursorSelectAll() 和 listSelectAll(),前者返回一个游标,后者返回一个 Friend 对象 ArrayList。这些方法在从数据库加载信息时由 MainActivity 调用(参见 清单 14)。
清单 14. 运行返回 ArrayList 的 Select All
    /**
     * Select All returns a cursor
     * @return the cursor for the DB selection
     */
    public Cursor cursorSelectAll() {
        Cursor cursor = this.db.query(
                TABLE_NAME, // Table Name
                new String[] { "fid", "name" }, // Columns to return
                null,       // SQL WHERE
                null,       // Selection Args
                null,       // SQL GROUP BY
                null,       // SQL HAVING
                "name");    // SQL ORDER BY
        return cursor;
    }
listSelectAll() 方法返回 ArrayList 容器中选定的行,该容器由 MainActivity 用来将它绑定到 MainScreen ListView(参见 清单 15)。
清单 15. 运行返回游标的 Select All
    /**
     * Select All that returns an ArrayList
     * @return the ArrayList for the DB selection
     */
    public ArrayList<Friend> listSelectAll() {
        ArrayList<Friend> list = new ArrayList<Friend>();
        Cursor cursor = this.db.query(TABLE_NAME, new String[] { "fid", "name" },
null, null, null, null, "name");
        if (cursor.moveToFirst()) {
            do {
                Friend f = new Friend();
                f.id = cursor.getString(0);
                f.name = cursor.getString(1);
                list.add(f);
            } while (cursor.moveToNext());
        }
        if (cursor != null && !cursor.isClosed()) {
            cursor.close();
        }
        return list;
    }
如果检测到数据库版本更改,就会调用 onUpgrade() 方法(参见 清单 16)。
清单 16. 检测数据库版本是否更改
    /**
     * Invoked if a DB upgrade (version change) has been detected
     */
    @Override
    /**
     * Invoked if a DB upgrade (version change) has been detected
     */
    @Override
    public void onUpgrade(SQLiteDatabase db,
       int oldVersion, int newVersion) {
        // Here add any steps needed due to version upgrade
        // for example, data format conversions, old tables
        // no longer needed, etc
    }
}
整个 MainActivity 中,当您将信息导出到数据库、从数据库加载信息以及清理数据库时,都会使用 DBHelper。第一件事是在创建 MainActivity 时实例化 DBHelper。在 onCreate() 时执行的其他任务包括初始化不同的屏幕视图(参见 清单 17)。
清单 17. MainActivity onCreate() 初始化数据库
public void onCreate(Bundle savedInstanceState) {
    super.onCreate(savedInstanceState);
    appContext = this;
    setContentView(R.layout.main);
    dbHelper = new DBHelper(this);
    listView = (ListView) findViewById(R.id.friendsview);
    friendsArrayAdapter = new FriendsArrayAdapter(
       this, R.layout.rowlayout, friends);
    listView.setAdapter(friendsArrayAdapter);
    :
    :
}
清单 18 展示了如何从资产加载好友列表以及如何将之解析并插入数据库中。
清单 18. MainActivity 插入到数据库中
String fname = prefsGetFilename();
if (fname != null && fname.length() > 0) {
    buffer = getAsset(fname);
    // Parse the JSON file
    String friendslist = new String(buffer);
    final JSONObject json = new JSONObject(friendslist);
    JSONArray d = json.getJSONArray("data");
    int l = d.length();
    for (int i2=0; i2<l; i2++) {
        JSONObject o = d.getJSONObject(i2);
        String n = o.getString("name");
        String id = o.getString("id");
        dbHelper.insert(id, n);
    }
    // Only the original owner thread can touch its views
    MainActivity.this.runOnUiThread(new Runnable() {
        public void run() {
            friendsArrayAdapter.notifyDataSetChanged();
        }
    });
}
清单 19 展示了如何执行 SELECT ALL 以及如何将数据绑定到主屏幕 ListView。
清单 19. MainActivitySelect All 和将数据绑定到 ListView
final ArrayList<Friend> dbFriends = dbHelper.listSelectAll();
if (dbFriends != null) {
    // Only the original owner thread can touch its views
    MainActivity.this.runOnUiThread(new Runnable() {
        public void run() {
            friendsArrayAdapter =
            new FriendsArrayAdapter(
                MainActivity.this, R.layout.rowlayout, dbFriends);
            listView.setAdapter(friendsArrayAdapter);
            friendsArrayAdapter.notifyDataSetChanged();
        }
    });
}
接下来,了解一下在示例应用程序中使用 Internal Storage API。
为私有数据使用设备的内部存储器
有了数据存储 API,您可以使用内部存储器存储数据。信息可以是私有的,您可以有选择地让其他应用程序对之具有读或写的访问权限。本节介绍这个存储私有数据的 API,它使用 android.content.Context.openFileInput、openFileOutput 和 getCacheDir() 来高速缓存数据,而不是永久地存储。
清单 20 中的代码片段展示了如何从内部私有存储器读取数据。使得存储器为私有的方法是对 openFileOutput() 使用 MODE_PRIVATE。
清单 20. 从本地私有存储器读取数据
/**
 * Writes content to internal storage making the content private to
 * the application. The method can be easily changed to take the MODE
 * as argument and let the caller dictate the visibility:
 * MODE_PRIVATE, MODE_WORLD_WRITEABLE, MODE_WORLD_READABLE, etc.
 *
 * @param filename - the name of the file to create
 * @param content - the content to write
 */
public void writeInternalStoragePrivate(
        String filename, byte[] content) {
    try {
        //MODE_PRIVATE creates/replaces a file and makes
        //  it private to your application. Other modes:
        //    MODE_WORLD_WRITEABLE
        //    MODE_WORLD_READABLE
        //    MODE_APPEND
        FileOutputStream fos =
           openFileOutput(filename, Context.MODE_PRIVATE);
        fos.write(content);
        fos.close();
    } catch (FileNotFoundException e) {
        e.printStackTrace();
    } catch (IOException e) {
        e.printStackTrace();
    }
}
清单 21 中的代码片段展示了如何从内部私有存储器读取数据;注意 openFileInput() 的使用。
清单 21. 从内部私有存储器读取数据
/**
 * Reads a file from internal storage
 * @param filename the file to read from
 * @return the file content
 */
public byte[] readInternalStoragePrivate(String filename) {
    int len = 1024;
    byte[] buffer = new byte[len];
    try {
        FileInputStream fis = openFileInput(filename);
        ByteArrayOutputStream baos = new ByteArrayOutputStream();
        int nrb = fis.read(buffer, 0, len); // read up to len bytes
        while (nrb != -1) {
            baos.write(buffer, 0, nrb);
            nrb = fis.read(buffer, 0, len);
        }
        buffer = baos.toByteArray();
        fis.close();
    } catch (FileNotFoundException e) {
        e.printStackTrace();
    } catch (IOException e) {
        e.printStackTrace();
    }
    return buffer;
}
清单 22 展示了如何从内部私有存储器删除数据。
清单 22. 从本地私有存储器删除数据
/**
 * Delete internal private file
 * @param filename - the filename to delete
 */
public void deleteInternalStoragePrivate(String filename) {
    File file = getFileStreamPath(filename);
    if (file != null) {
        file.delete();
    }
}
现在可以来看为公共数据使用外部存储器了。
为公共数据使用设备的外部存储器
有了数据存储 API,您可以使用外部存储器存储数据。信息可以是私有的,您可以有选择地让其他应用程序对之具有读或写的访问权限。本节您将对此 API 进行编程,以便使用包括 getExternalStorageState()、getExternalFilesDir()、getExternalStorageDirectory() 和 getExternalStoragePublicDirectory() 在内的很多 API 来存储公共数据。您为公共数据使用下面的路径:/Android/data//files/。
在使用外部存储器之前,必须看看它是否可用,是否可写。下面两个代码片段展示了测试这些条件的帮助器方法。清单 23 测试外部存储器是否可用。
清单 23. 测试外部存储器是否可用
/**
 * Helper Method to Test if external Storage is Available
 */
public boolean isExternalStorageAvailable() {
    boolean state = false;
    String extStorageState = Environment.getExternalStorageState();
    if (Environment.MEDIA_MOUNTED.equals(extStorageState)) {
        state = true;
    }
    return state;
}
清单 24 测试外部存储器是否只可读。
清单 24. 测试外部存储器是否只可读
/**
 * Helper Method to Test if external Storage is read only
 */
public boolean isExternalStorageReadOnly() {
    boolean state = false;
    String extStorageState = Environment.getExternalStorageState();
    if (Environment.MEDIA_MOUNTED_READ_ONLY.equals(extStorageState)) {
        state = true;
    }
    return state;
}
清单 25 展示了如何写到外部存储器,以存储公共数据。
清单 25. 写到外部内存
/**
 * Write to external public directory
 * @param filename - the filename to write to
 * @param content - the content to write
 */
public void writeToExternalStoragePublic(String filename, byte[] content) {

    // API Level 7 or lower, use getExternalStorageDirectory()
    //  to open a File that represents the root of the external
    // storage, but writing to root is not recommended, and instead
    // application should write to application-specific directory, as shown below.

    String packageName = this.getPackageName();
    String path = "/Android/data/" + packageName + "/files/";

    if (isExternalStorageAvailable() &&
       !isExternalStorageReadOnly()) {
        try {
            File file = new File(path, filename);
            file.mkdirs();
            FileOutputStream fos = new FileOutputStream(file);
            fos.write(content);
            fos.close();
        } catch (FileNotFoundException e) {
            e.printStackTrace();
        } catch (IOException e) {
            e.printStackTrace();
        }
    }
}
清单 26 展示了如何从外部存储器读取数据。
清单 26. 从外部内存读取数据
/**
 * Reads a file from internal storage
 * @param filename - the filename to read from
 * @return the file contents
 */
public byte[] readExternallStoragePublic(String filename) {
    int len = 1024;
    byte[] buffer = new byte[len];
    String packageName = this.getPackageName();
    String path = "/Android/data/" + packageName + "/files/";

    if (!isExternalStorageReadOnly()) {
        try {
            File file = new File(path, filename);
            FileInputStream fis = new FileInputStream(file);
            ByteArrayOutputStream baos = new ByteArrayOutputStream();
            int nrb = fis.read(buffer, 0, len); //read up to len bytes
            while (nrb != -1) {
                baos.write(buffer, 0, nrb);
                nrb = fis.read(buffer, 0, len);
            }
            buffer = baos.toByteArray();
            fis.close();
        } catch (FileNotFoundException e) {
            e.printStackTrace();
        } catch (IOException e) {
            e.printStackTrace();
        }
    }
    return buffer;
}
清单 27 中的代码片段展示了如何从外部内存删除文件。
清单 27. 从外部内存删除文件
/**
 * Delete external public file
 * @param filename - the filename to write to
 */
void deleteExternalStoragePublicFile(String filename) {
    String packageName = this.getPackageName();
    String path = "/Android/data/" + packageName + "/files/"+filename;
    File file = new File(path, filename);
    if (file != null) {
        file.delete();
    }
}
处理外部存储器需要特殊的权限 WRITE_EXTERNAL_STORAGE,它通过 AndroidManifest.xml 请求得到(参见 清单 28)。
清单 28. WRITE_EXTERNAL_STORAGE
<uses-permission android:name="android.permission.WRITE_EXTERNAL_STORAGE"/>外部存储 API 通过根据文件类型(比如 Pictures、Ringtones)将文件存储在预先确定的目录中,允许您公共地存储文件。本文没有介绍这种方法,但是您应该熟悉它。此外,记住外部存储器中的文件任何时候都可能消失。
相关的方法
如果您具有不需要长期永久保存的临时文件,那么可以将这些文件存储在高速缓存中。高速缓存是一种特殊的内存,可以用于存储中小型数据(少于兆字节),但是您一定要知道,取决于有多少内存可用,高速缓存的内容任何时候都可能被清除。
清单 29 展示了一个帮助器方法,它返回到内部内存中高速缓存的路径。
清单 29. 检索到内部内存高速缓存的路径
/**
 * Helper method to retrieve the absolute path to the application
 * specific internal cache directory on the file system. These files
 * will be ones that get deleted when the application is uninstalled or when
 * the device runs low on storage. There is no guarantee when these
 * files will be deleted.
 *
 * Note: This uses a Level 8+ API.
 *
 * @return the absolute path to the application specific cache
 * directory
 */
public String getInternalCacheDirectory() {
    String cacheDirPath = null;
    File cacheDir = getCacheDir();
    if (cacheDir != null) {
        cacheDirPath = cacheDir.getPath();
    }
    return cacheDirPath;
}
清单 30 展示了一个帮助器方法,它返回到外部内存中高速缓存的路径。
清单 30. 检索到外部内存高速缓存的路径
/**
 * Helper method to retrieve the absolute path to the application
 * specific external cache directory on the file system. These files
 * will be ones that get deleted when the application is uninstalled or when
 * the device runs low on storage. There is no guarantee when these
 * files will be deleted.
 *
 * Note: This uses a Level 8+ API.
 *
 * @return the absolute path to the application specific cache
 * directory
 */
public String getExternalCacheDirectory() {
    String extCacheDirPath = null;
    File cacheDir = getExternalCacheDir();
    if (cacheDir != null) {
        extCacheDirPath = cacheDir.getPath();
    }
    return extCacheDirPath;
}
通过使用示例应用程序,您现在应该很好地理解了如何为公共数据使用设备的外部存储器。
结束语
本文介绍了几个 Android 存储 API,从首选项到使用 SQLite 和内部及外部内存。利用首选项 API,您可以让自己的应用程序收集和存储简单的首选项信息。使用 SQLite API,您可以存储更复杂的数据,利用内部和外部存储器,您可以存储对应用程序是私有的或者对其他应用程序公共可用的文件。跨多个会话持久存储的已存储数据让您的应用程序甚至在与网络断开连接时仍然能够工作。您现在应该掌握了在开发 Android 应用程序时利用所有这些类型的存储器。
下载
| 描述 | 名字 | 大小 |
|---|---|---|
| 本文源代码 | android.storage.source.zip | 38KB |
参考资料
学习
- Facebook移动网页:学习如何使用为所有网站提供的、格式化为适合某款移动电话的
API 将 Facebook 合成到您自己的移动应用程序中。 - Create an Application - Facebook Developers:注册您的 Facebook 应用程序。
- Extended permissions - Facebook Developers:如果您的应用程序需要访问用户简介中其他可能为私有的部分,或者您的应用程序需要代表用户将内容发布到 Facebook,那么需要请求扩展的权限。
- 官方 Facebook 开发人员文档:探究强大的 API,它们让您能够创建社交体验,完善您的网站功能。
- Facebook Authentication:使用 Facebook 平台开发应用程序时,了解身份认证和授权。
- Facebook Developer Roadmap:使用该路线图来规划可能需要代码修改的更改。
- 用 Eclipse 开发 Android 应用程序(Frank Ableson,developerWorks,2008 年 2 月):开发 Android 应用程序最容易的方式是使用 Eclipse。在这篇 developerWorks 教程中了解关于这一主题的所有内容。
- Android 开发简介(Frank Ableson,developerWorks,2009 年 5 月):了解 Android 平台的介绍性内容,学习如何编写基本的 Android 应用程序。
- 使用 Android 实现联网(Frank Ableson,developerWorks,2009 年 6 月):探究 Android 的联网功能。
- 在 Android 上使用 XML(Michael Galpin,2009 年 6 月):了解在 Android 上使用 XML 的不同选择,以及如何使用它们来构建您自己的 Android 应用程序。
- Under the Hood of Native Web Apps for Android:了解 Android 中的混合应用程序。
- Unlocking Android(Frank Ableson,Manning Publications,2010 年):本书中介绍了 Android 开发的所有方面。
- Mobile Design and Development(Brian Fling,O’Reilly Media,2009 年):在本书中了解关于构建移动产品的实际指导方针、标准、技术和最佳实践。
- 阅读 Data Storage Dev Guide:跟官方 Android Developer 网站提到的那样,选择正确的解决方案保存持久的应用程序数据。
- Intents:了解一个将从 Android Developer 网站执行的操作的抽象描述。
- Android SDK 文档:在 Android API 参考资料中获得最新信息。
- The Open Handset Alliance:访问 Android 的发起者。
- 本作者的更多文章(C. Enrique Ortiz,developerWorks,2004 年 7 月至今):阅读关于 Android、移 - 动应用程序、web 服务和其他技术的文章。
- developerWorks XML 专区:在 XML 专区获取提高您的专业技能所需的资源。
- My developerWorks 中文社区:个性化您的 developerWorks 体验。
- IBM XML 认证:了解如何才能成为一名 IBM 认证的 XML 和相关技术的开发人员。
- XML 技术库:访问 developerWorks XML 专区,获得广泛的技术文章和技巧、教程、标准和 IBM 红皮书。此外,阅读更多的 XML 技巧。
- developerWorks 技术活动 和 网络广播:随时关注这些活动中的技术。
- developerWorks 播客:收听面向软件开发人员的有趣访谈和讨论。
- developerWorks 演示中心:观看包括面向初学者的产品安装和设置以及为经验丰富的开发人员提供的高级功能在内的演示。
获得产品和技术
- Facebook Android SDK(当前是 Alpha 版本):利用这个库将 Facebook 集成到您的 Android 移动应用程序中。
- Facebook Platform:扩展您在 Facebook 和 web 上构建社会应用程序的能力。
- Facebook Old Rest API(Graph API 的前一版本):通过简单的 HTTP 请求以编程方式与 Facebook 网站交互。
- Facebook Graph API(当前版本):深入研究这个核心的 Facebook Platform API。
- OAuth 2.0 Protocol 规范(2010 年 7 月):处理 OAuth 身份认证,受 Facebook Platform 支持。
- Android SDK:从官方 Android 开发人员网站下载 SDK、访问 API 参考资料以及获得关于 Android 的最新新闻。版本 1.5 及更新版本可以工作。
- Android Open Source Project:找到构建 Android 兼容的设备所需的开源信息和源代码。
- JDK 6 Update 21:获得 Java Platform, Standard Edition。
- Eclipse:获得最新的 Eclipse IDE。


 5775
5775


 被折叠的 条评论
为什么被折叠?
被折叠的 条评论
为什么被折叠?
 到【灌水乐园】发言


