


刚开始接触NDK,折腾了好久,以免以后又忘了,故记录下,方便以后需要用时再看看。
附上例子源码http://download.csdn.net/detail/crz082/9093273
NDK开发环境配置
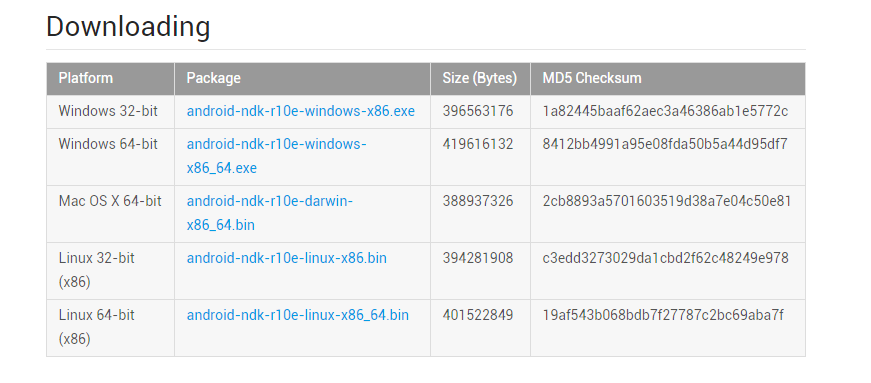
1. 下载NDK
NDK 官网下载地址https://developer.android.com/ndk/downloads/index.html
可根据需要下载相应的版本。下载后放到硬盘的某个目录下(比如:C:/ProgramFile),并解压,解压后的文件目录就是直接可以用的NDK了,NDK所在的目录最后不要包含空白符(PS:空格),有空白符的话,可能在后续的编译中会出错。
由于在NDK r7之后就已经集成了ndk-build.cmd,所以并不需要另外下载Cygwin来模拟Linux环境来编译。当然你也可以通过Cygwin来编译。
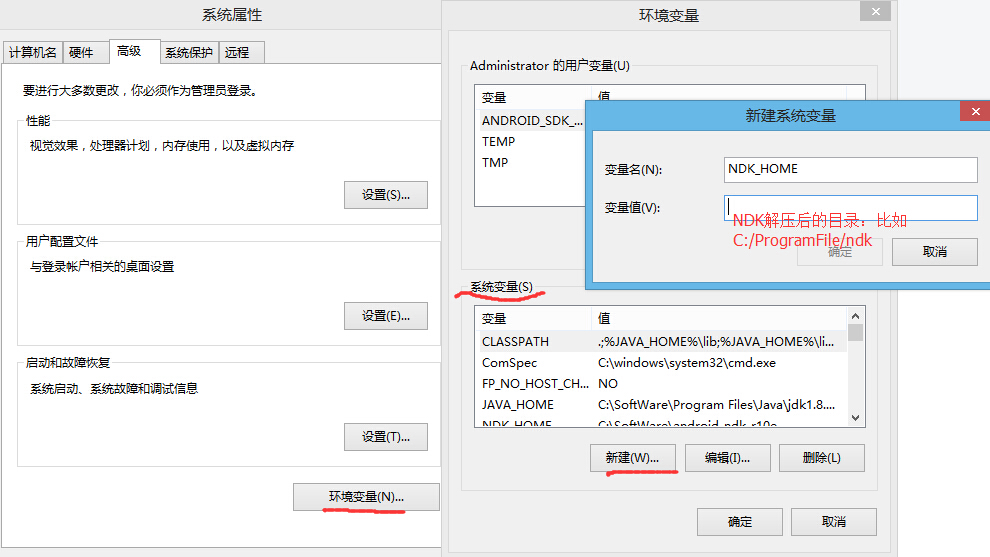
2. 环境变量配置
配置系统环境变量,如图
变量名称随意,变量值就是上面下载的NDK加压后,NDK的目录。接着在Path里面添加%NDK_HOME%,因为都是在eclipse上有插件自动编译,不用自己敲打命令行,所以这一变量有没有配置都没什么影响,如果不用Cygwin的话,估计是不需要用到NDK下面的编译程序的,如果使用Cygwin好像还需要配置Cygwin的环境变量。
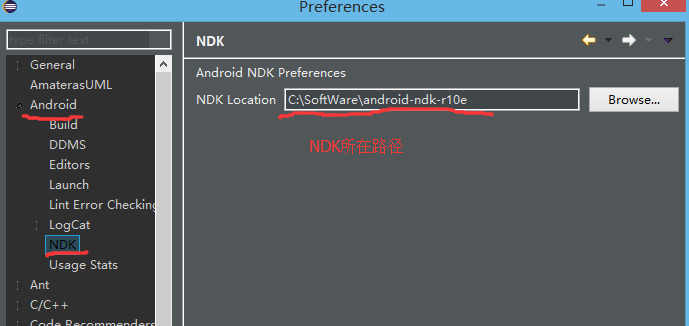
3. eclipse配置NDK
- 导入NDK到eclipse,Window->Preferences->Android->NDK,如图:
使用NDK开发
(eclipse已经安装了,ADT已经CDT插件)
1. 创建Android项目JNITest
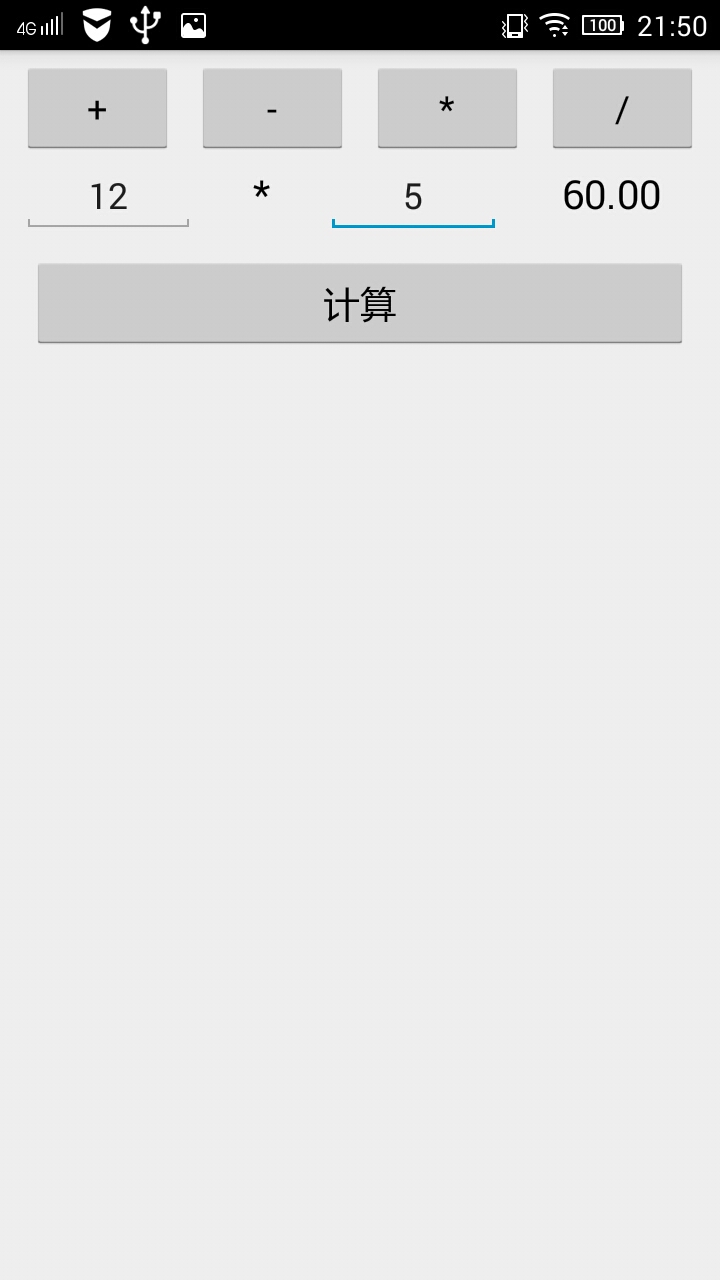
测试NDK开发的例子大概功能是,在Activity界面输入两个整型数字,用NDK C++代码实现+,-,*,/ 简单的四则运算,并返回结果显示在Activity中。
编写布局文件:
布局文件包含+,-,*,/ 四个运算符button在第一行,第二行则是两个文本输入框EditText,以及两个TextView来显示选择的运算符以及运算结果,第三行是一个按钮,点击按钮则计算。
<RelativeLayout xmlns:android="http://schemas.android.com/apk/res/android"
    android:layout_width="fill_parent"
    android:layout_height="fill_parent"
    android:layout_margin="5dp"
    >

    <LinearLayout
        android:id="@+id/operator"
        android:layout_width="fill_parent"
        android:layout_height="wrap_content"
        android:orientation="horizontal"
        android:layout_alignParentTop="true"
        >
        <Button
               android:id="@+id/add"
            android:layout_width="fill_parent"
            android:layout_height="wrap_content"
            android:layout_weight="1"
             android:layout_marginLeft="5dp"
            android:layout_marginRight="5dp"
            android:text="+"
            />

        <Button
           android:id="@+id/sub"
            android:layout_width="fill_parent"
            android:layout_height="wrap_content"
            android:layout_weight="1"
            android:layout_marginLeft="5dp"
            android:layout_marginRight="5dp"
            android:text="-"
            />

        <Button
              android:id="@+id/mul"
            android:layout_width="fill_parent"
            android:layout_height="wrap_content"
            android:layout_weight="1"
             android:layout_marginLeft="5dp"
            android:layout_marginRight="5dp"
            android:text="*"
            />

        <Button
            android:id="@+id/div"
            android:layout_width="fill_parent"
            android:layout_height="wrap_content"
            android:layout_weight="1"
             android:layout_marginLeft="5dp"
            android:layout_marginRight="5dp"
            android:text="/"
            />

    </LinearLayout>

    <LinearLayout
        android:id="@+id/cal_linaer"
        android:layout_width="fill_parent"
        android:layout_height="wrap_content"
        android:orientation="horizontal"
        android:layout_alignParentLeft="true"
        android:layout_below="@id/operator"
        >
        <EditText
            android:id="@+id/num1"
            android:layout_width="0dp"
            android:layout_height="wrap_content"
            android:layout_weight="2"
            android:gravity="center"
             android:layout_marginLeft="5dp"
            android:layout_marginRight="5dp"
             android:digits="1234567890"
            />
        <TextView
              android:id="@+id/select_op"
            android:layout_width="0dp"
            android:layout_height="wrap_content"
            android:layout_weight="1"
             android:layout_marginLeft="5dp"
            android:layout_marginRight="5dp"
            android:gravity="center"
            android:text="+"
             android:textSize="20sp"
            android:textColor="#000000"
            />

        <EditText
            android:id="@+id/num2"
            android:layout_width="0dp"
            android:layout_height="wrap_content"
            android:layout_weight="2"
            android:gravity="center"
             android:layout_marginLeft="5dp"
            android:layout_marginRight="5dp"
            android:digits="1234567890"
            />

        <TextView
              android:id="@+id/result"
            android:layout_width="0dp"
            android:layout_height="wrap_content"
            android:layout_weight="2"
            android:gravity="center"
             android:layout_marginLeft="5dp"
            android:layout_marginRight="5dp"
            android:textSize="20sp"
            android:textColor="#000000"
            />

    </LinearLayout>

    <Button
        android:id="@+id/cal"
        android:layout_width="fill_parent"
        android:layout_height="wrap_content"
        android:orientation="horizontal"
        android:layout_alignParentLeft="true"
        android:layout_below="@id/cal_linaer"
        android:layout_margin="10dp"
        android:text="计算"
        />
</RelativeLayout>- Activity代码:
package org.tonny.jni;


import android.app.Activity;
import android.os.Bundle;
import android.view.View;
import android.view.View.OnClickListener;
import android.view.inputmethod.EditorInfo;
import android.widget.Button;
import android.widget.EditText;
import android.widget.TextView;

public class JNITest extends Activity implements OnClickListener {


    //在对象创建之前加载本地方法
    static {
        System.loadLibrary("jni_test");
    }
    //用关键字native定义本地方法,即需要使用C或者C++实现的部分
    private native String GetReply(String operation, int num1, int num2);

    private Button btnAdd;
    private Button btnSub;
    private Button btnMul;
    private Button btnDiv;

    private EditText etNum1;
    private EditText etNum2;

    private TextView tvOp;
    private TextView tvResult;

    private Button btnCal;

    private TextView tvReturn;

    /** Called when the activity is first created. */
    @Override
    public void onCreate(Bundle savedInstanceState) {
        super.onCreate(savedInstanceState);
        setContentView(R.layout.activity_main);

        btnAdd = (Button)findViewById(R.id.add);
        btnSub = (Button)findViewById(R.id.sub);
        btnMul = (Button)findViewById(R.id.mul);
        btnDiv = (Button)findViewById(R.id.div);

        etNum1 = (EditText)findViewById(R.id.num1);
        etNum2 = (EditText)findViewById(R.id.num2);

        tvOp = (TextView)findViewById(R.id.select_op);
        tvResult = (TextView)findViewById(R.id.result);

        btnCal = (Button)findViewById(R.id.cal);

//      tvReturn = (TextView)findViewById(R.id.tv_return);

        btnAdd.setOnClickListener(this);
        btnSub.setOnClickListener(this);
        btnMul.setOnClickListener(this);
        btnDiv.setOnClickListener(this);

        btnCal.setOnClickListener(this);

        etNum1.setInputType(EditorInfo.TYPE_CLASS_PHONE);
        etNum2.setInputType(EditorInfo.TYPE_CLASS_PHONE);


    }

    @Override
    public void onClick(View v) {
        // TODO Auto-generated method stub
        int btnId = v.getId();
        switch(btnId){
        case R.id.add:
            tvOp.setText(btnAdd.getText());
            break;
        case R.id.sub:
            tvOp.setText(btnSub.getText());
            break;
        case R.id.mul:
            tvOp.setText(btnMul.getText());
            break;
        case R.id.div:
            tvOp.setText(btnDiv.getText());
            break;

        case R.id.cal:
            tvResult.setText(GetReply(tvOp.getText().toString(),
                    Integer.valueOf(etNum1.getText().toString()),
                    Integer.valueOf(etNum2.getText().toString())));


            break;
        }
    }
}
static {
System.loadLibrary("jni_test");
}2. 添加Native Support
项目右键,Android Tools->Add Native Sopport…,如图:
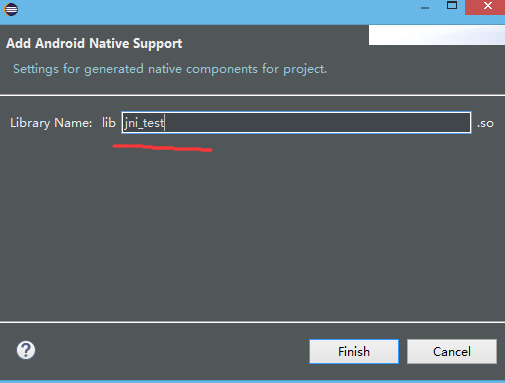
在这里填写的名称需要更Activity里的加载的一样。
 static {
        System.loadLibrary("jni_test");
}经过这一步之后会在项目的目录文件下生成jni目录文件,文件中包含有Android.mk和jni_test.cpp文件。Android.mk是NDK工程的Makefile,my-ndk.cpp就是NDK的源文件。
4. 生成C的头文件
打开cmd,并cd到项目下的src目录下,使用javah org.tonny.jni.JNITest来生成org_tonny_jni_JNITest.h C的头文件,此处的类必须使用类的全称,即加上包名和类名。接着把头文件拷到jni目录下。还有种方法是cd到bin/class目录下使用javah org.tonny.jni.JNITest来生成头文件,但是我使用这种发放时提示

我也不知道为什么,因为在src目录下同样可以生成头文件,也就没有深究这个出错的原因。
头文件代码:
/* DO NOT EDIT THIS FILE - it is machine generated */
#include <jni.h>
/* Header for class org_tonny_jni_JNITest */

#ifndef _Included_org_tonny_jni_JNITest
#define _Included_org_tonny_jni_JNITest
#ifdef __cplusplus
extern "C" {
#endif
/*
 * Class:     org_tonny_jni_JNITest
 * Method:    GetReply
 * Signature: (Ljava/lang/String;II)Ljava/lang/String;
 */
JNIEXPORT jstring JNICALL Java_org_tonny_jni_JNITest_GetReply
  (JNIEnv *, jobject, jstring, jint, jint);

#ifdef __cplusplus
}
#endif
#endif
5. 添加NDK Builder
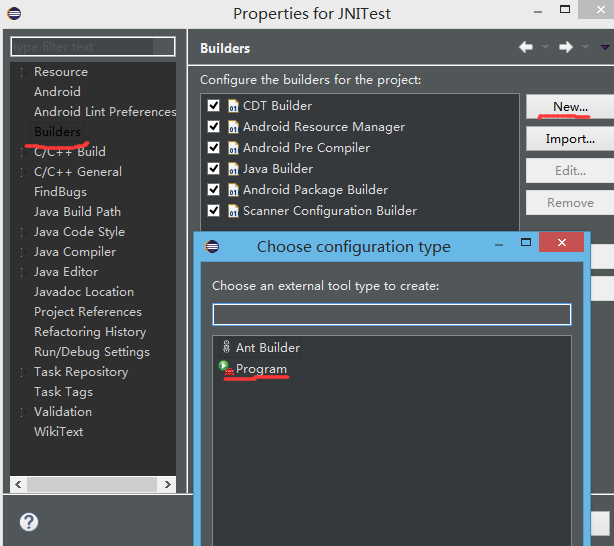
项目右键,Properties->Builder->New->Program,如图
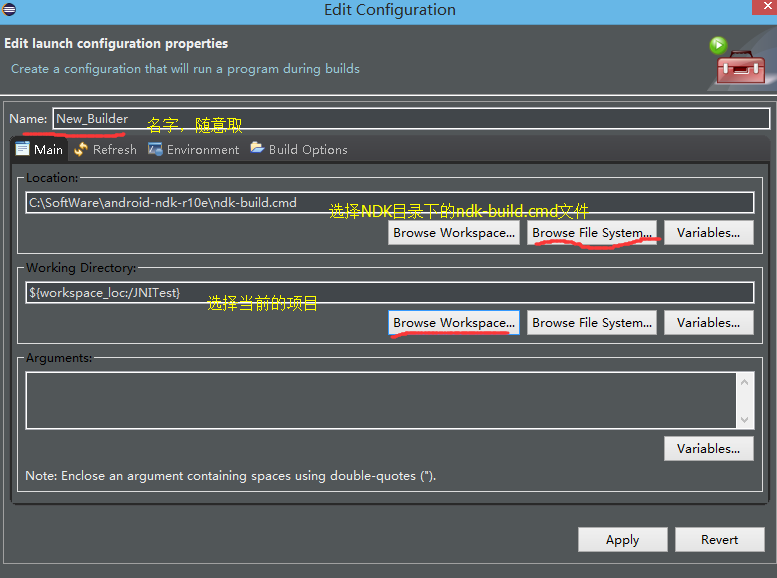
接着
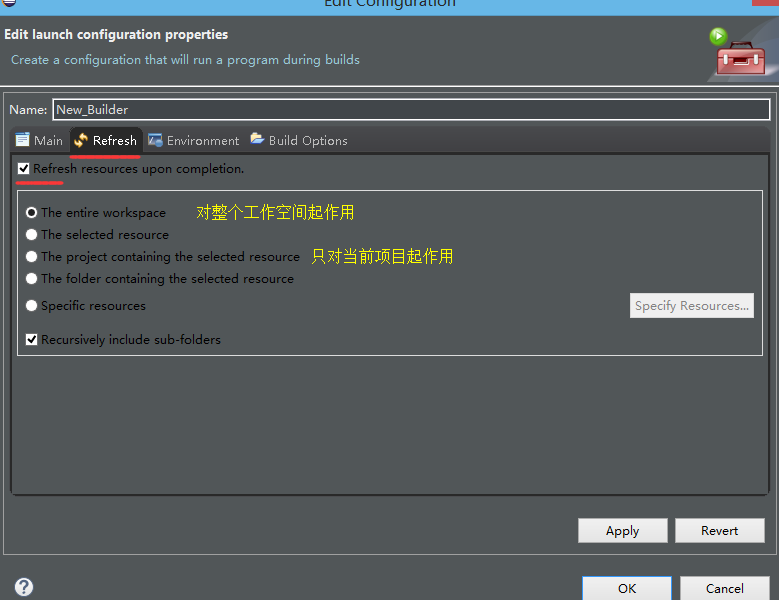
切换到Refresh选项卡,在Refresh resources upon completion前面打钩,如果想要在整个工作空间起作用的话,就行第一个,如果只想作用于当前项目则选择第三方。
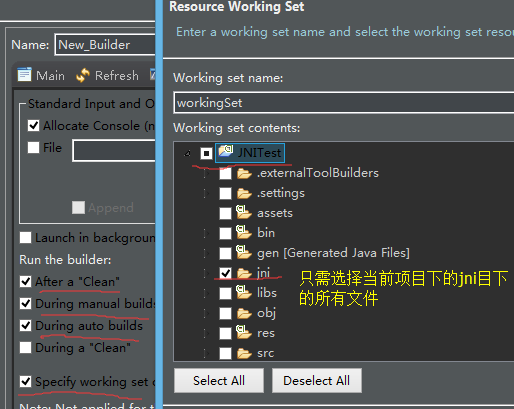
切换到Build Options选项卡,选上After a “Clean”、During manual builds 、During auto builds及最下面的specify working set of relevant resource,选择当前工程里的jni文件夹,即ndk编译时的源代码和mk文件所在目录。
然后Finish。
5. 添加依赖库
项目右键,Properties->C/C++ General->Paths and Symbos->Add

比如我的include文件所在目:C:\SoftWare\android-ndk-r10e\platforms\android-21\arch-arm\usr\include。这个路径比较长,为了使用方便,可以设置环境变量。
6. C++代码实现计算
#include<jni.h>
#include<string.h>
#include <stdio.h>
#include <stdlib.h>
#include"org_tonny_jni_JNITest.h"

JNIEXPORT jstring JNICALL Java_org_tonny_jni_JNITest_GetReply(JNIEnv * evn,
        jobject, jstring jop, jint jn1, jint jn2) {
    const char *op = evn->GetStringUTFChars(jop, 0);
    jdouble result = 0.0;
    if (strcmp(op, "+") == 0) {
        result = jn1 + jn2;
    }
    if (strcmp(op, "-") == 0) {
        result = jn1 - jn2;
    }
    if (strcmp(op, "*") == 0) {
        result = jn1 * jn2;
    }
    if (strcmp(op, "/") == 0) {
        if (jn2 == 0) {
            result = 0;
        } else {
            result = ((jdouble)jn1) / jn2;
        }
    }

    evn->ReleaseStringUTFChars(jop, op);

    char str[100];
//  itoa(result, str, 10);
    sprintf(str, "%.2f", result);

    jstring jstr = evn->NewStringUTF(str);
    return jstr;
}
7. 实例效果图
可能遇到的问题
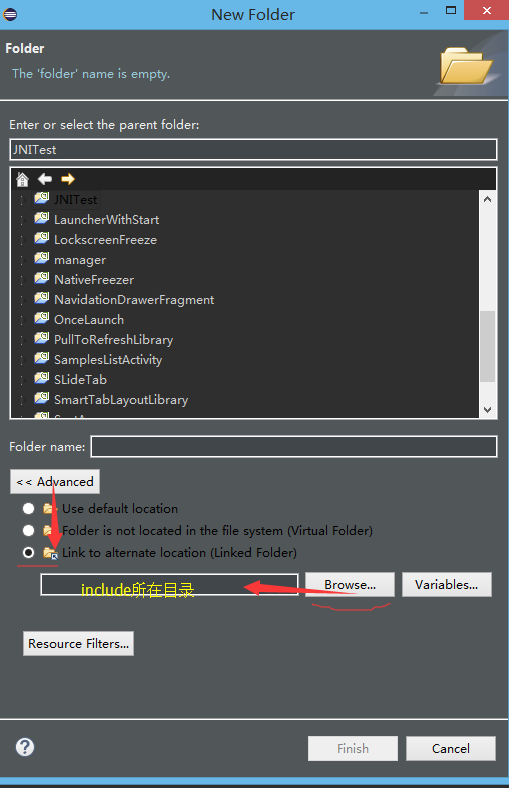
1. Type ‘JNICALL’ could not be resolved或者找不到头文件“Unresolved inclusion”之类的
如果已经导入了依赖包,依然出现这个问题,这时可以试试考虑:
NDK Project -> New -> Folder -> Advanced -> Link to alternate location(Linked Folder),添加:C:\SoftWare\android-ndk-r10e\platforms\android-21\arch-arm\usr\include;
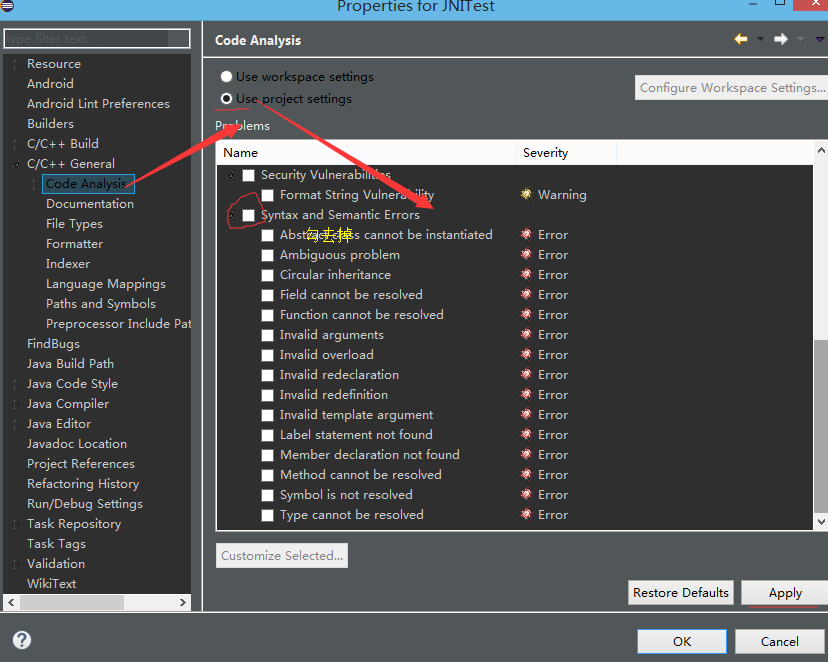
2. 如论做什么,只要打开.c或者.cpp文件就会出现未识别关键字之类的问题
这个时候,可以试试,project->clean,如果项目没有错误,但是一点开.c或者.cpp文件,则又会出现红叉,从而造成无法通过编译。这个问题,我在网上找了很久,有些说法是CDT插件的BUG,解决这个问题可以通过关闭CDT插件的语法分析,这样就不会报语法错误了,但是同时在写代码时又带来了很大的不便。


 262
262

 被折叠的 条评论
为什么被折叠?
被折叠的 条评论
为什么被折叠?
 到【灌水乐园】发言


