Android LayerDrawable

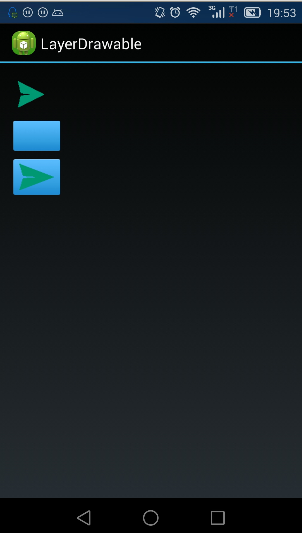
Android LayerDrawable可以将两个甚至多个图片合成一个Drawable。如下面截图,第三个图片就是第一个图片和第二个图片合成的,当然这只是一个简单的例子,不同场景怎么用还得看自己需要。
这里写图片描述

实现如下:
新建activity_main.xml

<LinearLayout xmlns:android="http://schemas.android.com/apk/res/android"
    xmlns:tools="http://schemas.android.com/tools"
    android:layout_width="match_parent"
    android:layout_height="match_parent"
    android:paddingBottom="@dimen/activity_vertical_margin"
    android:paddingLeft="@dimen/activity_horizontal_margin"
    android:paddingRight="@dimen/activity_horizontal_margin"
    android:paddingTop="@dimen/activity_vertical_margin"
    android:orientation="vertical"
    tools:context="com.test.layerdrawable.MainActivity" >

    <ImageView
        android:layout_width="wrap_content"
        android:layout_height="wrap_content"
        android:background="@drawable/actionbar_send_icon_press" 
        android:layout_marginBottom="10dp"/>

    <ImageView
        android:layout_width="wrap_content"
        android:layout_height="wrap_content"
        android:background="@drawable/chat_bottom_send_normal" 
        android:layout_marginBottom="10dp"/>

    <ImageView
        android:id="@+id/iv_layerdrawable"
        android:layout_width="wrap_content"
        android:layout_height="wrap_content" />

</LinearLayout>

新建MainActicity.java

package com.test.layerdrawable;

import android.annotation.SuppressLint;
import android.app.Activity;
import android.graphics.drawable.Drawable;
import android.graphics.drawable.LayerDrawable;
import android.os.Bundle;
import android.widget.ImageView;

public class MainActivity extends Activity {
    ImageView iv_layerdrawable;
    @Override
    protected void onCreate(Bundle savedInstanceState) {
        super.onCreate(savedInstanceState);
        setContentView(R.layout.activity_main);
        initView();
    }
    @SuppressLint("NewApi")
    private void initView() {
        iv_layerdrawable = (ImageView) findViewById(R.id.iv_layerdrawable);
        Drawable drawable1 = getResources().getDrawable(R.drawable.chat_bottom_send_normal);
        Drawable drawable2 = getResources().getDrawable(R.drawable.actionbar_send_icon_press);
        LayerDrawable layerDrawable = new LayerDrawable(new Drawable[]{drawable1,drawable2});
        iv_layerdrawable.setBackground(layerDrawable);
    }

}

至此,两个图片叠加已经实现.

  • 0
    点赞
  • 0
    收藏
    觉得还不错? 一键收藏
  • 0
    评论
要在 Android ProgressBar 中添加小圆点,可以使用自定义 Drawable 的方式来实现。以下是一个简单的实现步骤: 1. 在 drawable 文件夹下创建一个名为 custom_progress_bar.xml 的文件,用于定义进度条的样式。与上面的示例不同,这里需要添加一个小圆点的样式: ```xml <layer-list xmlns:android="http://schemas.android.com/apk/res/android"> <!-- 进度条背景 --> <item android:id="@android:id/background"> <shape> <corners android:radius="5dp" /> <gradient android:startColor="#cfcfcf" android:endColor="#cfcfcf" android:angle="270"/> </shape> </item> <!-- 进度条 --> <item android:id="@android:id/progress"> <clip> <shape> <corners android:radius="5dp" /> <gradient android:startColor="#FF0000" android:centerColor="#FF9900" android:endColor="#FFFF00" android:angle="270" /> </shape> </clip> </item> <!-- 小圆点 --> <item android:id="@android:id/progress"> <shape android:shape="oval"> <size android:width="10dp" android:height="10dp" /> <solid android:color="#FFFF00" /> </shape> </item> </layer-list> ``` 这里添加了一个形状为圆形的小圆点,颜色与进度条的当前颜色相同,大小为 10dp。 2. 在代码中获取 ProgressBar 控件,并设置进度: ```java ProgressBar progressBar = findViewById(R.id.progressBar); // 设置进度条进度 progressBar.setProgress(50); ``` 3. 如果需要将小圆点放置在进度条的当前进度位置,可以使用 setProgressDrawable 方法将自定义 Drawable 设置为进度条的样式,并在 OnProgressChangedListener 中获取当前进度位置,然后动态设置小圆点的位置。具体实现如下: ```java // 获取自定义 Drawable Drawable customDrawable = getResources().getDrawable(R.drawable.custom_progress_bar); // 设置自定义 Drawable progressBar.setProgressDrawable(customDrawable); // 添加进度改变监听器 progressBar.setOnSeekBarChangeListener(new SeekBar.OnSeekBarChangeListener() { @Override public void onProgressChanged(SeekBar seekBar, int progress, boolean fromUser) { // 获取进度条宽度 int width = seekBar.getWidth(); // 获取自定义 Drawable Drawable customDrawable = seekBar.getProgressDrawable(); if (customDrawable != null && customDrawable instanceof LayerDrawable) { // 获取进度条 LayerDrawable LayerDrawable layerDrawable = (LayerDrawable) customDrawable; // 获取小圆点 Drawable Drawable thumbDrawable = layerDrawable.findDrawableByLayerId(android.R.id.progress); if (thumbDrawable != null) { // 计算小圆点位置 int thumbX = (int) (width * (float) progress / seekBar.getMax()); int thumbY = thumbDrawable.getIntrinsicHeight() / 2; // 设置小圆点位置 thumbDrawable.setBounds(thumbX, 0, thumbX + thumbDrawable.getIntrinsicWidth(), thumbDrawable.getIntrinsicHeight()); } } } @Override public void onStartTrackingTouch(SeekBar seekBar) { } @Override public void onStopTrackingTouch(SeekBar seekBar) { } }); ``` 这样就可以在 Android ProgressBar 中添加小圆点,并将其放置在当前进度位置了。

“相关推荐”对你有帮助么?

  • 非常没帮助
  • 没帮助
  • 一般
  • 有帮助
  • 非常有帮助
提交
评论
添加红包

请填写红包祝福语或标题

红包个数最小为10个

红包金额最低5元

当前余额3.43前往充值 >
需支付:10.00
成就一亿技术人!
领取后你会自动成为博主和红包主的粉丝 规则
hope_wisdom
发出的红包
实付
使用余额支付
点击重新获取
扫码支付
钱包余额 0

抵扣说明:

1.余额是钱包充值的虚拟货币,按照1:1的比例进行支付金额的抵扣。
2.余额无法直接购买下载,可以购买VIP、付费专栏及课程。

余额充值