


这部分的内容:
- LibOSSO介绍
- 调用LibOSSO去实现D-Bus方法调用
- 调用LibOSSO实现异步方法调用
- 设备状态和模式的通知
- 模拟设备状态的改变
LibOSSO
介绍
几乎
Maemo
中所有的程序都要使用
LibOSSO
库。主要的原因是:
LibOSSO
可以保护一些将被杀掉的进程幸免于难,而不被杀掉。当从任务导航栏中启动一个没有注册
D-Bus
服务的程序时,超过一定时间,这个程序将由桌面环境去杀掉。
LibOSSO
另外一个方面的功能是版本隔离作用:由于
D-Bus
仍然在开发升级中,由
LibOSSO
对
D-Bus
进行封装,用户程序只要调用
LibOSSO
的对应接口就行,不必去直接调用
D-Bus
接口。
除了保护和隔离作用外,
LibOSSO
还提供了另外一些有用的功能:自动保存和状态保存;处理硬件状态;以及其它重要的事件。还有:对
D-Bus
的封装可以使得
LibOSSO
提供非常方便的函数去做
RPC(
远程调用
).
下面我们会重点介绍
LibOSSO
的
RPC
:
通过
LibOSSO
库实现
D-Bus
的方法调用
我们从哪开始呢?记得我们前面曾直接使用
libdbus
的函数实现了一个
RPC,
这里我们依然使用这个例子,只不过,这次我们用
LibOSSO
的函数去实现一个同样弹出对话框的功能。当然,
LibOSSO
库中有个函数
(
osso_system_note_dialog
)
可以直接去实现这种功能
.
我们暂时不用它。我们通过详细的代码看看
LibOSSO
如何支持
RPC
的。
头文件
:
#include
<libosso.h> //必须包含这个头文件
/*... Listing cut for brevity ...*/
//与上面一个例子同样的定义
#define
SYSNOTE_NAME "org.freedesktop.Notifications"
#define
SYSNOTE_OPATH "/org/freedesktop/Notifications"
#define
SYSNOTE_IFACE "org.freedesktop.Notifications"
#define
SYSNOTE_NOTE "SystemNoteDialog"
[
使用
LibOSSO
库函数需要包含的头文件
]
使用
LibOSSO
库,仅仅需要包含一个
libosso.h
头文件,我们这里同样定义
D-Bus service
名字,对象路径、接口名字、方法名字;
我们看看
LibOSSO
的上下文如何创建的以及如何运行的:
int
main(int argc, char** argv) {
/* The LibOSSO context that we need to do RPC.
*/
osso_context_t* ossoContext = NULL;
g_print
(
"Initializing LibOSSO
/n
"
);
/* The program name for registration is communicated from the
Makefile via a -D preprocessor directive. Since it doesn't
contain any dots in it, a prefix of "com.nokia." will be added
to it internally within osso_initialize().
*/
ossoContext = osso_initialize(ProgName, "1.0", FALSE, NULL);
if
(ossoContext == NULL) {
g_error("Failed to initialize LibOSSO/n");
}
g_print("Invoking the method call/n");
runRPC(ossoContext);
g_print("Shutting down LibOSSO/n");
/* Deinitialize LibOSSO. The function doesn't return status code so
we cannot know whether it succeeded or failed. We assume that it
always succeeds.
*/
osso_deinitialize(ossoContext);
ossoContext = NULL;
g_print
(
"Quitting
/n
"
);
return EXIT_SUCCESS;
}
[LibOSSO
初始化与卸载,见
(libosso-example-sync/libosso-rpc-sync.c) ]
LibOSSO
上下文,这个数据结构含有通过
D-Bus
进行通信的必要信息。当准备创建这个上下文时,第一个参数:你需要传入一个程序名字给
osso_initialize,
这个名字有两个用途:
1
,注册给
D-Bus; 2,
将来阻止销毁任务杀掉你的进程。如果这个名字没有包含任何点字符,那么,
LibOSSO
会自动把那个名字加个前缀:
com.nokia.
一般情况下,用户是看不到这个名字的,不过,这问题不大。如果你老是使用这种没有前缀的名字的话,可能会和别人的程序名冲突。建议使用全名。
第二个参数:版本号,目前
LibOSSO
中并没有用,不过你可以加上,以后可能会用的。
倒数第二个参数:如果最后一个参数传入
NULL
,这个参数不会起到任何作用。最后一个参数:使用
LibOSSO
自己的
GMainLoop
还是外面的,如果传入
NULL
,则直接使用
LibOSSO
内部的主循环。
释放
LibOSSO
上下文会自动关闭链接到
D-Bus
上面的链接通道,同时释放一些分配的内存。
下面这一段代码演示了如何使用
LibOSSO
做
RPC
调用,以及错误处理。
/**
* Do the RPC call.(
实现D-Bus远程调用的示例
)
*
* Note that this function will block until the method call either
* succeeds, or fails. If the method call would take a long time to
* run, this would block the GUI of the program (which we don't have).
* ()
* Needs the LibOSSO state to do the launch.
*/
static
void runRPC(osso_context_t* ctx) {
/* Message to display. */
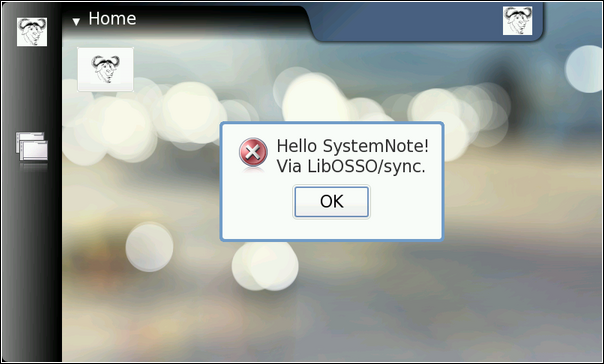
const char* dispMsg = "Hello SystemNote!/nVia LibOSSO/sync.";
/* Icon type to use. */
gint iconType = OSSO_GN_ERROR;
/* Button label text to use, "" means leaving the defaults. */
const char* labelText = "";
/* Will hold the result from the RPC invocation function. */
osso_return_t result;
/* Will hold the result of the method call (or error). */
osso_rpc_t methodResult = {};
g_print("runRPC called/n");
g_assert(ctx != NULL);
/* Compared to the libdbus functions, LibOSSO provides conveniently
a function that will do the dispatch and also allows us to pass
the arguments all with one call. (
libOSSO比libdbus更简单
)
The arguments for the "SystemNoteDialog" are the same as in
dbus-example.c (since it is the same service). You might also
notice that even if LibOSSO provides some convenience, it does
not completely isolate us from libdbus. We still supply the
argument types using D-Bus constants. (
在传参数方面,LibOSSO并没有完全同D-Bus隔离,还是使用D-Bus的参数规定
)
NOTE Do not pass the argument values by pointers as with libdbus,
instead pass them by value (as below). */
/* (
这是个阻塞调用,如果失败的话,可能会花费很长时间才能返回,这取决于D-Bus的超时时间值,D-Bus同步调用的超时时间值一般是25s
)*/
result = osso_rpc_run(ctx,
SYSNOTE_NAME, /* well-known name */
SYSNOTE_OPATH, /* object path */
SYSNOTE_IFACE, /* interface */
SYSNOTE_NOTE, /* method name */
&methodResult, /* method return value */
/* The arguments for the RPC. The types
are unchanged, but instead of passing
them via pointers, they're passed by
"value" instead. */
DBUS_TYPE_STRING, dispMsg,
DBUS_TYPE_UINT32, iconType,
DBUS_TYPE_STRING, labelText,
DBUS_TYPE_INVALID);
/* Check whether launching the RPC succeeded. */
if (result != OSSO_OK) {
g_error("Error launching the RPC (%s)/n",
ossoErrorStr(result));
/* We also terminate right away since there's nothing to do. */
}
g_print("RPC launched successfully/n");
/* Now decode the return data from the method call.
NOTE: If there is an error during RPC delivery, the return value
will be a string. It is not possible to differentiate that
condition from an RPC call that returns a string.
If a method returns "void", the type-field in the methodResult
will be set to DBUS_TYPE_INVALID. This is not an error. */
g_print("Method returns: ");
printOssoValue(&methodResult); /* 查看方法调用的返回情况 */
g_print("/n");
g_print("runRPC ending/n");
}
大家一定要注意:函数
osso_rpc_run
是个同步(阻塞)调用,有两种结果:有个及时的相应;或者超时返回。在实际使用过程中,一定要铭记这是一个阻塞的调用。另外呢:
LibOSSO
也有一套异步(非阻塞)的
RPC
函数。
如果你的方法调用返回不止一个值
(D-Bus
是支持的
)
,不过,
LibOSSO
目前并不支持返回所有的(而是返回第一个)。
对于函数返回码的
Error code
,这里非常直接的。我有篇文章是专门讲如何做
Error code,
那篇文章中对于
Error code
的解析非常好:有巧妙的、有直白的,也有更专业的。
/**
* Utility to return a pointer to a statically allocated string giving
* the textural representation of LibOSSO errors. Has no internal
* state (safe to use from threads).
*
* LibOSSO does not come with a function for this, so we define one
* ourselves.
*/
static
const gchar* ossoErrorStr(osso_return_t errCode) {
switch (errCode) {
case OSSO_OK:
return "No error (OSSO_OK)";
case OSSO_ERROR:
return "Some kind of error occurred (OSSO_ERROR)";
case OSSO_INVALID:
return "At least one parameter is invalid (OSSO_INVALID)";
case OSSO_RPC_ERROR:
return "Osso RPC method returned an error (OSSO_RPC_ERROR)";
case OSSO_ERROR_NAME:
return "(undocumented error) (OSSO_ERROR_NAME)";
case OSSO_ERROR_NO_STATE:
return "No state file found to read (OSSO_ERROR_NO_STATE)";
case OSSO_ERROR_STATE_SIZE:
return "Size of state file unexpected (OSSO_ERROR_STATE_SIZE)";
default:
return "Unknown/Undefined";
}
}
对于函数返回值的解析,有点复杂,因为返回值是包含在一个结构中的,需要逐个分拣。
/**
* Utility to print out the type and content of given osso_rpc_t.
* It also demonstrates the types available when using LibOSSO for
* the RPC. Most simple types are available, but arrays are not
* (unfortunately).
*/
static
void printOssoValue(const osso_rpc_t* val) {
g_assert(val != NULL);
// 对返回值的类型进行分拣,还是D-Bus的特色,让人用起来不习惯
switch (val->type) {
case DBUS_TYPE_BOOLEAN:
g_print("boolean:%s", (val->value.b == TRUE)?"TRUE":"FALSE");
break;
case DBUS_TYPE_DOUBLE:
g_print("double:%.3f", val->value.d);
break;
case DBUS_TYPE_INT32:
g_print("int32:%d", val->value.i);
break;
case DBUS_TYPE_UINT32:
g_print("uint32:%u", val->value.u);
break;
case DBUS_TYPE_STRING:
g_print("string:'%s'", val->value.s);
break;
case DBUS_TYPE_INVALID:
g_print("invalid/void");
break;
default:
g_print("unknown(type=%d)", val->type);
break;
}
}
请注意:
libOSSO RPC
函数并不支持数组参数,因此你要使用一些简单的参数了
L
。这可是不好的消息,
GArray
不能在
libOSSO
中使用了?
D-Bus
可是支持的啊。估计是支持的,有时间试探试探。
把上面的例子编译后运行,我们发现会弹出一个熟悉的对话框。
[sbox-CHINOOK_X86: ~/libosso-example-sync] > run-standalone.sh ./libosso-rpc-sync
Initializing LibOSSO
Invoking the method call
runRPC called
/dev/dsp: No such file or directory
RPC launched successfully
Method returns: uint32:8
runRPC ending
Shutting down LibOSSO
Quitting
和前一个例子的区别就是,多了一个关于音频设备的错误信息。这个信息可能会在
RPC
返回之前出现,因为
runRPC
是阻塞调用。
我们在前面的代码中用到了一个程序名称:
ProgName
,我们一般把它定义在
makefile
文件中,为什么呢?有时候我们需要分别编译
i386
和
ARMEL
,如果定义在头文件中,可能需要区分定义,如果放在
makefile
总定义,由于
makefile
的开头一般会先区分
i386,
和
ARM
。
另外一个好处是,我们把
ProgName
定义在
makefile
中,可以提高上面代码的复用率。
# define a list of pkg-config packages we want to use
pkg_packages :=
glib-2.0 libosso
# ... Listing cut for brevity ...
libosso-rpc-sync:
libosso-rpc-sync.c
$(CC) $(CFLAGS) -DProgName=/"LibOSSOExample/" / #定义在这里好处有两个,1 提高代码重用性,2 方便为不同的archetecture定义
$< -o $@ $(LDFLAGS)
LibOSSO
的异步调用
有时候,一个函数需要很长时间才能执行完,或者你不能确定这个函数是否需要很长时间,这些情况下,你应当使用异步调用,而不要使用同步调用。同步和异步最大的区别就是:异步是把同步割成两部分,启动
RPC
和在回调中处理返回结果。就是说,你
RPC
什么时候回来,我什么时候处理你的结果,这样就不至于导致
D-Bus
的超时问题。
为了使用
LibOSSO
的回调和控制其主循环,我们需要创建一个状态变量,这个状态变量在需要时,会传递给回调。
/**
* Small application state so that we can pass both LibOSSO context
* and the mainloop around to the callbacks.
*/
typedef
struct {
/* A mainloop object that will "drive" our example. */
GMainLoop* mainloop;
/* The LibOSSO context which we use to do RPC. */
osso_context_t* ossoContext;
}
ApplicationState;
函数
osso_rpc_async_run
是用来启动异步调用的,并且它立即返回。如果它返回了一个错误,可能是
client
端的错误,而不是
server
端得错误,因为
RPC
的错误没有通过它返回。那么,谁来处理
RPC
的回应数据呢,回调函数!
/**
* We launch the RPC call from within a timer callback in order to
* make sure that a mainloop object will be running when the RPC will
* return (to avoid a nasty race condition).
*
* So, in essence this is a one-shot timer callback.
*
* In order to launch the RPC, it will need to get a valid LibOSSO
* context (which is carried via the userData/application state
* parameter).
*/
static
gboolean launchRPC(gpointer userData) {
ApplicationState* state = (ApplicationState*)userData;
/* Message to display. */
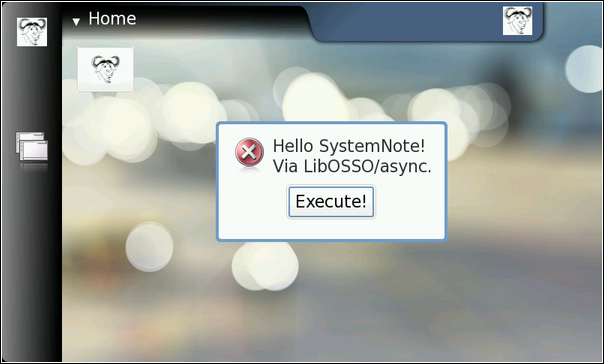
const char* dispMsg = "Hello SystemNote!/nVia LibOSSO/async.";
/* Icon type to use. */
gint iconType = OSSO_GN_ERROR;
/* Button label text to use. */
const char* labelText = "Execute!";
/* Will hold the result from the RPC launch call. */
osso_return_t result;
g_print("launchRPC called/n");
g_assert(state != NULL);
/*... Listing cut for brevity ...*/
/* The only difference compared to the synchronous version is the
addition of the callback function parameter, and the user-data
parameter for data that will be passed to the callback. */
result = osso_rpc_async_run(state->ossoContext,
SYSNOTE_NAME, /* well-known name */
SYSNOTE_OPATH, /* object path */
SYSNOTE_IFACE, /* interface */
SYSNOTE_NOTE, /* method name */
rpcCompletedCallback, /* 这就是我们注册的回调函数,async cb */
state, /* user-data for cb */
/* The arguments for the RPC. */
DBUS_TYPE_STRING, dispMsg,
DBUS_TYPE_UINT32, iconType,
DBUS_TYPE_STRING, labelText,
DBUS_TYPE_INVALID);
/* Check whether launching the RPC succeeded (we don't know the
result from the RPC itself). */
if (result != OSSO_OK) {
g_error("Error launching the RPC (%s)/n",
ossoErrorStr(result));
/* We also terminate right away since there's nothing to do. */
}
g_print("RPC launched successfully/n");
g_print("launchRPC ending/n");
/* We only want to be called once, so ask the caller to remove this
callback from the timer launch list by returning FALSE. */
return FALSE;
}
由一个简单的回调函数来处理
RPC
的返回,在这个函数中使用
osso_rpc_async_run
的两个参数:
interface
和
method
,这两个参数非常有用,这样的话,你就可以对多个
RPC
使用同一个回调函数了,因为这些
RPC
的
interface
和
method
都不同。
这个返回值的数据结构的内存是由
LibOSSO
分配的,当你的回调函数返回后,这个变量会由
LibOSSO
释放,因此,你不必手动去处理这个事情(这也是使用回调机制要注意的问题)。
/**
* Will be called from LibOSSO when the RPC return data is available.
* Will print out the result, and return. Note that it must not free
* the value, since it does not own it.
*
* The prototype (for reference) must be osso_rpc_async_f().
*
* The parameters for the callback are the D-Bus interface and method
* names (note that object path and well-known name are NOT
* communicated). The idea is that you can then reuse the same
* callback to process completions from multiple simple RPC calls.
*/
static
void rpcCompletedCallback(const gchar* interface,
const gchar* method,
osso_rpc_t* retVal,
gpointer userData) {
ApplicationState* state = (ApplicationState*)userData;
g_print("rpcCompletedCallback called/n");
g_assert(interface != NULL);
g_assert(method != NULL);
g_assert(retVal != NULL);
g_assert(state != NULL);
g_print(" interface: %s/n", interface);
g_print(" method: %s/n", method);
/* NOTE If there is an error in the RPC delivery, the return value
will be a string. This is unfortunate if your RPC call is
supposed to return a string as well, since it is not
possible to differentiate between the two cases.
If a method returns "void", the type-field in the retVal
will be set to DBUS_TYPE_INVALID (it's not an error). */
g_print(" result: ");
printOssoValue(retVal);
g_print("/n");
/* Tell the main loop to terminate. */
g_main_loop_quit(state->mainloop);
g_print("rpcCompletedCallback done/n");
}
下面是例子的代码
:
int
main(int argc, char** argv) {
/* Keep the application state in main's stack. */
ApplicationState state = {};
/* Keeps the results from LibOSSO functions for decoding. */
osso_return_t result;
/* Default timeout for RPC calls in LibOSSO. */
gint rpcTimeout;
g_print("Initializing LibOSSO/n");
state.ossoContext = osso_initialize(ProgName, "1.0", FALSE, NULL);
if
(state.ossoContext == NULL) {
g_error("Failed to initialize LibOSSO/n");
}
/* Print out the default timeout value (which we don't change, but
could, with osso_rpc_set_timeout()). */
result = osso_rpc_get_timeout(state.ossoContext, &rpcTimeout);
if (result != OSSO_OK) {
g_error("Error getting default RPC timeout (%s)/n",
ossoErrorStr(result));
}
/* Interestingly the timeout seems to be -1, but is something else
(by default). -1 probably then means that "no timeout has been
set". */
g_print("Default RPC timeout is %d (units)/n", rpcTimeout);
g_print("Creating a mainloop object/n");
/* Create a GMainLoop with default context and initial condition of
not running (FALSE). */
state.mainloop = g_main_loop_new(NULL, FALSE);
if (state.mainloop == NULL) {
g_error("Failed to create a GMainLoop/n");
}
g_print("Adding timeout to launch the RPC in one second/n");
/* This could be replaced by g_idle_add(cb, &state), in order to
guarantee that the RPC would be launched only after the mainloop
has started. We opt for a timeout here (for no particular
reason). */
g_timeout_add(1000, (GSourceFunc)launchRPC, &state);
g_print("Starting mainloop processing/n");
g_main_loop_run(state.mainloop);
g_print("Out of mainloop, shutting down LibOSSO/n");
/* Deinitialize LibOSSO. */
osso_deinitialize(state.ossoContext);
state.ossoContext = NULL;
/* Free GMainLoop as well. */
g_main_loop_unref(state.mainloop);
state.mainloop = NULL;
g_print("Quitting/n");
return EXIT_SUCCESS;
}
测试的结果可能有点意外
:
[sbox-CHINOOK_X86: ~/libosso-example-async] > run-standalone.sh ./libosso-rpc-async
Initializing LibOSSO
Default RPC timeout is -1 (units)
Creating a mainloop object
Adding timeout to launch the RPC in one second
Starting mainloop processing
launchRPC called
RPC launched successfully
launchRPC ending
rpcCompletedCallback called
interface: org.freedesktop.Notifications
method: SystemNoteDialog
result: uint32:10
rpcCompletedCallback done
Out of mainloop, shutting down LibOSSO
Quitting
/dev/dsp: No such file or directory
你可能已经注意到了,声音设备的错误,在最下面才打印出来,为什么?看起来好像是对话框运行很久后,才开始播放声音。这和前面的同步调用有明显的区别。这再次说明了:你不能依赖
D-Bus
的远程方法调用的时间精确性;
设备状态与模式的通知:
既然
Internet Tablets
是移动设备,你当然希望人们在移动过程中使用它(或者您开发的软件)。另外,在飞机上或者其他地方可能无法连接网络。所以你需要知道如何处理这种状态切换
为了演示如何处理设备的重要状态,下面我们用一个小工具程序演示一下。比如说:飞行模式。用户切换设备到“掉线”模式,就会激活飞行模式。
这个程序是用来跟踪手机的背光情况,通过定期的向系统轮询,是否推迟关闭背光。一般情况下,屏幕如果一段时间没有使用,则背光关闭,这主要为了省电,对于待机时间来说是非常重要的。当然,用户可以通过手机设置来完成背光的配置,不过我们不这么做。我们用这个程序来自动推迟背光的关闭
.
这里我们使用
45
秒的定时器来控制。
我们同时也跟踪手机的模式,一旦手机进入了飞行模式,这个程序将会被关闭,因此,如果手机已经处于飞行模式,是不能启动这个程序的。
由于这个程序是在后台运行的,没有自己的用户界面,因此我们使用通知对话框来显示一些信息给用户,提醒用户。
下面是主要的流程
:
/**
* Main program:
*
* 1) Setup application state //
设置程序的状态
* 2) Start mainloop //
启动主循环
* 3) Release application state & terminate //
释放程序状态和退出
*/
int
main(int argc, char** argv) {
/* We'll keep one application state in our program and allocate
space for it from the stack. */
ApplicationState state = {};
g_print(PROGNAME ":main Starting/n");
/* Attempt to setup the application state and if something goes
wrong, do cleanup here and exit. */
if (setupAppState(&state) == FALSE) {
g_print(PROGNAME ":main Setup failed, doing cleanup/n");
releaseAppState(&state);
g_print(PROGNAME ":main Terminating with failure/n");
return EXIT_FAILURE;
}
g_print(PROGNAME ":main Starting mainloop processing/n");
g_main_loop_run(state.mainloop);
g_print(PROGNAME ":main Out of main loop (shutting down)/n");
/* We come here when the application state has the running flag set
to FALSE and the device state changed callback has decided to
terminate the program. Display a message to the user about
termination next. */
displayExitMessage(&state, ProgName " exiting");
/* Release the state and exit with success. */
releaseAppState(&state);
g_print(PROGNAME ":main Quitting/n");
return EXIT_SUCCESS;
}
为了让设备状态的回调函数能强制让程序退出,我们需要传递
LibOSSO
的上下文给这个回调函数,同时也要让回调函数能访问主循环对象以及用一个标记量来通知定时器去退出(因为定时器是不能在
Glib
外部被删除的)。
/* Application state.
Contains the necessary state to control the application lifetime
and use LibOSSO. */
typedef
struct {
/* The GMainLoop that will run our code. */
GMainLoop* mainloop;
/* LibOSSO context that is necessary to use LibOSSO functions. */
osso_context_t* ossoContext;
/* Flag to tell the timer that it should stop running. Also utilized
to tell the main program that the device is already in Flight-
mode and the program shouldn't continue startup. */
gboolean running;
}
ApplicationState;
所有的设置和启动操作都是在函数
setupAppState
中完成的
,
同时也包含了一些非常重要的步骤:
/**
* Utility to setup the application state.
*
*
1) 初始化LibOSSO (链接到D-Bus)
*
2) 创建一个主循环对象
*
3) 注册回调函数
*
这个回调函数只会在注册时调用一次.
*
当程序需要结束时,这个回调函数把state->running复位,通过这个
*
变量我们可以知道是否要运行程序。否则,显示一个错误对话框。
* 4)
注册定时器回调函数(用于保持空白屏幕)
* 5)
Un-blank the screen.
* 6)
当电池不够时,显示告警提示框.
* 7)
发送第一个“推迟关闭背光”的命令
*
*
如果这个函数返回TRUE, 一切正常,否则,出差错了。
*/
static
gboolean setupAppState(ApplicationState* state) {
osso_return_t result;
g_assert(state != NULL);
g_print(PROGNAME ":setupAppState starting/n");
/* Zero out the state. Has the benefit of setting all pointers to
NULLs and all gbooleans to FALSE. This is useful when we'll need
to determine what to release later. */
memset(state, 0, sizeof(ApplicationState));
g_print(PROGNAME ":setupAppState Initializing LibOSSO/n");
/*... Listing cut for brevity ...*/
state->ossoContext = osso_initialize(ProgName, "1.0", FALSE, NULL);
if (state->ossoContext == NULL) {
g_printerr(PROGNAME ": Failed to initialize LibOSSO/n");
return FALSE;
}
g_print(PROGNAME ":setupAppState Creating a GMainLoop object/n");
/* Create a new GMainLoop object, with default context (NULL) and
initial "running"-state set to FALSE. */
state->mainloop = g_main_loop_new(NULL, FALSE);
if (state->mainloop == NULL) {
g_printerr(PROGNAME ": Failed to create a GMainLoop/n");
return FALSE;
}
g_print(PROGNAME
":setupAddState Adding hw-state change callback./n");
/* The callback will be called immediately with the state, so we
need to know whether we're in offline mode to start with. If so,
the callback will set the running-member to FALSE (and we'll
check it below). */
state->running = TRUE;
/* In order to receive information about device state and changes
in it, we register our callback here.
Parameters for the osso_hw_set_event_cb():
osso_context_t* : LibOSSO context object to use.
osso_hw_state_t* : Pointer to a device state type that we're
interested in. NULL for "all states".
osso_hw_cb_f* : Function to call on state changes.
gpointer : User-data passed to callback. */
result = osso_hw_set_event_cb(state->ossoContext,
NULL, /* We're interested in all. */
deviceStateChanged,
state);
if (result != OSSO_OK) {
g_printerr(PROGNAME
":setupAppState Failed to get state change CB/n");
/* Since we cannot reliably know when to terminate later on
without state information, we will refuse to run because of the
error. */
return FALSE;
}
/* We're in "Flight" mode? */
if (state->running == FALSE) {
g_print(PROGNAME ":setupAppState In offline, not continuing./n");
displayExitMessage(state, ProgName " not available in Offline mode");
return FALSE;
}
g_print(PROGNAME ":setupAppState Adding blanking delay timer./n");
if (g_timeout_add(45000,
(GSourceFunc)delayBlankingCallback,
state) == 0) {
/* If g_timeout_add returns 0, it signifies an invalid event
source id. This means that adding the timer failed. */
g_printerr(PROGNAME ": Failed to create a new timer callback/n");
return FALSE;
}
/* Un-blank the display (will always succeed in the SDK). */
g_print(PROGNAME ":setupAppState Unblanking the display/n");
result = osso_display_state_on(state->ossoContext);
if (result != OSSO_OK) {
g_printerr(PROGNAME ": Failed in osso_display_state_on (%s)/n",
ossoErrorStr(result));
/* If the RPC call fails, odds are that nothing else will work
either, so we decide to quit instead. */
return FALSE;
}
/* Display a "Note"-dialog with a WARNING icon.
The Dialog is MODAL, so user cannot do anything with the stylus
until the Ok is selected, or the Back-key is pressed. */
/*... Listing cut for brevity ...*/
/* Other icons available:
OSSO_GN_NOTICE: For general notices.
OSSO_GN_WARNING: For warning messages.
OSSO_GN_ERROR: For error messages.
OSSO_GN_WAIT: For messages about "delaying" for something (an
hourglass icon is displayed).
5: Animated progress indicator. */
/*... Listing cut for brevity ...*/
g_print(PROGNAME ":setupAppState Displaying Note dialog/n");
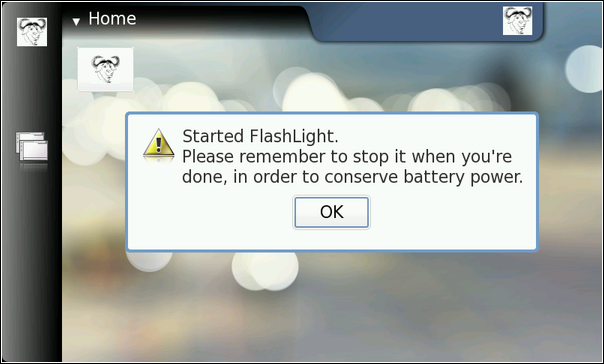
result = osso_system_note_dialog(state->ossoContext,
/* UTF-8 text into the dialog */
"Started " ProgName "./n"
"Please remember to stop it when you're done, "
"in order to conserve battery power.",
/* Icon to use */
OSSO_GN_WARNING,
/* We're not interested in the RPC
return value. */
NULL);
if (result != OSSO_OK) {
g_error(PROGNAME ": Error displaying Note dialog (%s)/n",
ossoErrorStr(result));
}
g_print(PROGNAME ":setupAppState Requested for the dialog/n");
/* Then delay the blanking timeout so that our timer callback has a
chance to run before that. */
delayDisplayBlanking(state);
g_print(PROGNAME ":setupAppState Completed/n");
/* State set up. */
return TRUE;
}
处理设备状态改变的回调是有函数
osso_hw_set_event_cb
注册的,同时我们也知道了如何强制打开背光。与此同时,我们注册了定时器的回调,这个回调在
45
秒后被调用。
处理设备状态的回调将接收新的“硬件状态”和用户传入的自定义数据。
在注册时,它就被调用了一次。这次调用讲通知应用程序当前设备的最初状态。我们就利用这个来判断当前手机是否处于飞行状态。另外,由于我们不知道这个主循环是否处于激活状态,所以我们使用了一个额外的标志量来通知定时器回调函数去关闭这个主循环。
/**
*
*
这个回调会在两种情况下被调用:1 注册时; 2 设备状态改变时
*
* The device state structure contains flags telling about conditions
* that might affect applications, as well as the mode of the device
* (for example telling whether the device is in "in-flight"-mode).
*/
static
void deviceStateChanged(osso_hw_state_t* hwState,
gpointer data) {
ApplicationState* state = (ApplicationState*)data;
g_print(PROGNAME ":deviceStateChanged Starting/n");
printDeviceState(hwState);
/* If device is in/going into "flight-mode" (called "Offline" on
some devices), we stop our operation automatically. Obviously
this makes flashlight useless (as an application) if someone gets
stuck in a dark cargo bay of a plane with snakes.. But we still
need a way to shut down the application and react to device
changes, and this is the easiest state to test with.
Note that since offline mode will terminate network connections,
you will need to test this on the device itself, not over ssh. */
if (hwState->sig_device_mode_ind == OSSO_DEVMODE_FLIGHT) {
g_print(PROGNAME ":deviceStateChanged In/going into offline./n");
/* Terminate the mainloop.
NOTE: Since this callback is executed immediately on
registration, the mainloop object is not yet "running",
hence calling quit on it will be ineffective! _quit only
works when the mainloop is running. */
g_main_loop_quit(state->mainloop);
/* We also set the running to correct state to fix the above
problem. */
state->running = FALSE;
}
}
函数
printDeviceState
主要是把手机的状态给打印出来。
/* Small macro to return "YES" or "no" based on given parameter.
Used in printDeviceState below. YES is in capital letters in order
for it to "stand out" in the program output (since it's much
rarer). */
#define
BOOLSTR(p) ((p)?"YES":"no")
/**
* Utility to decode the hwstate structure and print it out in human
* readable format. Mainly useful for debugging on the device.
*
* The mode constants unfortunately are not documented in LibOSSO.
*/
static
void printDeviceState(osso_hw_state_t* hwState) {
gchar* modeStr = "Unknown";
g_assert(hwState != NULL);
switch(hwState->sig_device_mode_ind) {
case OSSO_DEVMODE_NORMAL:
/* Non-flight-mode. */
modeStr = "Normal";
break;
case OSSO_DEVMODE_FLIGHT:
/* Power button -> "Offline mode". */
modeStr = "Flight";
break;
case OSSO_DEVMODE_OFFLINE:
/* Unknown. Even if all connections are severed, this mode will
not be triggered. */
modeStr = "Offline";
break;
case OSSO_DEVMODE_INVALID:
/* Unknown. */
modeStr = "Invalid(?)";
break;
default:
/* Leave at "Unknown". */
break;
}
g_print(
"Mode: %s, Shutdown: %s, Save: %s, MemLow: %s, RedAct: %s/n",
modeStr,
/* Set to TRUE if the device is shutting down. */
BOOLSTR(hwState->shutdown_ind),
/* Set to TRUE if our program has registered for autosave and
now is the moment to save user data. */
BOOLSTR(hwState->save_unsaved_data_ind),
/* Set to TRUE when device is running low on memory. If possible,
memory should be freed by our program. */
BOOLSTR(hwState->memory_low_ind),
/* Set to TRUE when system wants us to be less active. */
BOOLSTR(hwState->system_inactivity_ind));
}
如何延迟关闭屏幕呢?调用
LibOSSO
的一个函数即可以完成这个功能:
(
osso_display_blanking_pause
)
,这个函数在很多地方被用到。
/**
* Utility to ask the device to pause the screen blanking timeout.
* Does not return success/status.
*/
static
void delayDisplayBlanking(ApplicationState* state) {
osso_return_t result;
g_assert(state != NULL);
result = osso_display_blanking_pause(state->ossoContext);
if (result != OSSO_OK) {
g_printerr(PROGNAME ":delayDisplayBlanking. Failed (%s)/n",
ossoErrorStr(result));
/* But continue anyway. */
} else {
g_print(PROGNAME ":delayDisplayBlanking RPC succeeded/n");
}
}
定时器回调一般情况下用作,告诉系统推迟关屏,同时也可以检查该程序释放已经关闭。如果程序已经关闭,在定时器销毁自己(通过返回
FALSE
)
:
/**
* Timer callback that will be called within 45 seconds after
* installing the callback and will ask the platform to defer any
* display blanking for another 60 seconds.
*
* This will also prevent the device from going into suspend
* (according to LibOSSO documentation).
*
* It will continue doing this until the program is terminated.
*
* NOTE: Normally timers shouldn't be abused like this since they
* bring the CPU out from power saving state. Because the screen
* backlight dimming might be activated again after 60 seconds
* of receiving the "pause" message, we need to keep sending the
* "pause" messages more often than every 60 seconds. 45 seconds
* seems like a safe choice.
*/
static
gboolean delayBlankingCallback(gpointer data) {
ApplicationState* state = (ApplicationState*)data;
g_print(PROGNAME ":delayBlankingCallback Starting/n");
g_assert(state != NULL);
/* If we're not supposed to be running anymore, return immediately
and ask caller to remove the timeout. */
if (state->running == FALSE) {
g_print(PROGNAME ":delayBlankingCallback Removing/n");
return FALSE;
}
/* Delay the blanking for a while still (60 seconds). */
delayDisplayBlanking(state);
g_print(PROGNAME ":delayBlankingCallback Done/n");
/* We want the same callback to be invoked from the timer
launch again, so we return TRUE. */
return TRUE;
}
做些释放工作:
/**
* Release all resources allocated by setupAppState in reverse order.
*/
static
void releaseAppState(ApplicationState* state) {
g_print(PROGNAME ":releaseAppState starting/n");
g_assert(state != NULL);
/* First set the running state to FALSE so that if the timer will
(for some reason) be launched, it will remove itself from the
timer call list. This shouldn't be possible since we are running
only with one thread. */
state->running = FALSE;
/* Normally we would also release the timer, but since the only way
to do that is from the timer callback itself, there's not much we
can do about it here. */
/* Remove the device state change callback. It is possible that we
run this even if the callback was never installed, but it is not
harmful. */
if (state->ossoContext != NULL) {
osso_hw_unset_event_cb(state->ossoContext, NULL);
}
/* Release the mainloop object. */
if (state->mainloop != NULL) {
g_print(PROGNAME ":releaseAppState Releasing mainloop object./n");
g_main_loop_unref(state->mainloop);
state->mainloop = NULL;
}
/* Lastly, free up the LibOSSO context. */
if (state->ossoContext != NULL) {
g_print(PROGNAME ":releaseAppState De-init LibOSSO./n");
osso_deinitialize
(
state->ossoContext);
state->ossoContext = NULL;
}
/* All resources released. */
}
编译运行的结果
:
[sbox-CHINOOK_X86: ~/libosso-flashlight] > run-standalone.sh ./flashlight
flashlight:main Starting
flashlight:setupAppState starting
flashlight:setupAppState Initializing LibOSSO
flashlight:setupAppState Creating a GMainLoop object
flashlight:setupAddState Adding hw-state change callback.
flashlight:deviceStateChanged Starting
Mode: Normal, Shutdown: no, Save: no, MemLow: no, RedAct: no
flashlight:setupAppState Adding blanking delay timer.
flashlight:setupAppState Unblanking the display
flashlight:setupAppState Displaying Note dialog
flashlight:setupAppState Requested for the dialog
flashlight:delayDisplayBlanking RPC succeeded
flashlight:setupAppState Completed
flashlight:main Starting mainloop processing
/dev/dsp: No such file or directory
flashlight:delayBlankingCallback Starting
flashlight:delayDisplayBlanking RPC succeeded
flashlight:delayBlankingCallback Done
...
实际的运行结果:


 5866
5866

 被折叠的 条评论
为什么被折叠?
被折叠的 条评论
为什么被折叠?
 到【灌水乐园】发言


