


 本文介绍如何在Linux环境下安装Maven及配置环境变量,并详细讲解如何搭建Nexus私服,包括配置代理、添加自定义仓库及上传第三方jar包。
一、软件准备
1、apache-maven-3.0-bin.tar.gz下载地址:http://www.apache.org/dyn/closer.cgi/maven/binaries/apache-maven-3.0-bin.tar.gz
2、nexus-oss-webapp-1.8.0-bundle.tar.gz下载地址:http://nexus.sonatype.org/downloads/
二、maven安装配置
1、创建需要操作maven的用户组以及用户(如果用root用户安装不用创建)
1. #groupadd apaduser //创建用户组
2. #useradd -g apaduser apaduser //创建用户并指定用户组
3. #passwd apaduser //为用户分配密码
2、创建解压目录,并将apache-maven-3.0-bin.tar.gz文件解压到指定目录
1. #cd /opt
2. #mkdir maven
3. #chown -R apaduser:apaduser /opt/maven
4. #chmod 755 /opt/maven
5. #su -l apaduser
6. #tar -zvxf apache-maven-3.0-bin.tar.gz
7. #ln –s apache-maven-3.0 apache-maven
3、配置环境变量 (因为每种linux系统配置文件不一样,
详细请看http://blog.csdn.net/cuker919/archive/2010/11/17/6014727.aspx)
1. #cd /home/apaduser (“sudo su –“ for root user)
2. #vi .bash_profile
3. #. .bash_profile
在文件中添加如下行:
1. M2_HOME=/opt/maven/apache-maven
2. export M2_HOME
3. PATH=$PATH:$M2_HOME/bin
4. export PATH
4、查看版本
1. #cd /opt/maven/apache-maven/bin
2. #mvn –version
如果显示版本信息,应该会在${user}目录下创建.m2目录
5、查看.m2目录
1. #cd /home/apaduser/.m2
2. 如果没有.m2目录,则可以手动添加一个
3. #mkdir .m2
6、如果需要把maven的repository目录指定到其他目录,则修改maven安装目录下conf中的配置文件settings.xml文件
1. #vi /opt/maven/apache-maven/conf/settings.xml
2. 将文件中<localRepository>….</localRepository>的注释打开
3. 或者在文件中增加 在这个注释下增加
4. <localRepository>your repository path</localRepository>
二、搭建nexus私服
1、解压nexus-oss-webapp-1.8.0-bundle.tar.gz文件到指定目录
1. #cp nexus-oss-webapp-1.8.0-bundle.tar.gz /usr/local
2. #tar -zvxf nexus-oss-webapp-1.8.0-bundle.tar.gz
3. #ln –s nexus-oss-webapp-1.8.0 nexus
2、启动nexus
1. #cd /usr/local/nexus/bin/jsw
2.
3. 选择自己机器的版本:
4.
5. #cd linux-x86-64/
6. #./nexus start
7.
8. 重启:
9. #./nexus restart
10. 停止:
11. #./nexus stop
3、运行nexus
在浏览器中输入:http://changethislocalhost:8081/nexus
就可以看到nexus 的主页,点击右上角Log in
默认用户名和密码是:admin/admin123
运行后会自动生成一个nexus工作目录sonatype-work,nexus下载的jar包会存放在
sonatype-work/nexus/storage中
4、配置
1) 点击左侧菜单Repositories
分别将右侧列表中
1. Apache Snapshots
2. Codehaus Snapshots
3. Maven Central
三个repository 的configuration配置选项中的Download Remote Index 配置改为True,并保存设置,
然后在列表中分别右键点击三个Repository,点击ReIndex
true是开启,false是关闭 由于中央仓库内容比较多,因此其索引文件比较大,需要查看下载是否完成了,我们可以单击界面左边导航栏中的 Scheduled Tasks 链接后,就可以看到系统调度的任务其状态为 runing,在说哦因下载完毕之后,该任务就会消失。
Scheduled Tasks 界面:
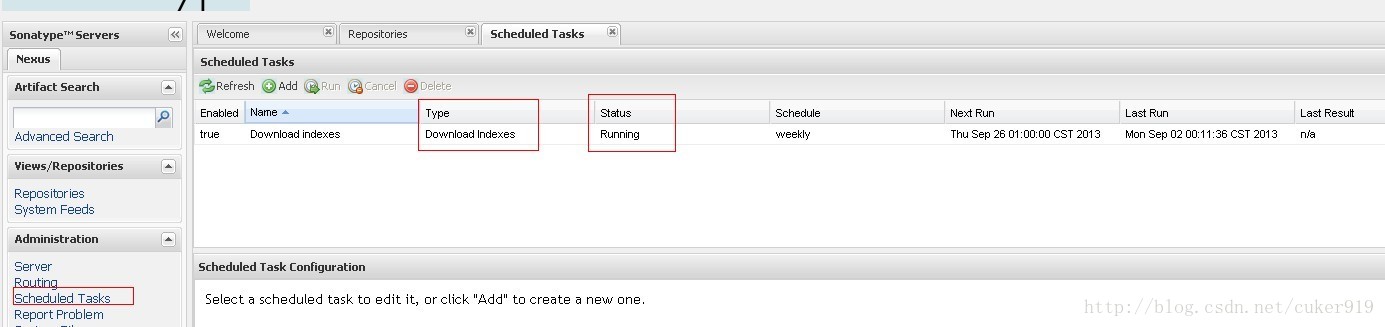
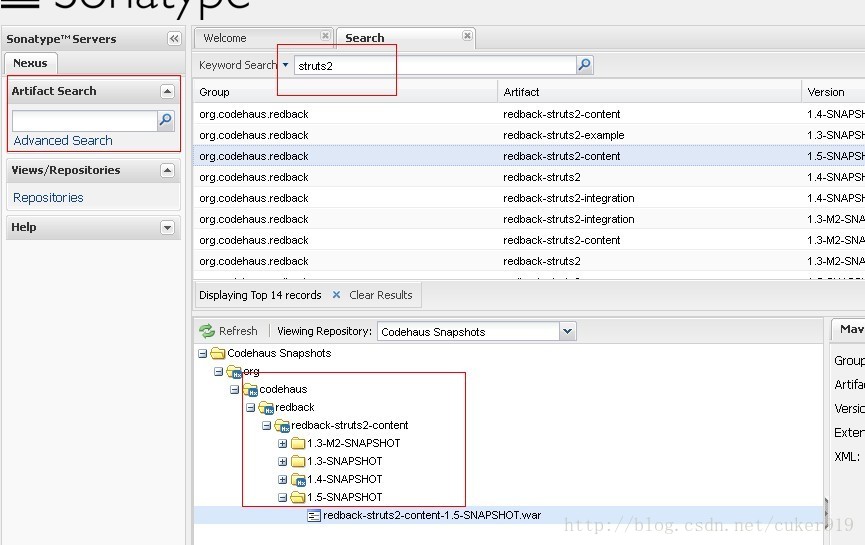
只有下载了,在search查询才会有东西,不然什么都搜索不到。
2)增加新的Repository,有一些比较常用jar包在nexus提供的repository中可能找不到,
一般比较常用的有
1. JBOSS的两个:
2. http://repository.jboss.org/maven2/
3. http://repository.jboss.org/nexus/content/repositories/releases/
4. SUN的:
5. http://download.java.net/maven/2/
6. K-INT的:
7. http://developer.k-int.com/maven2/
8.
9. 因为找juel:juel-impl:2.2.1 这个jar包,所以我还添加了一个自己找的:
10. http://repository.exoplatform.org/content/groups/public/
添加步骤:
点击Add->Proxy Repository->填写Repository ID, Repository Name, 以及Remote Storage Location 其他的默认即可。
3) 将新增的Repository添加到Public Repositories中
在Public Repositories 的Configuration中,将多选Select中的项全部添加到左边,然后保存。
4) 添加自己的jar包
1. 在repository列表中有一个3rd party,也就是第三方jar包,点击会看到一个Artifact Upload选项卡,点击后,填写相应的信息。
2. GAV Definition 一般选择 GAV Parameters
3. 然后添加Group:Artifact:Version:Package
4. 示例 juel:juel-impl:2.2.1:jar
然后选择要上传的jar包,保存即可
比如我们项目需要如下几个包:
javax.jms:jms:1.1:jar
proxool:proxool:0.9.1:jar
proxool:proxool-cglib:0.9.1:jar
com.lowagie:itextasian:1.0:jar
com.danga.MemCached:memcached:2.0.1:jar
5) nexus中设置代理服务器
选择左侧administrator菜单中的Server选项,在右侧打开的页面的中下部,有一个选择项:Default HTTP Proxy Settings(optional) 将前面的复选框选中,填写相应的代理服务器信息即可。 web-proxy.cce.hp.com:8080
6) 编写自己的settings.xml,文件内容如下:
1. <settings>
2. <proxies>
3. <proxy>
4. <id>normal</id>
5. <active>true</active>
6. <protocol>http</protocol>
7. <username>deployment</username>
8. <password>deploy</password>
9. <host>changethislocalhost:8081/nexus</host>
10. <port>80</port>
11. <nonProxyHosts>changethislocalhost:8081/nexus</nonProxyHosts>
12. </proxy>
13. </proxies>
14.
15. <mirrors>
16. <mirror>
17. <!–This is used to direct the public snapshots repo in the
18. profile below over to a different nexus group –>
19. <id>nexus-public-snapshots</id>
20. <mirrorOf>public-snapshots</mirrorOf>
21. <url>http://changethislocalhost:8081/nexus/content/groups/public-snapshots</url>
22. </mirror>
23. <mirror>
24. <!–This sends everything else to /public –>
25. <id>nexus</id>
26. <mirrorOf>*</mirrorOf>
27. <url>http://changethislocalhost:8081/nexus/content/groups/public</url>
28. </mirror>
29. </mirrors>
30.
31. <profiles>
32. <profile>
33. <id>nexus</id>
34. <repositories>
35. <repository>
36. <id>central</id>
37. <url>http://central</url>
38. <releases><enabled>true</enabled></releases>
39. <snapshots><enabled>true</enabled></snapshots>
40. </repository>
41. </repositories>
42. <pluginRepositories>
43. <pluginRepository>
44. <id>central</id>
45. <url>http://central</url>
46. <releases><enabled>true</enabled></releases>
47. <snapshots><enabled>true</enabled></snapshots>
48. </pluginRepository>
49. </pluginRepositories>
50. </profile>
51. <profile>
52. <!–this profile will allow snapshots to be searched when activated–>
53. <id>public-snapshots</id>
54. <repositories>
55. <repository>
56. <id>public-snapshots</id>
57. <url>http://public-snapshots</url>
58. <releases><enabled>false</enabled></releases>
59. <snapshots><enabled>true</enabled></snapshots>
60. </repository>
61. </repositories>
62. <pluginRepositories>
63. <pluginRepository>
64. <id>public-snapshots</id>
65. <url>http://public-snapshots</url>
66. <releases><enabled>false</enabled></releases>
67. <snapshots><enabled>true</enabled></snapshots>
68. </pluginRepository>
69. </pluginRepositories>
70. </profile>
71. </profiles>
72. <activeProfiles>
73. <activeProfile>nexus</activeProfile>
74. </activeProfiles>
75. </settings>
将settings.xml文件复制到${user}/.m2目录下
7) 测试
创建一个maven项目
#mvn archetype:generate
如果创建一个web项目可以选择83
填写相应的信息,maven会从私服上下载相应的jar包,看到的地址应该都是changethislocalhost的
项目创建成功后,将自己的pom.xml文件放在项目,执行
#mvn install 或者#mvn package
mvn会下载pom.xml文件定义的jar依赖
下载完成后,你可以在自己指定的repository目录下, 如果没有指定则是在 .m2/repository目录下查看自己的jar包
至此,我们的maven安装以及私服的搭建工作就完成了。


 793
793

 被折叠的 条评论
为什么被折叠?
被折叠的 条评论
为什么被折叠?
 到【灌水乐园】发言


