


目录
Button
RadoiButton
Button
这里button的基本属性不再详细介绍,仅介绍个别属性。
一、按钮背景颜色的设置
例:
android:background="@color/red"二、按钮背景图片的设置
方式一:
android:background="@mipmap/ic_launcher"方式二:
在drawable中新建xml文件,编写按钮背景图片
xml中添加Item:
<item android:drawable="@mipmap/ic_launcher"/>layout中的引用
android:background="@drawable/btn_press"方式三:自制图片并设置拉伸方向,内容方向
1、首先自制图片:
找到Sdk文件夹—tools—draw9patch.bat—将提前准备的图片拖入打开的java界面,进行设置:上左代表拉伸,下右代表内容——设置完成后将文件保存为.9.png文件。
2、将文件ctrl+c —ctrl+v复制到mipmap下
3、进行调用
例:
<RelativeLayout

xmlns:android="http://schemas.android.com/apk/res/android"
    xmlns:tools="http://schemas.android.com/tools"

android:layout_width="match_parent"
    android:layout_height="match_parent"

android:paddingLeft="@dimen/activity_horizontal_margin"
    android:paddingRight="@dimen/activity_horizontal_margin"
    android:paddingTop="@dimen/activity_vertical_margin"
    android:paddingBottom="@dimen/activity_vertical_margin"

tools:context=".MainActivity">

    <!-- android:textColor="#ff0000"-->
    <!-- android:autoLink="web"-->
<LinearLayout
    android:layout_width="match_parent"
    android:layout_height="wrap_content"
    android:orientation="vertical">


<TextView
    android:layout_width="match_parent"
    android:layout_height="wrap_content"
    android:singleLine="true"
    android:ellipsize="marquee"
    android:focusable="true"
    android:focusableInTouchMode="true"
    android:id="@+id/textview"
    android:text="我要上网

http://www.baidu.comndfdhbcdhvgvgdsakksdcdcdsdscdsssajddddddddj

jnvvvvvvvvvvvvvdddddddddd"
    />

<EditText
    android:layout_width="match_parent"
    android:layout_height="wrap_content"
    android:layout_alignParentBottom="true"/>
    <TextView
        android:layout_width="match_parent"
        android:layout_height="wrap_content"
        android:id="@+id/textview_span"
        android:layout_centerVertical="true"/>
    <TextView
        android:layout_width="match_parent"
        android:layout_height="wrap_content"
        android:id="@+id/textview_line"
        android:text="原价298"
        android:textStyle="bold"
        android:layout_below="@+id/textview"
        android:layout_alignParentLeft="true"
        android:layout_alignParentStart="true"
        />
    <Button
        android:layout_width="match_parent"
        android:layout_height="wrap_content"
        android:text="请点击"
        android:background="@drawable/btn_press"
        />
</LinearLayout>
</RelativeLayout>
drawable下的xml文件
该文件下设置了点击时的背景图片为background2,和常态时的背景图片button。使用时有两点注意事项:
①写入item时,state_pressed状态必须写在前面
②图片引用时虽然是 .9文件,但是引用时并不加.9
<?xml version="1.0" encoding="utf-8"?>
<selector xmlns:android="http://schemas.android.com/apk/res/android">
<item android:drawable="@mipmap/background2"

android:state_pressed="true"/>
    <item android:drawable="@mipmap/button"/>
</selector>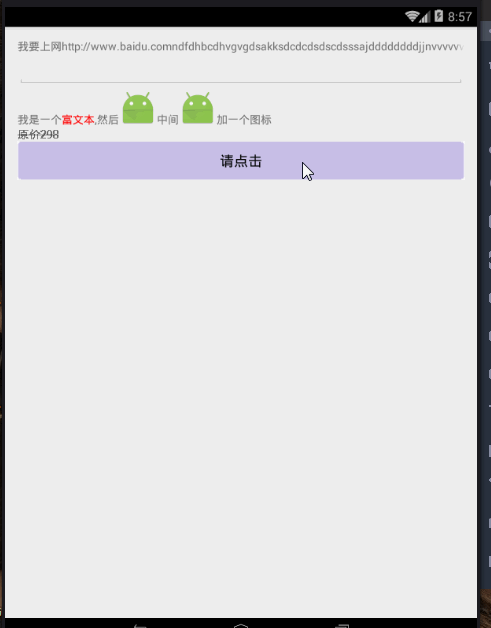
RadoiButton
RadioButton:一般与RadioGroup一块使用 例子:性别选择
用法:
1、先创建RadioGroup在RadioGroup中创建RadioButton
2、使用checkedButton检测选中的按钮。
3、在mainActivity中调用setOnCheckedChangeListener和OnCheckedChangeListener检测选框的变化。
package com.example.administrator.mytextview;

import android.app.Activity;
import android.graphics.Color;
import android.graphics.Paint;
import android.graphics.drawable.Drawable;
import android.os.Bundle;
import android.text.Html;
import android.text.Spanned;
import android.text.method.PasswordTransformationMethod;
import android.text.util.Linkify;
import android.util.Log;
import android.view.Menu;
import android.view.MenuItem;
import android.view.View;
import android.widget.Button;
import android.widget.EditText;
import android.widget.RadioButton;
import android.widget.RadioGroup;
import android.widget.TextView;

import java.lang.reflect.Field;

public class MainActivity extends Activity {
    private Button bt_commit;
    private RadioGroup radiogroup;
    @Override
    protected void onCreate(Bundle savedInstanceState) {
        super.onCreate(savedInstanceState);
        setContentView(R.layout.radiolayout);
        radiogroup= (RadioGroup) findViewById(R.id.radiogroup);
        radiogroup.setOnCheckedChangeListener(new RadioGroup.OnCheckedChangeListener() {
            @Override
            public void onCheckedChanged(RadioGroup group, int checkedId) {
                RadioButton rb= (RadioButton) findViewById(checkedId);
                Log.d("sex","您选择的性别是:"+rb.getText());
            }
        });
        bt_commit= (Button) findViewById(R.id.bt_commit);
        bt_commit.setOnClickListener(new View.OnClickListener() {
            @Override
            public void onClick(View v) {
            int checkid=radiogroup.getCheckedRadioButtonId();
                RadioButton bt_radio= (RadioButton) findViewById(checkid);
                Log.d("sex","您选择的性别是:"+bt_radio.getText());
            }
        });


    }
}
layout:
<?xml version="1.0" encoding="utf-8"?>
<LinearLayout xmlns:android="http://schemas.android.com/apk/res/android"
    android:orientation="vertical" android:layout_width="match_parent"
    android:layout_height="match_parent">
    <TextView
        android:layout_width="wrap_content"
        android:layout_height="wrap_content"
        android:text="性别"/>
<RadioGroup
    android:layout_width="wrap_content"
    android:layout_height="wrap_content"
    android:orientation="horizontal"
    android:id="@+id/radiogroup"
    android:checkedButton="@+id/bt_other"   >

    <RadioButton
        android:layout_width="wrap_content"
        android:layout_height="wrap_content"
        android:text="男"
        android:button="@drawable/checkbox_normal"
        android:id="@+id/bt_man"
        />
    <RadioButton
        android:layout_width="wrap_content"
        android:layout_height="wrap_content"
        android:text="女"
        android:button="@drawable/checkbox_normal"
        android:id="@+id/bt_woman"
        />
    <RadioButton
        android:id="@+id/bt_other"
        android:layout_width="wrap_content"
        android:layout_height="wrap_content"
        android:text="其他"
        />

</RadioGroup>
    <LinearLayout
        android:layout_width="wrap_content"
        android:layout_height="wrap_content">
        <Button
            android:layout_width="wrap_content"
            android:layout_height="wrap_content"
            android:id="@+id/bt_commit"
            android:text="提交信息"/>
    </LinearLayout>
</LinearLayout>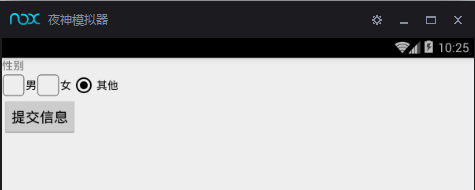


 102
102

 被折叠的 条评论
为什么被折叠?
被折叠的 条评论
为什么被折叠?
 到【灌水乐园】发言


