


⁄(⁄ ⁄•⁄ω⁄•⁄ ⁄)⁄决定写一篇完整的了!!
一、需要准备的安装包:
apr-1.5.2.tar.gz http://archive.apache.org/dist/apr/
apr-util-1.5.4.tar.gz http://archive.apache.org/dist/apr/
httpd-2.2.31.tar.gz http://httpd.apache.org/download.cgi
二、上传到Linux系统里,tar -zxvf 解压,再分别进入三个文件夹编译
首先把三个压缩包都传入/usr/local下并解压后
1)
cd apr-1.5.2
./configure
make  //如果make不了,就yum -y install gcc glibc glibc-common一系列包
make install
2)
cd apr-util-1.5.4
 ./configure --with-apr=/usr/local/apr/   /*这里有必要解释一下,如果只写./configure的话,会出现configure: error: APR could not b located. Please use the --with-apr option.这种报错,提示你加上--with-apr这个option,所以我们需要加并指定目录,不指定目录的话还会报错说找不到,机器这个智障!我们原谅它⁄(⁄ ⁄•⁄ω⁄•⁄ ⁄)⁄*/
make
make install
3)
cd httpd-2.2.31
mkdir -p /export/apache
./configure --prefix=/export/apache --enable-module=shared
make  /*这里如果进行不下去,报checking for APR...no configure: error: APR not found.  Please read the documentation.或者checking for APR-util...no configure: error: APR-util not found.  Please read the documentation.这两种错误,你肯定没执行前两步骤。不听我话,请尝试ctrl+w */
#make install
4)如果报缺少prec的错误,同理继续此步骤4,(看其他博文有提到,但是我没遇到缺少这个的错误,写出来)
下载包并解压  附下载链接 http://jaist.dl.sourceforge.net/project/pcre/pcre/
cd 进入目录
./configure
make
make install
三、验证安装
开启:apachectl -k start
关闭:apachectl -k stop
开启时报错??httpd: Could not reliably determine the server's fully qualified domain name, using 127.0.0.1 for ServerName
vim /export/apache/conf/httpd.conf //编辑这个文件而不是vim /etc/httpd/conf/httpd.conf,这个是系统自带的,我们需要编辑的是我们自己安装的最新Apache重启一下 apachectl -k restart(补充说明:如果去掉注释还是报错,建议把系统自带Apache删掉,用rpm -e命令,具体表现为:rpm -qa | grep http
rpm -e http-具体版本号 )
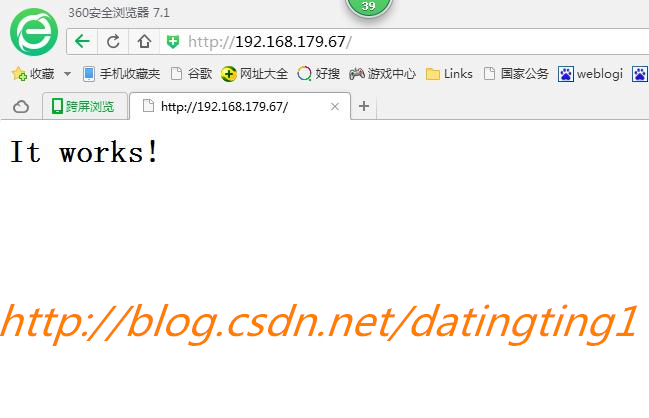
在浏览器上输入 http://localhost:80 回车 显示 It works!即成功。
写在题外的话,(以下鸡汤开灌⁄(⁄ ⁄•⁄ω⁄•⁄ ⁄)⁄可以忽略了)“所谓诚其意者,毋自欺也。如恶恶臭,如好好色,此之谓自谦,故君子必慎其独也。小人闲居为不善,无所不至;见君子而后厌然,掩其不善,而著其善。人之视已,如见其肺肝然则何益矣。此谓诚于中,形于外,故君子必慎其独也。”--《礼记·大学》
毋自欺


 1154
1154

 被折叠的 条评论
为什么被折叠?
被折叠的 条评论
为什么被折叠?
 到【灌水乐园】发言


