


之前每次配置web环境都是百度找度娘,然后一个一个看,发现都太啰嗦了,找的人也累,所以今天自己整理了一份,也便于以后自己参考
这里用的是阿里云服务器centos
安装说明
1、首先到阿里云市场搜“Linux一键安装web环境”下载安装包,也就2块钱,或者找度娘有人会分享免费的出来
一键安装包sh-1.x.x,可在阿里云所有linux系统上部署安装,此安装包包含的软件:
nginx / apache /mysql / php / php扩展 / JDK / Tomcat / ftp /phpwind / phpmyadmin
2、执行一键安装包(./install.sh),会自动清理之前一键安装包安装过的环境,将软件安装在/alidata目录下
如果您已经安装过一键安装包,再次执行安装,如若有重要数据,请自行备份/alidata目录。
执行以下命令可以卸载:
chmod 777 -R sh-1.x.x
cd sh-1.x.x
./uninstall.sh
开始安装:
1、首先准备好连接linux服务器的工具,推荐用xshell和xftp
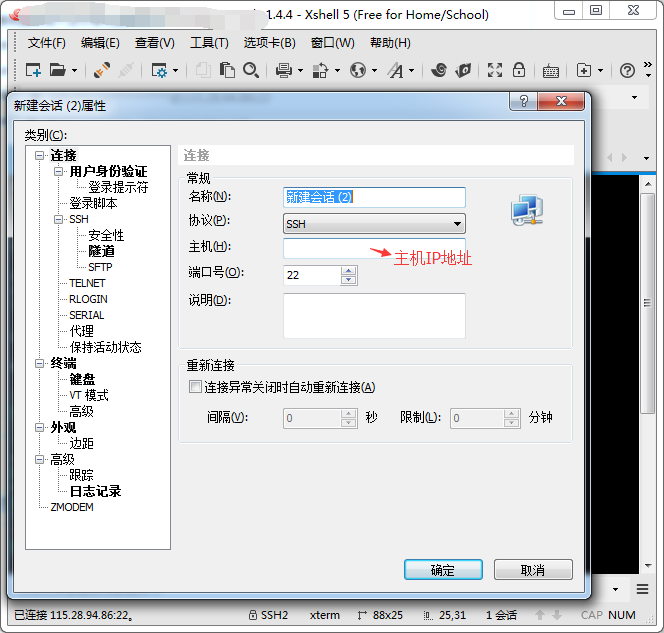
2、打开xshell,填写IP地址,用户名,密码就进入如下页面

3、打开xftp,上传一键安装文件
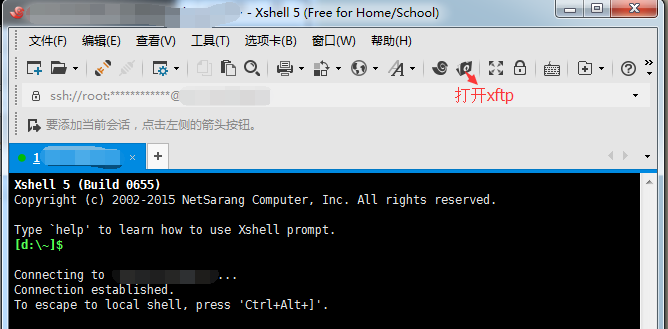

4、回到shell页面,ls看到多了sh-1.x.x目录

接下来按照说明,分步骤敲入安装命令
输入命令:chmod –R 777 sh-1.4.4
cd sh-1.4.4
./install.sh

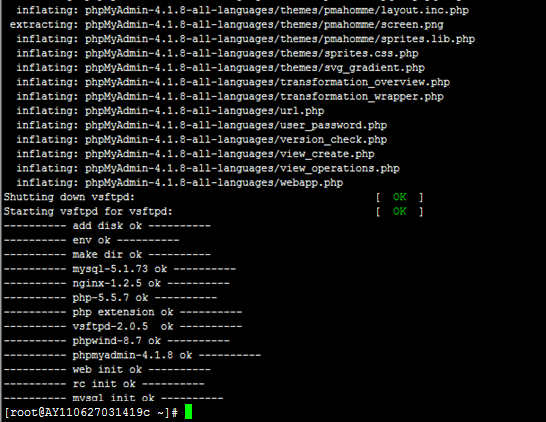
到这里已经安装结束了,但不能保证就是安装成功的,
输入命令 :netstat -tunpl
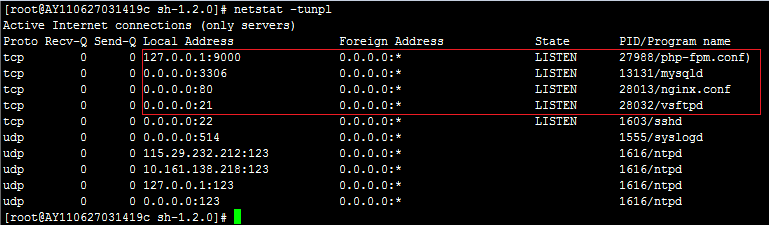
我们可以看到正在运行状态的服务及端口:9000端口是php进程服务,3306端口是mysql服务,80端口是nginx服务,21端口是ftp服务
如果看到以上信息,则说明安装没有异常
到这里安装就真正的结束了,一切OK。
备注:
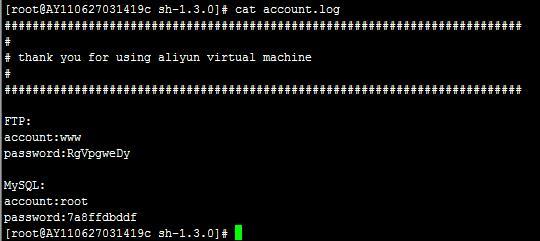
那我怎么登录ftp和mysql?
在命令行里输入: cat account.log
或者在./sh-1.x.x下面的account.log文件中查看

网站目录:/alidata/www
服务器软件目录:/alidata/server
Mysql 目录 /alidata/server/mysql
Php目录/alidata/server/php
选择了nginx 那么会有一个nginx 目录在 /alidata/server/nginx/
Nginx 配置文件在/alidata/server/nginx/conf
Nginx虚拟主机添加 你可以修改/alidata/server/nginx/conf/vhosts/phpwind.conf
选择了apache那么会有一个httpd 目录在 /alidata/server/httpd
apache 配置文件在/alidata/server/httpd/conf
apache虚拟主机添加 你可以修改/alidata/server/httpd/conf/vhosts/phpwind.conf
各个服务操作命令汇总:
nginx:
/etc/init.d/nginx start/stop/restart/reload)
apache:
/etc/init.d/httpd start/stop/restart/...
mysql:
/etc/init.d/mysqld start/stop/restart/...
php-fpm:
/etc/init.d/php-fpm start/stop/restart/...
ftp:
/etc/init.d/vsftpd start/stop/restart/...
比如启动nginx:
/etc/init.d/nginx start
备注:MySQL远程,SVN配置,防火墙设置
grant ALL PRIVILEGES ON *.* to wangxiong@"%" identified by "123456";
FLUSH PRIVILEGES;
vi :wq保存退出
:q退出
mkdir /opt/svn/repos
svnadmin create /opt/svn/repos
===先设置passwd
[users]
# harry = harryssecret
# sally = sallyssecret
hello=123
用户名=密码
===再设置权限authz
[/]
hello= rw
===最后设定snvserv.conf
anon-access = none # 使非授权用户无法访问
auth-access = write # 使授权用户有写权限
password-db = password
authz-db = authz # 访问控制文件
realm = /opt/svn/repos # 认证命名空间
以上语句都必须顶格写, 左侧不能留空格, 否则会出错.
===连接
启动svn: svnserve -d -r /opt/svn/repos
查看SVN进程
ps aux|grep svnserve
停止重启SVN
killall svnserve //停止
或kill -9 进程id
svn: svnserve -d -r /opt/svn/repos // 启动
如果已经有svn在运行,可以换一个端口运行
svnserve -d -r /opt/svn/repos --listen-port 3391
这样同一台服务器可以运行多个svnserver
svn://your server address (如果指定端口需要添加端口 :端口号)
服务器svn checkout
同步 svn://127.0.0.1/Test 到 /www/Test
cd /www
svn checkout svn://127.0.0.1/Test ./
iptables -L -n 查看防火墙的配置
service iptables status 查看防火墙状态
service iptables start|restart|stop 开启|重启|关闭
centos7默认防火墙为firewalld
关闭firewalld用iptables
systemctl status firewalld 查看状态
systemctl stop firewalld 停止
systemctl disable firewalld 禁止开机启动
systemctl mask firewalld 禁用firewalld
yum install iptables-services 安装iptables
vi /etc/sysconfig/iptables #编辑防火墙配置文件
-A INPUT -m state --state NEW -m tcp -p tcp --dport 22 -j ACCEPT
-A INPUT -m state --state NEW -m tcp -p tcp --dport 80 -j ACCEPT
-A INPUT -m state --state NEW -m tcp -p tcp --dport 3306 -j ACCEPT
systemctl restart iptables 重启iptables
systemctl restart ip6tables
systemctl enable iptables 设置开机启动
systemctl enable ip6tables
systemctl unmark iptables 开启


 3503
3503

 被折叠的 条评论
为什么被折叠?
被折叠的 条评论
为什么被折叠?
 到【灌水乐园】发言


