


准备:
在Linux主机上,安装上传下载工具包rz及sz
如果不知道你要安装包的具体名称,可以使用yum provides */name 进行查找系统自带软件包的信息;

一般会列出软件包的名称及版本,还有安装路径;查询到软件包名后,使用yum install -y 包名 进行安装。
lrzsz包安装完成后包括上传rz、下载sz命令;只需要安装这个包即可。
[root@localhost src]# yum install -y lrzsz
1.centos6安装配置java:方法 一
# rz (传入宿主机的rpm包,无次命令可通过yum install lrzsz安装)
# rpm -ivh jdk-8u111-linux-x64.rpm
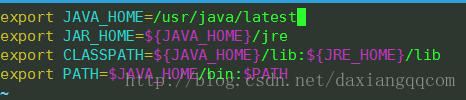
# vim /etc/profile.d/java.sh (新建)
# . /etc/profile.d/java.sh
linux允许多java版本共存,此处也可写成固定版本:
windows下环境变量设置:
# JAVA_HOME —— C:\Java\jdk
# CLASSPATH —— .;%JAVA_HOME%\lib\dt.jar;%JAVA_HOME%\lib\tools.jar;
# Path —— %JAVA_HOME%\bin;%JAVA_HOME%\jre\bin;
2.centos6安装配置TOMCAT
# wget http://mirrors.tuna.tsinghua.edu.cn/apache/tomcat/tomcat-8/v8.5.13/bin/apache-tomcat-8.5.13.tar.gz (或者直接去官网复制链接)
# tar xf apache-tomcat-8.5.13.tar.gz -C /usr/local/
# cd /usr/local/
# ln -sv apache-tomcat-8.5.13/ tomcat
# cd tomcat
# vim /etc/profile.d/tomcat.sh (新建)
# . /etc/profile.d/tomcat.sh

开启catalina:
# catalina.sh start
查看端口:
# ss -tnlp
方法 二:
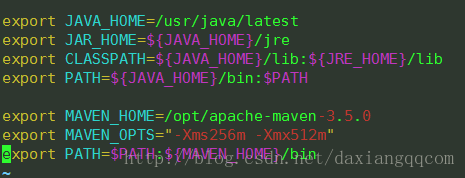
编辑/etc/profile,最后加上export语句,如下图:
输入:
# source /etc/profile
PATH内容重复,可使用如下脚本清除:
新建脚本文件:
# vim clearpath.sh
 awk -F: '{
    sep = ""
    for (i = 1; i <= NF; ++i)
        if (unique[$i] != 1)
        {
            out = out sep $i
            sep = ":"
            unique[$i] = 1
        }
    print out
    }' <<< $PATH
# chmod +x clearpath.sh
# . clearpath.sh
3.编译安装nginx:
- pcre-devel是使用pcre开发的一个二次开发库。
- zlib库提供了很多种压缩和解压缩的方式,nginx使用zlib对http包的内容进行gzip,所以需要在linux上安装zlib库。
- OpenSSL 是一个强大的安全套接字层密码库,囊括主要的密码算法、常用的密钥和证书封装管理功能及SSL协议,并提供丰富的应用程序供测试或其它目的使用。nginx不仅支持http协议,还支持https(即在ssl协议上传输http),所以需要在linux安装openssl库。
1、解决依赖关系
# yum groupinstall "Development Tools" "Server Platform Deveopment" -y && yum install openssl-devel pcre-devel -y
2、安装
首先添加用户nginx,实现以之运行nginx服务进程:
# groupadd -r nginx
# useradd -r -g nginx nginx
3、接着开始编译和安装:
# tar -zxvf nginx-1.12.0.tar.gz -C /software/
# ./configure \
  --prefix=/usr/local/nginx \
  --error-log-path=/data/applogs/nginx/error.log \
  --http-log-path=/data/applogs/nginx/access.log \
  --pid-path=/var/run/nginx/nginx.pid  \
  --lock-path=/var/lock/nginx.lock \
  --user=nginx \
  --group=nginx \
  --with-http_ssl_module \
  --with-http_flv_module \
  --with-http_stub_status_module \
  --with-http_gzip_static_module \
  --http-client-body-temp-path=/usr/local/nginx/client/ \
  --http-proxy-temp-path=/usr/local/nginx/proxy/ \
  --http-fastcgi-temp-path=/usr/local/nginx/fcgi/ \
  --http-uwsgi-temp-path=/usr/local/nginx/uwsgi \
  --http-scgi-temp-path=/usr/local/nginx/scgi \
  --with-pcre

# make && make install
4、说明:
- 1、Nginx可以使用Tmalloc(快速、多线程的malloc库及优秀性能分析工具)来加速内存分配,使用此功能需要事先安装gperftools,而后在编译nginx添加–with-google_perftools_module选项即可。
- 2、如果想使用nginx的perl模块,可以通过为configure脚本添加–with-http_perl_module选项来实现,但目前此模块仍处于实验性使用阶段,可能会在运行中出现意外,因此,其实现方式这里不再介绍。如果想使用基于nginx的cgi功能,也可以基于FCGI来实现,具体实现方法请参照网上的文档。
3、为nginx提供SysV init脚本:
新建文件/etc/rc.d/init.d/nginx,内容如下:#!/bin/sh # # nginx - this script starts and stops the nginx daemon # # chkconfig: - 85 15 # description: Nginx is an HTTP(S) server, HTTP(S) reverse \ # proxy and IMAP/POP3 proxy server # processname: nginx # config: /etc/nginx/nginx.conf # config: /etc/sysconfig/nginx # pidfile: /var/run/nginx.pid # Source function library. . /etc/rc.d/init.d/functions # Source networking configuration. . /etc/sysconfig/network # Check that networking is up. [ "$NETWORKING" = "no" ] && exit 0 nginx="/usr/local/nginx/sbin/nginx" prog=$(basename $nginx) NGINX_CONF_FILE="/usr/local/nginx/nginx.conf" [ -f /etc/sysconfig/nginx ] && . /etc/sysconfig/nginx lockfile=/var/lock/subsys/nginx make_dirs() { # make required directories user=`nginx -V 2>&1 | grep "configure arguments:" | sed 's/[^*]*--user=\([^ ]*\).*/\1/g' -` options=`$nginx -V 2>&1 | grep 'configure arguments:'` for opt in $options; do if [ `echo $opt | grep '.*-temp-path'` ]; then value=`echo $opt | cut -d "=" -f 2` if [ ! -d "$value" ]; then # echo "creating" $value mkdir -p $value && chown -R $user $value fi fi done } start() { [ -x $nginx ] || exit 5 [ -f $NGINX_CONF_FILE ] || exit 6 make_dirs echo -n $"Starting $prog: " daemon $nginx -c $NGINX_CONF_FILE retval=$? echo [ $retval -eq 0 ] && touch $lockfile return $retval } stop() { echo -n $"Stopping $prog: " killproc $prog -QUIT retval=$? echo [ $retval -eq 0 ] && rm -f $lockfile return $retval } restart() { configtest || return $? stop sleep 1 start } reload() { configtest || return $? echo -n $"Reloading $prog: " killproc $nginx -HUP RETVAL=$? echo } force_reload() { restart } configtest() { $nginx -t -c $NGINX_CONF_FILE } rh_status() { status $prog } rh_status_q() { rh_status >/dev/null 2>&1 } case "$1" in start) rh_status_q && exit 0 $1 ;; stop) rh_status_q || exit 0 $1 ;; restart|configtest) $1 ;; reload) rh_status_q || exit 7 $1 ;; force-reload) force_reload ;; status) rh_status ;; condrestart|try-restart) rh_status_q || exit 0 ;; *) echo $"Usage: $0 {start|stop|status|restart|condrestart|try-restart|reload|force-reload|configtest}" exit 2 esac
而后为此脚本赋予执行权限:
# chmod +x /etc/rc.d/init.d/nginx
添加至服务管理列表,并让其开机自动启动:
# chkconfig –add nginx
# chkconfig nginx on
而后就可以启动服务并测试了:
# service nginx start


 334
334


 被折叠的 条评论
为什么被折叠?
被折叠的 条评论
为什么被折叠?
 到【灌水乐园】发言


