


第一章 MyBatis 入门【工程源码下载>>>】
本章将涵盖以下话题: 本章将涵盖以下话题: 本章将涵盖以下话题: 本章将涵盖以下话题:
- MyBatis?
- 为什么选择 为什么选择 MyBatis?
- MyBatis安装配置
- 域模型样例
1.1 MyBatis
MyBatis 是一个简化和实现了 Java 数据持久化层(persistence layer)的开源框架,它抽象了大量的 JDBC 冗余代 码,并提供了一个简单易用的 API 和数据库交互。
MyBatis 的前身是 iBATIS,iBATIS 于 2002 年由 Clinton Begin 创建。MyBatis 3 是 iBATIS 的全新设计,支持 注解和 Mapper。
MyBatis 流行的主要原因在于它的简单性和易使用性。在 Java 应用程序中,数据持久化层涉及到的工作有:将从数 据库查询到的数据生成所需要的 Java 对象;将 Java 对象中的数据通过 SQL 持久化到数据库中。
MyBatis 通过抽象底层的 JDBC 代码,自动化 SQL 结果集产生 Java 对象、Java 对象的数据持久化数据库中的过程 使得对 SQL 的使用变得容易。
如 果 你 正 在 使 用 iBATIS ,并且想将 iBATIS 移 植 到 MyBatis 上 , 你 可 以 在 MyBatis 的官方网站
( https://code.google.com/p/mybatis/wiki/DocUpgrade )上找到详细的指导步骤。
1.2 为什么选择 MyBatis?
当前有很多 Java 实现的持久化框架,而 MyBatis 流行起来有以下原因:
- 它消除了大量的 JDBC 冗余代码
- 它有低的学习曲线
- 它能很好地与传统数据库协同工作
- 它可以接受 SQL 语句
- 它提供了与 Spring 和 Guice 框架的集成支持
- 它提供了与第三方缓存类库的集成支持
- 它引入了更好的性能
1.2.1 消除大量的 JDBC 冗余代码
Java 通过 Java 数据库连接(Java DataBase Connectivity,JDBC)API 来操作关系型数据库,但是 JDBC 是一个 非常底层的 API,我们需要书写大量的代码来完成对数据库的操作。
让我们演示一下我们是怎样使用纯的 JDBC 来对表 STUDENTS 实现简单的 select 和 insert 操作的。 假设表 STUDENTS 有 STUD_ID,NAME,EMAIL 和 DOB 字段。对应的 Student JavaBean 定义如下:
package com.mybatis3.domain;

import java.util.Date;

/**
 * Author: 王俊超
 * Time: 2016-07-30 06-55 10:58
 * CSDN: http://blog.csdn.net/derrantcm
 * Github: https://github.com/Wang-Jun-Chao
 * Declaration: All Rights Reserved !!!
 */
public class Student {
    private Integer studId;
    private String name;
    private String email;
    private Date dob;

    public Student() {
    }

    public Student(Integer studId, String name, String email, Date dob) {
        this.studId = studId;
        this.name = name;
        this.email = email;
        this.dob = dob;
    }

    public Integer getStudId() {
        return studId;
    }

    public void setStudId(Integer studId) {
        this.studId = studId;
    }

    public String getName() {
        return name;
    }

    public void setName(String name) {
        this.name = name;
    }

    public String getEmail() {
        return email;
    }

    public void setEmail(String email) {
        this.email = email;
    }

    public Date getDob() {
        return dob;
    }

    public void setDob(Date dob) {
        this.dob = dob;
    }

    @Override
    public String toString() {
        return "Student{" +
                "studId=" + studId +
                ", name='" + name + '\'' +
                ", email='" + email + '\'' +
                ", dob=" + dob +
                '}';
    }
}
下面的 StudentService.java 实现了 通过 JDBC 对表 STUDENTS 的 SELECT 和 INSERT 操作:
package com.mybatis3.services;

import com.mybatis3.domain.Student;

import java.sql.*;
import java.util.Date;

/**
 * Author: 王俊超
 * Time: 2016-07-30 21-43 10:58
 * CSDN: http://blog.csdn.net/derrantcm
 * Github: https://github.com/Wang-Jun-Chao
 * Declaration: All Rights Reserved !!!
 */
public class JdbcStudentService {
    private static final String DRIVER = "com.mysql.jdbc.Driver";
    private static final String URL = "jdbc:mysql://localhost:3306/test";
    private static final String USERNAME = "root";
    private static final String PASSWORD = "123456";

    public static void main(String[] args) {

        JdbcStudentService service = new JdbcStudentService();

        Student existingStudent = service.findStudentById(1);
        System.out.println(existingStudent);


        long ts = System.currentTimeMillis();//For creating unique student names
        Student newStudent = new Student(0, "student_" + ts, "student_" + ts + "@gmail.com", new Date());
        service.createStudent(newStudent);
        System.out.println(newStudent);

        int updateStudId = 3;
        Student updateStudent = service.findStudentById(updateStudId);
        ts = System.currentTimeMillis();//For creating unique student email
        updateStudent.setEmail("student_" + ts + "@gmail.com");
        service.updateStudent(updateStudent);

    }

    public Student findStudentById(int studId) {
        Student student = null;
        Connection conn = null;
        try {
            conn = getDatabaseConnection();
            String sql = "select * from students where stud_id=?";
            PreparedStatement pstmt = conn.prepareStatement(sql);
            pstmt.setInt(1, studId);
            ResultSet rs = pstmt.executeQuery();
            if (rs.next()) {
                student = new Student();
                student.setStudId(rs.getInt("stud_id"));
                student.setName(rs.getString("name"));
                student.setEmail(rs.getString("email"));
                student.setDob(rs.getDate("dob"));
            }

        } catch (SQLException e) {
            throw new RuntimeException(e);
        } finally {
            if (conn != null) {
                try {
                    conn.close();
                } catch (SQLException e) {
                }
            }
        }
        return student;
    }

    public void createStudent(Student student) {
        Connection conn = null;
        try {
            conn = getDatabaseConnection();
            String sql = "INSERT INTO STUDENTS(STUD_ID,NAME,EMAIL,DOB) VALUES(?,?,?,?)";
            PreparedStatement pstmt = conn.prepareStatement(sql);
            pstmt.setInt(1, student.getStudId());
            pstmt.setString(2, student.getName());
            pstmt.setString(3, student.getEmail());
            pstmt.setDate(4, new java.sql.Date(student.getDob().getTime()));
            pstmt.executeUpdate();

        } catch (SQLException e) {
            throw new RuntimeException(e);
        } finally {
            if (conn != null) {
                try {
                    conn.close();
                } catch (SQLException e) {
                }
            }
        }
    }

    public void updateStudent(Student student) {
        Connection conn = null;
        try {
            conn = getDatabaseConnection();
            conn = getDatabaseConnection();
            String sql = "UPDATE STUDENTS SET NAME=?,EMAIL=?,DOB=? WHERE STUD_ID=?";
            PreparedStatement pstmt = conn.prepareStatement(sql);
            pstmt.setString(1, student.getName());
            pstmt.setString(2, student.getEmail());
            pstmt.setDate(3, new java.sql.Date(student.getDob().getTime()));
            pstmt.setInt(4, student.getStudId());
            pstmt.executeUpdate();

        } catch (SQLException e) {
            throw new RuntimeException(e.getCause());
        } finally {
            if (conn != null) {
                try {
                    conn.close();
                } catch (SQLException e) {
                }
            }
        }
    }

    protected Connection getDatabaseConnection() throws SQLException {
        try {
            Class.forName(JdbcStudentService.DRIVER);
            return DriverManager.getConnection(JdbcStudentService.URL,
                    JdbcStudentService.USERNAME,
                    JdbcStudentService.PASSWORD);
        } catch (SQLException e) {
            throw e;
        } catch (Exception e) {
            throw new RuntimeException(e.getCause());
        }
    }
}
上述的每个方法中有大量的重复代码:创建一个连接,创建一个 Statement 对象,设置输入参数,关闭资源(如
connection,statement,resultSet)。
MyBatis 抽象了上述的这些相同的任务,如准备需要被执行的 SQL statement 对象并且将 Java 对象作为输入数据 传递给 statement 对象的任务,进而开发人员可以专注于真正重要的方面。
另外,MyBatis 自动化了将从输入的 Java 对象中的属性设置成查询参数、从 SQL 结果集上生成 Java 对象这两个过
程。
现在让我们看看怎样通过 MyBatis 实现上述的方法:
1 在 SQL Mapper 映射配置文件中配置 SQL 语句,假定为 StudentMapper.xml
XML Code
<?xml version="1.0" encoding="UTF-8" ?>
<!DOCTYPE mapper PUBLIC "-//mybatis.org//DTD Mapper 3.0//EN" "http://mybatis.org/dtd/mybatis-3-mapper.dtd">
<mapper namespace="com.mybatis3.mappers.StudentMapper">
    <resultMap id="StudentResult" type="Student">
        <id property="studId" column="stud_id"/>
        <result property="name" column="name"/>
        <result property="email" column="email"/>
        <result property="dob" column="dob"/>
    </resultMap>


    <select id="findAllStudents" resultMap="StudentResult">
        select * from Students
    </select>

    <select id="findStudentById" parameterType="int" resultType="Student">
        select stud_id as studId, name, email, dob from Students where stud_id=#{studId}
    </select>

    <insert id="insertStudent" parameterType="Student">
        insert INTO students(stud_id, name, email, dob) values (#{studId}, #{name}, #{email}, #{dob})
    </insert>

    <update id="updateStudent" parameterType="Student">
        update students set name=#{name}, email=#{email}, dob=#{dob} where stud_id=#{studId}
    </update>
</mapper>
2 创建一个 StudentMapper 接口
Java Code
package com.mybatis3.mappers;

import com.mybatis3.domain.Student;

import java.util.List;

/**
 * Author: 王俊超
 * Time: 2016-07-30 21-27 10:58
 * CSDN: http://blog.csdn.net/derrantcm
 * Github: https://github.com/Wang-Jun-Chao
 * Declaration: All Rights Reserved !!!
 */
public interface StudentMapper {
    List<Student> findAllStudents();

    Student findStudentById(Integer id);

    void insertStudent(Student student);

    void updateStudent(Student student);
}
3 在 Java 代码中,你可以使用如下代码触发 SQL 语句:
Java Code
package com.mybatis3.services;

import com.mybatis3.domain.Student;
import com.mybatis3.mappers.StudentMapper;
import com.mybatis3.util.MyBatisSqlSessionFactory;
import org.apache.ibatis.session.SqlSession;
import org.slf4j.Logger;
import org.slf4j.LoggerFactory;

import java.util.List;

/**
 * Author: 王俊超
 * Time: 2016-07-30 21-45 10:58
 * CSDN: http://blog.csdn.net/derrantcm
 * Github: https://github.com/Wang-Jun-Chao
 * Declaration: All Rights Reserved !!!
 */
public class StudentService {
    private Logger logger = LoggerFactory.getLogger(getClass());

    public List<Student> findAllStudents() {
        SqlSession sqlSession = MyBatisSqlSessionFactory.getSqlSession();
        try {
            StudentMapper studentMapper = sqlSession.getMapper(StudentMapper.class);
            return studentMapper.findAllStudents();
        } finally {
            sqlSession.close();
        }
    }

    public Student findStudentById(Integer studId) {
        logger.debug("Select Student By ID :{}", studId);
        SqlSession sqlSession = MyBatisSqlSessionFactory.getSqlSession();
        try {
            StudentMapper studentMapper = sqlSession.getMapper(StudentMapper.class);
            return studentMapper.findStudentById(studId);
            //return sqlSession.selectOne("com.mybatis3.StudentMapper.findStudentById", studId);
        } finally {
            sqlSession.close();
        }
    }

    public void createStudent(Student student) {
        SqlSession sqlSession = MyBatisSqlSessionFactory.getSqlSession();
        try {
            StudentMapper studentMapper = sqlSession.getMapper(StudentMapper.class);
            studentMapper.insertStudent(student);
            sqlSession.commit();
        } finally {
            sqlSession.close();
        }
    }

    public void updateStudent(Student student) {
        SqlSession sqlSession = MyBatisSqlSessionFactory.getSqlSession();
        try {
            StudentMapper studentMapper = sqlSession.getMapper(StudentMapper.class);
            studentMapper.updateStudent(student);
            sqlSession.commit();
        } finally {
            sqlSession.close();
        }
    }
}
就是这么简单!你不需要创建 Connection 连接,PreparedStatement,不需要自己对每一次数据库操作进行手动设置参数和关闭连接。只需要配置数据库连接属性和 SQL 语句,MyBatis 会处理这些底层工作。
现在你不用担心 SqlSessionFactory、SqlSession、Mapper XML 文件是什么,这些概念我们会在接下来的章节中 详细解释。另外,MyBatis 还提供了其他的一些特性来简化持久化逻辑的实现:
它支持复杂的 SQL 结果集数据映射到嵌套对象图结构
它支持一对一和一对多的结果集和 Java 对象的映射
它支持根据输入的数据构建动态的 SQL 语句
1.2.2 低学习曲线
MyBatis 能够流行的首要原因之一在于它学习和使用起来非常简单,它取决于你 Java 和 SQL 方面的知识。如果开发 人员很熟悉 Java 和 SQL,他们会发现 MyBatis 入门非常简单。
1.2.3 能够很好地与传统数据库协同工作
有时我们可能需要用不正规形式与传统数据库协同工作,使用成熟的 ORM 框架(如 Hibernate)有可能、但是很难跟 传统数据库很好地协同工作,因为他们尝试将 Java 对象静态地映射到数据库的表上 1。
而 MyBatis 是将查询的结果与 Java 对象映射起来,这使得 MyBatis 可以很好地与传统数据库协同工作。你可以根 据面相对象的模型创建 Java 域对象,执行传统数据库的查询,然后将结果映射到对应的 Java 对象上。
1.2.4 接受 SQL
成熟的 ORM 框架(如 Hibernate)鼓励使用实体对象(Entity Objects)和在其底层自动产生 SQL 语句。由于这种 的 SQL 生成方式,我们有可能不能够利用到数据库的一些特有的特性。Hibernate 允许执行本地 SQL,但是这样会打破持 久层和数据库独立的原则。
MyBatis 框架接受 SQL 语句,而不是将其对开发人员隐藏起来。由于 MyBatis 不会产生任何的 SQL 语句,所以开发 人员就要准备 SQL 语句,这样就可以充分利用数据库特有的特性并且可以准备自定义的查询。另外,MyBatis 对存储过程 也提供了支持。
1.2.5 与 Spring 和 Guice 框架的集成支持
MyBatis 提供了与 流行的依赖注入框架 Spring 和 Guice 的开包即用的集成支持,这将进一步简化 MyBatis 的使用
1.2.6 与第三方缓存类库的集成支持
MyBatis 有内建的 SqlSession 级别的缓存机制,用于缓存 Select 语句查询出来的结果。除此之外,MyBatis 提供 了与多种第三方缓存类库的集成支持,如 EHCache,OSCache,Hazelcast。
1.2.7 良好的性能
性能问题是关乎软件应用成功与否的关键因素之一。为了达到更好的性能,需要考虑很多事情,而对很多应用而言,数据持久化层是整个系统性能的关键。
MyBatis支持数据库连接池,消除了为每一个请求创建一个数据库连接的开销。
MyBatis提供了内建的缓存机制,在 SqlSession 级别提供了对 SQL 查询结果的缓存。即:如果你调用了相同的select 查询,MyBatis 会将放在缓存的结果返回,而不会去再查询数据库。
MyBatis 框架并没有大量地使用代理机制2,因此对于其他的过度地使用代理的 ORM 框架而言,MyBatis 可以获得更 好的性能。
1.3 MyBatis 安装和配置
我们假设你的系统上已经安装了 JDK1.6+ 和 MySQL5。JDK 和 MySQL 安装过程不在本书的叙述范围。 在写本书时,MyBatis 最新版是 MyBatis 3.2.2。贯穿本书,我们将使用 MyBatis 3.2.2 版本。 本文并不限定你使用什么类型的 IDE(如 Eclipse,NetBeans IDE,或者 IntelliJ IDEA,它们通过提供自动完成,
重构,调试特性来很大程度上简化了开发)来编码,你可以选择你喜欢的 IDE。
本节将(通过以下步骤)说明如何使用 MyBatis 开发一个简单的 Java 项目:
新建表 STUDENTS,插入样本数据
新建一个 Java 项目,将 MyBatis-3.2.2.jar 添加到 classpath 中
新建建 MyBatisSqlSessionFactory 单例模式类
新建映射器 StudentMapper 接口和 StudentService 类
新建一个 JUnit 测试类来测试 StudentService
1.3.1 新建表 STUDENTS,插入样本数据
使用以下 SQL 脚本往 MySQL 数据库中创建 STUDENTS 表插入样本数据:
SQL Code
CREATE TABLE ADDRESSES
(
    ADDR_ID INT(11)     NOT NULL AUTO_INCREMENT,
    STREET  VARCHAR(50) NOT NULL,
    CITY    VARCHAR(50) NOT NULL,
    STATE   VARCHAR(50) NOT NULL,
    ZIP     VARCHAR(10)          DEFAULT NULL,
    COUNTRY VARCHAR(50) NOT NULL,
    PRIMARY KEY (ADDR_ID)
)
    ENGINE = INNODB
    AUTO_INCREMENT = 1
    DEFAULT CHARSET = LATIN1;

CREATE TABLE STUDENTS
(
    STUD_ID INT(11)     NOT NULL AUTO_INCREMENT,
    NAME    VARCHAR(50) NOT NULL,
    EMAIL   VARCHAR(50) NOT NULL,
    PHONE   VARCHAR(15)          DEFAULT NULL,
    DOB     DATE                 DEFAULT NULL,
    BIO     LONGTEXT             DEFAULT NULL,
    PIC     BLOB                 DEFAULT NULL,
    ADDR_ID INT(11)              DEFAULT NULL,
    PRIMARY KEY (STUD_ID),
    CONSTRAINT FK_STUDENTS_ADDR FOREIGN KEY (ADDR_ID) REFERENCES ADDRESSES (ADDR_ID)
)
    ENGINE = INNODB
    AUTO_INCREMENT = 1
    DEFAULT CHARSET = LATIN1;

CREATE TABLE TUTORS
(
    TUTOR_ID INT(11)     NOT NULL AUTO_INCREMENT,
    NAME     VARCHAR(50) NOT NULL,
    EMAIL    VARCHAR(50) NOT NULL,
    PHONE    VARCHAR(15)          DEFAULT NULL,
    DOB      DATE                 DEFAULT NULL,
    BIO      LONGTEXT             DEFAULT NULL,
    PIC      BLOB                 DEFAULT NULL,
    ADDR_ID  INT(11)              DEFAULT NULL,
    PRIMARY KEY (TUTOR_ID),
    CONSTRAINT FK_TUTORS_ADDR FOREIGN KEY (ADDR_ID) REFERENCES ADDRESSES (ADDR_ID)
)
    ENGINE = INNODB
    AUTO_INCREMENT = 1
    DEFAULT CHARSET = LATIN1;


CREATE TABLE COURSES
(
    COURSE_ID   INT(11)      NOT NULL AUTO_INCREMENT,
    NAME        VARCHAR(100) NOT NULL,
    DESCRIPTION VARCHAR(512)          DEFAULT NULL,
    START_DATE  DATE                  DEFAULT NULL,
    END_DATE    DATE                  DEFAULT NULL,
    TUTOR_ID    INT(11)      NOT NULL,
    PRIMARY KEY (COURSE_ID),
    CONSTRAINT FK_COURSE_TUTOR FOREIGN KEY (TUTOR_ID) REFERENCES TUTORS (TUTOR_ID)
)
    ENGINE = INNODB
    AUTO_INCREMENT = 1
    DEFAULT CHARSET = LATIN1;


CREATE TABLE COURSE_ENROLLMENT
(
    COURSE_ID INT(11) NOT NULL,
    STUD_ID   INT(11) NOT NULL,
    PRIMARY KEY (COURSE_ID, STUD_ID),
    CONSTRAINT FK_ENROLLMENT_STUD FOREIGN KEY (STUD_ID) REFERENCES STUDENTS (STUD_ID),
    CONSTRAINT FK_ENROLLMENT_COURSE FOREIGN KEY (COURSE_ID) REFERENCES COURSES (COURSE_ID)
)
    ENGINE = INNODB
    DEFAULT CHARSET = LATIN1;


CREATE TABLE USER_PICS
(
    ID   INT(11) NOT NULL AUTO_INCREMENT,
    NAME VARCHAR(50)      DEFAULT NULL,
    PIC  BLOB,
    BIO  LONGTEXT,
    PRIMARY KEY (ID)
)
    ENGINE = INNODB
    AUTO_INCREMENT = 1
    DEFAULT CHARSET = LATIN1;
-- Sample DATA FOR TABLE ADDRESSES
INSERT INTO ADDRESSES (ADDR_ID, STREET, CITY, STATE, ZIP, COUNTRY) VALUES
(1, '4891 Pacific Hwy', 'San Diego', 'CA', '92110', 'San Diego'),
(2, '2400 N Jefferson St', 'Perry', 'FL', '32347', 'Taylor'),
(3, '710 N Cable Rd', 'Lima', 'OH', '45825', 'Allen'),
(4, '5108 W Gore Blvd', 'Lawton', 'OK', '32365', 'Comanche');
-- Sample data for table STUDENTS
INSERT INTO STUDENTS (STUD_ID, NAME, EMAIL, PHONE, DOB, BIO, PIC, ADDR_ID) VALUES
(1, 'Timothy', 'timothy@gmail.com', '123-123-1234', '1988-04-25', NULL, NULL, 3),
(2, 'Douglas', 'douglas@gmail.com', '789-456-1234', '1990-08-15', NULL, NULL, 4);
-- Sample data for table TUTORS
INSERT INTO TUTORS (TUTOR_ID, NAME, EMAIL, PHONE, DOB, BIO, PIC, ADDR_ID) VALUES
(1, 'John', 'john@gmail.com', '111-222-3333', '1980-05-20', NULL, NULL, 1),
(2, 'Paul', 'paul@gmail.com', '123-321-4444', '1981-03-15', NULL, NULL, 2);
-- Sample data for table courses
INSERT INTO COURSES (COURSE_ID, NAME, DESCRIPTION, START_DATE, END_DATE, TUTOR_ID) VALUES
(1, 'Quickstart Core Java', 'Core Java Programming', '2013-03-01', '2013-04-15', 1),
(2, 'Quickstart JavaEE6', 'Enterprise App Development using JavaEE6', '2013-04-01', '2013-08-30', 1),
(3, 'MyBatis3 Premier', 'MyBatis 3 framework', '2013-06-01', '2013-07-15', 2);
-- Sample data for table COURSE_ENROLLMENT
INSERT INTO COURSE_ENROLLMENT (COURSE_ID, STUD_ID) VALUES
(1, 1),
(1, 2),
(2, 2);1.3.3 新建 mybatis-config.xml 和映射器 StudentMapper.xml 配置文件
让我们来创建 MyBatis 的主要配置文件 mybatis-config.xml,其中包括数据库连接信息,类型别名等等;然后创
建一个包含了映射的 SQL 语句的 StudentMapper.xml 文件。
1. 创建 MyBatis 的主要配置文件 mybatis-config.xml,其中包括数据库连接信息,类型别名等等,然后将其加 到 classpath 中;
XML Code
<?xml version="1.0" encoding="UTF-8" ?>
<!DOCTYPE configuration PUBLIC "-//mybatis.org//DTD Config 3.0//EN" "http://mybatis.org/dtd/mybatis-3-config.dtd">
<configuration>
    <properties resource="application.properties"/>
    <typeAliases>
        <package name="com.mybatis3.domain"/>
    </typeAliases>

    <environments default="development">
        <environment id="development">
            <transactionManager type="JDBC"/>
            <dataSource type="POOLED">
                <property name="driver" value="${jdbc.driverClassName}"/>
                <property name="url" value="${jdbc.url}"/>
                <property name="username" value="${jdbc.username}"/>
                <property name="password" value="${jdbc.password}"/>
            </dataSource>
        </environment>
    </environments>

    <mappers>
        <mapper resource="com/mybatis3/mappers/StudentMapper.xml"/>
    </mappers>
</configuration>
################### DataSource Configuration ##########################
jdbc.driverClassName=com.mysql.jdbc.Driver
jdbc.url=jdbc:mysql://localhost:3306/test
jdbc.username=root
jdbc.password=123456 2. 创建 SQL 映射器 XML 配置文件 StudentMapper.xml 并且将它放在 com.mybatis3.mappers 包中
XML Code
<?xml version="1.0" encoding="UTF-8" ?>
<!DOCTYPE mapper PUBLIC "-//mybatis.org//DTD Mapper 3.0//EN" "http://mybatis.org/dtd/mybatis-3-mapper.dtd">
<mapper namespace="com.mybatis3.mappers.StudentMapper">
    <resultMap id="StudentResult" type="Student">
        <id property="studId" column="stud_id"/>
        <result property="name" column="name"/>
        <result property="email" column="email"/>
        <result property="dob" column="dob"/>
    </resultMap>


    <select id="findAllStudents" resultMap="StudentResult">
        select * from Students
    </select>

    <select id="findStudentById" parameterType="int" resultType="Student">
        select stud_id as studId, name, email, dob from Students where stud_id=#{studId}
    </select>

    <insert id="insertStudent" parameterType="Student">
        insert INTO students(stud_id, name, email, dob) values (#{studId}, #{name}, #{email}, #{dob})
    </insert>

    <update id="updateStudent" parameterType="Student">
        update students set name=#{name}, email=#{email}, dob=#{dob} where stud_id=#{studId}
    </update>
</mapper>
上述的 StudentMapper,xml 文件包含的映射的 SQL 语句可以通过 ID 加上名空间调用。
1.3.4 新建 MyBatisSqlSessionFactory 单例类
新建 MyBatisSqlSessionFactory.java 类文件,实例化它,使其持有一个 SqlSessionFactory 单例对象:
Java Code
package com.mybatis3.util;

import org.apache.ibatis.datasource.DataSourceFactory;
import org.apache.ibatis.io.Resources;
import org.apache.ibatis.session.SqlSession;
import org.apache.ibatis.session.SqlSessionFactory;
import org.apache.ibatis.session.SqlSessionFactoryBuilder;

import java.io.IOException;
import java.io.InputStream;
import java.sql.Connection;
import java.sql.DriverManager;
import java.util.Properties;

/**
 * Author: 王俊超
 * Time: 2016-07-30 21-13 10:58
 * CSDN: http://blog.csdn.net/derrantcm
 * Github: https://github.com/Wang-Jun-Chao
 * Declaration: All Rights Reserved !!!
 */
public class MyBatisSqlSessionFactory {
    private static SqlSessionFactory sqlSessionFactory;
    private static final Properties PROPERTIES = new Properties();

    static {
        try {
            InputStream is = DataSourceFactory.class.getResourceAsStream("/application.properties");
            PROPERTIES.load(is);
        } catch (IOException e) {
            e.printStackTrace();
        }
    }

    public static SqlSessionFactory getSqlSessionFactory() {
        if (sqlSessionFactory == null) {
            InputStream inputStream = null;
            try {
                inputStream = Resources.getResourceAsStream("mybatis-config.xml");
                sqlSessionFactory = new SqlSessionFactoryBuilder().build(inputStream);
            } catch (IOException e) {
                throw new RuntimeException(e.getCause());
            } finally {
                if (inputStream != null) {
                    try {
                        inputStream.close();
                    } catch (IOException e) {
                    }
                }
            }
        }
        return sqlSessionFactory;
    }

    public static SqlSession getSqlSession() {
        return getSqlSessionFactory().openSession();
    }

    public static Connection getConnection() {
        String driver = PROPERTIES.getProperty("jdbc.driverClassName");
        String url = PROPERTIES.getProperty("jdbc.url");
        String username = PROPERTIES.getProperty("jdbc.username");
        String password = PROPERTIES.getProperty("jdbc.password");
        Connection connection = null;
        try {
            Class.forName(driver);
            connection = DriverManager.getConnection(url, username, password);
        } catch (Exception e) {
            throw new RuntimeException(e);
        }
        return connection;
    }
}
上述的代码段中,我们创建了一个 SqlSessionFactory 对象,我们将使用它来获得 SqlSession 对象和执行映射的SQL 语句。
1.3.5 新建 StudentMapper 接口和 StudentService 类
让我们创建一个 StudentMapper 接口,其定义的方法名和在 Mapper XML 配置文件定义的 SQL 映射语句名称相同; 在创建一个 StudentService.java 类,包含了一些业务操作的实现。
1. 首先, 创建 JavaBean Student.java
Java Code
package com.mybatis3.services;

import com.mybatis3.domain.Student;
import com.mybatis3.mappers.StudentMapper;
import com.mybatis3.util.MyBatisSqlSessionFactory;
import org.apache.ibatis.session.SqlSession;
import org.slf4j.Logger;
import org.slf4j.LoggerFactory;

import java.util.List;

/**
 * Author: 王俊超
 * Time: 2016-07-30 21-45 10:58
 * CSDN: http://blog.csdn.net/derrantcm
 * Github: https://github.com/Wang-Jun-Chao
 * Declaration: All Rights Reserved !!!
 */
public class StudentService {
    private Logger logger = LoggerFactory.getLogger(getClass());

    public List<Student> findAllStudents() {
        SqlSession sqlSession = MyBatisSqlSessionFactory.getSqlSession();
        try {
            StudentMapper studentMapper = sqlSession.getMapper(StudentMapper.class);
            return studentMapper.findAllStudents();
        } finally {
            sqlSession.close();
        }
    }

    public Student findStudentById(Integer studId) {
        logger.debug("Select Student By ID :{}", studId);
        SqlSession sqlSession = MyBatisSqlSessionFactory.getSqlSession();
        try {
            StudentMapper studentMapper = sqlSession.getMapper(StudentMapper.class);
            return studentMapper.findStudentById(studId);
            //return sqlSession.selectOne("com.mybatis3.StudentMapper.findStudentById", studId);
        } finally {
            sqlSession.close();
        }
    }

    public void createStudent(Student student) {
        SqlSession sqlSession = MyBatisSqlSessionFactory.getSqlSession();
        try {
            StudentMapper studentMapper = sqlSession.getMapper(StudentMapper.class);
            studentMapper.insertStudent(student);
            sqlSession.commit();
        } finally {
            sqlSession.close();
        }
    }

    public void updateStudent(Student student) {
        SqlSession sqlSession = MyBatisSqlSessionFactory.getSqlSession();
        try {
            StudentMapper studentMapper = sqlSession.getMapper(StudentMapper.class);
            studentMapper.updateStudent(student);
            sqlSession.commit();
        } finally {
            sqlSession.close();
        }
    }
}
2. 创建映射器 Mapper 接口 StudentMapper.java 其方法签名和 StudentMapper.xml 中定义的 SQL 映射定义名相同
Java Code
package com.mybatis3.mappers;

import com.mybatis3.domain.Student;

import java.util.List;

/**
 * Author: 王俊超
 * Time: 2016-07-30 21-27 10:58
 * CSDN: http://blog.csdn.net/derrantcm
 * Github: https://github.com/Wang-Jun-Chao
 * Declaration: All Rights Reserved !!!
 */
public interface StudentMapper {
    List<Student> findAllStudents();

    Student findStudentById(Integer id);

    void insertStudent(Student student);

    void updateStudent(Student student);
}
3. 现在创建 StudentService.java 实现对表 STUDENTS 的数据库操作
Java Code
package com.mybatis3.services;

import com.mybatis3.domain.Student;
import com.mybatis3.mappers.StudentMapper;
import com.mybatis3.util.MyBatisSqlSessionFactory;
import org.apache.ibatis.session.SqlSession;
import org.slf4j.Logger;
import org.slf4j.LoggerFactory;

import java.util.List;

/**
 * Author: 王俊超
 * Time: 2016-07-30 21-45 10:58
 * CSDN: http://blog.csdn.net/derrantcm
 * Github: https://github.com/Wang-Jun-Chao
 * Declaration: All Rights Reserved !!!
 */
public class StudentService {
    private Logger logger = LoggerFactory.getLogger(getClass());

    public List<Student> findAllStudents() {
        SqlSession sqlSession = MyBatisSqlSessionFactory.getSqlSession();
        try {
            StudentMapper studentMapper = sqlSession.getMapper(StudentMapper.class);
            return studentMapper.findAllStudents();
        } finally {
            sqlSession.close();
        }
    }

    public Student findStudentById(Integer studId) {
        logger.debug("Select Student By ID :{}", studId);
        SqlSession sqlSession = MyBatisSqlSessionFactory.getSqlSession();
        try {
            StudentMapper studentMapper = sqlSession.getMapper(StudentMapper.class);
            return studentMapper.findStudentById(studId);
            //return sqlSession.selectOne("com.mybatis3.StudentMapper.findStudentById", studId);
        } finally {
            sqlSession.close();
        }
    }

    public void createStudent(Student student) {
        SqlSession sqlSession = MyBatisSqlSessionFactory.getSqlSession();
        try {
            StudentMapper studentMapper = sqlSession.getMapper(StudentMapper.class);
            studentMapper.insertStudent(student);
            sqlSession.commit();
        } finally {
            sqlSession.close();
        }
    }

    public void updateStudent(Student student) {
        SqlSession sqlSession = MyBatisSqlSessionFactory.getSqlSession();
        try {
            StudentMapper studentMapper = sqlSession.getMapper(StudentMapper.class);
            studentMapper.updateStudent(student);
            sqlSession.commit();
        } finally {
            sqlSession.close();
        }
    }
}
你也可以通过不通过 Mapper 接口执行映射的 SQL 语句。
Java Code
SqlSession sqlSession = MyBatisSqlSessionFactory.getSqlSession();
        try {
            StudentMapper studentMapper = sqlSession.getMapper(StudentMapper.class);
            return studentMapper.findStudentById(studId);
            //return sqlSession.selectOne("com.mybatis3.StudentMapper.findStudentById", studId);
        } finally {
            sqlSession.close();
        }
然而,使用 Mapper 接口是最佳实践,我们可以以类型安全的方式调用映射的 SQL 语句。
1.3.6 新建一个 JUnit 测试类来测试 StudentService
新建一个 JUnit 测试类测试 StudentSerivce.java 中定义的方法。
Java Code
package com.mybatis3.services;

import com.mybatis3.util.MyBatisSqlSessionFactory;
import org.apache.ibatis.io.Resources;
import org.apache.ibatis.jdbc.ScriptRunner;
import org.slf4j.Logger;
import org.slf4j.LoggerFactory;

import java.io.Reader;
import java.sql.Connection;

/**
 * Author: 王俊超
 * Time: 2016-07-31 06-03 10:58
 * CSDN: http://blog.csdn.net/derrantcm
 * Github: https://github.com/Wang-Jun-Chao
 * Declaration: All Rights Reserved !!!
 */
public class TestDataPopulator {
    private static Logger logger = LoggerFactory.getLogger(TestDataPopulator.class);

    public static void main(String[] args) {
        initDatabase();
    }

    public static void initDatabase() {
        Connection connection = null;
        Reader reader = null;
        try {
            connection = MyBatisSqlSessionFactory.getConnection();
            ScriptRunner scriptRunner = new ScriptRunner(connection);
            reader = Resources.getResourceAsReader("sql/drop_tables.sql");
            scriptRunner.runScript(reader);
            logger.info("drop_tables.sql executed successfully");
            reader = Resources.getResourceAsReader("sql/create_tables.sql");
            scriptRunner.runScript(reader);
            logger.info("create_tables.sql executed successfully");
            reader = Resources.getResourceAsReader("sql/sample_data.sql");
            scriptRunner.runScript(reader);
            logger.info("sample_data.sql executed successfully");
            connection.commit();
            reader.close();
            scriptRunner.closeConnection();
        } catch (Exception e) {
            throw new RuntimeException(e);
        }
    }
}
package com.mybatis3.services;

import com.mybatis3.domain.Student;
import org.junit.AfterClass;
import org.junit.BeforeClass;
import org.junit.Test;

import java.util.Date;
import java.util.List;

import static org.junit.Assert.assertEquals;
import static org.junit.Assert.assertNotNull;

/**
 * Author: 王俊超
 * Time: 2016-07-31 06-07 10:58
 * CSDN: http://blog.csdn.net/derrantcm
 * Github: https://github.com/Wang-Jun-Chao
 * Declaration: All Rights Reserved !!!
 */
public class StudentServiceTest {
    private static StudentService studentService;

    @BeforeClass
    public static void setup() {
        studentService = new StudentService();
        TestDataPopulator.initDatabase();
    }

    @AfterClass
    public static void teardown() {
        studentService = null;
    }

    @Test
    public void testFindAllStudents() {
        List<Student> students = studentService.findAllStudents();
        assertNotNull(students);
        for (Student student : students) {
            assertNotNull(student);
            //System.out.println(student);
        }

    }

    @Test
    public void testFindStudentById() {
        Student student = studentService.findStudentById(1);
        assertNotNull(student);
    }

    @Test
    public void testCreateUStudent() {
        Student student = new Student();
        int id = 4;
        student.setStudId(id);
        student.setName("student_" + id);
        student.setEmail("student_" + id + "gmail.com");
        student.setDob(new Date());
        studentService.createStudent(student);
        Student newStudent = studentService.findStudentById(id);
        assertNotNull(newStudent);
        assertEquals("student_" + id, newStudent.getName());
        assertEquals("student_" + id + "gmail.com", newStudent.getEmail());
    }

    @Test
    public void testUpdateStudent() {
        int id = 2;
        Student student = studentService.findStudentById(id);
        student.setStudId(id);
        student.setName("student_" + id);
        student.setEmail("student_" + id + "gmail.com");
        Date now = new Date();
        student.setDob(now);
        studentService.updateStudent(student);
        Student updatedStudent = studentService.findStudentById(id);
        assertNotNull(updatedStudent);
        assertEquals("student_" + id, updatedStudent.getName());
        assertEquals("student_" + id + "gmail.com", updatedStudent.getEmail());

    }
}
1.3.7 它是怎么工作的
首先,我们配置了 MyBatis 最主要的配置文件-mybatis-config.xml,里面包含了 JDBC 连接参数;配置了映射器Mapper XML 配置文件文件,里面包含了 SQL 语句的映射。
我们使用 mybatis-config.xml 内 的 信 息 创 建 了 SqlSessionFactory 对 象 。 每 个 数 据 库 环 境 应 该 就 一 个SqlSessionFactory 对象实例,所以我们使用了单例模式只创建一个 SqlSessionFactory 实例。
我们创建了一个映射器 Mapper 接口-StudentMapper,其定义的方法签名和在 StudentMapper.xml 中定义的完全 一样(即映射器 Mapper 接口中的方法名跟 StudentMapper.xml 中的 id 的值相同)。注意 StudentMapper.xml 中 namespace 的值被设置成 com.mybatis3.mappers.StudentMapper,是 StudentMapper 接口的完全限定名。这使我们 可以使用接口来调用映射的 SQL 语句。
在 StudentService.java 中,我们在每一个方法中创建了一个新的 SqlSession,并在方法功能完成后关闭 SqlSession。每一个线程应该有它自己的 SqlSession 实例。SqlSession 对象实例不是线程安全的,并且不被共享。所 以 SqlSession 的作用域最好就是其所在方法的作用域。从 Web 应用程序角度上看,SqlSession 应该存在于 request 级 别作用域上。
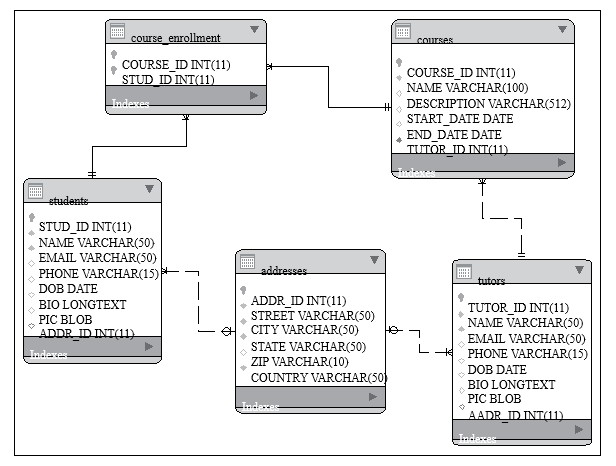
1.4 域模型样例
在这一节,我们将讨论一个表示在线学习系统应用的域模型样例,该模型的使用会贯穿全书。 在线学习系统中,学生可以选择课程,并且通过基于 Web 的传播媒介上课,日虚拟课堂或者是桌面共享系统。有兴趣通过在线学习系统上课的导师可以在系统中注册,声明他们要教的课程明细。
课程明细包括课程名称,课程描述,课程时长。全球的学生都可以注册和选择他们想学的课程。
1.5 总结
在本章中,我们讨论了 MyBatis,和与使用纯 JDBC 相比,使用 MyBaits 访问数据库的优点。我们学习了怎样创建一 个项目,安装 MyBatis jar 包依赖,创建 MyBatis 配置文件,以及在映射器 Mapper XML 文件中配置 SQL 映射语句。我 们创建了一个使用 MyBatis 对数据库插数据和取数据的 Service 类。我们创建了一个 JUnit 测试类来测试 Service 类。


 5030
5030


 被折叠的 条评论
为什么被折叠?
被折叠的 条评论
为什么被折叠?
 到【灌水乐园】发言


