


前言
布局是安卓开发中很基础的部分,作为移动开发的初学者,我也在不断的学习进步中~
正文
文件的位置
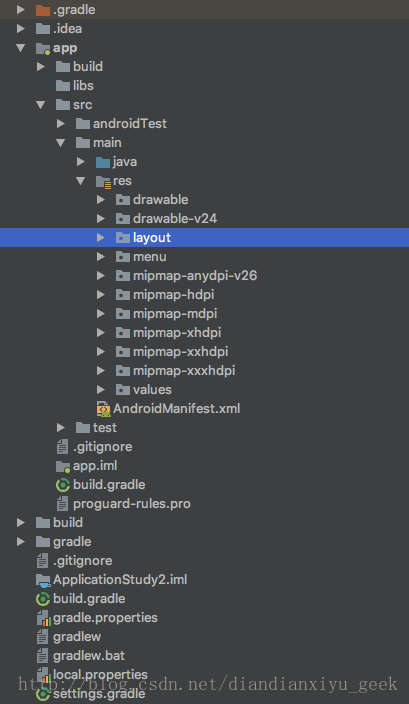
一般都在layout文件夹内。
一个布局文件,一般对应一个Activity,在代码中通过
setContentView(R.layout.first_layout);将页面跟逻辑关联起来
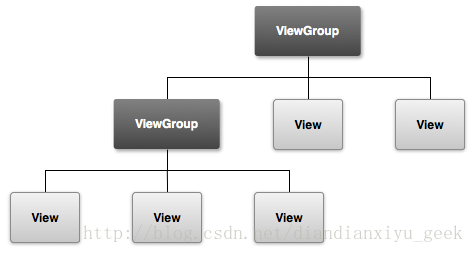
布局的分类
常见的布局
LinearLayout,线性布局方式
一种使用单个水平行或垂直行来组织子项的布局。它会在窗口长度超出屏幕长度时创建一个滚动条。
<?xml version="1.0" encoding="utf-8"?>
<LinearLayout xmlns:android="http://schemas.android.com/apk/res/android"
    android:layout_width="match_parent"
    android:layout_height="match_parent"
    android:paddingLeft="16dp"
    android:paddingRight="16dp"
    android:orientation="vertical" >
    <EditText
        android:layout_width="match_parent"
        android:layout_height="wrap_content"
        android:hint="@string/to" />
    <EditText
        android:layout_width="match_parent"
        android:layout_height="wrap_content"
        android:hint="@string/subject" />
    <EditText
        android:layout_width="match_parent"
        android:layout_height="0dp"
        android:layout_weight="1"
        android:gravity="top"
        android:hint="@string/message" />
    <Button
        android:layout_width="100dp"
        android:layout_height="wrap_content"
        android:layout_gravity="right"
        android:text="@string/send" />
</LinearLayout>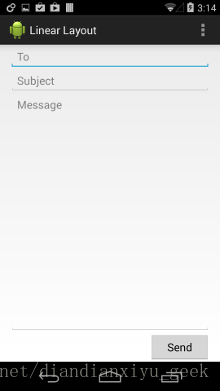
Relative Layout,相对布局
让您能够指定子对象彼此之间的相对位置(子对象 A 在子对象 B 左侧)或子对象与父对象的相对位置(与父对象顶部对齐)。
<?xml version="1.0" encoding="utf-8"?>
<RelativeLayout xmlns:android="http://schemas.android.com/apk/res/android"
    android:layout_width="match_parent"
    android:layout_height="match_parent"
    android:paddingLeft="16dp"
    android:paddingRight="16dp" >
    <EditText
        android:id="@+id/name"
        android:layout_width="match_parent"
        android:layout_height="wrap_content"
        android:hint="@string/reminder" />
    <Spinner
        android:id="@+id/dates"
        android:layout_width="0dp"
        android:layout_height="wrap_content"
        android:layout_below="@id/name"
        android:layout_alignParentLeft="true"
        android:layout_toLeftOf="@+id/times" />
    <Spinner
        android:id="@id/times"
        android:layout_width="96dp"
        android:layout_height="wrap_content"
        android:layout_below="@id/name"
        android:layout_alignParentRight="true" />
    <Button
        android:layout_width="96dp"
        android:layout_height="wrap_content"
        android:layout_below="@id/times"
        android:layout_alignParentRight="true"
        android:text="@string/done" />
</RelativeLayout>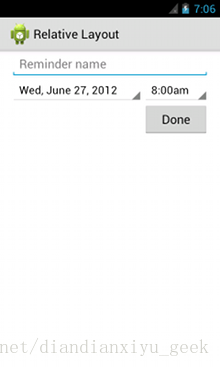
WebView,网页布局
展示网页
<?xml version="1.0" encoding="utf-8"?>
<WebView  xmlns:android="http://schemas.android.com/apk/res/android"
    android:id="@+id/webview"
    android:layout_width="fill_parent"
    android:layout_height="fill_parent"
/>
//加载网页
WebView myWebView = (WebView) findViewById(R.id.webview);
myWebView.loadUrl("http://www.example.com");//网络访问权限
<manifest ... >
<uses-permission android:name="android.permission.INTERNET" />
...
</manifest>使用适配器构建布局
如果你的元素是动态加载的,可以用下面的布局。
ListView,列表视图
显示滚动的单列列表。
public class ListViewLoader extends ListActivity
        implements LoaderManager.LoaderCallbacks<Cursor> {

    // This is the Adapter being used to display the list's data
    SimpleCursorAdapter mAdapter;

    // These are the Contacts rows that we will retrieve
    static final String[] PROJECTION = new String[] {ContactsContract.Data._ID,
            ContactsContract.Data.DISPLAY_NAME};

    // This is the select criteria
    static final String SELECTION = "((" +
            ContactsContract.Data.DISPLAY_NAME + " NOTNULL) AND (" +
            ContactsContract.Data.DISPLAY_NAME + " != '' ))";

    @Override
    protected void onCreate(Bundle savedInstanceState) {
        super.onCreate(savedInstanceState);

        // Create a progress bar to display while the list loads
        ProgressBar progressBar = new ProgressBar(this);
        progressBar.setLayoutParams(new LayoutParams(LayoutParams.WRAP_CONTENT,
                LayoutParams.WRAP_CONTENT, Gravity.CENTER));
        progressBar.setIndeterminate(true);
        getListView().setEmptyView(progressBar);

        // Must add the progress bar to the root of the layout
        ViewGroup root = (ViewGroup) findViewById(android.R.id.content);
        root.addView(progressBar);

        // For the cursor adapter, specify which columns go into which views
        String[] fromColumns = {ContactsContract.Data.DISPLAY_NAME};
        int[] toViews = {android.R.id.text1}; // The TextView in simple_list_item_1

        // Create an empty adapter we will use to display the loaded data.
        // We pass null for the cursor, then update it in onLoadFinished()
        mAdapter = new SimpleCursorAdapter(this,
                android.R.layout.simple_list_item_1, null,
                fromColumns, toViews, 0);
        setListAdapter(mAdapter);

        // Prepare the loader.  Either re-connect with an existing one,
        // or start a new one.
        getLoaderManager().initLoader(0, null, this);
    }

    // Called when a new Loader needs to be created
    public Loader<Cursor> onCreateLoader(int id, Bundle args) {
        // Now create and return a CursorLoader that will take care of
        // creating a Cursor for the data being displayed.
        return new CursorLoader(this, ContactsContract.Data.CONTENT_URI,
                PROJECTION, SELECTION, null, null);
    }

    // Called when a previously created loader has finished loading
    public void onLoadFinished(Loader<Cursor> loader, Cursor data) {
        // Swap the new cursor in.  (The framework will take care of closing the
        // old cursor once we return.)
        mAdapter.swapCursor(data);
    }

    // Called when a previously created loader is reset, making the data unavailable
    public void onLoaderReset(Loader<Cursor> loader) {
        // This is called when the last Cursor provided to onLoadFinished()
        // above is about to be closed.  We need to make sure we are no
        // longer using it.
        mAdapter.swapCursor(null);
    }

    @Override
    public void onListItemClick(ListView l, View v, int position, long id) {
        // Do something when a list item is clicked
    }
}
GridView,网格视图
显示滚动的行列网格。
特别推荐
ConstraintLayout,约束布局
这种布局综合的大部分布局的优点,更容易的去调节元素的边距。
详情参考 https://developer.android.com/reference/android/support/constraint/ConstraintLayout.html
以后详细写下相关的文章。
不推荐的布局
由于版本的更新,下面的这些布局不再推荐。官方文档里也没有推荐这些布局了。
- AbsoluteLayout,绝对位置布局
- FrameLayout,帧布局
- TableLayout,表格布局
总结
布局部分,很容易去类比网页开发的部分。
html也是xml,所以对理解这些很方便。
持续的学习就是进步。
参考资料
- https://developer.android.com/guide/topics/ui/declaring-layout.html
- https://www.cnblogs.com/devinzhang/archive/2012/01/19/2327535.html
- https://developer.android.com/reference/android/support/constraint/ConstraintLayout.html#GoneMargin
- https://developer.android.com/guide/topics/ui/layout/linear.html
- https://developer.android.com/guide/webapps/webview.html#UsingJavaScript


 1万+
1万+


 被折叠的 条评论
为什么被折叠?
被折叠的 条评论
为什么被折叠?
 到【灌水乐园】发言


