


首先比较生气,刚才写的东西就没了,也不想在整理一遍了,下面大概说一下吧,
1.首先系统会调用下面这个函数解析init.rc,至于init.rc里面是什么东西,大家看一下源代码下面的“/system/core/init”目录下的readme.txt吧,说的很清楚。
init_parse_config_file("/init.rc");该函数调用了parse_config(const char *fn, char *s),该函数通过lookup_keyword函数等等来解析每一个section。
2.zygote启动过程
启动zygote的文件在/framework/base/cmds/app_process/app_main.cpp中。其中zygote在init.rc中的配置信息如下:
service zygote /system/bin/app_process -Xzygote /system/bin --zygote --start-system-server
    class main
    socket zygote stream 660 root system
    onrestart write /sys/android_power/request_state wake
    onrestart write /sys/power/state on
    onrestart restart media
    onrestart restart netd
首先看一下main函数:
    argc--;//数量,此时数量为4.
argv++;//参数的指针,最初指向“zygote /system/bin/app_process”,加1后指向“-Xzygote /system/bin”上面两步主要是将zygote /system/bin/app_process这个参数对去掉
    int i;
    for (i = 0; i < argc; i++) {
        if (argv[i][0] != '-') {
            break;
        }
        if (argv[i][1] == '-' && argv[i][2] == 0) {
            ++i; // Skip --.
            break;
        }
        runtime.addOption(strdup(argv[i]));
    }
以上代码片段主要是将-Xzygote /system/bin这个参数对解析出来,并添加到runtime的参数中。
    while (i < argc) {
        const char* arg = argv[i++];
        if (strcmp(arg, "--zygote") == 0) {
            zygote = true;
            niceName = ZYGOTE_NICE_NAME;
        } else if (strcmp(arg, "--start-system-server") == 0) {
            startSystemServer = true;
        } else if (strcmp(arg, "--application") == 0) {
            application = true;
        } else if (strncmp(arg, "--nice-name=", 12) == 0) {
            niceName.setTo(arg + 12);
        } else if (strncmp(arg, "--", 2) != 0) {
            className.setTo(arg);
            break;
        } else {
            --i;
            break;
        }
    }
这部分代码是设定一下几个变量的值,用于启动配置
    bool zygote = false;
    bool startSystemServer = false;
    bool application = false;
    String8 niceName;
    String8 className;
    if (zygote) {
        runtime.start("com.android.internal.os.ZygoteInit", args);
    } else if (className) {
        runtime.start("com.android.internal.os.RuntimeInit", args);
    } else {
        fprintf(stderr, "Error: no class name or --zygote supplied.\n");
        app_usage();
        LOG_ALWAYS_FATAL("app_process: no class name or --zygote supplied.");
        return 10;
    }
运行zygote
3.函数AndroidRuntime::start的功能主要有两个:1)启动虚拟机,2)调用类名称为“className”的主方法“static void main(String[] args)”。
该函数首先获得ANDROID_ROOT的环境变量,如何没有设置的话,则将其置为“/system”。然后是JniInvocation调用初始化,代码如下:
JniInvocation jni_invocation;
jni_invocation.Init(NULL);
其中Init的方法如下:
bool JniInvocation::Init(const char* library) {
  //因为此处传进来的library为null,根据GetLibrary函数,此时library为库“libart.so”,此库就是传说中的ART,用来替换Dalvik虚拟机。至于如何替换,请看此文:
  [Android运行时ART简要介绍和学习计划](http://blog.sina.com.cn/s/blog_62cac8510102vrjc.html)
  library = GetLibrary(library);

  handle_ = dlopen(library, RTLD_NOW);
  if (handle_ == NULL) {
    if (strcmp(library, kLibraryFallback) == 0) {
      // Nothing else to try.
      ALOGE("Failed to dlopen %s: %s", library, dlerror());
      return false;
    }
    //此处是重新加载一遍
    // Note that this is enough to get something like the zygote
    // running, we can't property_set here to fix this for the future
    // because we are root and not the system user. See
    // RuntimeInit.commonInit for where we fix up the property to
    // avoid future fallbacks. http://b/11463182
    ALOGW("Falling back from %s to %s after dlopen error: %s",
          library, kLibraryFallback, dlerror());
    library = kLibraryFallback;
    handle_ = dlopen(library, RTLD_NOW);
    if (handle_ == NULL) {
      ALOGE("Failed to dlopen %s: %s", library, dlerror());
      return false;
    }
  }
  if (!FindSymbol(reinterpret_cast<void**>(&JNI_GetDefaultJavaVMInitArgs_),
                  "JNI_GetDefaultJavaVMInitArgs")) {
    return false;
  }
  if (!FindSymbol(reinterpret_cast<void**>(&JNI_CreateJavaVM_),
                  "JNI_CreateJavaVM")) {
    return false;
  }
  if (!FindSymbol(reinterpret_cast<void**>(&JNI_GetCreatedJavaVMs_),
                  "JNI_GetCreatedJavaVMs")) {
    return false;
  }
  return true;
}
我们来看一下这张图片:

此时,要理解AOT和JIT的区别:
AOT(ahead of time):APK在安装时将dex翻译为本地机器指令,此后应用即可无限次的使用本地机器指令的形式运行。这也是为什么不需要对原有的apk进行任何的修改。AOT将dex翻译成本地机器指令居然用的是LLVM。
JIT(Just in time):Dalvik执行的是dex字节码,通过解释器执行。尽管Dalvik会对频繁执行的字节码进行 JIT 生成本地机器指令,但是应用运行的过程中,这种翻译也会影响到应用程序的执行。
AOT翻译的框架如下图:

此图中,dex字节码即为前段,将之翻译为LLVM IR之后,用现成的优化器翻译成对应体系结构的机器指令。
翻译后的ELF文件格式如下图:
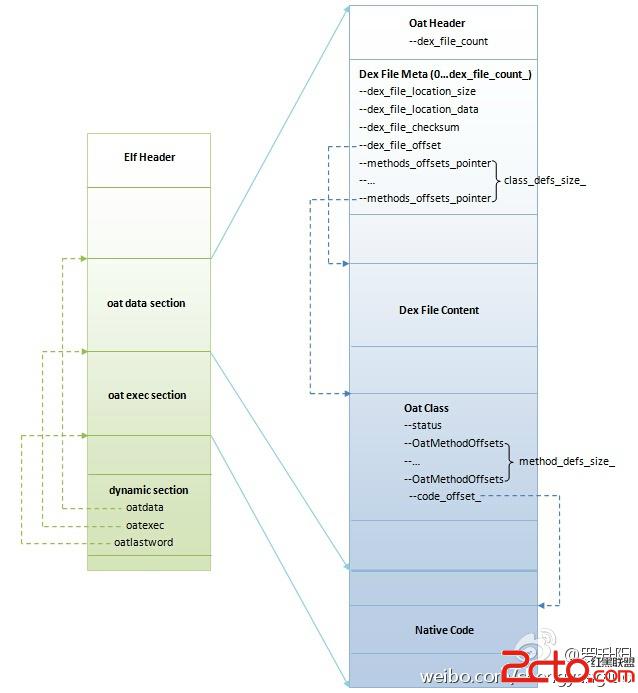
其中,oatdata、oatexec和oatlastword三个字段分别标记了oat data section和oat exec section的起始地址。在oat data section段中包括两个重要部分的信息,一个是翻译前的完整的classes.dex文件,另一部分是,引导ART找到classes.dex中对应类的本地机器指令,这些指令存放在exec section部分。
话题跑远,再回来看start函数:
实例化JniInvocation类以后,调用它的成员函数init来初始化JNI环境;然后调用AndroidRuntime类的成员函数startVm来创建一个虚拟机及其对应的JNI接口,即创建一个JavaVM接口和一个JNIEnv接口。有了JavaVM接口和JNIEnv接口之后,就可以在Zygote进程中加载指定的class了。
4.ZygoteInit.java的main函数
    public static void main(String argv[]) {
        try {
            // Start profiling the zygote initialization.
            SamplingProfilerIntegration.start();

            boolean startSystemServer = false;
            String socketName = "zygote";
            String abiList = null;
            for (int i = 1; i < argv.length; i++) {
                if ("start-system-server".equals(argv[i])) {
                    startSystemServer = true;
                } else if (argv[i].startsWith(ABI_LIST_ARG)) {
                    abiList = argv[i].substring(ABI_LIST_ARG.length());
                } else if (argv[i].startsWith(SOCKET_NAME_ARG)) {
                    socketName = argv[i].substring(SOCKET_NAME_ARG.length());
                } else {
                    throw new RuntimeException("Unknown command line argument: " + argv[i]);
                }
            }

            if (abiList == null) {
                throw new RuntimeException("No ABI list supplied.");
            }

            registerZygoteSocket(socketName);
            EventLog.writeEvent(LOG_BOOT_PROGRESS_PRELOAD_START,
                SystemClock.uptimeMillis());
            preload();
            EventLog.writeEvent(LOG_BOOT_PROGRESS_PRELOAD_END,
                SystemClock.uptimeMillis());

            // Finish profiling the zygote initialization.
            SamplingProfilerIntegration.writeZygoteSnapshot();

            // Do an initial gc to clean up after startup
            gc();

            // Disable tracing so that forked processes do not inherit stale tracing tags from
            // Zygote.
            Trace.setTracingEnabled(false);
            if (startSystemServer) {
                startSystemServer(abiList, socketName);
            }

            Log.i(TAG, "Accepting command socket connections");
            runSelectLoop(abiList);
            closeServerSocket();
        } catch (MethodAndArgsCaller caller) {
            caller.run();
        } catch (RuntimeException ex) {
            Log.e(TAG, "Zygote died with exception", ex);
            closeServerSocket();
            throw ex;
        }
    }
其中SamplingProfilerIntegration.start()函数如下:
    public static void start() {
        if (!enabled) {
            return;
        }
        if (samplingProfiler != null) {
            Log.e(TAG, "SamplingProfilerIntegration already started at " + new Date(startMillis));
            return;
        }

        ThreadGroup group = Thread.currentThread().getThreadGroup();
        SamplingProfiler.ThreadSet threadSet = SamplingProfiler.newThreadGroupThreadSet(group);
        samplingProfiler = new SamplingProfiler(samplingProfilerDepth, threadSet);
        samplingProfiler.start(samplingProfilerMilliseconds);
        startMillis = System.currentTimeMillis();
    }
SamplingProfiler函数是不需要任何虚拟机支持,只依赖于Thread.getStackTrace来收集样本,开销比native代码要大,并且不提供在哪些native代码使用了多少时间,但是它能方便的说明一个程序将时间花在了哪些地方。
ZygoteInit函数首先启动了性能统计功能,然后初始化Zygote的socket监听,接收app_main.cpp中传递过来的参数,启动SystemServer,最后调用runSelectLoop函数,进入无线循环状态,等待其他进程请求它孵化出新的进程。至此完成了app启动的所有准备工作。
runSelectLoop函数如下:
private static void runSelectLoop(String abiList) throws MethodAndArgsCaller {
ArrayList<FileDescriptor> fds = new ArrayList<FileDescriptor>();
ArrayList<ZygoteConnection> peers = new ArrayList<ZygoteConnection>();
FileDescriptor[] fdArray = new FileDescriptor[4];
fds.add(sServerSocket.getFileDescriptor());
peers.add(null);
int loopCount = GC_LOOP_COUNT;
while (true) {
int index;
/*
* Call gc() before we block in select().
* It's work that has to be done anyway, and it's better
* to avoid making every child do it. It will also
* madvise() any free memory as a side-effect.
*
* Don't call it every time, because walking the entire
* heap is a lot of overhead to free a few hundred bytes.
*/
if (loopCount <= 0) {
gc();
loopCount = GC_LOOP_COUNT;
} else {
loopCount--;
}
try {
fdArray = fds.toArray(fdArray);
//通过selectReadable函数来读取新的socket消息,其返回值有<0,0,0>三种,分别代表:发生异常,继续读取新消息, 首先处理当前消息。
index = selectReadable(fdArray);
} catch (IOException ex) {
throw new RuntimeException("Error in select()", ex);
}
//小于0表示链接失败。
if (index < 0) {
throw new RuntimeException("Error in select()");
} else if (index == 0) {//等于0表示有客户端连接。每当有客户端连接的时候acceptCommandPeer返回一个ZygoteConnection对象,ZygoteConnection里面保存着accpet返回的LocalSocket对象,然后将相应的文件描述符添加到fds中。
ZygoteConnection newPeer = acceptCommandPeer(abiList);
peers.add(newPeer);
fds.add(newPeer.getFileDescriptor());
} else {//大于0表示有客户款发过来的数据请求,交给ZygoteConnection对象的runOnce函数处理,index表示客户端的标志位。
boolean done;
done = peers.get(index).runOnce();
if (done) {
peers.remove(index);
fds.remove(index);
}
}
}
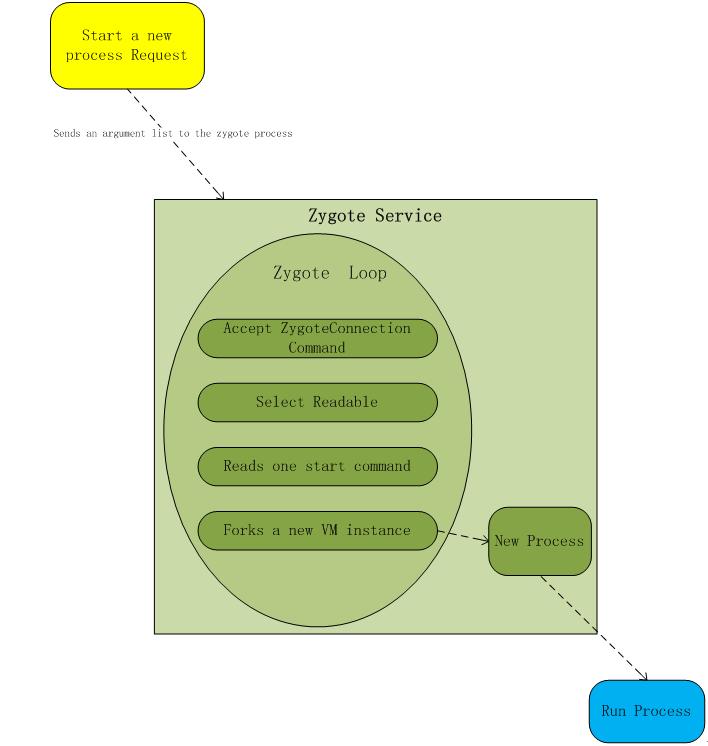
}该函数接收新的connections,并且从子进程中读取commands,其它解析见代码处。参考下图:
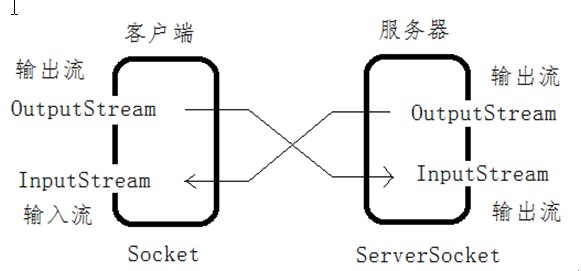
首先看一下Socket的数据流,如下图所示:
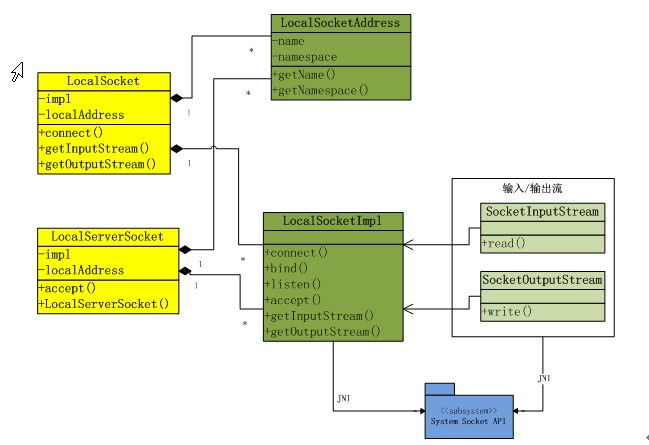
LocalSocket与LocalServerSocket之间的关系,如下图所示:
ActivityManagerService到Zygote的时序图如下图所示:
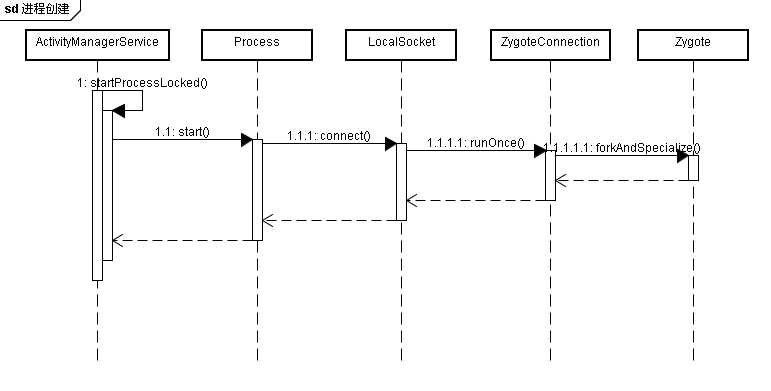
下面简单分析一下runOnce函数,该函数才是真正创建进程的地方,其中
pid = Zygote.forkAndSpecialize(parsedArgs.uid, parsedArgs.gid, parsedArgs.gids,
parsedArgs.debugFlags, rlimits, parsedArgs.mountExternal, parsedArgs.seInfo,
parsedArgs.niceName, fdsToClose, parsedArgs.instructionSet,
parsedArgs.appDataDir);
该函数创建了一个进程,而且有两个返回值,一个实在当前进程中返回的,一个是在新创建的进程中返回,在当前进程中返回值就是新创建的子进程的pid值,而在子进程中返回值是0.


 1448
1448


 被折叠的 条评论
为什么被折叠?
被折叠的 条评论
为什么被折叠?
 到【灌水乐园】发言


